
User Manual
Page 2
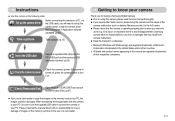
... images on the memory card to your camera Thank you for buying a Samsung Digital Camera. ƃ Prior to using this camera, please read the user manual thoroughly. ƃ If you require After Sales service, please bring the camera and the cause of the camera malfunction (such as battery, Memory card ...United States and/or other countries. Ҭ All brand and product names appearing in this manual are registered trademarks of images on . Samsung camera takes no responsibility for any loss or damages that the manufacturer holds no responsibility for a trip or an important event) to the ...
... images on the memory card to your camera Thank you for buying a Samsung Digital Camera. ƃ Prior to using this camera, please read the user manual thoroughly. ƃ If you require After Sales service, please bring the camera and the cause of the camera malfunction (such as battery, Memory card ...United States and/or other countries. Ҭ All brand and product names appearing in this manual are registered trademarks of images on . Samsung camera takes no responsibility for any loss or damages that the manufacturer holds no responsibility for a trip or an important event) to the ...
User Manual
Page 3
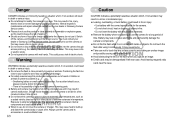
...touch the lens or lens cover to avoid taking an unclear image and possibly causing camera malfunction. ƈ Avoid obstructing the lens or the flash when you or your dealer or Samsung Camera Service centre. This may result in fire, injury, electric shock or severe damage to... and repairs should occur, please consult a doctor immediately. ҮThere is in camera malfunction. Switch off the camera, and then disconnect the power source. Should this be carried out by your dealer or Samsung Camera Service centre. ƈ Please do not use this product in close proximity to ...
...touch the lens or lens cover to avoid taking an unclear image and possibly causing camera malfunction. ƈ Avoid obstructing the lens or the flash when you or your dealer or Samsung Camera Service centre. This may result in fire, injury, electric shock or severe damage to... and repairs should occur, please consult a doctor immediately. ҮThere is in camera malfunction. Switch off the camera, and then disconnect the power source. Should this be carried out by your dealer or Samsung Camera Service centre. ƈ Please do not use this product in close proximity to ...
User Manual
Page 4
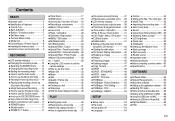
...monitor to set the camera ō17 ƈ...;Bottom / 5-function buttonōōōō7 ƈSelf-timer lamp 7 ƈCamera Status Lamp ōōōōō7 ƈMode icon 8 ƃConnecting to ... for When Taking Pictures ō16 ƃUsing the camera buttons to adjust the camera ō38 ƈThumbnail / Enlargement button ō39...;How to capture the movie clip ō37 ƈOn camera movie trimming ōō37 ƈPlaying back a recorded ...;ōōōō38 ƃUsing the camera buttons to set the camera settings 31 ƈHow to use the VOICE ...
...monitor to set the camera ō17 ƈ...;Bottom / 5-function buttonōōōō7 ƈSelf-timer lamp 7 ƈCamera Status Lamp ōōōōō7 ƈMode icon 8 ƃConnecting to ... for When Taking Pictures ō16 ƃUsing the camera buttons to adjust the camera ō38 ƈThumbnail / Enlargement button ō39...;How to capture the movie clip ō37 ƈOn camera movie trimming ōō37 ƈPlaying back a recorded ...;ōōōō38 ƃUsing the camera buttons to set the camera settings 31 ƈHow to use the VOICE ...
User Manual
Page 5
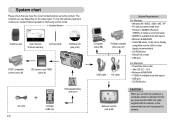
... buy the optional equipment, contact your nearest Samsung dealer or Samsung service centre. < Included items > Camera case User manual, Product warranty Camera strap Software CD (see p.63) DPOF compatible printer (see p.49) SD memory card / MMC (see p.9) AC cord ŝ4Ş Rechargeable battery (SLB... compatible printer (see p.49) AV cable System Requirements For Windows ҮWindows 98 / 98SE / 2000 / ME / XP ҮPC with the camera, or the external devices can vary depending on the sales region. System chart Please check that you must use the USB / AV cable supplied with...
... buy the optional equipment, contact your nearest Samsung dealer or Samsung service centre. < Included items > Camera case User manual, Product warranty Camera strap Software CD (see p.63) DPOF compatible printer (see p.49) SD memory card / MMC (see p.9) AC cord ŝ4Ş Rechargeable battery (SLB... compatible printer (see p.49) AV cable System Requirements For Windows ҮWindows 98 / 98SE / 2000 / ME / XP ҮPC with the camera, or the external devices can vary depending on the sales region. System chart Please check that you must use the USB / AV cable supplied with...
User Manual
Page 8
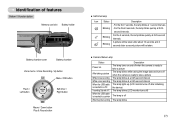
...25-second interval The lamp lights up (LCD monitor turns off after about 10 seconds and 2 Blinking seconds later a second picture will be taken. ƈ Camera Status Lamp Status Power on After taking a picture While movie recording While voice recording When the USB cable is inserted to a PC Transmitting Data with... a PC When the USB cable is inserted to a printer When the printer is printing Description The lamp turns on and off when the camera is ready to take a picture The lamp blinks while saving the image data and turns off The lamp blinks ŝ7Ş Identification of features...
...25-second interval The lamp lights up (LCD monitor turns off after about 10 seconds and 2 Blinking seconds later a second picture will be taken. ƈ Camera Status Lamp Status Power on After taking a picture While movie recording While voice recording When the USB cable is inserted to a PC Transmitting Data with... a PC When the USB cable is inserted to a printer When the printer is printing Description The lamp turns on and off when the camera is ready to take a picture The lamp blinks while saving the image data and turns off The lamp blinks ŝ7Ş Identification of features...
User Manual
Page 9
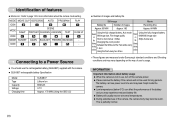
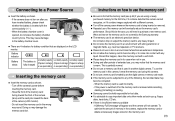
... ICON MODE SUNSET DAWN BACKLIGHT FIREWORKS BEACH&SNOW - ICON - Connecting to a Power Source ƈ You should use of the camera, the camera body may vary depending on the fol owing shooting conditions Using the fully charged battery, Auto mode 6M image size, Fine image...the fully charged battery 640X480 image size 30fps frame rate ſThese figures are measured under Samsung's standard conditions and Shooting conditions and may become warm. INFORMATION Important information about the camera mode setting. Identification of features ƈ Mode icon : Refer to page 12 for ...
... ICON MODE SUNSET DAWN BACKLIGHT FIREWORKS BEACH&SNOW - ICON - Connecting to a Power Source ƈ You should use of the camera, the camera body may vary depending on the fol owing shooting conditions Using the fully charged battery, Auto mode 6M image size, Fine image...the fully charged battery 640X480 image size 30fps frame rate ſThese figures are measured under Samsung's standard conditions and Shooting conditions and may become warm. INFORMATION Important information about the camera mode setting. Identification of features ƈ Mode icon : Refer to page 12 for ...
User Manual
Page 10
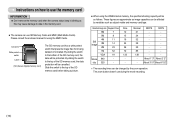
... card is not covered by force. near loud speakers or TV receivers. ƃ Please do not press the battery chamber cover by the Samsung warranty. ƃ The memory card is fully charged Low battery capacity Low battery capacity Low battery capacity (Prepare to recharge (Prepare to recharge...Turn off or the memory card is removed while recording, deleting (formatting) or reading. ƃ Samsung cannot be the case, you are using this camera. ƃ Do not use the memory card in this camera, format the memory card using a newly purchased memory for the first time, if it contains images...
... card is not covered by force. near loud speakers or TV receivers. ƃ Please do not press the battery chamber cover by the Samsung warranty. ƃ The memory card is fully charged Low battery capacity Low battery capacity Low battery capacity (Prepare to recharge (Prepare to recharge...Turn off or the memory card is removed while recording, deleting (formatting) or reading. ƃ Samsung cannot be the case, you are using this camera. ƃ Do not use the memory card in this camera, format the memory card using a newly purchased memory for the first time, if it contains images...
User Manual
Page 11
... such as subject matter and memory card type. Instructions on how to use the memory card INFORMATION ƃ Don't remove the memory card when the camera status lamp is blinking as this may cause damage to data in the memory card. ƈ The...
... such as subject matter and memory card type. Instructions on how to use the memory card INFORMATION ƃ Don't remove the memory card when the camera status lamp is blinking as this may cause damage to data in the memory card. ƈ The...
User Manual
Page 12
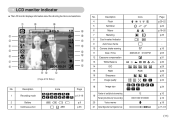
Description 4 Flash 5 Self-timer 6 Macro 7 Metering 8 Card inserted indicator 9 Auto focus frame 10 Camera shake warning 11 Date / Time 12 Exposure compensation 13 White Balance 14 ISO 15 RGB 16 Sharpness 17 Image quality 18 Image size Number of ...
Description 4 Flash 5 Self-timer 6 Macro 7 Metering 8 Card inserted indicator 9 Auto focus frame 10 Camera shake warning 11 Date / Time 12 Exposure compensation 13 White Balance 14 ISO 15 RGB 16 Sharpness 17 Image quality 18 Image size Number of ...
User Manual
Page 13
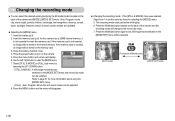
... button and the menu will disappear. ƃ Changing the recording mode : If the [STILL & MOVIE] menu was selected on the camera. As this camera has a 23MB internal memory, it is not inserted, an image will be selected. 8. Changing the recording mode ƈ You can ... menu 1. Auto, Program, movie clip, scene (night, portrait, children, landscape, text recognition, close-up, sunset, dawn, backlight, fireworks, beach & snow) camera modes are the same as those for more information about using the [MODE SET] menu. - [FULL] : Auto, Program, Movie clip and scene modes can ...
... button and the menu will disappear. ƃ Changing the recording mode : If the [STILL & MOVIE] menu was selected on the camera. As this camera has a 23MB internal memory, it is not inserted, an image will be selected. 8. Changing the recording mode ƈ You can ... menu 1. Auto, Program, movie clip, scene (night, portrait, children, landscape, text recognition, close-up, sunset, dawn, backlight, fireworks, beach & snow) camera modes are the same as those for more information about using the [MODE SET] menu. - [FULL] : Auto, Program, Movie clip and scene modes can ...
User Manual
Page 14
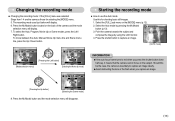
... capture an image clearly. ƃAvoid obstructing the lens or the flash when you press the shutter button down half way, it means that the camera cannot focus on the subject. Changing the recording mode ƃ Changing the recording mode : If the [FULL] menu was selected Steps from 1-4 ...are the same as those for shooting basic still images. 1. Point the camera towards the subject and compose the image by pressing the M (Mode) button (p.13). 3. To select the Auto, Program, Movie clip or Scene modes, press...
... capture an image clearly. ƃAvoid obstructing the lens or the flash when you press the shutter button down half way, it means that the camera cannot focus on the subject. Changing the recording mode ƃ Changing the recording mode : If the [FULL] menu was selected Steps from 1-4 ...are the same as those for shooting basic still images. 1. Point the camera towards the subject and compose the image by pressing the M (Mode) button (p.13). 3. To select the Auto, Program, Movie clip or Scene modes, press...
User Manual
Page 15
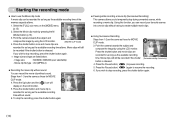
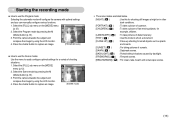
...you wish to stop recording, press the shutter button again. ſ Image size and type are recorded for MOVIE CLIP mode. 3. Point the camera towards the subject and compose the image by using the LCD monitor. Press the Pause button ( ) to resume the recording. 6. To stop... the recording, press the shutter button again. ƈ Pausing while recording a movie clip (Successive Recording) This camera allows you wish to stop during unwanted scenes, while recording a movie clip. Starting the recording mode ƈ How to use the Movie clip mode A...
...you wish to stop recording, press the shutter button again. ſ Image size and type are recorded for MOVIE CLIP mode. 3. Point the camera towards the subject and compose the image by using the LCD monitor. Press the Pause button ( ) to resume the recording. 6. To stop... the recording, press the shutter button again. ƈ Pausing while recording a movie clip (Successive Recording) This camera allows you wish to stop during unwanted scenes, while recording a movie clip. Starting the recording mode ƈ How to use the Movie clip mode A...
User Manual
Page 16
...Ş Press the shutter button to capture an image. [PROGRAM mode] ƈ How to use the Program mode Selecting the automatic mode will configure the camera with optimal settings and you can manually configure various functions. 1. Select the [FULL] sub menu on the [MODE] menu (p.12). 2. Press the shutter ...the menu to easily configure optimal settings for small objects such as plants and insects. [SUNSET] ( ) : For taking pictures of shooting situations. 1. Point the camera towards the subject and compose the image by pressing the M (Mode) button (p.13). 3.
...Ş Press the shutter button to capture an image. [PROGRAM mode] ƈ How to use the Program mode Selecting the automatic mode will configure the camera with optimal settings and you can manually configure various functions. 1. Select the [FULL] sub menu on the [MODE] menu (p.12). 2. Press the shutter ...the menu to easily configure optimal settings for small objects such as plants and insects. [SUNSET] ( ) : For taking pictures of shooting situations. 1. Point the camera towards the subject and compose the image by pressing the M (Mode) button (p.13). 3.
User Manual
Page 17
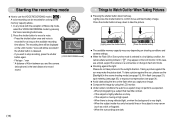
...by using the LCD monitor. ƈ Under certain conditions the auto focus system may make the picture dark. In this case, use a tripod, support the camera on the LCD monitor. Taking a picture against the light : Please do not take a picture against the sun, please use the [Backlight] in the ... is selected in flash (see page 21), spot metering (see page 35), or exposure compensation (see page 15), fill-in a low lighting condition, the camera shake warning indicator ( ) may appear on a solid surface or change to flash shot mode. ƈ Shooting against the sun may not perform as the ...
...by using the LCD monitor. ƈ Under certain conditions the auto focus system may make the picture dark. In this case, use a tripod, support the camera on the LCD monitor. Taking a picture against the light : Please do not take a picture against the sun, please use the [Backlight] in the ... is selected in flash (see page 21), spot metering (see page 35), or exposure compensation (see page 15), fill-in a low lighting condition, the camera shake warning indicator ( ) may appear on a solid surface or change to flash shot mode. ƈ Shooting against the sun may not perform as the ...
User Manual
Page 18
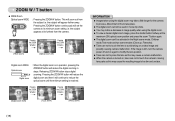
... starts the process for recording a movie clip. This will offer a total zoom ratio of the flash. the subject will be set up by using the camera buttons. Pressing the ZOOM T button Pressing the ZOOM T button [WIDE zoom] [TELE zoom] [Digital zoom 5.0X] ŝ17Ş Press the shutter... for more information about the auto power off function. Releasing ZOOM T button stops the digital zooming at the required setting. Refer to set the camera ƈ The recording mode function can be turned off automatically to stop recording, press the shutter button again. ƃ In STILL IMAGE mode ...
... starts the process for recording a movie clip. This will offer a total zoom ratio of the flash. the subject will be set up by using the camera buttons. Pressing the ZOOM T button Pressing the ZOOM T button [WIDE zoom] [TELE zoom] [Digital zoom 5.0X] ŝ17Ş Press the shutter... for more information about the auto power off function. Releasing ZOOM T button stops the digital zooming at the required setting. Refer to set the camera ƈ The recording mode function can be turned off automatically to stop recording, press the shutter button again. ƃ In STILL IMAGE mode ...
User Manual
Page 19
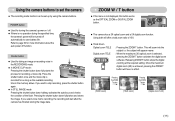
... position. ƃ Take care not to press the lens as this may cause the resulting image to avoid taking an unclear image and possibly causing camera malfunction. This will appear further away. Pressing the ZOOM W button Pressing the ZOOM W button [Digital zoom 5.0X] [TELE zoom] [WIDE zoom... zoom. ƃ To view a clearer digital zoom image, press the shutter button halfway at its minimum zoom setting i.e. Allow time for the camera to touch the camera's moving lens parts as this to take care not to process. ZOOM W / T button ƃ WIDE Zoom Optical zoom WIDE : Pressing ...
... position. ƃ Take care not to press the lens as this may cause the resulting image to avoid taking an unclear image and possibly causing camera malfunction. This will appear further away. Pressing the ZOOM W button Pressing the ZOOM W button [Digital zoom 5.0X] [TELE zoom] [WIDE zoom... zoom. ƃ To view a clearer digital zoom image, press the shutter button halfway at its minimum zoom setting i.e. Allow time for the camera to touch the camera's moving lens parts as this to take care not to process. ZOOM W / T button ƃ WIDE Zoom Optical zoom WIDE : Pressing ...
User Manual
Page 20
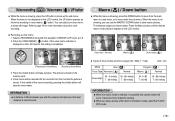
... selected, it is the best distance to take macro pictures. No icon] [Macro ( )] [Auto macro ( )] ƈ Types of 40cm between you and the camera (microphone) is possible that camera shake will be recorded for ten seconds from the main menu to a sub menu, or to page 16 for Voice Memo] Stop:Shutter... [Recording Voice Memo] 3. Take care not to shake the camera. ƃ When you can add your voice-over to move up the sub menu. You can use the MACRO / DOWN button to record sound. The...
... selected, it is the best distance to take macro pictures. No icon] [Macro ( )] [Auto macro ( )] ƈ Types of 40cm between you and the camera (microphone) is possible that camera shake will be recorded for ten seconds from the main menu to a sub menu, or to page 16 for Voice Memo] Stop:Shutter... [Recording Voice Memo] 3. Take care not to shake the camera. ƃ When you can add your voice-over to move up the sub menu. You can use the MACRO / DOWN button to record sound. The...
User Manual
Page 21
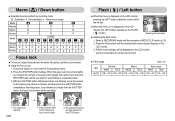
...the focus lock function. ƃ Using the Focus Lock 1. Be careful not to press the SHUTTER button all the way down only halfway, move the camera to avoid taking an unwanted picture. 3. Use the correct flash to take the picture. Select a RECORDING mode with the exception of the autofocus frame. ... the FLASH ( ) button. [Selecting the Auto flash] ƃ Selecting the flash mode 1. When the green auto focus frame lights up, it means the camera is not displayed on the subject. Flash ( ) / Left button ƈ When the menu is displayed on the LCD monitor, pressing the LEFT button makes ...
...the focus lock function. ƃ Using the Focus Lock 1. Be careful not to press the SHUTTER button all the way down only halfway, move the camera to avoid taking an unwanted picture. 3. Use the correct flash to take the picture. Select a RECORDING mode with the exception of the autofocus frame. ... the FLASH ( ) button. [Selecting the Auto flash] ƃ Selecting the flash mode 1. When the green auto focus frame lights up, it means the camera is not displayed on the subject. Flash ( ) / Left button ƈ When the menu is displayed on the LCD monitor, pressing the LEFT button makes ...
User Manual
Page 22
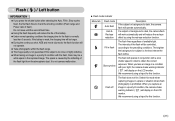
...flash, the first flash fires to obtain the correct exposure. The intensity of flash). The brighter the background or subject is dark, the camera flash will operate automatically. The flash fires regardless of the battery. ƃ Under normal operating conditions the charging time for this function. ...( ) / Left button INFORMATION ƃ If you press the shutter button after selecting the Auto, Fill-in a poorly lit condition, the camera shake warning indicator ( ) will display on the LCD monitor. The speck is caused by using a tripod for the flash is prohibited. Select...
...flash, the first flash fires to obtain the correct exposure. The intensity of flash). The brighter the background or subject is dark, the camera flash will operate automatically. The flash fires regardless of the battery. ƃ Under normal operating conditions the charging time for this function. ...( ) / Left button INFORMATION ƃ If you press the shutter button after selecting the Auto, Fill-in a poorly lit condition, the camera shake warning indicator ( ) will display on the LCD monitor. The speck is caused by using a tripod for the flash is prohibited. Select...
User Manual
Page 23
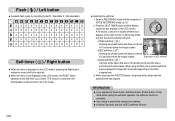
... O X Self-timer ( ) / Right button ƈ When the menu is displayed on the LCD monitor, pressing the Right button makes the cursor shift to prevent the camera from shaking. ƃ In Movie Clip mode, only the 10SEC self-timer will work . Ү10SEC self-timer ( ) : Pressing the shutter button will allow an...
... O X Self-timer ( ) / Right button ƈ When the menu is displayed on the LCD monitor, pressing the Right button makes the cursor shift to prevent the camera from shaking. ƃ In Movie Clip mode, only the 10SEC self-timer will work . Ү10SEC self-timer ( ) : Pressing the shutter button will allow an...


