Troubleshooting Guide
Page 4
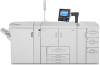
Do not exceed the paper mark indicator. The copier will move the paper from the LEFT to the RIGHT side of the paper Tray After machine has ceased all movements, carefully pull out paper ...
Do not exceed the paper mark indicator. The copier will move the paper from the LEFT to the RIGHT side of the paper Tray After machine has ceased all movements, carefully pull out paper ...
Troubleshooting Guide
Page 6
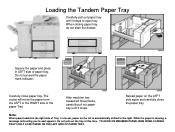
... inside the machine or melt plastic parts, machine failure will cause damage and machine failure. Always use wet rags or spray any liquids in the copier manual.
... inside the machine or melt plastic parts, machine failure will cause damage and machine failure. Always use wet rags or spray any liquids in the copier manual.
Troubleshooting Guide
Page 13
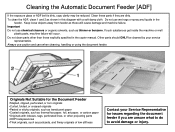
Instructions are located on inside of front door, on the toner box And on copier panel. Color Device Copier panel will indicate when toner is low and which color needs to be Replaced. Follow directions carefully and only add toner when indicated on copier panel. Changing Toner -
Instructions are located on inside of front door, on the toner box And on copier panel. Color Device Copier panel will indicate when toner is low and which color needs to be Replaced. Follow directions carefully and only add toner when indicated on copier panel. Changing Toner -

Troubleshooting Guide
Page 14
Replacing Toner Cartridges Note: Copier Panel will indicate when toner requires replacement and which color needs to be replaced. • Open the front cover of the machine. • Pull out the toner cartridge slowly. • • Remove new toner cartridge from the box. •
Replacing Toner Cartridges Note: Copier Panel will indicate when toner requires replacement and which color needs to be replaced. • Open the front cover of the machine. • Pull out the toner cartridge slowly. • • Remove new toner cartridge from the box. •
Troubleshooting Guide
Page 16
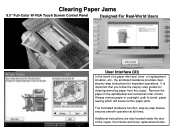
... important operations. Clearing Paper Jams 8.5" Full-Color W-VGA Touch Screen Control Panel Designed For Real-World Users User Interface (UI) In the event of the copier, the finisher and toner replacement bottle. Always remove paper in the alphabetical and numerical order shown. Remove the paper in a straight path to avoid paper... door of a paper mis-feed, toner or replacement situation, etc., the animated Guidance provides clear, step-by-step instructions for clearing/removing paper from the copier.
... important operations. Clearing Paper Jams 8.5" Full-Color W-VGA Touch Screen Control Panel Designed For Real-World Users User Interface (UI) In the event of the copier, the finisher and toner replacement bottle. Always remove paper in the alphabetical and numerical order shown. Remove the paper in a straight path to avoid paper... door of a paper mis-feed, toner or replacement situation, etc., the animated Guidance provides clear, step-by-step instructions for clearing/removing paper from the copier.
Quick Start Guide
Page 2
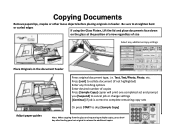
... face down on the glass at the position of arrow regardless of size Select any finishing options Enter desired number of copies Press [Sample Copy] copier will print one completed set and prompt you [Suspend] to cancel job or change settings [Continue] if job is correct to complete remaining copy sets...
... face down on the glass at the position of arrow regardless of size Select any finishing options Enter desired number of copies Press [Sample Copy] copier will print one completed set and prompt you [Suspend] to cancel job or change settings [Continue] if job is correct to complete remaining copy sets...
Quick Start Guide
Page 4
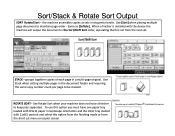
... a finisher is installed with 11x8.5 portrait and select this option from the finishing mode or from the next set from the short cut menu on copier screen. the machine assembles copies as [Collate]. Use Stack when setting multiple pages in sequential order. To use this option you must have a finisher to...
... a finisher is installed with 11x8.5 portrait and select this option from the finishing mode or from the next set from the short cut menu on copier screen. the machine assembles copies as [Collate]. Use Stack when setting multiple pages in sequential order. To use this option you must have a finisher to...
Quick Start Guide
Page 7
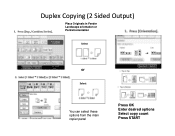
Duplex Copying (2 Sided Output) Place Originals in Feeder Landscape orientation or Portrait orientation Select or Select You can select these options from the main copier panel Press OK Enter desired options Select copy count Press START
Duplex Copying (2 Sided Output) Place Originals in Feeder Landscape orientation or Portrait orientation Select or Select You can select these options from the main copier panel Press OK Enter desired options Select copy count Press START
Quick Start Guide
Page 9
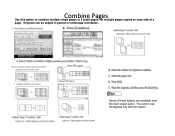
Some of a page. Originals can be copied in portrait or landscape orientation. You cannot use the Bypass tray with this option to combine multiple single pages or 2 sided pages for multiple pages copied on each side of these options are available from the main copier panel. Combine Pages Use this option.
Some of a page. Originals can be copied in portrait or landscape orientation. You cannot use the Bypass tray with this option to combine multiple single pages or 2 sided pages for multiple pages copied on each side of these options are available from the main copier panel. Combine Pages Use this option.
Quick Start Guide
Page 21
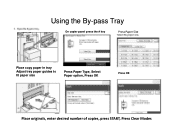
Using the By-pass Tray On copier panel press the # key Press Paper Size Place copy paper in tray Adjust tray paper guides to fit paper size Press Paper Type, Select Paper option, Press OK Press OK Place originals, enter desired number of copies, press START, Press Clear Modes
Using the By-pass Tray On copier panel press the # key Press Paper Size Place copy paper in tray Adjust tray paper guides to fit paper size Press Paper Type, Select Paper option, Press OK Press OK Place originals, enter desired number of copies, press START, Press Clear Modes
Quick Start Guide
Page 23
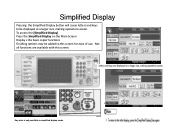
Not all functions are available with this screen for ease of use. To access the [Simplified Display] Press the Simplified Display on the Main Screen Display s the basic copier functions Finishing options may be displayed at a larger size, making operations easier. Key color is only available in simplified display mode. Simplified Display Pressing the Simplified Display button will cause letters and keys to be added to this screen.
Not all functions are available with this screen for ease of use. To access the [Simplified Display] Press the Simplified Display on the Main Screen Display s the basic copier functions Finishing options may be displayed at a larger size, making operations easier. Key color is only available in simplified display mode. Simplified Display Pressing the Simplified Display button will cause letters and keys to be added to this screen.
Quick Start Guide
Page 33
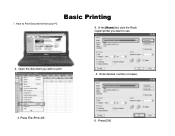
Enter desired number of copies. 3. In the [Name] list, click the Ricoh Copier/printer you wish to print 5. Press File>Print>OK 6. Press [OK] How to use 2. Open the document you want to Print Documents from your PC Basic Printing 4. !.
Enter desired number of copies. 3. In the [Name] list, click the Ricoh Copier/printer you wish to print 5. Press File>Print>OK 6. Press [OK] How to use 2. Open the document you want to Print Documents from your PC Basic Printing 4. !.
Quick Start Guide
Page 34
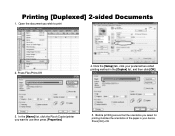
In the [Name] list, click the Ricoh Copier/printer you select for printing matches the orientation of the paper in your preferred two-sided printing method in the [Duplex] list, and then click [OK]. 3. Click the [Setup] tab, click your device. Before printing ensure that the orientation you want to print 2. Press File>Print>OK 4. Press [OK] >OK Printing [Duplexed] 2-sided Documents 1. Open the document you wish to use then press [Properties] 5.
In the [Name] list, click the Ricoh Copier/printer you select for printing matches the orientation of the paper in your preferred two-sided printing method in the [Duplex] list, and then click [OK]. 3. Click the [Setup] tab, click your device. Before printing ensure that the orientation you want to print 2. Press File>Print>OK 4. Press [OK] >OK Printing [Duplexed] 2-sided Documents 1. Open the document you wish to use then press [Properties] 5.
Quick Start Guide
Page 35
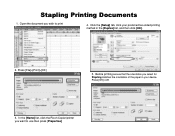
Stapling Printing Documents 1. Press [File]>[Print]>[OK] 5. Press [OK] >OK 3. Before printing ensure that the orientation you want to print 4. In the [Name] list, click the Ricoh Copier/printer you select for Stapling matches the orientation of the paper in your preferred two-sided printing method in the [Duplex] list, and then click [OK]. 2. Click the [Setup] tab, click your device. Open the document you wish to use then press [Properties]
Stapling Printing Documents 1. Press [File]>[Print]>[OK] 5. Press [OK] >OK 3. Before printing ensure that the orientation you want to print 4. In the [Name] list, click the Ricoh Copier/printer you select for Stapling matches the orientation of the paper in your preferred two-sided printing method in the [Duplex] list, and then click [OK]. 2. Click the [Setup] tab, click your device. Open the document you wish to use then press [Properties]
Quick Start Guide
Page 36
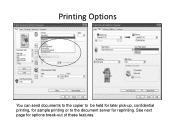
See next page for reprinting. Printing Options You can send documents to the copier to be held for later pick-up, confidential printing, for sample printing or to the document server for options break-out of these features.
See next page for reprinting. Printing Options You can send documents to the copier to be held for later pick-up, confidential printing, for sample printing or to the document server for options break-out of these features.
Quick Start Guide
Page 40
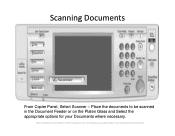
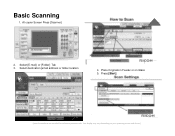
Place the documents to be scanned in the Document Feeder or on your Documents where necessary. (Note: Screenshots are provided for reference purposes only. Your display may vary depending on the Platen Glass and Select the appropriate options for your operating system and device.) Scanning Documents From Copier Panel, Select Scanner -
Place the documents to be scanned in the Document Feeder or on your Documents where necessary. (Note: Screenshots are provided for reference purposes only. Your display may vary depending on the Platen Glass and Select the appropriate options for your operating system and device.) Scanning Documents From Copier Panel, Select Scanner -
Quick Start Guide
Page 42
Select [E-mail] or [Folder] Tab 3. Place Originals in Feeder or on your operating system and device.) Basic Scanning 1. Your display may vary depending on Glass 5. Select destination [email address or folder location 4. Press [Start] (Note: Screenshots are provided for reference purposes only. At copier Screen Press [Scanner] 2.
Select [E-mail] or [Folder] Tab 3. Place Originals in Feeder or on your operating system and device.) Basic Scanning 1. Your display may vary depending on Glass 5. Select destination [email address or folder location 4. Press [Start] (Note: Screenshots are provided for reference purposes only. At copier Screen Press [Scanner] 2.
Design Guide
Page 3
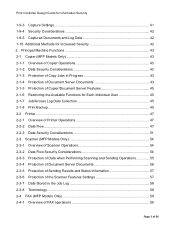
... 57 2-3-7 Data Stored in Progress 43 2-1-4 Protection of Document Server Documents 43 2-1-5 Protection of Copier/Document Server Features 45 2-1-6 Restricting the Available Functions for Increased Security 42 2. Principal Machine Functions 43 2-1 Copier (MFP Models Only 43 2-1-1 Overview of Copier Operations 43 2-1-2 Data Security Considerations 43 2-1-3 Protection of Copy Jobs in the Job Log...
... 57 2-3-7 Data Stored in Progress 43 2-1-4 Protection of Document Server Documents 43 2-1-5 Protection of Copier/Document Server Features 45 2-1-6 Restricting the Available Functions for Increased Security 42 2. Principal Machine Functions 43 2-1 Copier (MFP Models Only 43 2-1-1 Overview of Copier Operations 43 2-1-2 Data Security Considerations 43 2-1-3 Protection of Copy Jobs in the Job Log...
Design Guide
Page 4
... 77 4-1 Overview of Operations 77 4-1-1 Installation...78 4-1-2 Overview of SDK Application Functions 79 4-2 Data Flow...80 4-2-1 Scanning Functions: Sending Data Over the Network with the Copier and Scanner Page 4 of Copy Data Security Operations 74 3-2-2 Data Flow...75 4. Print Controller Design Guide for Information Security 2-4-2 Data Security Considerations 60 2-4-3 Protection of...
... 77 4-1 Overview of Operations 77 4-1-1 Installation...78 4-1-2 Overview of SDK Application Functions 79 4-2 Data Flow...80 4-2-1 Scanning Functions: Sending Data Over the Network with the Copier and Scanner Page 4 of Copy Data Security Operations 74 3-2-2 Data Flow...75 4. Print Controller Design Guide for Information Security 2-4-2 Data Security Considerations 60 2-4-3 Protection of...
Design Guide
Page 11
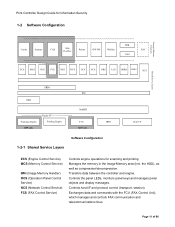
... panel LEDs, monitors panel keys and manages panel objects and display messages. Principal Machine Functions Print Controller Design Guide for Information Security 1-2 Software Configuration SDK Copier Scanner FAX Web DocBox Printer GW WS WebSys EAC VAS ECS MCS OCS FCS NCS DCS UCS CCS NRS LCS MIRS DESS SCS S Shared Service...
... panel LEDs, monitors panel keys and manages panel objects and display messages. Principal Machine Functions Print Controller Design Guide for Information Security 1-2 Software Configuration SDK Copier Scanner FAX Web DocBox Printer GW WS WebSys EAC VAS ECS MCS OCS FCS NCS DCS UCS CCS NRS LCS MIRS DESS SCS S Shared Service...


