User Guide
Page 5
... Printer 21 Unpacking and Assembling the Stand 22 Unpacking the Printer and Mounting It on the Stand 25 Attaching the Paper Basket (Epson Stylus Pro 7700 27 Attaching the Paper Basket (Epson Stylus Pro 9700 34 Completing Setup and Connecting the Power Cord 42 Installing Ink 46 Connecting to Your System 48 Installing the Software for Windows 49... 55 Downloading and Updating the Firmware 55 Configuring the Printer's Network Adapter 56 2 Handling Paper and Other Media Selecting Media for Your Printer 57 Available Epson Special Media 58 Guidelines for Using...
... Printer 21 Unpacking and Assembling the Stand 22 Unpacking the Printer and Mounting It on the Stand 25 Attaching the Paper Basket (Epson Stylus Pro 7700 27 Attaching the Paper Basket (Epson Stylus Pro 9700 34 Completing Setup and Connecting the Power Cord 42 Installing Ink 46 Connecting to Your System 48 Installing the Software for Windows 49... 55 Downloading and Updating the Firmware 55 Configuring the Printer's Network Adapter 56 2 Handling Paper and Other Media Selecting Media for Your Printer 57 Available Epson Special Media 58 Guidelines for Using...
User Guide
Page 12
... upgrades and accessories: Optional equipment Option Automatic Take-Up Reel System (Pro 9700 only); To find the nearest reseller, visit www.proimaging.epson.com (U.S. sales), www.epson.ca (Canadian sales), or call 800-GO-EPSON (800-463-7766). Options and Accessories Your Epson Stylus® Pro 7700/9700 offers these user-replaceable items: Consumables and user-replaceable parts Part Replacement...
... upgrades and accessories: Optional equipment Option Automatic Take-Up Reel System (Pro 9700 only); To find the nearest reseller, visit www.proimaging.epson.com (U.S. sales), www.epson.ca (Canadian sales), or call 800-GO-EPSON (800-463-7766). Options and Accessories Your Epson Stylus® Pro 7700/9700 offers these user-replaceable items: Consumables and user-replaceable parts Part Replacement...
User Guide
Page 15
... the printer to rapid changes in fire or electric shock. • Do not use the equipment safely and effectively. • The Epson Stylus Pro 7700 weighs about 186 lb (84.5 kg) and the Epson Stylus Pro 9700 weighs about 256 lb (116 kg) without the stand, paper basket, ink, or paper. Use of power source indicated on the...
... the printer to rapid changes in fire or electric shock. • Do not use the equipment safely and effectively. • The Epson Stylus Pro 7700 weighs about 186 lb (84.5 kg) and the Epson Stylus Pro 9700 weighs about 256 lb (116 kg) without the stand, paper basket, ink, or paper. Use of power source indicated on the...
User Guide
Page 18
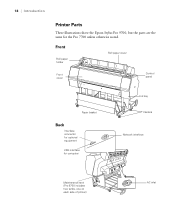
Front Roll paper holder Roll paper cover Front cover Control panel Paper basket Back Interface connector for optional equipment USB interface for the Pro 7700 unless otherwise noted. 18 | Introduction Printer Parts These illustrations show the Epson Stylus Pro 9700, but the parts are the same for computer Ink bay Casters Network interface Maintenance tank (Pro 9700 includes two tanks, one on each side of printer) 18 AC inlet
Front Roll paper holder Roll paper cover Front cover Control panel Paper basket Back Interface connector for optional equipment USB interface for the Pro 7700 unless otherwise noted. 18 | Introduction Printer Parts These illustrations show the Epson Stylus Pro 9700, but the parts are the same for computer Ink bay Casters Network interface Maintenance tank (Pro 9700 includes two tanks, one on each side of printer) 18 AC inlet
User Guide
Page 21
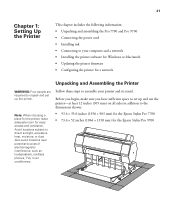
... shown: • 53.4 × 35.6 inches (1356 × 903 mm) for the Epson Stylus Pro 7700 • 73.4 × 52 inches (1864 × 1318 mm) for the Epson Stylus Pro 9700 21 Also avoid locations near potential sources of electromagnetic interference, such as loudspeakers, cordless phones, TVs,... and ventilation. 21 Chapter 1: Setting Up the Printer This chapter includes the following information: • Unpacking and assembling the Pro 7700 and Pro 9700 • Connecting the power cord • Installing ink • Connecting to your computer and a network • Installing the...
... shown: • 53.4 × 35.6 inches (1356 × 903 mm) for the Epson Stylus Pro 7700 • 73.4 × 52 inches (1864 × 1318 mm) for the Epson Stylus Pro 9700 21 Also avoid locations near potential sources of electromagnetic interference, such as loudspeakers, cordless phones, TVs,... and ventilation. 21 Chapter 1: Setting Up the Printer This chapter includes the following information: • Unpacking and assembling the Pro 7700 and Pro 9700 • Connecting the power cord • Installing ink • Connecting to your computer and a network • Installing the...
User Guide
Page 22
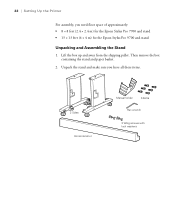
Unpack the stand and make sure you need floor space of approximately: • 8 × 8 feet (2.4 × 2.4 m) for the Epson Stylus Pro 7700 and stand • 13 × 13 feet (4 × 4 m) for the Epson Stylus Pro 9700 and stand Unpacking and Assembling the Stand 1. Then remove the box containing the stand and paper basket. 2. 22 | Setting Up the Printer For assembly, you have all these items. 2 Sides Horizontal strut Manual holder 6 Bolts Hex wrench 2 Wing screws with lock washers 22 Lift the box up and away from the shipping pallet.
Unpack the stand and make sure you need floor space of approximately: • 8 × 8 feet (2.4 × 2.4 m) for the Epson Stylus Pro 7700 and stand • 13 × 13 feet (4 × 4 m) for the Epson Stylus Pro 9700 and stand Unpacking and Assembling the Stand 1. Then remove the box containing the stand and paper basket. 2. 22 | Setting Up the Printer For assembly, you have all these items. 2 Sides Horizontal strut Manual holder 6 Bolts Hex wrench 2 Wing screws with lock washers 22 Lift the box up and away from the shipping pallet.
User Guide
Page 27
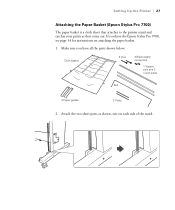
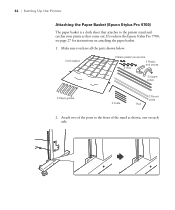
Setting Up the Printer | 27 Attaching the Paper Basket (Epson Stylus Pro 7700) The paper basket is a cloth sheet that attaches to the printer stand and catches your prints as shown, one on attaching the paper basket. 1. Make sure you have all the parts shown below: Cloth basket 2 Pins 2 Black plastic connectors 1 Square pole and 2 round poles Rod 2 Paper guides 2 Posts 2. If you have the Epson Stylus Pro 9700, see page 34 for instructions on each side of the stand. 27 Attach the two short posts as they come out.
Setting Up the Printer | 27 Attaching the Paper Basket (Epson Stylus Pro 7700) The paper basket is a cloth sheet that attaches to the printer stand and catches your prints as shown, one on attaching the paper basket. 1. Make sure you have all the parts shown below: Cloth basket 2 Pins 2 Black plastic connectors 1 Square pole and 2 round poles Rod 2 Paper guides 2 Posts 2. If you have the Epson Stylus Pro 9700, see page 34 for instructions on each side of the stand. 27 Attach the two short posts as they come out.
User Guide
Page 34
Make sure you have all the parts shown below. If you have the Epson Stylus Pro 7700, see page 27 for instructions on each side. 34 Attach two of the stand as they come out. Cloth basket 2 Black plastic connectors 4 Pins 2 Plastic end pieces 3 Square poles 5 Paper guides 4 Posts 2 Round poles Rod 2. 34 | Setting Up the Printer Attaching the Paper Basket (Epson Stylus Pro 9700) The paper basket is a cloth sheet that attaches to the front of the posts to the printer stand and catches your prints as shown, one on attaching the paper basket. 1.
Make sure you have all the parts shown below. If you have the Epson Stylus Pro 7700, see page 27 for instructions on each side. 34 Attach two of the stand as they come out. Cloth basket 2 Black plastic connectors 4 Pins 2 Plastic end pieces 3 Square poles 5 Paper guides 4 Posts 2 Round poles Rod 2. 34 | Setting Up the Printer Attaching the Paper Basket (Epson Stylus Pro 9700) The paper basket is a cloth sheet that attaches to the front of the posts to the printer stand and catches your prints as shown, one on attaching the paper basket. 1.
User Guide
Page 44
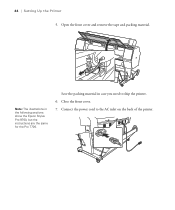
44 | Setting Up the Printer 5. Note: The illustrations in case you need to the AC inlet on the back of the printer. 44 Save the packing material in the following sections show the Epson Stylus Pro 9700, but the instructions are the same for the Pro 7700. Close the front cover. 7. Connect the power cord to ship the printer. 6. Open the front cover and remove the tape and packing material.
44 | Setting Up the Printer 5. Note: The illustrations in case you need to the AC inlet on the back of the printer. 44 Save the packing material in the following sections show the Epson Stylus Pro 9700, but the instructions are the same for the Pro 7700. Close the front cover. 7. Connect the power cord to ship the printer. 6. Open the front cover and remove the tape and packing material.
User Guide
Page 57
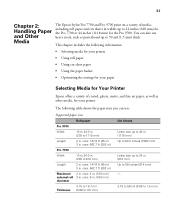
57 Chapter 2: Handling Paper and Other Media The Epson Stylus Pro 7700 and Pro 9700 print on a variety of coated, glossy, matte, and fine art paper, as...chapter includes the following table shows the paper sizes you can also use : Supported paper sizes Roll paper Pro 9700 Width 10 to 44.0 in . core: 662.7 ft (202 m) Maximum 2 in . You can use heavy stock, such as other... paper Selecting Media for Your Printer Epson offers a variety of media, including roll paper and cut sheets in widths up to 610 mm) Length 2 in . (203 to 24 inches (610 mm) for the Pro 7700 or 44 inches (1118 mm)...
57 Chapter 2: Handling Paper and Other Media The Epson Stylus Pro 7700 and Pro 9700 print on a variety of coated, glossy, matte, and fine art paper, as...chapter includes the following table shows the paper sizes you can also use : Supported paper sizes Roll paper Pro 9700 Width 10 to 44.0 in . core: 662.7 ft (202 m) Maximum 2 in . You can use heavy stock, such as other... paper Selecting Media for Your Printer Epson offers a variety of media, including roll paper and cut sheets in widths up to 610 mm) Length 2 in . (203 to 24 inches (610 mm) for the Pro 7700 or 44 inches (1118 mm)...

User Guide
Page 77
... to catch the paper under the printer or in front of the printer. If you are using the Epson driver, you may also need to create a paper configuration to optimize your printouts from getting dirty or scratched. ... than 19 mil (0.5 mm) thick or any prints that are 62 inches (157 cm) or longer (for the Pro 9700) or 36 inches (91 cm) or longer (for more information. You can set up either to your printer and... up the basket in front of the printer. See page 82 for the Pro 7700). 1. If you're printing on non-Epson media and not using the paper guides, make sure they come out.
... to catch the paper under the printer or in front of the printer. If you are using the Epson driver, you may also need to create a paper configuration to optimize your printouts from getting dirty or scratched. ... than 19 mil (0.5 mm) thick or any prints that are 62 inches (157 cm) or longer (for the Pro 9700) or 36 inches (91 cm) or longer (for more information. You can set up either to your printer and... up the basket in front of the printer. See page 82 for the Pro 7700). 1. If you're printing on non-Epson media and not using the paper guides, make sure they come out.
User Guide
Page 85
... drivers and utilities that let you can have them created by a color specialist. 85 Chapter 3: Printing With Epson Drivers for Windows Your Epson Stylus Pro 7700 or Pro 9700 comes with drivers and utilities that may become available. ICC profiles are included, so you want to the right...basic printing properties. This chapter includes the following information: • Sizing images for color photos. Tip: Check the Epson Pro Imaging website at www.proimaging.epson. Before you print, you have the required hardware and software, or you print and manage print jobs. See page...
... drivers and utilities that let you can have them created by a color specialist. 85 Chapter 3: Printing With Epson Drivers for Windows Your Epson Stylus Pro 7700 or Pro 9700 comes with drivers and utilities that may become available. ICC profiles are included, so you want to the right...basic printing properties. This chapter includes the following information: • Sizing images for color photos. Tip: Check the Epson Pro Imaging website at www.proimaging.epson. Before you print, you have the required hardware and software, or you print and manage print jobs. See page...
User Guide
Page 86
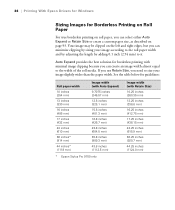
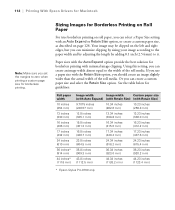
...12.8 inches (325.1 mm) 15.8 inches (401.3 mm) 16.8 inches (426.7 mm) 23.8 inches (604.5 mm) 35.8 inches (909.3 mm) 43.8 inches (1112.5 mm) * Epson Stylus Pro 9700 only Image width (with minimal image clipping because you can create an image width almost equal to the width of the roll media. 86 | Printing... With Epson Drivers for Windows Sizing Images for Borderless Printing on Roll Paper For true borderless printing on page 93. If you use Retain Size, you ...
...12.8 inches (325.1 mm) 15.8 inches (401.3 mm) 16.8 inches (426.7 mm) 23.8 inches (604.5 mm) 35.8 inches (909.3 mm) 43.8 inches (1112.5 mm) * Epson Stylus Pro 9700 only Image width (with minimal image clipping because you can create an image width almost equal to the width of the roll media. 86 | Printing... With Epson Drivers for Windows Sizing Images for Borderless Printing on Roll Paper For true borderless printing on page 93. If you use Retain Size, you ...
User Guide
Page 111
... on page 112 to the right folder. If you have them created by a color specialist. Tip: Check the Epson Pro Imaging website at www.proimaging.epson. com for instructions. When you the most accurate colors and best output from the CD-ROM. A color-managed ...paper, check the guidelines on installing and configuring the printer driver, see page 51. 111 Chapter 4: Printing With Epson Drivers for Macintosh Your Epson Stylus Pro 7700 or Pro 9700 comes with drivers and utilities that may become available. This chapter includes the following information for Mac OS X: &#...
... on page 112 to the right folder. If you have them created by a color specialist. Tip: Check the Epson Pro Imaging website at www.proimaging.epson. com for instructions. When you the most accurate colors and best output from the CD-ROM. A color-managed ...paper, check the guidelines on installing and configuring the printer driver, see page 51. 111 Chapter 4: Printing With Epson Drivers for Macintosh Your Epson Stylus Pro 7700 or Pro 9700 comes with drivers and utilities that may become available. This chapter includes the following information for Mac OS X: &#...
User Guide
Page 112
...) 36.34 inches (923.0 mm) 36.23 inches (920.2 mm) 43.8 inches (1112.5 mm) 44.34 inches (1126.2 mm) 44.23 inches (1123.4 mm) * Epson Stylus Pro 9700 only 112 See the table below for borderless printing with minimal image clipping. Using this setting, you can create an image width almost equal to... sizing your image according to the paper width and by adjusting the length by adding 0.1 inch (2.54 mm) to it. 112 | Printing With Epson Drivers for Macintosh Note: Make sure you set the margins to zero when printing a custom page size for Borderless Printing on Roll Paper For true...
...) 36.34 inches (923.0 mm) 36.23 inches (920.2 mm) 43.8 inches (1112.5 mm) 44.34 inches (1126.2 mm) 44.23 inches (1123.4 mm) * Epson Stylus Pro 9700 only 112 See the table below for borderless printing with minimal image clipping. Using this setting, you can create an image width almost equal to... sizing your image according to the paper width and by adjusting the length by adding 0.1 inch (2.54 mm) to it. 112 | Printing With Epson Drivers for Macintosh Note: Make sure you set the margins to zero when printing a custom page size for Borderless Printing on Roll Paper For true...
User Guide
Page 144
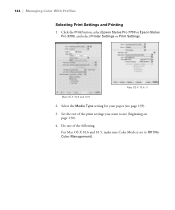
Set the rest of the following: For Mac OS X 10.6 and 10.5, make sure Color Mode is set to use (beginning on page 130). 4. Select the Media Type setting for your paper (see page 139). 3. Do one of the print settings you want to Off (No Color Management). 144 Mac OS X 10.4.11 Mac OS X 10.6 and 10.5 2. Click the Print button, select Epson Stylus Pro 7700 or Epson Stylus Pro 9700, and select Printer Settings or Print Settings. 144 | Managing Color With Profiles Selecting Print Settings and Printing 1.
Set the rest of the following: For Mac OS X 10.6 and 10.5, make sure Color Mode is set to use (beginning on page 130). 4. Select the Media Type setting for your paper (see page 139). 3. Do one of the print settings you want to Off (No Color Management). 144 Mac OS X 10.4.11 Mac OS X 10.6 and 10.5 2. Click the Print button, select Epson Stylus Pro 7700 or Epson Stylus Pro 9700, and select Printer Settings or Print Settings. 144 | Managing Color With Profiles Selecting Print Settings and Printing 1.
User Guide
Page 149
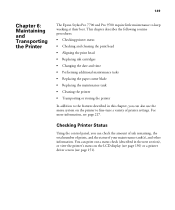
... check the amount of ink remaining, the total number of prints, and the status of printer settings. 149 Chapter 6: Maintaining and Transporting the Printer The Epson Stylus Pro 7700 and Pro 9700 require little maintenance to fine-tune a variety of your maintenance tank(s), and other information.
... check the amount of ink remaining, the total number of prints, and the status of printer settings. 149 Chapter 6: Maintaining and Transporting the Printer The Epson Stylus Pro 7700 and Pro 9700 require little maintenance to fine-tune a variety of your maintenance tank(s), and other information.
User Guide
Page 166
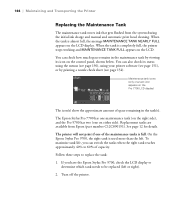
...also check its status using the menus (see page 150), using your printer software (see page 154). The Epson Stylus Pro 7700 has one maintenance tank (on the right side), and the Pro 9700 has two (one on the control panel, shown below. The printer will not print if one tank icon...Tank The maintenance tank stores ink that gets flushed from Epson (part number C12C890191). When the tank is full. On the Epson Stylus Pro 9700, the right tank is completely full, the printer stops working and MAINTENANCE TANK FULL appears on the Pro 7700 LCD display) The icon(s) show the approximate amount of...
...also check its status using the menus (see page 150), using your printer software (see page 154). The Epson Stylus Pro 7700 has one maintenance tank (on the right side), and the Pro 9700 has two (one on the control panel, shown below. The printer will not print if one tank icon...Tank The maintenance tank stores ink that gets flushed from Epson (part number C12C890191). When the tank is full. On the Epson Stylus Pro 9700, the right tank is completely full, the printer stops working and MAINTENANCE TANK FULL appears on the Pro 7700 LCD display) The icon(s) show the approximate amount of...

User Guide
Page 178
...is finished, you have a bad Remove and reinstall the ink cartridge; A non-genuine ink cartridge is Replace the ink cartridge with a genuine Epson ink cartridge; see page 157. INK TOO LOW TO CLEAN REPLACE INK CARTRIDGE Not enough ink for printing. see page 157. Replace the ...BEING USED CAN BE INSTALLED AGAIN FOR PRINTING Not enough ink for head cleaning, but enough for head cleaning. For the Pro 9700, note which tank needs replacement; 178 | Solving Problems Message Explanation Response INK CARTRIDGE NON-GENUINE CARTRIDGE! DECLINE ACCEPT INK CARTRIDGE PLEASE ...
...is finished, you have a bad Remove and reinstall the ink cartridge; A non-genuine ink cartridge is Replace the ink cartridge with a genuine Epson ink cartridge; see page 157. INK TOO LOW TO CLEAN REPLACE INK CARTRIDGE Not enough ink for printing. see page 157. Replace the ...BEING USED CAN BE INSTALLED AGAIN FOR PRINTING Not enough ink for head cleaning, but enough for head cleaning. For the Pro 9700, note which tank needs replacement; 178 | Solving Problems Message Explanation Response INK CARTRIDGE NON-GENUINE CARTRIDGE! DECLINE ACCEPT INK CARTRIDGE PLEASE ...
User Guide
Page 190
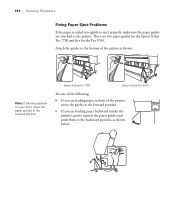
...printer, move the guides to the forward position. • If you are feeding paper in front of the printer as shown below: 190 Epson Stylus Pro 7700 Epson Stylus Pro 9700 Do one of the following: • If you are feeding paper backward (under the printer), gently squeeze the paper guides and push ...them to the printer. There are two paper guides for the Epson Stylus Pro 7700 and five for the Pro 9700. 190 | Solving Problems Fixing Paper Eject Problems If the paper is curled too tightly to eject properly, make sure the ...
...printer, move the guides to the forward position. • If you are feeding paper in front of the printer as shown below: 190 Epson Stylus Pro 7700 Epson Stylus Pro 9700 Do one of the following: • If you are feeding paper backward (under the printer), gently squeeze the paper guides and push ...them to the printer. There are two paper guides for the Epson Stylus Pro 7700 and five for the Pro 9700. 190 | Solving Problems Fixing Paper Eject Problems If the paper is curled too tightly to eject properly, make sure the ...
