User Guide
Page 2
... with these Epson printers. PhotoEnhance and ePlaten are registered trademarks; Epson is designed only for use of any options or any consumable products other printers. UltraSmooth and Piezo Pro are trademarks; Seiko Epson Corporation shall not be trademarks of Seiko Epson Corporation. No... Legal Notices Neither Seiko Epson Corporation nor its affiliates shall be reproduced, stored in a retrieval system, or transmitted in those designated as a result of: accident, misuse, or abuse of Seiko Epson Corporation. Trademarks Epson, Epson Stylus, UltraChrome, and MicroWeave ...
... with these Epson printers. PhotoEnhance and ePlaten are registered trademarks; Epson is designed only for use of any options or any consumable products other printers. UltraSmooth and Piezo Pro are trademarks; Seiko Epson Corporation shall not be trademarks of Seiko Epson Corporation. No... Legal Notices Neither Seiko Epson Corporation nor its affiliates shall be reproduced, stored in a retrieval system, or transmitted in those designated as a result of: accident, misuse, or abuse of Seiko Epson Corporation. Trademarks Epson, Epson Stylus, UltraChrome, and MicroWeave ...
User Guide
Page 5
... 18 Control Panel 19 LCD Display 19 1 Setting Up the Printer Unpacking and Assembling the Printer 21 Unpacking and Assembling the Stand 22 Unpacking the Printer and Mounting It on the Stand 25 Attaching the Paper Basket (Epson Stylus Pro 7700 27 Attaching the Paper Basket (Epson Stylus Pro 9700 34 Completing Setup and Connecting the Power Cord 42 Installing...
... 18 Control Panel 19 LCD Display 19 1 Setting Up the Printer Unpacking and Assembling the Printer 21 Unpacking and Assembling the Stand 22 Unpacking the Printer and Mounting It on the Stand 25 Attaching the Paper Basket (Epson Stylus Pro 7700 27 Attaching the Paper Basket (Epson Stylus Pro 9700 34 Completing Setup and Connecting the Power Cord 42 Installing...
User Guide
Page 6
...the Platen Gap for Thick or Thin Paper 76 Using the Paper Basket 77 Catching Printouts in Front of the Printer 77 Catching Printouts Under the Printer 79 Storing the Paper Basket 81 Optimizing the Settings for Your Paper 82 Creating Paper Configurations 82 Printing Your ...Paper Configurations 84 Selecting Paper Configurations 84 3 Printing With Epson Drivers for Windows Sizing Images for Borderless Printing on Roll Paper 86 ...
...the Platen Gap for Thick or Thin Paper 76 Using the Paper Basket 77 Catching Printouts in Front of the Printer 77 Catching Printouts Under the Printer 79 Storing the Paper Basket 81 Optimizing the Settings for Your Paper 82 Creating Paper Configurations 82 Printing Your ...Paper Configurations 84 Selecting Paper Configurations 84 3 Printing With Epson Drivers for Windows Sizing Images for Borderless Printing on Roll Paper 86 ...
User Guide
Page 8
... 149 Printing Status Information 150 Viewing Status Information 150 Checking Printer Status From the Printer Driver 151 Checking and Cleaning the Print Head 152 Running the Nozzle Check and Head Cleaning Utilities 152 Checking and Cleaning the... Cutter 162 Installing the New Cutter 164 Replacing the Maintenance Tank 166 Cleaning the Printer 168 Transporting or Storing the Printer 170 Preparing the Printer for Shipment 170 Moving the Printer on the Stand 172 Setting Up the Printer After Transportation 173 7 Solving Problems Diagnosing Problems 175 Checking Error Messages and Lights...
... 149 Printing Status Information 150 Viewing Status Information 150 Checking Printer Status From the Printer Driver 151 Checking and Cleaning the Print Head 152 Running the Nozzle Check and Head Cleaning Utilities 152 Checking and Cleaning the... Cutter 162 Installing the New Cutter 164 Replacing the Maintenance Tank 166 Cleaning the Printer 168 Transporting or Storing the Printer 170 Preparing the Printer for Shipment 170 Moving the Printer on the Stand 172 Setting Up the Printer After Transportation 173 7 Solving Problems Diagnosing Problems 175 Checking Error Messages and Lights...
User Guide
Page 9
... 193 Macintosh OS X 10.6 and 10.5 193 Macintosh OS X 10.4 194 Windows 194 A Specifications Environmental 195 Electrical 195 Dimensions and Weight 196 Printer Interfaces 196 Safety Approvals 196 Media 196 Roll Paper 196 Cut Sheets 198 Printable Area 201 Ink Cartridges 201 B Using the Optional Auto Take-Up ...
... 193 Macintosh OS X 10.6 and 10.5 193 Macintosh OS X 10.4 194 Windows 194 A Specifications Environmental 195 Electrical 195 Dimensions and Weight 196 Printer Interfaces 196 Safety Approvals 196 Media 196 Roll Paper 196 Cut Sheets 198 Printable Area 201 Ink Cartridges 201 B Using the Optional Auto Take-Up ...
User Guide
Page 11
... to get the most out of procedures for setting up and using the Epson printer drivers, and replacing ink cartridges. Warnings, Cautions, Notes, and Tips Please follow these guidelines as you use and printer maintenance-loading paper, replacing ink cartridges and other components, cleaning and aligning ...at its best, and provides troubleshooting tips in case you how to maintain your printer to keep it to your printer for easy reference. • The on-screen Network Guide on how to your printer, loading paper, using your equipment. For additional information, see the following: &#...
... to get the most out of procedures for setting up and using the Epson printer drivers, and replacing ink cartridges. Warnings, Cautions, Notes, and Tips Please follow these guidelines as you use and printer maintenance-loading paper, replacing ink cartridges and other components, cleaning and aligning ...at its best, and provides troubleshooting tips in case you how to maintain your printer to keep it to your printer for easy reference. • The on-screen Network Guide on how to your printer, loading paper, using your equipment. For additional information, see the following: &#...

User Guide
Page 13
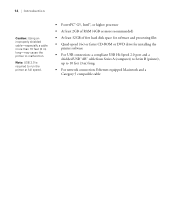
...: Ethernet equipped PC and a Category 5 compatible cable Macintosh System Requirements To use your printer in your Macintosh® system should meet these requirements: • IBM®-compatible PC... or peer-to locate your local service provider. Windows System Requirements To use your printer in either a stand-alone or peer-to-peer network environment, your system should... you do not have your service contract, please visit the Ricoh Americas Corporation website at http://www.ricoh-usa.com for installing the printer software • For USB connection: a Windows-compliant USB...
...: Ethernet equipped PC and a Category 5 compatible cable Macintosh System Requirements To use your printer in your Macintosh® system should meet these requirements: • IBM®-compatible PC... or peer-to locate your local service provider. Windows System Requirements To use your printer in either a stand-alone or peer-to-peer network environment, your system should... you do not have your service contract, please visit the Ricoh Americas Corporation website at http://www.ricoh-usa.com for installing the printer software • For USB connection: a Windows-compliant USB...
User Guide
Page 14
... 2GB of free hard disk space for software and processing files • Quad-speed (4×) or faster CD-ROM or DVD drive for installing the printer software • For USB connection: a compliant USB Hi-Speed 2.0 port and a shielded USB "AB" cable from Series A (computer) to Series... B (printer), up to malfunction. 14 | Introduction Caution: Using an improperly shielded cable-especially a cable more recommended) • At least 32GB of RAM (4GB or more than ...
... 2GB of free hard disk space for software and processing files • Quad-speed (4×) or faster CD-ROM or DVD drive for installing the printer software • For USB connection: a compliant USB Hi-Speed 2.0 port and a shielded USB "AB" cable from Series A (computer) to Series... B (printer), up to malfunction. 14 | Introduction Caution: Using an improperly shielded cable-especially a cable more recommended) • At least 32GB of RAM (4GB or more than ...
User Guide
Page 15
... and vibrations. • Keep the printer away from dusty areas. • Keep your printer, read the following safety instructions to rapid changes in fire or electric shock. • Do not use the equipment safely and effectively. • The Epson Stylus Pro 7700 weighs about 186 lb (84.5 kg) and the Epson Stylus Pro 9700 weighs about 256 lb (116...
... and vibrations. • Keep the printer away from dusty areas. • Keep your printer, read the following safety instructions to rapid changes in fire or electric shock. • Do not use the equipment safely and effectively. • The Epson Stylus Pro 7700 weighs about 186 lb (84.5 kg) and the Epson Stylus Pro 9700 weighs about 256 lb (116...
User Guide
Page 16
...customers only: The lithium batteries in this button, POWER OFF appears on the printer. • Do not attempt to service the printer yourself. • Power down the printer from the control panel, unplug the printer, and refer servicing to do so by hand unless instructed to qualified service ...personnel under the following conditions: The power cord or plug is in performance. • Before transporting the printer, make sure the total ampere rating of all devices plugged into the extension cord does not exceed the cord's ampere rating. Take...
...customers only: The lithium batteries in this button, POWER OFF appears on the printer. • Do not attempt to service the printer yourself. • Power down the printer from the control panel, unplug the printer, and refer servicing to do so by hand unless instructed to qualified service ...personnel under the following conditions: The power cord or plug is in performance. • Before transporting the printer, make sure the total ampere rating of all devices plugged into the extension cord does not exceed the cord's ampere rating. Take...
User Guide
Page 17
... do not drink the ink. • Store ink cartridges in the ink supply port, making covers or plugs unnecessary, but care is consumed because the printer automatically performs a reliability check. • If you remove an ink cartridge for best results. • Do not use an ink cartridge beyond the date printed...
... do not drink the ink. • Store ink cartridges in the ink supply port, making covers or plugs unnecessary, but care is consumed because the printer automatically performs a reliability check. • If you remove an ink cartridge for best results. • Do not use an ink cartridge beyond the date printed...
User Guide
Page 18
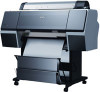
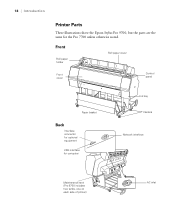
18 | Introduction Printer Parts These illustrations show the Epson Stylus Pro 9700, but the parts are the same for computer Ink bay Casters Network interface Maintenance tank (Pro 9700 includes two tanks, one on each side of printer) 18 AC inlet Front Roll paper holder Roll paper cover Front cover Control panel Paper basket Back Interface connector for optional equipment USB interface for the Pro 7700 unless otherwise noted.
18 | Introduction Printer Parts These illustrations show the Epson Stylus Pro 9700, but the parts are the same for computer Ink bay Casters Network interface Maintenance tank (Pro 9700 includes two tanks, one on each side of printer) 18 AC inlet Front Roll paper holder Roll paper cover Front cover Control panel Paper basket Back Interface connector for optional equipment USB interface for the Pro 7700 unless otherwise noted.
User Guide
Page 21
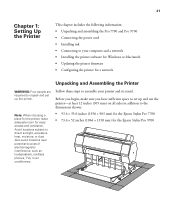
...sure you have sufficient space to set up and use the printer-at least 12 inches (305 mm) on all sides in addition to the dimensions shown: • 53.4 × 35.6 inches (1356 × 903 mm) for the Epson Stylus Pro 7700 • 73.4 × 52 inches (1864 ×... 1318 mm) for easy access and ventilation. 21 Chapter 1: Setting Up the Printer This chapter includes the following information: • Unpacking and assembling the Pro 7700 and Pro 9700 • Connecting the power cord • ...
...sure you have sufficient space to set up and use the printer-at least 12 inches (305 mm) on all sides in addition to the dimensions shown: • 53.4 × 35.6 inches (1356 × 903 mm) for the Epson Stylus Pro 7700 • 73.4 × 52 inches (1864 ×... 1318 mm) for easy access and ventilation. 21 Chapter 1: Setting Up the Printer This chapter includes the following information: • Unpacking and assembling the Pro 7700 and Pro 9700 • Connecting the power cord • ...
User Guide
Page 22
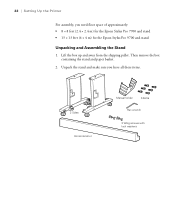
22 | Setting Up the Printer For assembly, you have all these items. 2 Sides Horizontal strut Manual holder 6 Bolts Hex wrench 2 Wing screws with lock washers 22 Lift the box up and away from the shipping pallet. Unpack the stand and make sure you need floor space of approximately: • 8 × 8 feet (2.4 × 2.4 m) for the Epson Stylus Pro 7700 and stand • 13 × 13 feet (4 × 4 m) for the Epson Stylus Pro 9700 and stand Unpacking and Assembling the Stand 1. Then remove the box containing the stand and paper basket. 2.
22 | Setting Up the Printer For assembly, you have all these items. 2 Sides Horizontal strut Manual holder 6 Bolts Hex wrench 2 Wing screws with lock washers 22 Lift the box up and away from the shipping pallet. Unpack the stand and make sure you need floor space of approximately: • 8 × 8 feet (2.4 × 2.4 m) for the Epson Stylus Pro 7700 and stand • 13 × 13 feet (4 × 4 m) for the Epson Stylus Pro 9700 and stand Unpacking and Assembling the Stand 1. Then remove the box containing the stand and paper basket. 2.
User Guide
Page 23
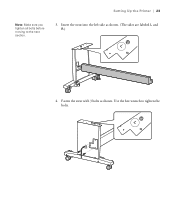
Fasten the strut with 3 bolts as shown. (The sides are labeled L and R.) 4. Setting Up the Printer | 23 Note: Make sure you tighten all bolts before moving to tighten the bolts. 23 Insert the strut into the left side as shown. Use the hex wrench to the next section. 3.
Fasten the strut with 3 bolts as shown. (The sides are labeled L and R.) 4. Setting Up the Printer | 23 Note: Make sure you tighten all bolts before moving to tighten the bolts. 23 Insert the strut into the left side as shown. Use the hex wrench to the next section. 3.
User Guide
Page 24
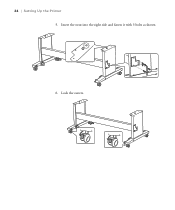
Insert the strut into the right side and fasten it with 3 bolts as shown. 6. 24 | Setting Up the Printer 5. Lock the casters. 24
Insert the strut into the right side and fasten it with 3 bolts as shown. 6. 24 | Setting Up the Printer 5. Lock the casters. 24
User Guide
Page 25
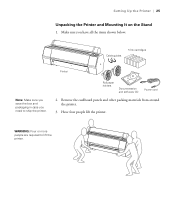
WARNING: Four or more people are required to ship the printer. Make sure you have all the items shown below: Cable guides 5 Ink cartridges Printer Note: Make sure you save the box and packaging in case you need to lift the printer. 25 Roll paper holders Documentation and software CD Power cord 2. Setting Up the Printer | 25 Unpacking the Printer and Mounting It on the Stand 1. Remove the cardboard panels and other packing materials from around the printer. 3. Have four people lift the printer.
WARNING: Four or more people are required to ship the printer. Make sure you have all the items shown below: Cable guides 5 Ink cartridges Printer Note: Make sure you save the box and packaging in case you need to lift the printer. 25 Roll paper holders Documentation and software CD Power cord 2. Setting Up the Printer | 25 Unpacking the Printer and Mounting It on the Stand 1. Remove the cardboard panels and other packing materials from around the printer. 3. Have four people lift the printer.
User Guide
Page 26
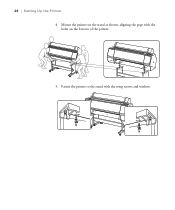
Mount the printer on the bottom of the printer. 5. Fasten the printer to the stand with the holes on the stand as shown, aligning the pegs with the wing screws and washers. 26 26 | Setting Up the Printer 4.
Mount the printer on the bottom of the printer. 5. Fasten the printer to the stand with the holes on the stand as shown, aligning the pegs with the wing screws and washers. 26 26 | Setting Up the Printer 4.
User Guide
Page 27
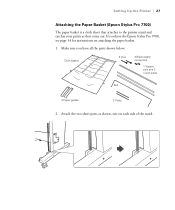
Make sure you have all the parts shown below: Cloth basket 2 Pins 2 Black plastic connectors 1 Square pole and 2 round poles Rod 2 Paper guides 2 Posts 2. Setting Up the Printer | 27 Attaching the Paper Basket (Epson Stylus Pro 7700) The paper basket is a cloth sheet that attaches to the printer stand and catches your prints as shown, one on attaching the paper basket. 1. Attach the two short posts as they come out. If you have the Epson Stylus Pro 9700, see page 34 for instructions on each side of the stand. 27
Make sure you have all the parts shown below: Cloth basket 2 Pins 2 Black plastic connectors 1 Square pole and 2 round poles Rod 2 Paper guides 2 Posts 2. Setting Up the Printer | 27 Attaching the Paper Basket (Epson Stylus Pro 7700) The paper basket is a cloth sheet that attaches to the printer stand and catches your prints as shown, one on attaching the paper basket. 1. Attach the two short posts as they come out. If you have the Epson Stylus Pro 9700, see page 34 for instructions on each side of the stand. 27
User Guide
Page 28
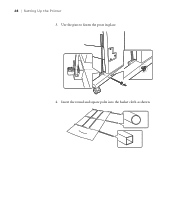
28 | Setting Up the Printer 3. Insert the round and square poles into the basket cloth as shown. 28 Use the pins to fasten the posts in place. 4.
28 | Setting Up the Printer 3. Insert the round and square poles into the basket cloth as shown. 28 Use the pins to fasten the posts in place. 4.


