User's Guide
Page 16
Chapter 9: TROUBLESHOOTING Clearing Document Jams 9.2 Input Misfeed 9.2 Exit Misfeed 9.3 Roller Misfeed 9.4 Clearing Paper Jams 9.5 In Tray 1 9.5 In Optional Tray 2 9.6 In the Fuser Area or Around the Toner Cartridge 9.7 In the Paper Exit Area 9.9 In the Multipurpose Tray 9.10 Tips for Avoiding Paper Jams 9.11 Clearing LCD Error ...
Chapter 9: TROUBLESHOOTING Clearing Document Jams 9.2 Input Misfeed 9.2 Exit Misfeed 9.3 Roller Misfeed 9.4 Clearing Paper Jams 9.5 In Tray 1 9.5 In Optional Tray 2 9.6 In the Fuser Area or Around the Toner Cartridge 9.7 In the Paper Exit Area 9.9 In the Multipurpose Tray 9.10 Tips for Avoiding Paper Jams 9.11 Clearing LCD Error ...

User's Guide
Page 40
WARNING: The fuser area inside of the supplied three-pronged electrical cord into the AC socket on the machine and the other end into a 2 properly grounded AC outlet. 2 Press the power switch to burn your display text in use. Take care not to turn the machine on. To the AC wall jack To view your fingers when you access this area. GETTING STARTED 2.15 Turning the Machine On 1 Plug one end of the machine becomes very hot when in another language, see page 2.16. "Warming Up Please Wait" appears on the display indicating that the machine is now on.
WARNING: The fuser area inside of the supplied three-pronged electrical cord into the AC socket on the machine and the other end into a 2 properly grounded AC outlet. 2 Press the power switch to burn your display text in use. Take care not to turn the machine on. To the AC wall jack To view your fingers when you access this area. GETTING STARTED 2.15 Turning the Machine On 1 Plug one end of the machine becomes very hot when in another language, see page 2.16. "Warming Up Please Wait" appears on the display indicating that the machine is now on.
User's Guide
Page 88
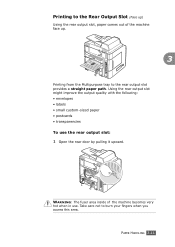
PAPER HANDLING 3.11 Take care not to burn your fingers when you access this area. WARNING: The fuser area inside of the machine face up. 3 Printing from the Multipurpose tray to the rear output slot provides a straight paper path. Printing to the Rear ...
PAPER HANDLING 3.11 Take care not to burn your fingers when you access this area. WARNING: The fuser area inside of the machine face up. 3 Printing from the Multipurpose tray to the rear output slot provides a straight paper path. Printing to the Rear ...
User's Guide
Page 208
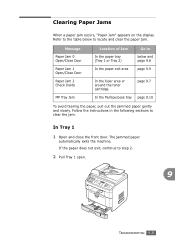
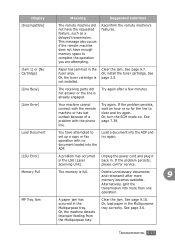
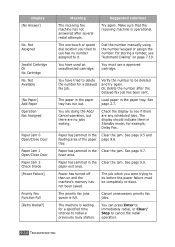
... Jam In the paper tray (Tray 1 or Tray 2) In the paper exit area Go to below to the table below and page 9.6 page 9.9 In the fuser area or around the toner cartridge.
... Jam In the paper tray (Tray 1 or Tray 2) In the paper exit area Go to below to the table below and page 9.6 page 9.9 In the fuser area or around the toner cartridge.
User's Guide
Page 209
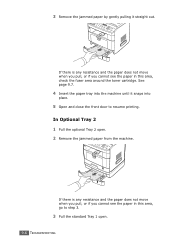
... there is any resistance and the paper does not move when you pull, or if you cannot see the paper in this area, check the fuser area around the toner cartridge. In Optional Tray 2 1 Pull the optional Tray 2 open . 9.6 TROUBLESHOOTING 3 Remove the jammed paper by gently pulling it snaps into place...
... there is any resistance and the paper does not move when you pull, or if you cannot see the paper in this area, check the fuser area around the toner cartridge. In Optional Tray 2 1 Pull the optional Tray 2 open . 9.6 TROUBLESHOOTING 3 Remove the jammed paper by gently pulling it snaps into place...

User's Guide
Page 210
4 Pull the paper straight up and out. 5 Insert Tray 1 into the machine until it snaps into place. 6 Open and close the front door to burn your fingers when removing paper from the machine. 1 Open the front door and pull the toner cartridge out, lightly pushing it down. 9 TROUBLESHOOTING 9.7 Take care not to resume printing. In the Fuser Area or Around the Toner Cartridge WARNING: The fuser area is hot.
4 Pull the paper straight up and out. 5 Insert Tray 1 into the machine until it snaps into place. 6 Open and close the front door to burn your fingers when removing paper from the machine. 1 Open the front door and pull the toner cartridge out, lightly pushing it down. 9 TROUBLESHOOTING 9.7 Take care not to resume printing. In the Fuser Area or Around the Toner Cartridge WARNING: The fuser area is hot.
User's Guide
Page 215
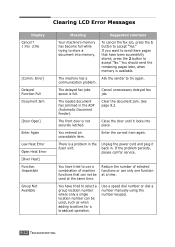
... only a single location number can not be used at a time. If you want to accept "No." The delayed fax jobs queue is a problem in the fuser unit. Enter the correct item again. There is full. You have been successfully stored, press the 2 button to send there pages that can be used...
... only a single location number can not be used at a time. If you want to accept "No." The delayed fax jobs queue is a problem in the fuser unit. Enter the correct item again. There is full. You have been successfully stored, press the 2 button to send there pages that can be used...
User's Guide
Page 216
... with the remote machine or has lost contact because of a problem with no document loaded into more 9 memory becomes available. A problem has occurred in the fuser area. Paper has jammed in the LSU (Laser Scanning Unit). A paper jam has occurred in the Multipurpose tray. TROUBLESHOOTING 9.13 This message also occurs if...
... with the remote machine or has lost contact because of a problem with no document loaded into more 9 memory becomes available. A problem has occurred in the fuser area. Paper has jammed in the LSU (Laser Scanning Unit). A paper jam has occurred in the Multipurpose tray. TROUBLESHOOTING 9.13 This message also occurs if...
User's Guide
Page 217
...-done. Verify the number to redial a previously busy station. The display should indicate them in the paper tray has run out. See page 9.5 and page 9.6. fuser area. See page 9.7. The priority fax jobs queue is full. Or, delete the number after several redial attempts. You are doing the Add/ Cancel operation...
...-done. Verify the number to redial a previously busy station. The display should indicate them in the paper tray has run out. See page 9.5 and page 9.6. fuser area. See page 9.7. The priority fax jobs queue is full. Or, delete the number after several redial attempts. You are doing the Add/ Cancel operation...

User's Guide
Page 272
... to seal must use adhesives compatible with the heat and pressure in an envelope, creating an air bubble, then the envelope may even damage the fuser. Envelope Storage Proper storage of the envelope. • Avoid printing over to print quality. SPECIFICATIONS C.11 Correct C Incorrect Envelopes with Adhesive Strips or Flaps Envelopes...
... to seal must use adhesives compatible with the heat and pressure in an envelope, creating an air bubble, then the envelope may even damage the fuser. Envelope Storage Proper storage of the envelope. • Avoid printing over to print quality. SPECIFICATIONS C.11 Correct C Incorrect Envelopes with Adhesive Strips or Flaps Envelopes...


