User's Guide
Page 2
... no event will the company be liable for direct, indirect incidental or consequential damages as a printer, a scanner, a copier, and a facsimile, and information for maintaining and troubleshooting the machine. Contents of the detailed instructions for using your machine as a result of the multi-function application, SmarThru. It also provides all of this...
... no event will the company be liable for direct, indirect incidental or consequential damages as a printer, a scanner, a copier, and a facsimile, and information for maintaining and troubleshooting the machine. Contents of the detailed instructions for using your machine as a result of the multi-function application, SmarThru. It also provides all of this...
User's Guide
Page 16
Chapter 9: TROUBLESHOOTING Clearing Document Jams 9.2 Input Misfeed 9.2 Exit Misfeed 9.3 Roller Misfeed 9.4 Clearing Paper Jams 9.5 In Tray 1 9.5 In Optional Tray 2 9.6 In the Fuser Area or Around the Toner ...
Chapter 9: TROUBLESHOOTING Clearing Document Jams 9.2 Input Misfeed 9.2 Exit Misfeed 9.3 Roller Misfeed 9.4 Clearing Paper Jams 9.5 In Tray 1 9.5 In Optional Tray 2 9.6 In the Fuser Area or Around the Toner ...

User's Guide
Page 204
9 TROUBLESHOOTING This chapter gives helpful information for what to do if you encounter an error. This chapter includes: • Clearing Document Jams • Clearing Paper Jams • Clearing LCD Error Messages • Solving Other Problems
9 TROUBLESHOOTING This chapter gives helpful information for what to do if you encounter an error. This chapter includes: • Clearing Document Jams • Clearing Paper Jams • Clearing LCD Error Messages • Solving Other Problems

User's Guide
Page 205
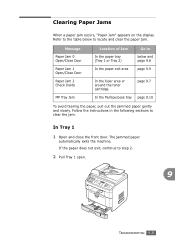
Clearing Document Jams When a document jams while passing through the ADF (Automatic Document Feeder), "Document Jam" appears on the right end of the ADF. 9.2 TROUBLESHOOTING Pull the document gently to the left and out of the ADF roller toward the ADF ( 1 ) and remove the roller from the ADF. 2 Open the ADF cover. 3 Rotate the bushing on the display. Input Misfeed 1 Remove any remaining page(s) from the slot ( 2 ).
Clearing Document Jams When a document jams while passing through the ADF (Automatic Document Feeder), "Document Jam" appears on the right end of the ADF. 9.2 TROUBLESHOOTING Pull the document gently to the left and out of the ADF roller toward the ADF ( 1 ) and remove the roller from the ADF. 2 Open the ADF cover. 3 Rotate the bushing on the display. Input Misfeed 1 Remove any remaining page(s) from the slot ( 2 ).

User's Guide
Page 206
... any remaining page(s) from the ADF. 2 Open the document cover and turn the release knob to remove the misfed documents from the document output tray. 9 TROUBLESHOOTING 9.3 NOTE: To prevent document jams, use the document glass for thick, thin, or mixed paper-type documents. Exit Misfeed 1 Remove any , back into the right...
... any remaining page(s) from the ADF. 2 Open the document cover and turn the release knob to remove the misfed documents from the document output tray. 9 TROUBLESHOOTING 9.3 NOTE: To prevent document jams, use the document glass for thick, thin, or mixed paper-type documents. Exit Misfeed 1 Remove any , back into the right...

User's Guide
Page 207
Roller Misfeed 1 Remove any , back into the ADF. Then load the removed page(s), if any remaining page(s) from the ADF. 2 Open the document cover. 3 Turn the release knob so that you can easily seize the misfed page, and remove the page from the roller or the feed area by carefully pulling it to the right using both hands. 4 Close the document cover. Then load the removed page(s), if any, back into the ADF. 9.4 TROUBLESHOOTING 3 Close the document cover.
Roller Misfeed 1 Remove any , back into the ADF. Then load the removed page(s), if any remaining page(s) from the ADF. 2 Open the document cover. 3 Turn the release knob so that you can easily seize the misfed page, and remove the page from the roller or the feed area by carefully pulling it to the right using both hands. 4 Close the document cover. Then load the removed page(s), if any, back into the ADF. 9.4 TROUBLESHOOTING 3 Close the document cover.
User's Guide
Page 208
Clearing Paper Jams When a paper jam occurs, "Paper Jam" appears on the display. Follow the instructions in the following sections to step 2. 2 Pull Tray 1 open. 9 TROUBLESHOOTING 9.5 page 9.7 In the Multipurpose tray page 9.10 To avoid tearing the paper, pull out the jammed paper gently and slowly. In Tray 1 1 Open and close ...
Clearing Paper Jams When a paper jam occurs, "Paper Jam" appears on the display. Follow the instructions in the following sections to step 2. 2 Pull Tray 1 open. 9 TROUBLESHOOTING 9.5 page 9.7 In the Multipurpose tray page 9.10 To avoid tearing the paper, pull out the jammed paper gently and slowly. In Tray 1 1 Open and close ...
User's Guide
Page 209
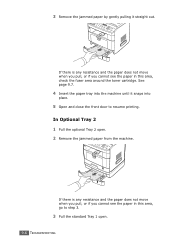
In Optional Tray 2 1 Pull the optional Tray 2 open . 9.6 TROUBLESHOOTING If there is any resistance and the paper does not move when you pull, or if you cannot see the paper in this area, go ...
In Optional Tray 2 1 Pull the optional Tray 2 open . 9.6 TROUBLESHOOTING If there is any resistance and the paper does not move when you pull, or if you cannot see the paper in this area, go ...

User's Guide
Page 210
Take care not to burn your fingers when removing paper from the machine. 1 Open the front door and pull the toner cartridge out, lightly pushing it snaps into the machine until it down. 9 TROUBLESHOOTING 9.7 In the Fuser Area or Around the Toner Cartridge WARNING: The fuser area is hot. 4 Pull the paper straight up and out. 5 Insert Tray 1 into place. 6 Open and close the front door to resume printing.
Take care not to burn your fingers when removing paper from the machine. 1 Open the front door and pull the toner cartridge out, lightly pushing it snaps into the machine until it down. 9 TROUBLESHOOTING 9.7 In the Fuser Area or Around the Toner Cartridge WARNING: The fuser area is hot. 4 Pull the paper straight up and out. 5 Insert Tray 1 into place. 6 Open and close the front door to resume printing.

User's Guide
Page 211
2 Remove the jammed paper by gently pulling it straight out. 3 Replace the toner cartridge and close the front door. Printing automatically resumes. 9.8 TROUBLESHOOTING
2 Remove the jammed paper by gently pulling it straight out. 3 Replace the toner cartridge and close the front door. Printing automatically resumes. 9.8 TROUBLESHOOTING

User's Guide
Page 212
In the Paper Exit Area 1 Open and close the front door. If the paper does not exit, continue to step 6. 3 If there is any resistance and the paper does not move when you pull, or if you cannot see the paper in the front output tray, open the rear door. 9 TROUBLESHOOTING 9.9 Skip to step 2. 2 Gently pull the paper out of the front output tray. The jammed paper automatically exits the machine.
In the Paper Exit Area 1 Open and close the front door. If the paper does not exit, continue to step 6. 3 If there is any resistance and the paper does not move when you pull, or if you cannot see the paper in the front output tray, open the rear door. 9 TROUBLESHOOTING 9.9 Skip to step 2. 2 Gently pull the paper out of the front output tray. The jammed paper automatically exits the machine.

User's Guide
Page 213
4 Remove the jammed paper by gently pulling it straight out. 5 Close the rear door. 6 Open and close the front door. 9.10 TROUBLESHOOTING If the paper is not feeding properly, pull the paper out of paper or improper paper loading. To resume printing, open and close the front door to print using the Multipurpose tray and the machine does not detect paper. In the Multipurpose Tray "MP Tray Jam" appears on the display when you try to resume printing. This may be a lack of the machine.
4 Remove the jammed paper by gently pulling it straight out. 5 Close the rear door. 6 Open and close the front door. 9.10 TROUBLESHOOTING If the paper is not feeding properly, pull the paper out of paper or improper paper loading. To resume printing, open and close the front door to print using the Multipurpose tray and the machine does not detect paper. In the Multipurpose Tray "MP Tray Jam" appears on the display when you try to resume printing. This may be a lack of the machine.

User's Guide
Page 214
... . - When a paper jam occurs, follow the steps outlined in "Clearing Paper Jams" on page 9.5. • Follow the procedures in the printer properties window. See page 4.5. 9 TROUBLESHOOTING 9.11 Ensure that the adjustable guides are positioned correctly. • Do not overload the paper tray. Ensure that the paper is printing. • Flex, fan...
... . - When a paper jam occurs, follow the steps outlined in "Clearing Paper Jams" on page 9.5. • Follow the procedures in the printer properties window. See page 4.5. 9 TROUBLESHOOTING 9.11 Ensure that the adjustable guides are positioned correctly. • Do not overload the paper tray. Ensure that the paper is printing. • Flex, fan...
User's Guide
Page 215
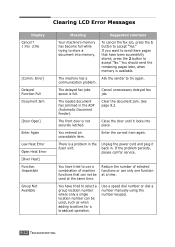
... of selected functions or use only one function at the same time. Use a speed dial number or dial a number manually using the number keypad. 9.12 TROUBLESHOOTING Clear the document jam. See page 9.2. Enter the correct item again. Unplug the power cord and plug it locks into memory. Reduce the number of...
... of selected functions or use only one function at the same time. Use a speed dial number or dial a number manually using the number keypad. 9.12 TROUBLESHOOTING Clear the document jam. See page 9.2. Enter the correct item again. Unplug the power cord and plug it locks into memory. Reduce the number of...
User's Guide
Page 216
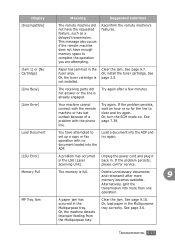
... a document into more 9 memory becomes available. Unplug the power cord and plug it back in the LSU (Laser Scanning Unit). The memory is already engaged. TROUBLESHOOTING 9.13 See page 9.7. Or, install the toner cartridge. You have the requested feature, such as a delayed transmission. Delete unnecessary documents and retransmit after a few minutes...
... a document into more 9 memory becomes available. Unplug the power cord and plug it back in the LSU (Laser Scanning Unit). The memory is already engaged. TROUBLESHOOTING 9.13 See page 9.7. Or, install the toner cartridge. You have the requested feature, such as a delayed transmission. Delete unnecessary documents and retransmit after a few minutes...
User's Guide
Page 217
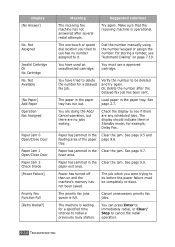
... a previously busy station. Power has turned off then on page 7.19. The machine is waiting for a specified time interval to cancel the redial operation. 9.14 TROUBLESHOOTING Cancel unnecessary priority fax jobs. Suggested solutions Try again. Verify the number to see "Automatic Dialing" on and the machine's memory has not been saved...
... a previously busy station. Power has turned off then on page 7.19. The machine is waiting for a specified time interval to cancel the redial operation. 9.14 TROUBLESHOOTING Cancel unnecessary priority fax jobs. Suggested solutions Try again. Verify the number to see "Automatic Dialing" on and the machine's memory has not been saved...
User's Guide
Page 218
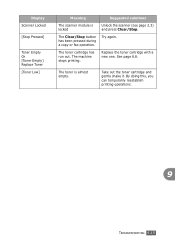
... one. Take out the toner cartridge and gently shake it. The toner cartridge has run out. By doing this, you can temporarily reestablish printing operations. 9 TROUBLESHOOTING 9.15 Try again. The toner is locked Unlock the scanner (see page 2.3) and press Clear/Stop. The machine stops printing. Display Scanner Locked [Stop Pressed...
... one. Take out the toner cartridge and gently shake it. The toner cartridge has run out. By doing this, you can temporarily reestablish printing operations. 9 TROUBLESHOOTING 9.15 Try again. The toner is locked Unlock the scanner (see page 2.3) and press Clear/Stop. The machine stops printing. Display Scanner Locked [Stop Pressed...
User's Guide
Page 219
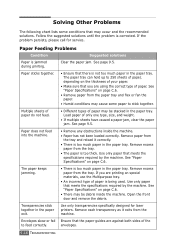
... paper is not too much paper in the paper tray. Envelopes skew or fail Ensure that meets the specifications required by the machine. envelopes. 9.16 TROUBLESHOOTING See page 9.5. Clear the paper jam. Open the front door and remove the debris. Remove each transparency as it correctly. • There is too much...
... paper is not too much paper in the paper tray. Envelopes skew or fail Ensure that meets the specifications required by the machine. envelopes. 9.16 TROUBLESHOOTING See page 9.5. Clear the paper jam. Open the front door and remove the debris. Remove each transparency as it correctly. • There is too much...
User's Guide
Page 220
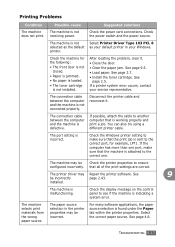
... jammed. • No paper is loaded. • The toner cartridge is not does not print. The machine selects print materials from the wrong paper source. TROUBLESHOOTING 9.17 See page 9.5. • Load paper. See page 4.6. receiving power. See page 2.5. You can also try using a different printer cable. The printer driver may be...
... jammed. • No paper is loaded. • The toner cartridge is not does not print. The machine selects print materials from the wrong paper source. TROUBLESHOOTING 9.17 See page 9.5. • Load paper. See page 4.6. receiving power. See page 2.5. You can also try using a different printer cable. The printer driver may be...

User's Guide
Page 221
..., ensure that your application. Disconnect the printer cable and reconnect. The software application is blank. Turn the machine off and then back on again. 9.18 TROUBLESHOOTING If you know works. Change the page orientation in the tray. The printer cable is malfunctioning. Try printing a job from another computer and try a print...
..., ensure that your application. Disconnect the printer cable and reconnect. The software application is blank. Turn the machine off and then back on again. 9.18 TROUBLESHOOTING If you know works. Change the page orientation in the tray. The printer cable is malfunctioning. Try printing a job from another computer and try a print...


