

English Manual
Page 4
...-4663). If you enjoy this healthful exercise in the drawing below. Before reading further, please familiarize yourself with the parts that are labeled in the convenience and privacy of the most effective exercises for selecting the new PROFORM® XP 70 exercise cycle. To help us assist you,... please note the product model number and serial number before you use the exercise cycle. For your home. Cycling is 831.215010. The serial number can be found on a decal attached to...
...-4663). If you enjoy this healthful exercise in the drawing below. Before reading further, please familiarize yourself with the parts that are labeled in the convenience and privacy of the most effective exercises for selecting the new PROFORM® XP 70 exercise cycle. To help us assist you,... please note the product model number and serial number before you use the exercise cycle. For your home. Cycling is 831.215010. The serial number can be found on a decal attached to...
English Manual
Page 5
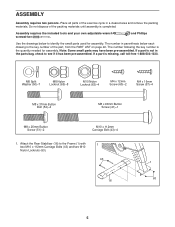
...page 22. If a part is completed. Assembly requires the included tools and your own adjustable wrench screwdriver . Do not dispose of the exercise cycle in parenthesis below to see if it has been pre-assembled. and Phillips Use the drawings below each drawing is the quantity needed ...M8 x 90mm Button Screw (41)-1 M8 x 25mm Button Screw (51)-2 M10 x 112mm Carriage Bolt (43)-4 1. Note: Some small parts may have been pre-assembled. Attach the Rear Stabilizer (16) to the Frame (1) with two M10 x 112mm Carriage Bolts (43) and two M10 Nylon Locknuts (63). 1 43 16 1 63 5 ...
...page 22. If a part is completed. Assembly requires the included tools and your own adjustable wrench screwdriver . Do not dispose of the exercise cycle in parenthesis below to see if it has been pre-assembled. and Phillips Use the drawings below each drawing is the quantity needed ...M8 x 90mm Button Screw (41)-1 M8 x 25mm Button Screw (51)-2 M10 x 112mm Carriage Bolt (43)-4 1. Note: Some small parts may have been pre-assembled. Attach the Rear Stabilizer (16) to the Frame (1) with two M10 x 112mm Carriage Bolts (43) and two M10 Nylon Locknuts (63). 1 43 16 1 63 5 ...

English Manual
Page 6
...the Upper Wire Harness (42) to the Upright (2) with two M8 x 37mm 5 Button Bolts (52) and two M8 Nylon Locknuts (65). Identify the Left Handlebar (3). Attach the Upright to the Frame (1) with two M8 x 25mm Button Screws (51), an M8 x 90mm Button Screw (41), and three M8 Split Washers (50). 1 ... harness does not get pinched and 2 damaged during this step. 1 50 51 42 46 51 41 50 4. Orient the Front Stabilizer (15) as shown. Attach the Front Stabilizer to the Frame with two M10 x 112mm Carriage Bolts (43) and two M10 Nylon Locknuts (63). 2 43 15 3. Gently pull the ...
...the Upper Wire Harness (42) to the Upright (2) with two M8 x 37mm 5 Button Bolts (52) and two M8 Nylon Locknuts (65). Identify the Left Handlebar (3). Attach the Upright to the Frame (1) with two M8 x 25mm Button Screws (51), an M8 x 90mm Button Screw (41), and three M8 Split Washers (50). 1 ... harness does not get pinched and 2 damaged during this step. 1 50 51 42 46 51 41 50 4. Orient the Front Stabilizer (15) as shown. Attach the Front Stabilizer to the Frame with two M10 x 112mm Carriage Bolts (43) and two M10 Nylon Locknuts (63). 2 43 15 3. Gently pull the ...
English Manual
Page 7
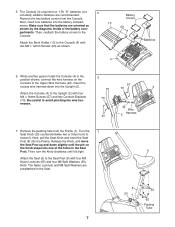
... recommended. The Console (4) requires four 1.5V "D" batteries (not 5 included); Then, reattach the battery covers to avoid pinching the wire harnesses. 6 70 57 7. While another person holds the Console (4) in the Seat Post. Remove the packing tube from the Console. Next, pull the Seat Knob and...the holes in the position shown, connect the wire harness on the Knob snaps into the Upright (2). Be careful to the Console. Attach the Seat (9) to the Seat. 57 70 4 42 Wire 2 Harness 9 8 20 1 50 65 Packing Tube 7 Insert the excess wire harness down slightly until it ...
... recommended. The Console (4) requires four 1.5V "D" batteries (not 5 included); Then, reattach the battery covers to avoid pinching the wire harnesses. 6 70 57 7. While another person holds the Console (4) in the Seat Post. Remove the packing tube from the Console. Next, pull the Seat Knob and...the holes in the position shown, connect the wire harness on the Knob snaps into the Upright (2). Be careful to the Console. Attach the Seat (9) to the Seat. 57 70 4 42 Wire 2 Harness 9 8 20 1 50 65 Packing Tube 7 Insert the excess wire harness down slightly until it ...


