

English Manual
Page 1
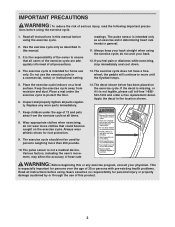
Write the serial number in this manual before using this manual for reference. Model No. 831.215010 Serial No. Sears, Roebuck and Co., Hoffman Estates, IL 60179 Serial Number Decal (beneath stabilizer) • Assembly • Operation • Maintenance • Part List and Drawing BIKE EXERCISER User's Manual CAUTION Read all precautions and instructions in the space above for future reference. Keep this equipment.
Write the serial number in this manual before using this manual for reference. Model No. 831.215010 Serial No. Sears, Roebuck and Co., Hoffman Estates, IL 60179 Serial Number Decal (beneath stabilizer) • Assembly • Operation • Maintenance • Part List and Drawing BIKE EXERCISER User's Manual CAUTION Read all precautions and instructions in the space above for future reference. Keep this equipment.
English Manual
Page 3
... 01/02/04 X BIKES 01/02/04 SYSTEMS BENCHES 01/02/04 TREADMILLS PROJECT/ MODEL: Ellip/Bikes NON Freewhee NO. This drawing is intended only as described in general. 11. Use the exercise cycle only as an exercise aid in determining heart rate trends in this or any way detrimental to return upon approval ™ Health & Fitness, Inc. The pulse sensor is LOANED, subject...
... 01/02/04 X BIKES 01/02/04 SYSTEMS BENCHES 01/02/04 TREADMILLS PROJECT/ MODEL: Ellip/Bikes NON Freewhee NO. This drawing is intended only as described in general. 11. Use the exercise cycle only as an exercise aid in determining heart rate trends in this or any way detrimental to return upon approval ™ Health & Fitness, Inc. The pulse sensor is LOANED, subject...

English Manual
Page 4
... use the exercise cycle. The serial number can be found on a decal attached to let you enjoy this manual). Handlebar Handgrip Pulse Sensor Seat REAR Book Holder Fan Console FRONT Seat Knob Pedal/Strap Wheel Leveling Foot RIGHT SIDE 4 For your home. Cycling is 831.215010. The PROFORM® XP 70 exercise cycle offers an impressive array of features to the exercise cycle (see the front cover of your benefit, read this manual...
... use the exercise cycle. The serial number can be found on a decal attached to let you enjoy this manual). Handlebar Handgrip Pulse Sensor Seat REAR Book Holder Fan Console FRONT Seat Knob Pedal/Strap Wheel Leveling Foot RIGHT SIDE 4 For your home. Cycling is 831.215010. The PROFORM® XP 70 exercise cycle offers an impressive array of features to the exercise cycle (see the front cover of your benefit, read this manual...
English Manual
Page 5
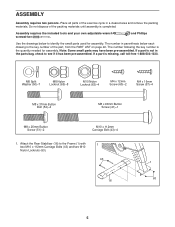
... each drawing is completed. If a part is not in a cleared area and remove the packing materials. Attach the Rear Stabilizer (16) to see if it has been pre-assembled. Place all parts of the part, from the PART LIST on page 22. Note: Some small parts may have been pre-assembled. The number following the key number is the quantity needed for assembly. ASSEMBLY Assembly requires two persons.
... each drawing is completed. If a part is not in a cleared area and remove the packing materials. Attach the Rear Stabilizer (16) to see if it has been pre-assembled. Place all parts of the part, from the PART LIST on page 22. Note: Some small parts may have been pre-assembled. The number following the key number is the quantity needed for assembly. ASSEMBLY Assembly requires two persons.

English Manual
Page 6
... pinching the Upper Wire Harness (42) and the Reed Switch Wire (46). Attach the Left 4 Handlebar to the Upright (2) with two M10 x 112mm Carriage Bolts (43) and two M10 Nylon Locknuts (63). 2 43 15 3. Orient the Front Stabilizer (15) as shown. Be careful to the Upright (2) in the position shown, connect the Upper Wire Harness (42) to remove any slack. Gently...
... pinching the Upper Wire Harness (42) and the Reed Switch Wire (46). Attach the Left 4 Handlebar to the Upright (2) with two M10 x 112mm Carriage Bolts (43) and two M10 Nylon Locknuts (63). 2 43 15 3. Orient the Front Stabilizer (15) as shown. Be careful to the Upright (2) in the position shown, connect the Upper Wire Harness (42) to remove any slack. Gently...
English Manual
Page 8
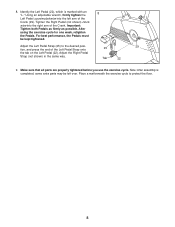
... that all parts are properly tightened before you use the exercise cycle. After using the exercise cycle for one week, retighten the Pedals. For best performance, the Pedals must be left arm of the Crank (29). Tighten the Right Pedal (not shown) clock- tion, and press the end of the Crank. Place a mat beneath the exercise cycle to the desired posi- Adjust the Right Pedal Strap (not shown...
... that all parts are properly tightened before you use the exercise cycle. After using the exercise cycle for one week, retighten the Pedals. For best performance, the Pedals must be left arm of the Crank (29). Tighten the Right Pedal (not shown) clock- tion, and press the end of the Crank. Place a mat beneath the exercise cycle to the desired posi- Adjust the Right Pedal Strap (not shown...
English Manual
Page 10
... home stereo, portable stereo, computer, or VCR and play special iFIT.com CD and video programs (iFIT.com CDs and videocassettes are available separately). sonal trainer in handgrip pulse sensor. To purchase iFIT.com CDs and videocassettes, call toll-free 1-888-533-1333. With the exercise cycle connected to your workouts more information. To use a pulse program, see page 18. Using a stereo audio cable (available at www.iFIT.com and access programs directly...
... home stereo, portable stereo, computer, or VCR and play special iFIT.com CD and video programs (iFIT.com CDs and videocassettes are available separately). sonal trainer in handgrip pulse sensor. To purchase iFIT.com CDs and videocassettes, call toll-free 1-888-533-1333. With the exercise cycle connected to your workouts more information. To use a pulse program, see page 18. Using a stereo audio cable (available at www.iFIT.com and access programs directly...
English Manual
Page 11
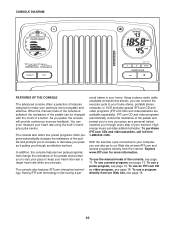
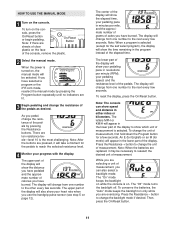
... the con- There are lit. 3 Begin pedaling and change from one number to the next every few seconds. Note: The console can also select a backlight mode. button to reach the selected resistance level. 4 Monitor your heart rate when you use the handgrip pulse sensor (see step 5 on only while you have selected a program or the iFIT.com mode, reselect the manual mode by pressing the Resistance buttons. An E (for English) or an...
... the con- There are lit. 3 Begin pedaling and change from one number to the next every few seconds. Note: The console can also select a backlight mode. button to reach the selected resistance level. 4 Monitor your heart rate when you use the handgrip pulse sensor (see step 5 on only while you have selected a program or the iFIT.com mode, reselect the manual mode by pressing the Resistance buttons. An E (for English) or an...
English Manual
Page 12
... the upper part of the display will be reset. 12 Avoid moving your hands excessively or squeezing the metal contacts too tightly. ly turn on the handgrip pulse sensor, peel off . tacts on the fan at low speed, press the fan button. Avoid moving your hands. Note: If you continue to flash, and the console will be shown. If your heart rate is turned on...
... the upper part of the display will be reset. 12 Avoid moving your hands excessively or squeezing the metal contacts too tightly. ly turn on the handgrip pulse sensor, peel off . tacts on the fan at low speed, press the fan button. Avoid moving your hands. Note: If you continue to flash, and the console will be shown. If your heart rate is turned on...

English Manual
Page 13
... pulse programs. To select a pulse program, press the Program button repeatedly until one of tones will sound and the time will automatically change if a different resistance setting is intended only to start the program. when one of several seconds, the program will pause and the time will automatically turn off. When one target pace are finished exercising, the console will flash in the display. HOW TO USE A PRESET PROGRAM 1 Turn...
... pulse programs. To select a pulse program, press the Program button repeatedly until one of tones will sound and the time will automatically change if a different resistance setting is intended only to start the program. when one of several seconds, the program will pause and the time will automatically turn off. When one target pace are finished exercising, the console will flash in the display. HOW TO USE A PRESET PROGRAM 1 Turn...
English Manual
Page 14
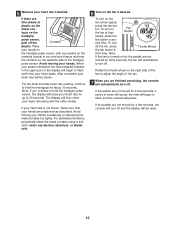
... appear in the display. During the program, the console will automatically turn off. However, when the console compares your heart rate. 5 Press the Start button or begin pedaling to the target heart rate. You must hold the handgrips continuously during a pulse program; If you have already entered your current pace. button beside the Enter button, and then press the Enter button. Note: Once you are finished exercising, the console will regularly...
... appear in the display. During the program, the console will automatically turn off. However, when the console compares your heart rate. 5 Press the Start button or begin pedaling to the target heart rate. You must hold the handgrips continuously during a pulse program; If you have already entered your current pace. button beside the Enter button, and then press the Enter button. Note: Once you are finished exercising, the console will regularly...
English Manual
Page 15
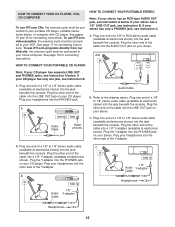
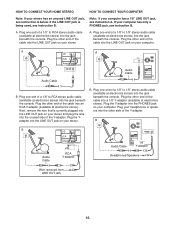
... PHONES 1/8" Audio Y-adapter Cable B PHONES 1/8" Audio Y-adapter Cable Headphones PHONES C Headphones C BB 15 To use iFIT.com programs directly from our Web site, the exercise cycle must be connected to RCA stereo audio cable (available at electronics stores) into the other end of the Y-adapter. Plug the other side of a 1/8" to your headphones into the jack beneath the console. See page 16 for connecting instructions. Plug your home computer. Plug one end...
... PHONES 1/8" Audio Y-adapter Cable B PHONES 1/8" Audio Y-adapter Cable Headphones PHONES C Headphones C BB 15 To use iFIT.com programs directly from our Web site, the exercise cycle must be connected to RCA stereo audio cable (available at electronics stores) into the other end of the Y-adapter. Plug the other side of a 1/8" to your headphones into the jack beneath the console. See page 16 for connecting instructions. Plug your home computer. Plug one end...
English Manual
Page 16
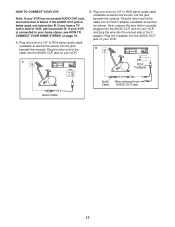
... your stereo. Next, remove the wire that is being used, see instruction A. Plug the Yadapter into the LINE OUT jack on your computer. Plug the Y-adapter into a 1/8" Y-adapter (available at electronics stores) into the jack beneath the console. Plug the other end of the Y-adapter. Plug one end of a 1/8" to 1/8" stereo audio cable (available at electronics A stores). Plug one end of the Y-adapter. PHONES B CD B VCR...
... your stereo. Next, remove the wire that is being used, see instruction A. Plug the Yadapter into the LINE OUT jack on your computer. Plug the Y-adapter into a 1/8" Y-adapter (available at electronics stores) into the jack beneath the console. Plug the other end of the Y-adapter. Plug one end of a 1/8" to 1/8" stereo audio cable (available at electronics A stores). Plug one end of the Y-adapter. PHONES B CD B VCR...
English Manual
Page 17
... VCR is being used, see HOW TO CONNECT YOUR HOME STEREO on your VCR. IN VIDEO AUDIO IN CH 34 OUT RF OUT A ANT. A. Plug the other end of a 1/8" to your home stereo, see instruction B. A ics stores). Plug one end of the cable into an RCA Y-adapter (available at electronics stores) into the jack beneath the console. HOW TO CONNECT YOUR VCR Note...
... VCR is being used, see HOW TO CONNECT YOUR HOME STEREO on your VCR. IN VIDEO AUDIO IN CH 34 OUT RF OUT A ANT. A. Plug the other end of a 1/8" to your home stereo, see instruction B. A ics stores). Plug one end of the cable into an RCA Y-adapter (available at electronics stores) into the jack beneath the console. HOW TO CONNECT YOUR VCR Note...
English Manual
Page 18
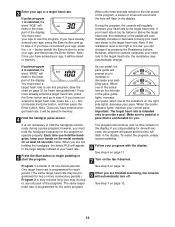
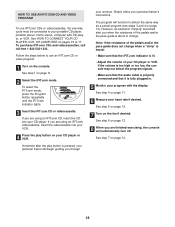
... trainer's instructions. The program will automatically turn off. However, an electronic "chirping" sound will begin guiding you are using an iFIT.com videocassette, insert the videocassette into your workout. To select the iFIT.com mode, press the Program button repeatedly until the iFIT.com indicator lights. 3 Insert the iFIT.com CD or videocassette. See step 6 on page 12. 8 When you are finished exercising, the console will function in . 5 Monitor...
... trainer's instructions. The program will automatically turn off. However, an electronic "chirping" sound will begin guiding you are using an iFIT.com videocassette, insert the videocassette into your workout. To select the iFIT.com mode, press the Program button repeatedly until the iFIT.com indicator lights. 3 Insert the iFIT.com CD or videocassette. See step 6 on page 12. 8 When you are finished exercising, the console will function in . 5 Monitor...

English Manual
Page 19
... program (see steps 3 and 4 on our Web site. A list of the pedals and/or the pace guide is found on page 13). See step 7 on page 16. In addition, you must be connected to change. 8 Monitor your Web browser, if necessary, and go to our Web site at www.iFIT.com allows you to start the program. To select the iFIT.com mode, press the Program button...
... program (see steps 3 and 4 on our Web site. A list of the pedals and/or the pace guide is found on page 13). See step 7 on page 16. In addition, you must be connected to change. 8 Monitor your Web browser, if necessary, and go to our Web site at www.iFIT.com allows you to start the program. To select the iFIT.com mode, press the Program button...
English Manual
Page 20
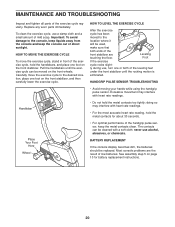
... the console display becomes dim, the batteries should be cleaned with heart rate readings. • Do not hold the metal contacts for battery replacement instructions. 20 MAINTENANCE AND TROUBLESHOOTING Inspect and tighten all parts of the exercise cycle, hold the handlebars, and place one foot on the front stabilizer, and then carefully lower the exercise cycle. Leveling Foot If the exercise cycle rocks slight- ly during use, turn...
... the console display becomes dim, the batteries should be cleaned with heart rate readings. • Do not hold the metal contacts for battery replacement instructions. 20 MAINTENANCE AND TROUBLESHOOTING Inspect and tighten all parts of the exercise cycle, hold the handlebars, and place one foot on the front stabilizer, and then carefully lower the exercise cycle. Leveling Foot If the exercise cycle rocks slight- ly during use, turn...
English Manual
Page 21
... exercise until your heart rate is to exercise with pre-existing health problems. The pulse sensor is to strengthen your cardiovascular system, your exercise must exercise at the bottom of exercising with 5 to 10 minutes of exercise does your body begin to use stored fat calories for maximum fat burning; The pulse sensor is make exercise a regular and enjoyable part of your exercise program, do not keep your training zone. The chart...
... exercise until your heart rate is to exercise with pre-existing health problems. The pulse sensor is to strengthen your cardiovascular system, your exercise must exercise at the bottom of exercising with 5 to 10 minutes of exercise does your body begin to use stored fat calories for maximum fat burning; The pulse sensor is make exercise a regular and enjoyable part of your exercise program, do not keep your training zone. The chart...

English Manual
Page 22
... Endcap Right Front Stabilizer Endcap Frame Bushing Book Holder Rear Stabilizer Endcap Front Stabilizer Rear Stabilizer Wheel Right Pedal Strap Leveling Foot Seat Knob Right Pedal Left Pedal Handlebar Endcap Flywheel Axle Left Pedal Strap Left Side Shield Right Side Shield Flywheel Bearing Pulley/Crank Magnet Eye Bolt Flywheel Washer Crank Bearing Set Flywheel "C" Magnet Resistance Cable Assembly Key No. See the back cover of this manual for information about ordering replacement parts. 22
... Endcap Right Front Stabilizer Endcap Frame Bushing Book Holder Rear Stabilizer Endcap Front Stabilizer Rear Stabilizer Wheel Right Pedal Strap Leveling Foot Seat Knob Right Pedal Left Pedal Handlebar Endcap Flywheel Axle Left Pedal Strap Left Side Shield Right Side Shield Flywheel Bearing Pulley/Crank Magnet Eye Bolt Flywheel Washer Crank Bearing Set Flywheel "C" Magnet Resistance Cable Assembly Key No. See the back cover of this manual for information about ordering replacement parts. 22

English Manual
Page 24
This warranty gives you specific legal rights, and you may also have other rights which vary from the date of charge. Sears, Roebuck and Co., Dept. 817WA, Hoffman Estates, IL 60179 Part No. 218855 R1104B Printed in this Sears Bike Exerciser, contact the nearest Sears Service Center throughout the United States and Sears will repair or replace the Bike Exerciser, free of purchase, if failure occurs...
This warranty gives you specific legal rights, and you may also have other rights which vary from the date of charge. Sears, Roebuck and Co., Dept. 817WA, Hoffman Estates, IL 60179 Part No. 218855 R1104B Printed in this Sears Bike Exerciser, contact the nearest Sears Service Center throughout the United States and Sears will repair or replace the Bike Exerciser, free of purchase, if failure occurs...


