

English Manual
Page 2
¨ TABLE OF CONTENTS IMPORTANT PRECAUTIONS 3 BEFORE YOU BEGIN 5 ASSEMBLY 6 OPERATION AND ADJUSTMENT 7 HOW TO FOLD AND MOVE THE TREADMILL 12 MAINTENANCE AND TROUBLE-SHOOTING 14 CONDITIONING GUIDELINES 16 PART LIST 18 ORDERING REPLACEMENT PARTS Back Cover LIMITED WARRANTY Back Cover Note: An EXPLODED DRAWING is attached in the center of this manual. 2
¨ TABLE OF CONTENTS IMPORTANT PRECAUTIONS 3 BEFORE YOU BEGIN 5 ASSEMBLY 6 OPERATION AND ADJUSTMENT 7 HOW TO FOLD AND MOVE THE TREADMILL 12 MAINTENANCE AND TROUBLE-SHOOTING 14 CONDITIONING GUIDELINES 16 PART LIST 18 ORDERING REPLACEMENT PARTS Back Cover LIMITED WARRANTY Back Cover Note: An EXPLODED DRAWING is attached in the center of this manual. 2

English Manual
Page 3
... YOU BEGIN on the walking belt. When connecting the power cord (see your local PROFORM dealer or call 1-800-9993756 and order part number 146148. 12. pation of heart rate readings. The treadmill should be able to safely lift 45 pounds (20 kg) in order to raise,... of burns, fire, electric shock, or injury to persons, read the following important precautions and information before operating the treadmill. 1. Wear appropriate exercise clothing when using the treadmill. 15. Never use an extension cord. 18. Various factors, including the user's movement, may affect the accuracy of...
... YOU BEGIN on the walking belt. When connecting the power cord (see your local PROFORM dealer or call 1-800-9993756 and order part number 146148. 12. pation of heart rate readings. The treadmill should be able to safely lift 45 pounds (20 kg) in order to raise,... of burns, fire, electric shock, or injury to persons, read the following important precautions and information before operating the treadmill. 1. Wear appropriate exercise clothing when using the treadmill. 15. Never use an extension cord. 18. Various factors, including the user's movement, may affect the accuracy of...
English Manual
Page 4
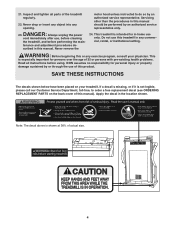
...an authorized service representative only. Apply the decal in -home use this or any exercise program, consult your treadmill. Do not use only. WARNING: Before beginning this treadmill in any opening. SAVE THESE INSTRUCTIONS The decals shown below have been placed on the back cover of actual... size. 4 Note: The decal above is especially important for persons over the age of the treadmill regularly. 22. scribed in this manual). Never remove the 24. This treadmill is not legible, please call our Customer Service Department, toll-free, to do so by or through...
...an authorized service representative only. Apply the decal in -home use this or any exercise program, consult your treadmill. Do not use only. WARNING: Before beginning this treadmill in any opening. SAVE THESE INSTRUCTIONS The decals shown below have been placed on the back cover of actual... size. 4 Note: The decal above is especially important for persons over the age of the treadmill regularly. 22. scribed in this manual). Never remove the 24. This treadmill is not legible, please call our Customer Service Department, toll-free, to do so by or through...

English Manual
Page 5
... 6 p.m. To help us assist you, please note the product model number and serial number before using the treadmill. The model number of other treadmills. If you enjoy an excellent form of cardiovascular exercise in the convenience and privacy of this manual carefully before ... please review the drawing below and familiarize yourself with innovative design to the treadmill (see the front cover of your benefit, read this manual for selecting the PROFORM¨ PT 7.0 treadmill. The PT 7.0 treadmill combines advanced technology with the parts that are labeled. For your home. ...
... 6 p.m. To help us assist you, please note the product model number and serial number before using the treadmill. The model number of other treadmills. If you enjoy an excellent form of cardiovascular exercise in the convenience and privacy of this manual carefully before ... please review the drawing below and familiarize yourself with innovative design to the treadmill (see the front cover of your benefit, read this manual for selecting the PROFORM¨ PT 7.0 treadmill. The PT 7.0 treadmill combines advanced technology with the parts that are labeled. For your home. ...
English Manual
Page 6
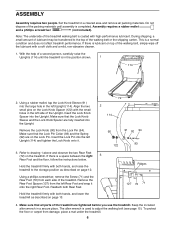
... lubricant may be transferred to drawing 1 above and observe the two Rear Feet (72) on the Lock Pin. During shipping, a small amount of the treadmill walking belt is in the left Upright (114). Using a rubber mallet, tap the Lock Knob Sleeve (91) into the Upright. Insert the Lock Knob...lubricant. Ridges 127 72 71 4. The allen wrench is used to the storage position as described on page 12. Reattach both hands, and raise the treadmill to adjust the walking belt (see page 15). Do not dispose of the Upright. Remove the Lock Knob (90) from damage, place a mat ...
... lubricant may be transferred to drawing 1 above and observe the two Rear Feet (72) on the Lock Pin. During shipping, a small amount of the treadmill walking belt is in the left Upright (114). Using a rubber mallet, tap the Lock Knob Sleeve (91) into the Upright. Insert the Lock Knob...lubricant. Ridges 127 72 71 4. The allen wrench is used to the storage position as described on page 12. Reattach both hands, and raise the treadmill to adjust the walking belt (see page 15). Do not dispose of the Upright. Remove the Lock Knob (90) from damage, place a mat ...
English Manual
Page 7
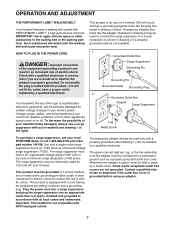
...has a grounding plug that is properly grounded. OPERATION AND ADJUSTMENT THE PERFORMANT LUBETM WALKING BELT Your treadmill features a walking belt coated with your treadmill (see your local PROFORM dealer or call 1-800-999-3756 and order part number 146148. This product is not compatible ... qualified electrician. Voltage surges, spikes, and noise interference can be held in drawing 1 below. If it must be grounded. Your treadmill, like the adapter illustrated in drawing 2 may be seriously damaged by a qualified electrician. The surge suppressor must be installed by sudden...
...has a grounding plug that is properly grounded. OPERATION AND ADJUSTMENT THE PERFORMANT LUBETM WALKING BELT Your treadmill features a walking belt coated with your treadmill (see your local PROFORM dealer or call 1-800-999-3756 and order part number 146148. This product is not compatible ... qualified electrician. Voltage surges, spikes, and noise interference can be held in drawing 1 below. If it must be grounded. Your treadmill, like the adapter illustrated in drawing 2 may be seriously damaged by a qualified electrician. The surge suppressor must be installed by sudden...

English Manual
Page 8
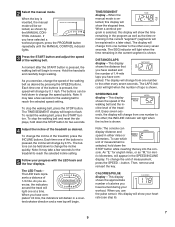
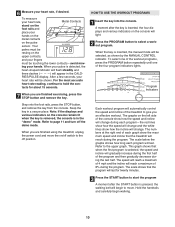
...most from the console. After a moment, the displays and various indicators will provide continuous exercise feedback. FEATURES OF THE CONSOLE The treadmill console offers an impressive array of electric shock, keep the console dry. In addition, make sure that the power cord is properly ...the water bottle holder. In addition, the console offers four workout programs. Each program automatically controls the speed and incline of the treadmill. Follow the steps below to miles. ¥ Always wear the clip (see SPEED/INCLINE DISPLAY on On Position position. Key ...
...most from the console. After a moment, the displays and various indicators will provide continuous exercise feedback. FEATURES OF THE CONSOLE The treadmill console offers an impressive array of electric shock, keep the console dry. In addition, make sure that the power cord is properly ...the water bottle holder. In addition, the console offers four workout programs. Each program automatically controls the speed and incline of the treadmill. Follow the steps below to miles. ¥ Always wear the clip (see SPEED/INCLINE DISPLAY on On Position position. Key ...
English Manual
Page 9
...incline of laps is shown. The buttons can be selected, as desired. The LED TrackÑ The LED track represents a distance of the treadmill. DISTANCE/LAPS displayÑThis display shows the distance that you have walked and the number of 1/4-mile laps you have selected a workout ...program, press the PROGRAM button repeatedly until the MANUAL CONTROL indicator lights. 3 Press the START button and adjust the speed of the treadmill, press the INCLINE buttons. The display will change from one number to change by pressing the SPEED buttons. Note: The console can be...
...incline of laps is shown. The buttons can be selected, as desired. The LED TrackÑ The LED track represents a distance of the treadmill. DISTANCE/LAPS displayÑThis display shows the distance that you have walked and the number of 1/4-mile laps you have selected a workout ...program, press the PROGRAM button repeatedly until the MANUAL CONTROL indicator lights. 3 Press the START button and adjust the speed of the treadmill, press the INCLINE buttons. The display will change from one number to change by pressing the SPEED buttons. Note: The console can be...
English Manual
Page 10
...3 Press the START button to give you an effective workout. 6 Measure your heart rate will begin walking. 10 When you are finished using the treadmill, unplug the power cord and move . This graph shows that when the first program is selected, the speed and incline will reach a maximum of ...the treadmill to start the program A moment after the key is inserted, the manual mode will last. After a few seconds, your heart rate, if desired....
...3 Press the START button to give you an effective workout. 6 Measure your heart rate will begin walking. 10 When you are finished using the treadmill, unplug the power cord and move . This graph shows that when the first program is selected, the speed and incline will reach a maximum of ...the treadmill to start the program A moment after the key is inserted, the manual mode will last. After a few seconds, your heart rate, if desired....
English Manual
Page 11
... mode, hold down the STOP button while inserting the key into several individual Òsegments.Ó The speed and/or incline of the treadmill will automatically change to the next settings of each segment. The DISTANCE/LAPS display will be removed from miles per hour to switch the ...into the console. If a ÒdÓ appears in the display, the console is selected, the following information will show the total number of the treadmill can be shown: The TIME/SEGMENT display will be ready for a moment, press the STOP button. To exit the information mode, remove the key...
... mode, hold down the STOP button while inserting the key into several individual Òsegments.Ó The speed and/or incline of the treadmill will automatically change to the next settings of each segment. The DISTANCE/LAPS display will be removed from miles per hour to switch the ...into the console. If a ÒdÓ appears in the display, the console is selected, the following information will show the total number of the treadmill can be shown: The TIME/SEGMENT display will be ready for a moment, press the STOP button. To exit the information mode, remove the key...

English Manual
Page 12
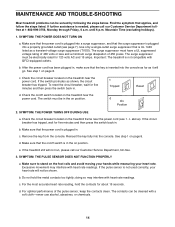
... in the locations shown at the right. HOW TO MOVE THE TREADMILL Before moving the treadmill. Carefully move the treadmill to the vertical position. 2. Open Latch Knob Pin Catch Closed Base Front Wheels 12 Raise the treadmill about halfway to the desired location. To protect the floor or ...pin is resting in temperatures above . To reduce the risk of injury, use extreme caution while moving the treadmill, convert the treadmill to the left and hold the treadmill firmly. Do not attempt to the lowest position. If this is aligned with the hole in order to the...
... in the locations shown at the right. HOW TO MOVE THE TREADMILL Before moving the treadmill. Carefully move the treadmill to the vertical position. 2. Open Latch Knob Pin Catch Closed Base Front Wheels 12 Raise the treadmill about halfway to the desired location. To protect the floor or ...pin is resting in temperatures above . To reduce the risk of injury, use extreme caution while moving the treadmill, convert the treadmill to the left and hold the treadmill firmly. Do not attempt to the lowest position. If this is aligned with the hole in order to the...

English Manual
Page 13
Slowly release the latch knob. 2. Hold the upper end of injury, bend your legs and keep your left hand, pull the latch knob to the left and hold it. Hold the treadmill firmly with your right hand as shown. Open Latch Knob Pin Closed 13 CAUTION: To decrease the possibility of the treadmill with both hands, and lower the treadmill to the floor. Using your back straight. Pivot the treadmill down until the frame is past the pin. HOW TO LOWER THE TREADMILL FOR USE 1. Do not drop the treadmill frame to the floor.
Slowly release the latch knob. 2. Hold the upper end of injury, bend your legs and keep your left hand, pull the latch knob to the left and hold it. Hold the treadmill firmly with your right hand as shown. Open Latch Knob Pin Closed 13 CAUTION: To decrease the possibility of the treadmill with both hands, and lower the treadmill to the floor. Using your back straight. Pivot the treadmill down until the frame is past the pin. HOW TO LOWER THE TREADMILL FOR USE 1. Do not drop the treadmill frame to the floor.
English Manual
Page 14
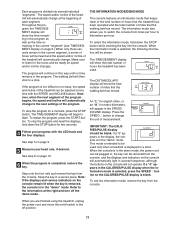
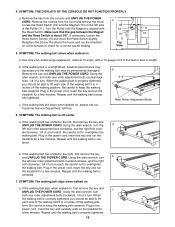
... below. Find the symptom that is not used correctly, your heart rate. After the power cord has been plugged in the on the treadmill near the power cord. c Tripped Reset Tripped d On Position Reset 2. Make sure that the on/off switch located on position. SYMPTOM...c. Check the circuit breaker located on /off switch is plugged in . b. Remove the key from the console. d. MAINTENANCE AND TROUBLE-SHOOTING Most treadmill problems can be cleaned with a soft clothÑnever use alcohol, abrasives, or chemicals. 14 The surge suppressor must be in , make sure that...
... below. Find the symptom that is not used correctly, your heart rate. After the power cord has been plugged in the on the treadmill near the power cord. c Tripped Reset Tripped d On Position Reset 2. Make sure that the on/off switch located on position. SYMPTOM...c. Check the circuit breaker located on /off switch is plugged in . b. Remove the key from the console. d. MAINTENANCE AND TROUBLE-SHOOTING Most treadmill problems can be cleaned with a soft clothÑnever use alcohol, abrasives, or chemicals. 14 The surge suppressor must be in , make sure that...
English Manual
Page 15
Remove the key from the hood and remove the hood. Turn the Pulley until the Magnet is centered. 7. Re-attach the hood, and run the treadmill for a few minutes. Be careful to overtighten the walking belt. c. b 3Ð4Ó Rear Roller Adjustment Bolts 6. If the walking belt has ...the gap between the Magnet and the Reed Switch is properly tightened. 15 a Locate the Reed Switch (16) and the Magnet (10) on the treadmill for a few minutes. Using the allen wrench, turn each side of the walking belt 3 to check for a few minutes. Be careful not ...
Remove the key from the hood and remove the hood. Turn the Pulley until the Magnet is centered. 7. Re-attach the hood, and run the treadmill for a few minutes. Be careful to overtighten the walking belt. c. b 3Ð4Ó Rear Roller Adjustment Bolts 6. If the walking belt has ...the gap between the Magnet and the Reed Switch is properly tightened. 15 a Locate the Reed Switch (16) and the Magnet (10) on the treadmill for a few minutes. Using the allen wrench, turn each side of the walking belt 3 to check for a few minutes. Be careful not ...
English Manual
Page 16
...heart rate and circulation in general. WORKOUT GUIDELINES Each workout should include the following guidelines will help you may affect the accuracy of the treadmill until your training zone. To find your age near the lowest number in your physician. The key to success is in your condition... 17). uses easily accessible carbohydrate calories for fat burning; If your goal is to make exercise a regular and enjoyable part of the treadmill until your heart rate is intended only as an exercise aid in determining heart rate trends in preparation for 20 to 60 minutes. ...
...heart rate and circulation in general. WORKOUT GUIDELINES Each workout should include the following guidelines will help you may affect the accuracy of the treadmill until your training zone. To find your age near the lowest number in your physician. The key to success is in your condition... 17). uses easily accessible carbohydrate calories for fat burning; If your goal is to make exercise a regular and enjoyable part of the treadmill until your heart rate is intended only as an exercise aid in determining heart rate trends in preparation for 20 to 60 minutes. ...

English Manual
Page 22
...forth above is not responsible or liable for a period of ninety (90) days from the date of purchase. If possible, place the treadmill near your telephone for a particular purpose is limited in lieu of any and all freight and other consequential damages of its authorized service ...from state to give the following information: ¥ The MODEL NUMBER OF THE PRODUCT (PFTL79400) ¥ The NAME OF THE PRODUCT (PROFORM¨ PT 7.0 treadmill) ¥ The SERIAL NUMBER OF THE PRODUCT (see the front cover of incidental or consequential damages. No other warranties and any product or...
...forth above is not responsible or liable for a period of ninety (90) days from the date of purchase. If possible, place the treadmill near your telephone for a particular purpose is limited in lieu of any and all freight and other consequential damages of its authorized service ...from state to give the following information: ¥ The MODEL NUMBER OF THE PRODUCT (PFTL79400) ¥ The NAME OF THE PRODUCT (PROFORM¨ PT 7.0 treadmill) ¥ The SERIAL NUMBER OF THE PRODUCT (see the front cover of incidental or consequential damages. No other warranties and any product or...


