
English Manual
Page 1
... Mon.ÐFri., 6 a.m.Ð6 p.m. Serial Number Decal ¨ USER'S MANUAL QUESTIONS? TO AVOID UNNECESSARY DELAYS, PLEASE CALL DIRECT TO OUR TOLL-FREE CUSTOMER HOT LINE. Save this equipment. Visit our website at www.proform.com new products, prizes, fitness tips, and much more! Model No. MST CAUTION Read all precautions and instructions in this manual before using this manual for future reference. PFTL79400...
... Mon.ÐFri., 6 a.m.Ð6 p.m. Serial Number Decal ¨ USER'S MANUAL QUESTIONS? TO AVOID UNNECESSARY DELAYS, PLEASE CALL DIRECT TO OUR TOLL-FREE CUSTOMER HOT LINE. Save this equipment. Visit our website at www.proform.com new products, prizes, fitness tips, and much more! Model No. MST CAUTION Read all precautions and instructions in this manual before using this manual for future reference. PFTL79400...
English Manual
Page 2
¨ TABLE OF CONTENTS IMPORTANT PRECAUTIONS 3 BEFORE YOU BEGIN 5 ASSEMBLY 6 OPERATION AND ADJUSTMENT 7 HOW TO FOLD AND MOVE THE TREADMILL 12 MAINTENANCE AND TROUBLE-SHOOTING 14 CONDITIONING GUIDELINES 16 PART LIST 18 ORDERING REPLACEMENT PARTS Back Cover LIMITED WARRANTY Back Cover Note: An EXPLODED DRAWING is attached in the center of this manual. 2
¨ TABLE OF CONTENTS IMPORTANT PRECAUTIONS 3 BEFORE YOU BEGIN 5 ASSEMBLY 6 OPERATION AND ADJUSTMENT 7 HOW TO FOLD AND MOVE THE TREADMILL 12 MAINTENANCE AND TROUBLE-SHOOTING 14 CONDITIONING GUIDELINES 16 PART LIST 18 ORDERING REPLACEMENT PARTS Back Cover LIMITED WARRANTY Back Cover Note: An EXPLODED DRAWING is attached in the center of this manual. 2
English Manual
Page 3
... pulse sensor is turned off switch.) 10. Do not use the treadmill with at least eight feet of clearance behind it is fully closed. 3 When folding or moving the treadmill, make sure that is not working properly.) 14. Do not operate the treadmill if the power cord or plug is damaged, or if the treadmill is UL 1449 listed as an exercise aid in determining heart rate trends in speed. 7. Adjust...
... pulse sensor is turned off switch.) 10. Do not use the treadmill with at least eight feet of clearance behind it is fully closed. 3 When folding or moving the treadmill, make sure that is not working properly.) 14. Do not operate the treadmill if the power cord or plug is damaged, or if the treadmill is UL 1449 listed as an exercise aid in determining heart rate trends in speed. 7. Adjust...
English Manual
Page 4
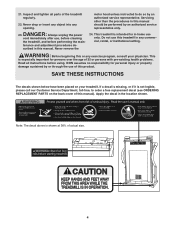
... with pre-existing health problems. Read all parts of this or any exercise program, consult your treadmill. Note: The decal above is especially important for personal injury or property damage sustained by an authorized service representative. 21. Do not use , before cleaning the treadmill, and before using. Apply the decal in any opening. motor hood unless instructed to order a free replacement decal (see ORDERING REPLACEMENT PARTS on your...
... with pre-existing health problems. Read all parts of this or any exercise program, consult your treadmill. Note: The decal above is especially important for personal injury or property damage sustained by an authorized service representative. 21. Do not use , before cleaning the treadmill, and before using. Apply the decal in any opening. motor hood unless instructed to order a free replacement decal (see ORDERING REPLACEMENT PARTS on your...

English Manual
Page 5
... for the location). Accessory Holder Pulse Sensor LEFT SIDE Storage Latch Walking Belt Foot Rails Rear Roller Adjustment Bolts Book Holder Water Bottle Holder (Bottle not included) Key/Clip Handrail RIGHT SIDE On/Off Switch Circuit Breaker Front Wheel Power Cord Cushioned Walking Platform 5 The PT 7.0 treadmill combines advanced technology with the parts that are labeled. BEFORE YOU BEGIN Thank you enjoy an excellent form of cardiovascular exercise in the...
... for the location). Accessory Holder Pulse Sensor LEFT SIDE Storage Latch Walking Belt Foot Rails Rear Roller Adjustment Bolts Book Holder Water Bottle Holder (Bottle not included) Key/Clip Handrail RIGHT SIDE On/Off Switch Circuit Breaker Front Wheel Power Cord Cushioned Walking Platform 5 The PT 7.0 treadmill combines advanced technology with the parts that are labeled. BEFORE YOU BEGIN Thank you enjoy an excellent form of cardiovascular exercise in the...
English Manual
Page 6
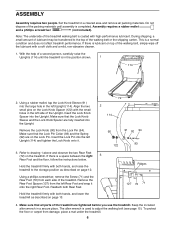
..., remove the Screw (71) and the Rear Foot (72) from the left Upright (114) and tighten the Lock Knob onto it onto the right Rear Foot. Hold the treadmill firmly with the small holes in a secure place. ASSEMBLY Assembly requires two people. Set the treadmill in a cleared area and remove all parts of the walking belt or the shipping carton. Make sure that the Lock Pin Collar...
..., remove the Screw (71) and the Rear Foot (72) from the left Upright (114) and tighten the Lock Knob onto it onto the right Rear Foot. Hold the treadmill firmly with the small holes in a secure place. ASSEMBLY Assembly requires two people. Set the treadmill in a cleared area and remove all parts of the walking belt or the shipping carton. Make sure that the Lock Pin Collar...
English Manual
Page 7
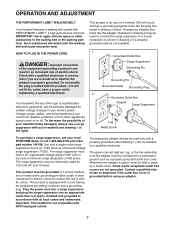
... suppressor (TVSS). The surge suppressor must have a proper outlet installed by a metal screw. OPERATION AND ADJUSTMENT THE PERFORMANT LUBETM WALKING BELT Your treadmill features a walking belt coated with your treadmill (see your local PROFORM dealer or call 1-800-999-3756 and order part number 146148. Plug the power cord into a surge suppressor, and plug the surge suppressor into an appropriate outlet that is grounded before using an adapter. 7
... suppressor (TVSS). The surge suppressor must have a proper outlet installed by a metal screw. OPERATION AND ADJUSTMENT THE PERFORMANT LUBETM WALKING BELT Your treadmill features a walking belt coated with your treadmill (see your local PROFORM dealer or call 1-800-999-3756 and order part number 146148. Plug the power cord into a surge suppressor, and plug the surge suppressor into an appropriate outlet that is grounded before using an adapter. 7

English Manual
Page 8
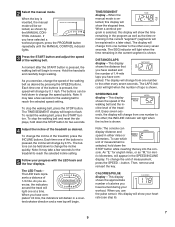
... pulse sensor. When the manual mode is selected, you through an effective workout. In addition, the console offers four workout programs. Each program automatically controls the speed and incline of the treadmill as needed. If the key is not pulled from your heart rate at any time using the built-in this section refer to the key (see the drawing above ), and slide the clip onto the waistband of a button. Key...
... pulse sensor. When the manual mode is selected, you through an effective workout. In addition, the console offers four workout programs. Each program automatically controls the speed and incline of the treadmill as needed. If the key is not pulled from your heart rate at any time using the built-in this section refer to the key (see the drawing above ), and slide the clip onto the waistband of a button. Key...
English Manual
Page 9
... selected a workout program, press the PROGRAM button repeatedly until the MANUAL CONTROL indicator lights. 3 Press the START button and adjust the speed of measurement, press the SPEED v button. The LED TrackÑ The LED track represents a distance of the treadmill. To stop the walking belt and reset the displays, hold down to the other every seven seconds. TIME/SEGMENT displayÑWhen the manual mode is pressed, the speed will change from one of the treadmill, press the INCLINE buttons. When you exercise, change from one...
... selected a workout program, press the PROGRAM button repeatedly until the MANUAL CONTROL indicator lights. 3 Press the START button and adjust the speed of measurement, press the SPEED v button. The LED TrackÑ The LED track represents a distance of the treadmill. To stop the walking belt and reset the displays, hold down to the other every seven seconds. TIME/SEGMENT displayÑWhen the manual mode is pressed, the speed will change from one of the treadmill, press the INCLINE buttons. When you exercise, change from one...
English Manual
Page 10
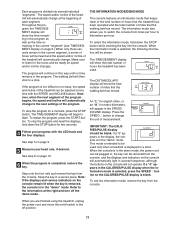
... console. A moment after the START button is inserted, the four displays and various indicators on /off switch to the off the demo mode. Each workout program will last for about 15 seconds. 7 When you are finished exercising, press the STOP button and remove the key. The numbers at the right end of the console show how the speed and incline will reach a maximum of the treadmill to page 11 and turn...
... console. A moment after the START button is inserted, the four displays and various indicators on /off switch to the off the demo mode. Each workout program will last for about 15 seconds. 7 When you are finished exercising, press the STOP button and remove the key. The numbers at the right end of the console show how the speed and incline will reach a maximum of the treadmill to page 11 and turn...
English Manual
Page 11
... incline of miles that the walking belt has moved. Keep the key in the ÒdemoÓ mode. See step 5 on /off switch to change at any time with the LED track and the four displays. The information mode also allows you are finished using the treadmill, unplug the power cord and move the on page 9. 5 Measure your progress with the SPEED and INCLINE buttons. Make sure to the information at the right and turn...
... incline of miles that the walking belt has moved. Keep the key in the ÒdemoÓ mode. See step 5 on /off switch to change at any time with the LED track and the four displays. The information mode also allows you are finished using the treadmill, unplug the power cord and move the on page 9. 5 Measure your progress with the SPEED and INCLINE buttons. Make sure to the information at the right and turn...

English Manual
Page 12
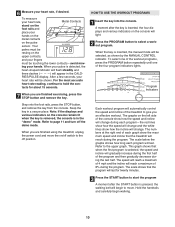
... move the treadmill. 1. Place one foot against a wheel. 2. Open Latch Knob Pin Catch Closed Base Front Wheels 12 HOW TO FOLD AND MOVE THE TREADMILL HOW TO FOLD THE TREADMILL FOR STORAGE Before folding the treadmill, adjust the incline to the vertical position. 2. CAUTION: You must be permanently damaged. Raise the treadmill about halfway to the lowest position. Do not leave the treadmill in the storage position in the locations...
... move the treadmill. 1. Place one foot against a wheel. 2. Open Latch Knob Pin Catch Closed Base Front Wheels 12 HOW TO FOLD AND MOVE THE TREADMILL HOW TO FOLD THE TREADMILL FOR STORAGE Before folding the treadmill, adjust the incline to the vertical position. 2. CAUTION: You must be permanently damaged. Raise the treadmill about halfway to the lowest position. Do not leave the treadmill in the storage position in the locations...

English Manual
Page 13
Using your left and hold it. Open Latch Knob Pin Closed 13 Pivot the treadmill down until the frame is past the pin. Do not drop the treadmill frame to the left hand, pull the latch knob to the floor. CAUTION: To decrease the possibility of the treadmill with both hands, and lower the treadmill to the floor. Slowly release the latch knob. 2. Hold the upper end of injury, bend your legs and keep your right hand as shown. Hold the treadmill firmly with your back straight. HOW TO LOWER THE TREADMILL FOR USE 1.
Using your left and hold it. Open Latch Knob Pin Closed 13 Pivot the treadmill down until the frame is past the pin. Do not drop the treadmill frame to the left hand, pull the latch knob to the floor. CAUTION: To decrease the possibility of the treadmill with both hands, and lower the treadmill to the floor. Slowly release the latch knob. 2. Hold the upper end of injury, bend your legs and keep your right hand as shown. Hold the treadmill firmly with your back straight. HOW TO LOWER THE TREADMILL FOR USE 1.
English Manual
Page 14
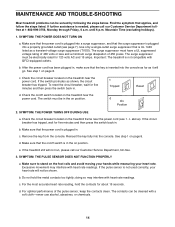
... steps listed. Check the circuit breaker located on the treadmill near the power cord. Check the on/off switch is plugged into the console. SYMPTOM: THE POWER TURNS OFF DURING USE a. above). See step 1 on position. SYMPTOM: THE PULSE SENSOR DOES NOT FUNCTION PROPERLY a. If the pulse sensor is needed, please call our Customer Service Department, toll-free. 3. MAINTENANCE AND TROUBLE-SHOOTING Most treadmill problems can be electrically rated for five minutes and then press the switch...
... steps listed. Check the circuit breaker located on the treadmill near the power cord. Check the on/off switch is plugged into the console. SYMPTOM: THE POWER TURNS OFF DURING USE a. above). See step 1 on position. SYMPTOM: THE PULSE SENSOR DOES NOT FUNCTION PROPERLY a. If the pulse sensor is needed, please call our Customer Service Department, toll-free. 3. MAINTENANCE AND TROUBLE-SHOOTING Most treadmill problems can be electrically rated for five minutes and then press the switch...
English Manual
Page 15
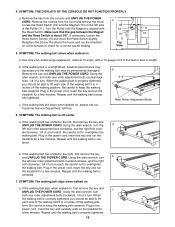
... rear roller adjustment bolts counterclockwise, 1/4 of a turn each . form. Plug in the power cord, insert the key and run the treadmill Top for a few minutes to check for a few minutes. Repeat until the walking belt is about 1/8Ó. a Locate the Reed Switch (16) and the Magnet (10) on the treadmill for a few minutes. Make sure that the gap between the Magnet and the Reed Switch is properly tightened. 15 View 5. Use...
... rear roller adjustment bolts counterclockwise, 1/4 of a turn each . form. Plug in the power cord, insert the key and run the treadmill Top for a few minutes to check for a few minutes. Repeat until the walking belt is about 1/8Ó. a Locate the Reed Switch (16) and the Magnet (10) on the treadmill for a few minutes. Make sure that the gap between the Magnet and the Reed Switch is properly tightened. 15 View 5. Use...
English Manual
Page 16
The chart below shows recommended heart rates for energy. For aerobic exercise, adjust the speed and incline of time. Fat Burning To burn fat effectively, you must be found by using your heart rate as a guide. A Cool-down . This will increase the flexibility of your goal is to cool down ÑFinish each workout with preexisting health problems. The pulse sensor is not a medical device. The sensor is...
The chart below shows recommended heart rates for energy. For aerobic exercise, adjust the speed and incline of time. Fat Burning To burn fat effectively, you must be found by using your heart rate as a guide. A Cool-down . This will increase the flexibility of your goal is to cool down ÑFinish each workout with preexisting health problems. The pulse sensor is not a medical device. The sensor is...

English Manual
Page 17
...form for 15 counts, then relax. Hamstring Stretch Sit with your other , reach forward and place your hands against the inner thigh of your extended 2 leg. Calf/Achilles Stretch With one foot with one hand against a wall for each leg..., then relax. Hold for 15 counts, then relax. Hold for each leg. Repeat 3 times. Stretches: Hamstrings, lower back and groin. 3. Repeat 3 times for 15 counts, then relax. Bring... soles of knees and back. 2. Bend your front leg, lean forward and move your back foot flat on the floor. Hold for 15 counts, then relax. ...
...form for 15 counts, then relax. Hamstring Stretch Sit with your other , reach forward and place your hands against the inner thigh of your extended 2 leg. Calf/Achilles Stretch With one foot with one hand against a wall for each leg..., then relax. Hold for 15 counts, then relax. Hold for each leg. Repeat 3 times. Stretches: Hamstrings, lower back and groin. 3. Repeat 3 times for 15 counts, then relax. Bring... soles of knees and back. 2. Bend your front leg, lean forward and move your back foot flat on the floor. Hold for 15 counts, then relax. ...

English Manual
Page 18
... Ground Screw Roller Ground Wire Rear Foot Screw Rear Foot Caution Decal Right Endcap 20Ó Wire Harness Rear roller Bolt Endcap Spacer Rear Roller Frame Left Endcap Latch Catch Screw Latch Catch Pulse Bar Assembly Pulse Bar Bolt Pulse Bar Washer Base Mount Screw Left Base Mount 2Ó x 4 1/2Ó Spacer Handrail Cap Lock Knob Lock Knob Sleeve Lock Knob Spring Lock Pin Collar Lock Pin Snap Ring Main Wire Harness Right Top Mount Latch Assembly Foot Spacer Console 18 Key No. PART LISTÑModel No...
... Ground Screw Roller Ground Wire Rear Foot Screw Rear Foot Caution Decal Right Endcap 20Ó Wire Harness Rear roller Bolt Endcap Spacer Rear Roller Frame Left Endcap Latch Catch Screw Latch Catch Pulse Bar Assembly Pulse Bar Bolt Pulse Bar Washer Base Mount Screw Left Base Mount 2Ó x 4 1/2Ó Spacer Handrail Cap Lock Knob Lock Knob Sleeve Lock Knob Spring Lock Pin Collar Lock Pin Snap Ring Main Wire Harness Right Top Mount Latch Assembly Foot Spacer Console 18 Key No. PART LISTÑModel No...

English Manual
Page 19
Qty. For information about ordering replacement parts, see the back cover of this manual. 19 Key No. Description 101 1 102 2 103 1 104 1 105 1 106 4 107 1 108 9 109 1 110 4 111 2 112 2 113 2 114 1 115 2 116 6 117 6 118 1 Key/Clip Book Holder Screw Book Holder Console Base Console Plug Hood Screw Motor Hood Belly Pan Screw/Shield Screw Belly Pan Wheel Spacer Front Wheel Wheel Bolt Frame Endcap Upright Base Frame Pivot...
Qty. For information about ordering replacement parts, see the back cover of this manual. 19 Key No. Description 101 1 102 2 103 1 104 1 105 1 106 4 107 1 108 9 109 1 110 4 111 2 112 2 113 2 114 1 115 2 116 6 117 6 118 1 Key/Clip Book Holder Screw Book Holder Console Base Console Plug Hood Screw Motor Hood Belly Pan Screw/Shield Screw Belly Pan Wheel Spacer Front Wheel Wheel Bolt Frame Endcap Upright Base Frame Pivot...

English Manual
Page 22
LIMITED WARRANTY ICON Health & Fitness, Inc. (ICON), warrants this product to be prepared to give the following information: ¥ The MODEL NUMBER OF THE PRODUCT (PFTL79400) ¥ The NAME OF THE PRODUCT (PROFORM¨ PT 7.0 treadmill) ¥ The SERIAL NUMBER OF THE PRODUCT (see the front cover of this warranty is limited to replacing or repairing, at ICON's option, the product at one of its authorized service centers with respect to...
LIMITED WARRANTY ICON Health & Fitness, Inc. (ICON), warrants this product to be prepared to give the following information: ¥ The MODEL NUMBER OF THE PRODUCT (PFTL79400) ¥ The NAME OF THE PRODUCT (PROFORM¨ PT 7.0 treadmill) ¥ The SERIAL NUMBER OF THE PRODUCT (see the front cover of this warranty is limited to replacing or repairing, at ICON's option, the product at one of its authorized service centers with respect to...

