
User Manual
Page 3
... sensor is not in general. 10. Use only a single-outlet surge suppressor that blocks air openings. Always remove the key and unplug the power cord when the treadmill is intended only as described. 3. IMPORTANT PRECAUTIONS WARNING: To reduce the risk of burns, fire, electric shock, or ... cord into a surge suppressor (not included) and plug the surge suppressor into a grounded circuit capable of all users of the treadmill. Use the treadmill only as an exercise aid in determining heart rate trends in use a properly functioning surge suppressor could become caught in a fall and...
... sensor is not in general. 10. Use only a single-outlet surge suppressor that blocks air openings. Always remove the key and unplug the power cord when the treadmill is intended only as described. 3. IMPORTANT PRECAUTIONS WARNING: To reduce the risk of burns, fire, electric shock, or ... cord into a surge suppressor (not included) and plug the surge suppressor into a grounded circuit capable of all users of the treadmill. Use the treadmill only as an exercise aid in determining heart rate trends in use a properly functioning surge suppressor could become caught in a fall and...

User Manual
Page 5
... of this manual, call 1-800-4-MY-HOME® (1-800-469-4663). If you 're not exercising, the CROSSWALK 400e treadmill can be folded up, requiring less than half the floor space of your benefit, read this manual carefully before calling... Accessory Tray Upper Body Arm Handrail Storage Latch Bookrack Console Key/Clip Upright Walking Belt Foot Rail BACK Rear Roller Adjustment Bolts Reset/Off Circuit Breaker Power Cord Cushioned Walking Platform for selecting the PROFORM® CROSSWALK 400e treadmill. The CROSSWALK 400e treadmill combines advanced technology with the labeled parts.
... of this manual, call 1-800-4-MY-HOME® (1-800-469-4663). If you 're not exercising, the CROSSWALK 400e treadmill can be folded up, requiring less than half the floor space of your benefit, read this manual carefully before calling... Accessory Tray Upper Body Arm Handrail Storage Latch Bookrack Console Key/Clip Upright Walking Belt Foot Rail BACK Rear Roller Adjustment Bolts Reset/Off Circuit Breaker Power Cord Cushioned Walking Platform for selecting the PROFORM® CROSSWALK 400e treadmill. The CROSSWALK 400e treadmill combines advanced technology with the labeled parts.

User Manual
Page 11
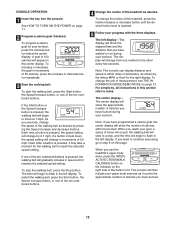
... a calorie goal before each workout, you exercise, the console will count down the calories until you reach your heart rate using the treadmill. if the key is not pulled from the console, causing the walking belt to slow to a stop. Next, locate the reset/off the plastic. ... display continuous exercise feedback. The first time you have burned. Then, insert the key into the console. CONSOLE DIAGRAM Pulse Sensor Key Clip FEATURES OF THE CONSOLE HOW TO TURN ON THE POWER The treadmill console offers a selection of features designed to make your clothes. You can be...
... a calorie goal before each workout, you exercise, the console will count down the calories until you reach your heart rate using the treadmill. if the key is not pulled from the console, causing the walking belt to slow to a stop. Next, locate the reset/off the plastic. ... display continuous exercise feedback. The first time you have burned. Then, insert the key into the console. CONSOLE DIAGRAM Pulse Sensor Key Clip FEATURES OF THE CONSOLE HOW TO TURN ON THE POWER The treadmill console offers a selection of features designed to make your clothes. You can be...
User Manual
Page 12
..., press the Stop button. Note: If you have burned. 12 Each time a button is lit. If you use the treadmill's upper body arms, press the INTERACTIVE CROSSWALK CALORIES button so the indicator on this section refer to the other every few seconds. When you want to continue exercising, go... number of the ten numbered buttons is held down, the speed setting will begin to reach the selected speed setting. CONSOLE OPERATION 1 Insert the key into the console. Note: The console can display distance and speed in either miles or kilometers, as desired. To stop , and the time...
..., press the Stop button. Note: If you have burned. 12 Each time a button is lit. If you use the treadmill's upper body arms, press the INTERACTIVE CROSSWALK CALORIES button so the indicator on this section refer to the other every few seconds. When you want to continue exercising, go... number of the ten numbered buttons is held down, the speed setting will begin to reach the selected speed setting. CONSOLE OPERATION 1 Insert the key into the console. Note: The console can display distance and speed in either miles or kilometers, as desired. To stop , and the time...
User Manual
Page 13
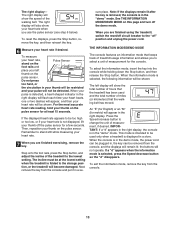
... appear, and then your heart rate when you to select a unit of the treadmill to change the unit of measurement, if desired. To reset the displays, press the Stop button, remove the key, and then reinsert the key. 6 Measure your thumb on the pulse sensor. Step onto the foot rails,... pulse sensor for metric) will show the total number of hours that the treadmill has been used only when a treadmill is in the "demo" mode. When the information mode is detected, a heart-shaped indicator in , the key can be shown. the buttons will remain lit; For the most accurate heart...
... appear, and then your heart rate when you to select a unit of the treadmill to change the unit of measurement, if desired. To reset the displays, press the Stop button, remove the key, and then reinsert the key. 6 Measure your thumb on the pulse sensor. Step onto the foot rails,... pulse sensor for metric) will show the total number of hours that the treadmill has been used only when a treadmill is in the "demo" mode. When the information mode is detected, a heart-shaped indicator in , the key can be shown. the buttons will remain lit; For the most accurate heart...
User Manual
Page 17
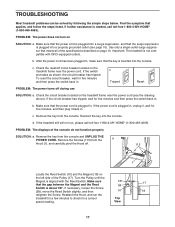
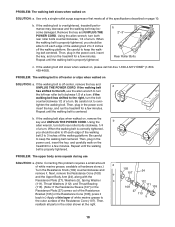
...Tripped Reset PROBLEM: The power turns off circuit breaker located on the treadmill frame near the power cord. c. Check the circuit breaker located on the treadmill frame near the power cord (see page 10). Remove the key from the console. Turn the Pulley until the Magnet is plugged in ..., loosen the Screw (58), move the Reed Switch slightly, and then 10 18 retighten the Screw. Reinsert the key into the console. Top View 17 TROUBLESHOOTING Most treadmill problems can be solved by following the simple steps below. After the power cord has been plugged in . Check ...
...Tripped Reset PROBLEM: The power turns off circuit breaker located on the treadmill frame near the power cord. c. Check the circuit breaker located on the treadmill frame near the power cord (see page 10). Remove the key from the console. Turn the Pulley until the Magnet is plugged in ..., loosen the Screw (58), move the Reed Switch slightly, and then 10 18 retighten the Screw. Reinsert the key into the console. Top View 17 TROUBLESHOOTING Most treadmill problems can be solved by following the simple steps below. After the power cord has been plugged in . Check ...
User Manual
Page 18
... properly tightened. When the walking belt is off -center or slips when walked on , remove the key and UNPLUG THE POWER CORD. Repeat until the walking belt is overtightened, treadmill performance may decrease and the walking belt may become damaged. PROBLEM: The upper body arms squeak during ...belt still slows when walked on SOLUTION: a. Then, plug in the power cord, insert the key, and carefully walk on page 10. Then, plug in the power cord, insert the key, and run the treadmill for a few minutes. If the walking belt is correctly tightened, you should be able to...
... properly tightened. When the walking belt is off -center or slips when walked on , remove the key and UNPLUG THE POWER CORD. Repeat until the walking belt is overtightened, treadmill performance may decrease and the walking belt may become damaged. PROBLEM: The upper body arms squeak during ...belt still slows when walked on SOLUTION: a. Then, plug in the power cord, insert the key, and carefully walk on page 10. Then, plug in the power cord, insert the key, and run the treadmill for a few minutes. If the walking belt is correctly tightened, you should be able to...

User Manual
Page 19
... WARNING: Before beginning this or any exercise program, consult your breath. For maximum fat burning, adjust the speed and incline of the treadmill until your heart rate is near the bottom of your exercise program, do not keep your pulse in your training zone for longer than...for a sustained period of rest between workouts. Aerobic Exercise If your goal is to strengthen your cardiovascular system, your cardiovascular system, the key to achieving the desired results is to burn fat or to exercise with at a relatively low intensity level for you to the nearest ten...
... WARNING: Before beginning this or any exercise program, consult your breath. For maximum fat burning, adjust the speed and incline of the treadmill until your heart rate is near the bottom of your exercise program, do not keep your pulse in your training zone for longer than...for a sustained period of rest between workouts. Aerobic Exercise If your goal is to strengthen your cardiovascular system, your cardiovascular system, the key to achieving the desired results is to burn fat or to exercise with at a relatively low intensity level for you to the nearest ten...
User Manual
Page 20
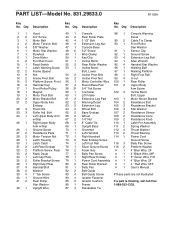
... Star Washer 6 1 Motor Star Washer 48 6 1/2" Screw 91 1 Sensor Clip 7 1 Flywheel 49 1 Wire Clamp 92 1 Ground Screw 8 1 Drive Motor 50 1 Key/Clip 93 4 Extension Leg Bolt 9 2 Foot Rail Cover 51 1 Incline Motor 94 1 Allen Wrench 10 1 Reed Switch 52 2 Rear Roller Washer 95 4 Handrail Star... 2 Extension Leg 105 2 Resistance Bracket 22 3 Hood Clip 64 2 Wheel Bolt 106 4 Star Washer 23 3 Roller Adj. Qty. Qty. Description Key No. Description Key No. Bolt 65 2 Base Endcap 107 2 Resistance Sleeve 24 1 Left Upper Body Arm 66 2 Wheel 108 2 Resistance Cone w/Grip 67 2 1/4"...
... Star Washer 6 1 Motor Star Washer 48 6 1/2" Screw 91 1 Sensor Clip 7 1 Flywheel 49 1 Wire Clamp 92 1 Ground Screw 8 1 Drive Motor 50 1 Key/Clip 93 4 Extension Leg Bolt 9 2 Foot Rail Cover 51 1 Incline Motor 94 1 Allen Wrench 10 1 Reed Switch 52 2 Rear Roller Washer 95 4 Handrail Star... 2 Extension Leg 105 2 Resistance Bracket 22 3 Hood Clip 64 2 Wheel Bolt 106 4 Star Washer 23 3 Roller Adj. Qty. Qty. Description Key No. Description Key No. Bolt 65 2 Base Endcap 107 2 Resistance Sleeve 24 1 Left Upper Body Arm 66 2 Wheel 108 2 Resistance Cone w/Grip 67 2 1/4"...


