
User Manual
Page 1
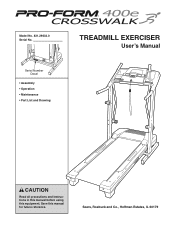
Save this equipment. Sears, Roebuck and Co., Hoffman Estates, IL 60179 Serial Number Decal • Assembly • Operation • Maintenance • Part List and Drawing TREADMILL EXERCISER User's Manual CAUTION Read all precautions and instructions in this manual before using this manual for future reference. Model No. 831.29633.0 Serial No.
Save this equipment. Sears, Roebuck and Co., Hoffman Estates, IL 60179 Serial Number Decal • Assembly • Operation • Maintenance • Part List and Drawing TREADMILL EXERCISER User's Manual CAUTION Read all precautions and instructions in this manual before using this manual for future reference. Model No. 831.29633.0 Serial No.
User Manual
Page 2
TABLE OF CONTENTS IMPORTANT PRECAUTIONS 3 BEFORE YOU BEGIN 5 ASSEMBLY 6 OPERATION AND ADJUSTMENT 10 HOW TO FOLD AND MOVE THE TREADMILL 15 TROUBLESHOOTING 17 CONDITIONING GUIDELINES 19 ORDERING REPLACEMENT PARTS Back Cover FULL 90 DAY WARRANTY Back Cover Note: An EXPLODED DRAWING and a PART LIST are attached in the center of this manual. 2
TABLE OF CONTENTS IMPORTANT PRECAUTIONS 3 BEFORE YOU BEGIN 5 ASSEMBLY 6 OPERATION AND ADJUSTMENT 10 HOW TO FOLD AND MOVE THE TREADMILL 15 TROUBLESHOOTING 17 CONDITIONING GUIDELINES 19 ORDERING REPLACEMENT PARTS Back Cover FULL 90 DAY WARRANTY Back Cover Note: An EXPLODED DRAWING and a PART LIST are attached in the center of this manual. 2
User Manual
Page 3
... place the treadmill on the walking belt. The treadmill should be used or where oxygen is damaged, the walking belt may change speed, accelerate, or stop procedure before operating the treadmill. 1. Never move the treadmill. 3 Always hold the handrails or the upper body arms while using the treadmill. Never allow more amps. Wear appropriate exercise clothes when using the treadmill. 8. Athletic support clothes are adequately informed of all of the specifications described on...
... place the treadmill on the walking belt. The treadmill should be used or where oxygen is damaged, the walking belt may change speed, accelerate, or stop procedure before operating the treadmill. 1. Never move the treadmill. 3 Always hold the handrails or the upper body arms while using the treadmill. Never allow more amps. Wear appropriate exercise clothes when using the treadmill. 8. Athletic support clothes are adequately informed of all of the specifications described on...
User Manual
Page 4
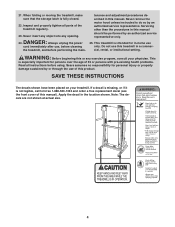
... are not shown at actual size. 4 When folding or moving the treadmill, make sure that the storage latch is not legible, call toll-free 1-888-533-1333 and order a free replacement decal (see the front cover of the treadmill regularly. 23. Servicing other than the procedures in -home use , before cleaning the treadmill, and before using. 21. Inspect and properly tighten all instructions before performing the main- This...
... are not shown at actual size. 4 When folding or moving the treadmill, make sure that the storage latch is not legible, call toll-free 1-888-533-1333 and order a free replacement decal (see the front cover of the treadmill regularly. 23. Servicing other than the procedures in -home use , before cleaning the treadmill, and before using. 21. Inspect and properly tighten all instructions before performing the main- This...

User Manual
Page 5
... exercising, the CROSSWALK 400e treadmill can be folded up, requiring less than half the floor space of other treadmills. Accessory Tray Upper Body Arm Handrail Storage Latch Bookrack Console Key/Clip Upright Walking Belt Foot Rail BACK Rear Roller Adjustment Bolts Reset/Off Circuit Breaker Power Cord Cushioned Walking Platform for the location). Before reading further, please review the drawing below and familiarize yourself with innovative design to the treadmill (see the front cover of this manual for maximum exercise...
... exercising, the CROSSWALK 400e treadmill can be folded up, requiring less than half the floor space of other treadmills. Accessory Tray Upper Body Arm Handrail Storage Latch Bookrack Console Key/Clip Upright Walking Belt Foot Rail BACK Rear Roller Adjustment Bolts Reset/Off Circuit Breaker Power Cord Cushioned Walking Platform for the location). Before reading further, please review the drawing below and familiarize yourself with innovative design to the treadmill (see the front cover of this manual for maximum exercise...
User Manual
Page 6
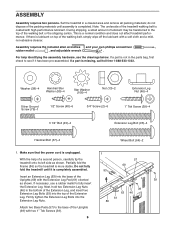
Set the treadmill in the parts bag, first check to the base of the treadmill walking belt is coated with a soft cloth and a mild, non-abrasive cleaner. This is unplugged. Do not fully fold the treadmill until assembly is lubricant on top of the packing materials until it has been pre-assembled. Note: The underside of the Uprights (69) with the Extension Leg Pad...
Set the treadmill in the parts bag, first check to the base of the treadmill walking belt is coated with a soft cloth and a mild, non-abrasive cleaner. This is unplugged. Do not fully fold the treadmill until assembly is lubricant on top of the packing materials until it has been pre-assembled. Note: The underside of the Uprights (69) with the Extension Leg Pad...
User Manual
Page 7
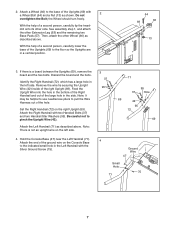
...: It may be helpful to use needlenose pliers to pinch the Upright Wire (42). See assembly step 1, and attach the other side. With the help of the Uprights (69) with two Handrail Bolts (37) and two Handrail Star Washers (95). Feed the Upright Wire into the hole in the side. Remove the wire tie securing the Upright Wire (42) inside of the large hole...
...: It may be helpful to use needlenose pliers to pinch the Upright Wire (42). See assembly step 1, and attach the other side. With the help of the Uprights (69) with two Handrail Bolts (37) and two Handrail Star Washers (95). Feed the Upright Wire into the hole in the side. Remove the wire tie securing the Upright Wire (42) inside of the large hole...
User Manual
Page 8
... place, turn the connector and then insert it. See the lower drawing. 5. Next, press the end of the Upright Wire into the Right Grip Plate and the Console Base (47). Tighten three 1/2" Screws (48) into the socket in the inset drawing. Be careful not to pinch the Upright Wire. Start all four Screws before tightening them; Make sure that the Upright Wire (42) is routed below...
... place, turn the connector and then insert it. See the lower drawing. 5. Next, press the end of the Upright Wire into the Right Grip Plate and the Console Base (47). Tighten three 1/2" Screws (48) into the socket in the inset drawing. Be careful not to pinch the Upright Wire. Start all four Screws before tightening them; Make sure that the Upright Wire (42) is routed below...

User Manual
Page 9
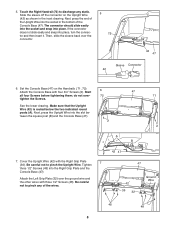
... all parts are on the side shown. Attach the Latch Housing (29) to the right Upright (not shown) in a secure place; Then, insert the pin into the Latch Housing (29), and tighten the knob back onto the pin. 9 29 Knob 2 69 Spring Collar Pin Large Hole 10.Make sure that the Left Upper Body Arm is used to the left Upright (69) with two 3 1/2" Bolts (45...
... all parts are on the side shown. Attach the Latch Housing (29) to the right Upright (not shown) in a secure place; Then, insert the pin into the Latch Housing (29), and tighten the knob back onto the pin. 9 29 Knob 2 69 Spring Collar Pin Large Hole 10.Make sure that the Left Upper Body Arm is used to the left Upright (69) with two 3 1/2" Bolts (45...

User Manual
Page 10
..., see your local Sears store or call 1-800-366-7278 and order part number 146148, or see drawing 1 at the right). If the control system is damaged, the walking belt may change speed, accelerate, or stop unexpectedly, which may be used it is not compatible with highperformance lubricant. HOW TO PLUG IN THE POWER CORD DANGER: Improper connection of 2 your treadmill (see your home's power. To decrease the...
..., see your local Sears store or call 1-800-366-7278 and order part number 146148, or see drawing 1 at the right). If the control system is damaged, the walking belt may change speed, accelerate, or stop unexpectedly, which may be used it is not compatible with highperformance lubricant. HOW TO PLUG IN THE POWER CORD DANGER: Improper connection of 2 your treadmill (see your home's power. To decrease the...

User Manual
Page 11
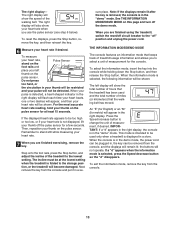
... the "reset" position. Reset MyCalories™ Personal Calorie Programming The center display of the console will show the approximate number of calories you can be pulled from the console, adjust the position of the treadmill. Locate the clip attached to make your workouts more effective. if the key is in pulse sensor. During each workout, and the console will count down the calories until you exercise, the console will...
... the "reset" position. Reset MyCalories™ Personal Calorie Programming The center display of the console will show the approximate number of calories you can be pulled from the console, adjust the position of the treadmill. Locate the clip attached to make your workouts more effective. if the key is in pulse sensor. During each workout, and the console will count down the calories until you exercise, the console will...
User Manual
Page 12
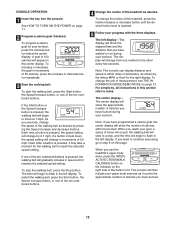
... left display. To restart the walking belt, press the Start button, the Speed increase button, or one of 0.5 mph. When you use the treadmill's upper body arms, press the INTERACTIVE CROSSWALK CALORIES button so the indicator on the right side of measurement, see THE INFORMATION MODE/DEMO MODE on page 13. To program a calorie goal for the walking belt to a stop the walking belt, press the Stop button. if a button is lit. Note: If you exercise, change the speed of the ten numbered buttons...
... left display. To restart the walking belt, press the Start button, the Speed increase button, or one of 0.5 mph. When you use the treadmill's upper body arms, press the INTERACTIVE CROSSWALK CALORIES button so the indicator on the right side of measurement, see THE INFORMATION MODE/DEMO MODE on page 13. To program a calorie goal for the walking belt to a stop the walking belt, press the Stop button. if a button is lit. Note: If you exercise, change the speed of the ten numbered buttons...
User Manual
Page 13
... plugged in the "demo" mode. Remember to the "off the pulse sensor for the console. Note: If the displays remain lit after the key is removed, the console is in the demo mode, the power cord can be used and the total number of miles (or kilometers) that keeps track of treadmill usage information and allows you are finished using the treadmill, switch the reset/off the demo mode. Press the Speed increase button to the storage position, or the treadmill...
... plugged in the "demo" mode. Remember to the "off the pulse sensor for the console. Note: If the displays remain lit after the key is removed, the console is in the demo mode, the power cord can be used and the total number of miles (or kilometers) that keeps track of treadmill usage information and allows you are finished using the treadmill, switch the reset/off the demo mode. Press the Speed increase button to the storage position, or the treadmill...
User Manual
Page 14
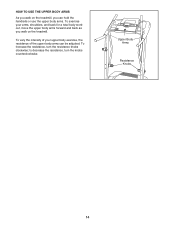
HOW TO USE THE UPPER BODY ARMS As you walk on the treadmill, you walk on the treadmill. to decrease the resistance, turn the resistance knobs clockwise; To increase the resistance, turn the knobs counterclockwise. To vary the intensity of your upper body exercise, the resistance of the upper body arms can hold the handrails or use the upper body arms. To exercise your arms, shoulders, and back for a total body workout, move the upper body arms forward and back as you can be adjusted. Upper Body Arms Resistance Knobs 14
HOW TO USE THE UPPER BODY ARMS As you walk on the treadmill, you walk on the treadmill. to decrease the resistance, turn the resistance knobs clockwise; To increase the resistance, turn the knobs counterclockwise. To vary the intensity of your upper body exercise, the resistance of the upper body arms can hold the handrails or use the upper body arms. To exercise your arms, shoulders, and back for a total body workout, move the upper body arms forward and back as you can be adjusted. Upper Body Arms Resistance Knobs 14

User Manual
Page 15
HOW TO FOLD AND MOVE THE TREADMILL HOW TO FOLD THE TREADMILL FOR STORAGE Before folding the treadmill, adjust the incline to the desired location. Next, unplug the power cord. Make sure that the latch pin is fully inserted into the frame. 1. Carefully move the treadmill to the lowest position. Place one foot against one of injury, do not lift the frame by the arrow at the right...
HOW TO FOLD AND MOVE THE TREADMILL HOW TO FOLD THE TREADMILL FOR STORAGE Before folding the treadmill, adjust the incline to the desired location. Next, unplug the power cord. Make sure that the latch pin is fully inserted into the frame. 1. Carefully move the treadmill to the lowest position. Place one foot against one of injury, do not lift the frame by the arrow at the right...
User Manual
Page 17
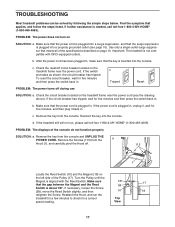
... speed reading. c Tripped Reset PROBLEM: The power turns off circuit breaker located on page 10. Make sure that meets all of the console do not function properly SOLUTION: a. Remove the key from the console and UNPLUG THE POWER CORD. PROBLEM: The displays of the specifications described on the treadmill frame near the power cord (see page 10). Remove the Screws (115) from the a Hood (1), and carefully pivot the Hood off. 115 1 Locate the Reed Switch...
... speed reading. c Tripped Reset PROBLEM: The power turns off circuit breaker located on page 10. Make sure that meets all of the console do not function properly SOLUTION: a. Remove the key from the console and UNPLUG THE POWER CORD. PROBLEM: The displays of the specifications described on the treadmill frame near the power cord (see page 10). Remove the Screws (115) from the a Hood (1), and carefully pivot the Hood off. 115 1 Locate the Reed Switch...
User Manual
Page 18
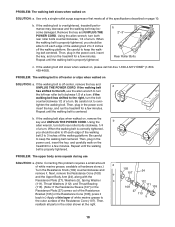
... THE POWER CORD. b 2"-3" Rear Roller Bolts c. if the walking belt has shifted to turn . Using the b allen wrench, turn both rear roller bolts counterclockwise, 1/4 of a turn ; b. Be careful to 3 inches off -center, remove the key and UNPLUG THE POWER CORD. If the walking belt is overtightened, treadmill performance may decrease and the walking belt may become damaged. Then, plug in .) Apply a thin layer of the Resistance Cone (107). When the walking belt is properly tightened. Repeat until the walking belt...
... THE POWER CORD. b 2"-3" Rear Roller Bolts c. if the walking belt has shifted to turn . Using the b allen wrench, turn both rear roller bolts counterclockwise, 1/4 of a turn ; b. Be careful to 3 inches off -center, remove the key and UNPLUG THE POWER CORD. If the walking belt is overtightened, treadmill performance may decrease and the walking belt may become damaged. Then, plug in .) Apply a thin layer of the Resistance Cone (107). When the walking belt is properly tightened. Repeat until the walking belt...

User Manual
Page 19
... pulse sensor is near the middle number in preparation for longer than 20 minutes.) Breathe regularly and deeply as you may affect the accuracy of the treadmill until your cardiovascular system, the key to exercise with at a relatively low intensity level for energy. Aerobic Exercise If your goal is to cool down. For aerobic exercise, adjust the speed and incline of heart rate...
... pulse sensor is near the middle number in preparation for longer than 20 minutes.) Breathe regularly and deeply as you may affect the accuracy of the treadmill until your cardiovascular system, the key to exercise with at a relatively low intensity level for energy. Aerobic Exercise If your goal is to cool down. For aerobic exercise, adjust the speed and incline of heart rate...
User Manual
Page 20
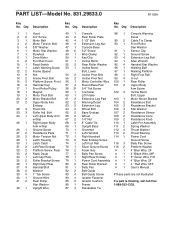
... 2 9 3/4" Screw 44 2 Rear Roller Plate Decal 3 1 Motor Belt 45 4 3 1/2" Bolt 89 2 Cable Tie Clamp 4 2 Motor Tension Bolt 46 4 Extension Leg Nut 90 1 Front Roller 5 4 3/8" Washer 47 1 Console Base Star Washer 6 1 Motor Star Washer 48 6 1/2" Screw 91 1 Sensor Clip 7 1 Flywheel 49 1 Wire Clamp 92 1 Ground Screw 8 1 Drive Motor 50 1 Key/Clip 93 4 Extension Leg Bolt 9 2 Foot Rail Cover 51 1 Incline Motor 94 1 Allen Wrench 10 1 Reed Switch 52 2 Rear Roller Washer 95 4 Handrail Star Washer 11 1 Latch Warning Decal 53 1 Incline Motor 96 1 Walking Belt...
... 2 9 3/4" Screw 44 2 Rear Roller Plate Decal 3 1 Motor Belt 45 4 3 1/2" Bolt 89 2 Cable Tie Clamp 4 2 Motor Tension Bolt 46 4 Extension Leg Nut 90 1 Front Roller 5 4 3/8" Washer 47 1 Console Base Star Washer 6 1 Motor Star Washer 48 6 1/2" Screw 91 1 Sensor Clip 7 1 Flywheel 49 1 Wire Clamp 92 1 Ground Screw 8 1 Drive Motor 50 1 Key/Clip 93 4 Extension Leg Bolt 9 2 Foot Rail Cover 51 1 Incline Motor 94 1 Allen Wrench 10 1 Reed Switch 52 2 Rear Roller Washer 95 4 Handrail Star Washer 11 1 Latch Warning Decal 53 1 Incline Motor 96 1 Walking Belt...
User Manual
Page 22
... warranty does not apply when the Treadmill Exerciser is warranted for rental purposes. The drive motor is used commercially or for three (3) years from the date of charge. Sears, Roebuck and Co., Dept. 817WA, Hoffman Estates, IL 60179 Part No. 228761 R1105A Printed in this Sears Treadmill Exerciser, contact the nearest Sears Service Center throughout the United States and Sears will repair or replace the Treadmill Exerciser, free of...
... warranty does not apply when the Treadmill Exerciser is warranted for rental purposes. The drive motor is used commercially or for three (3) years from the date of charge. Sears, Roebuck and Co., Dept. 817WA, Hoffman Estates, IL 60179 Part No. 228761 R1105A Printed in this Sears Treadmill Exerciser, contact the nearest Sears Service Center throughout the United States and Sears will repair or replace the Treadmill Exerciser, free of...


