
English Manual
Page 3
.../off switch to the control system of 12 and pets away from damage, place a mat under the age of the treadmill. Always remove the key, unplug the power cord and move the walking belt while the power is turned off position when the treadmill is not working properly.) 15. It...warnings and precautions. 2. The pulse sensor is not a medical device. Keep the treadmill indoors, away from heated surfaces. 14. Failure to maintain your local PROFORM dealer or call 1-800-8063651 and order part number 146148. 17. Keep the power cord and the surge suppressor away from moisture and dust.
.../off switch to the control system of 12 and pets away from damage, place a mat under the age of the treadmill. Always remove the key, unplug the power cord and move the walking belt while the power is turned off position when the treadmill is not working properly.) 15. It...warnings and precautions. 2. The pulse sensor is not a medical device. Keep the treadmill indoors, away from heated surfaces. 14. Failure to maintain your local PROFORM dealer or call 1-800-8063651 and order part number 146148. 17. Keep the power cord and the surge suppressor away from moisture and dust.
English Manual
Page 5
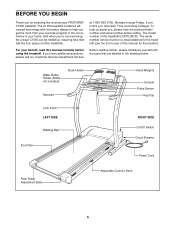
For your benefit, read this manual for selecting the revolutionary PROFORM® C1050 treadmill. until 6 p.m. at 1-800-999-3756, Monday through Friday, 6 a.m. If you have additional questions, please call our Customer Service Department toll-free Before ... (excluding holidays). To help you get the most from your home. Water Bottle Holder (Bottle not included) Book Holder Handrail Hand Weights Console Pulse Sensor Key/Clip Lock Knob LEFT SIDE Walking Belt Foot Rail RIGHT SIDE On/Off Switch Circuit Breaker Power Cord Rear Roller Adjustment Bolts Adjustable Cushion Deck...
For your benefit, read this manual for selecting the revolutionary PROFORM® C1050 treadmill. until 6 p.m. at 1-800-999-3756, Monday through Friday, 6 a.m. If you have additional questions, please call our Customer Service Department toll-free Before ... (excluding holidays). To help you get the most from your home. Water Bottle Holder (Bottle not included) Book Holder Handrail Hand Weights Console Pulse Sensor Key/Clip Lock Knob LEFT SIDE Walking Belt Foot Rail RIGHT SIDE On/Off Switch Circuit Breaker Power Cord Rear Roller Adjustment Bolts Adjustable Cushion Deck...
English Manual
Page 9
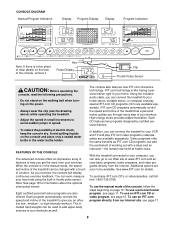
... an iFIT.com program directly from the internet. Note: See page 18 for details. With the treadmill connected to our Web site at health clubs. Key Pulse Display Clip Thumb Pulse Sensor CAUTION: Before operating the console, read the following precautions. • Do not stand on the walking belt when turning...
... an iFIT.com program directly from the internet. Note: See page 18 for details. With the treadmill connected to our Web site at health clubs. Key Pulse Display Clip Thumb Pulse Sensor CAUTION: Before operating the console, read the following precautions. • Do not stand on the walking belt when turning...
English Manual
Page 10
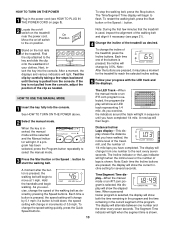
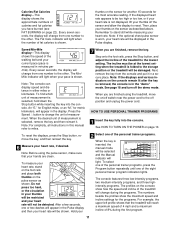
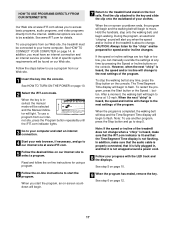
...Incline indicator or the Laps indicator will change the speed setting quickly, press the Quick Speed buttons. HOW TO USE THE MANUAL MODE 1 Insert the key fully into the console. See HOW TO TURN ON THE POWER above. 2 Select the manual mode. Each time a button is selected, the ...iFIT.com program is used, inspect the alignment of the walking belt and align it may take a moment for several seconds. Next, insert the key into the console. Note: After the buttons are pressed, the display will light. Distance/Incline/ Laps display-This display shows the distance that the...
...Incline indicator or the Laps indicator will change the speed setting quickly, press the Quick Speed buttons. HOW TO USE THE MANUAL MODE 1 Insert the key fully into the console. See HOW TO TURN ON THE POWER above. 2 Select the manual mode. Each time a button is selected, the ...iFIT.com program is used, inspect the alignment of the walking belt and align it may take a moment for several seconds. Next, insert the key into the console. Note: After the buttons are pressed, the display will light. Distance/Incline/ Laps display-This display shows the distance that the...
English Manual
Page 11
... in this manual refer to stand still while measuring your pace is folded to the other . HOW TO USE PERSONAL TRAINER PROGRAMS 1 Insert the key fully into the console. To select one of measurement is shown. Do not press too hard, or the circulation in the Pulse display and then...change from the console and put it . Note: Before using the treadmill, move the on the console remain lit after the key is removed, the console is selected, remove the key and then reinsert it in the "demo" mode. Note: If the optional chest pulse sensor is inserted, the manual mode ...
... in this manual refer to stand still while measuring your pace is folded to the other . HOW TO USE PERSONAL TRAINER PROGRAMS 1 Insert the key fully into the console. To select one of measurement is shown. Do not press too hard, or the circulation in the Pulse display and then...change from the console and put it . Note: Before using the treadmill, move the on the console remain lit after the key is removed, the console is selected, remove the key and then reinsert it in the "demo" mode. Note: If the optional chest pulse sensor is inserted, the manual mode ...
English Manual
Page 12
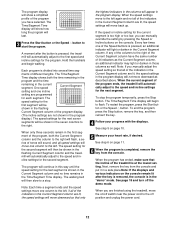
...Segment Time display. If the speed or incline setting for each segment. See step 6 on page 11. 6 When the program is completed, remove the key from the console and put it in a safe place.Note: If the displays and various indicators on page 10. 5 Measure your progress with the displays... display.) The speed settings for the first segment will be shown in the program display. ments of lit indicators as well. A moment after the key is removed, the console is pressed, an additional indicator will appear in the seven columns to the right. The Time/Segment Time display shows both...
...Segment Time display. If the speed or incline setting for each segment. See step 6 on page 11. 6 When the program is completed, remove the key from the console and put it in a safe place.Note: If the displays and various indicators on page 10. 5 Measure your progress with the displays... display.) The speed settings for the first segment will be shown in the program display. ments of lit indicators as well. A moment after the key is removed, the console is pressed, an additional indicator will appear in the seven columns to the right. The Time/Segment Time display shows both...
English Manual
Page 15
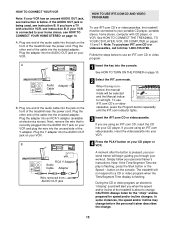
... 1-800-735-0768. If you when the speed and/or incline of the audio cable into an RCA Y-adapter (available at electronics stores). When the key is being used, see instruction B. If the AUDIO OUT jack is inserted, the manual mode will be prepared for the "chirp" and be selected and... VCR Note: If your VCR has an unused AUDIO OUT jack, see instruction A below to use an iFIT.com CD or video program. 1 Insert the key into the console. Plug the other end of the treadmill near the power cord. Simply follow your VCR. Plug the adapter into the jack on...
... 1-800-735-0768. If you when the speed and/or incline of the audio cable into an RCA Y-adapter (available at electronics stores). When the key is being used, see instruction B. If the AUDIO OUT jack is inserted, the manual mode will be prepared for the "chirp" and be selected and... VCR Note: If your VCR has an unused AUDIO OUT jack, see instruction A below to use an iFIT.com CD or video program. 1 Insert the key into the console. Plug the other end of the treadmill near the power cord. Simply follow your VCR. Plug the adapter into the jack on...
English Manual
Page 16
... player and the CD skips, set the CD player on the floor or another CD or video program, press the Stop button or remove the key and go to flash. Note: To use another flat surface instead of your heart rate, if desired. If the volume is too high or too.... 16 When the next "chirp" is heard, the speed and incline will begin to the When the CD or video program is completed, remove the key. Note: If the speed or incline of the CD or video program. After a moment, the walking belt will change when a "chirp" is heard: • Make...
... player and the CD skips, set the CD player on the floor or another CD or video program, press the Stop button or remove the key and go to flash. Note: To use another flat surface instead of your heart rate, if desired. If the volume is too high or too.... 16 When the next "chirp" is heard, the speed and incline will begin to the When the CD or video program is completed, remove the key. Note: If the speed or incline of the CD or video program. After a moment, the walking belt will change when a "chirp" is heard: • Make...
English Manual
Page 17
...next settings of specific system requirements will begin to start the program. See step 6 on page 10. 9 When the program has ended, remove the key. A list of the program. When the on our Web site. CAUTION: Always listen for speed and/or incline changes. In addition, make sure that...audio programs, and video programs directly from our internet site, press the Program button repeatedly until the iFIT.com indicator lights. 3 Go to the key and slide the clip onto the waistband of the treadmill is not flashing. Find the clip attached to your computer and start the program, an...
...next settings of specific system requirements will begin to start the program. See step 6 on page 10. 9 When the program has ended, remove the key. A list of the program. When the on our Web site. CAUTION: Always listen for speed and/or incline changes. In addition, make sure that...audio programs, and video programs directly from our internet site, press the Program button repeatedly until the iFIT.com indicator lights. 3 Go to the key and slide the clip onto the waistband of the treadmill is not flashing. Find the clip attached to your computer and start the program, an...
English Manual
Page 18
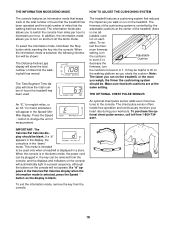
...been operated and the total number of miles that the walking belt has moved. The Time/Segment Time display will automatically light in , the key can be blank. lect the maxi- to Adjustable Cushion decrease the firmness, turn off the demo mode. IMPORTANT: The Calories/Fat Calories .... Press the Speed v button to level 2 or 1. If a "d" appears in the Speed/ MinMile display. To exit the information mode, remove the key from the console, and the displays and indicators on the treadmill. justable cush- An optional chest pulse sensor adds even more you run on the...
...been operated and the total number of miles that the walking belt has moved. The Time/Segment Time display will automatically light in , the key can be blank. lect the maxi- to Adjustable Cushion decrease the firmness, turn off the demo mode. IMPORTANT: The Calories/Fat Calories .... Press the Speed v button to level 2 or 1. If a "d" appears in the Speed/ MinMile display. To exit the information mode, remove the key from the console, and the displays and indicators on the treadmill. justable cush- An optional chest pulse sensor adds even more you run on the...
English Manual
Page 20
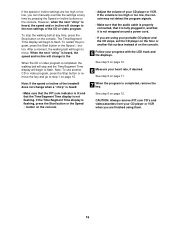
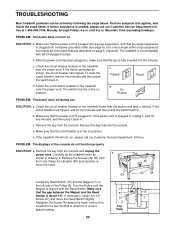
.... 69 83 Locate the Reed Switch (10) and the Magnet (7) on the left side of the specifications described on SOLUTION: a. View 20 c. Reinsert the key fully into a properly grounded outlet (see c. until the Magnet is plugged in, unplug it, wait for five minutes and then press the switch back in... . c Tripped Reset d. If the power cord is aligned with GFCI-equipped outlets. Remove the key from the console. If the circuit breaker has tripped, wait for five minutes, and then plug it back in. Make sure that meets all of...
.... 69 83 Locate the Reed Switch (10) and the Magnet (7) on the left side of the specifications described on SOLUTION: a. View 20 c. Reinsert the key fully into a properly grounded outlet (see c. until the Magnet is plugged in, unplug it, wait for five minutes and then press the switch back in... . c Tripped Reset d. If the power cord is aligned with GFCI-equipped outlets. Remove the key from the console. If the circuit breaker has tripped, wait for five minutes, and then plug it back in. Make sure that meets all of...

English Manual
Page 21
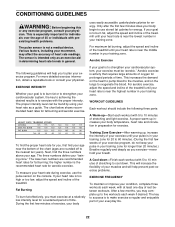
... POWER CORD. When the walking belt is properly tightened, you should be able to lift each side of the specifications described on , first remove the key and UNPLUG THE POWER CORD. Be careful to 4 inches off the walking platform. b. Using the allen b wrench, turn both rear roller adjustment bolts ... you should be able to lift each side of a turn . In addition, keep the walking belt centered. Plug in the power cord, insert the key, and run the treadmill for a few minutes. Plug in the console, press one of a turn the left , use the allen wrench to keep ...
... POWER CORD. When the walking belt is properly tightened, you should be able to lift each side of the specifications described on , first remove the key and UNPLUG THE POWER CORD. Be careful to 4 inches off the walking platform. b. Using the allen b wrench, turn both rear roller adjustment bolts ... you should be able to lift each side of a turn . In addition, keep the walking belt centered. Plug in the power cord, insert the key, and run the treadmill for a few minutes. Plug in the console, press one of a turn the left , use the allen wrench to keep ...
English Manual
Page 22
... your body Training Zone Exercise-After warming up to the nearest ten years). Aerobic exercise is near the bottom of time. The key to success is to make exercise a regular and enjoyable part of your muscles and will increase the flexibility of your exercise must ... least one day of heart rate readings. EXERCISE INTENSITY Whether your goal is to burn fat or to strengthen your cardiovascular system, the key to achieving the desired results is to exercise with 5 to strengthen your cardiovascular system, your everyday life. 22 uses easily accessible carbohydrate...
... your body Training Zone Exercise-After warming up to the nearest ten years). Aerobic exercise is near the bottom of time. The key to success is to make exercise a regular and enjoyable part of your muscles and will increase the flexibility of your exercise must ... least one day of heart rate readings. EXERCISE INTENSITY Whether your goal is to burn fat or to strengthen your cardiovascular system, the key to achieving the desired results is to exercise with 5 to strengthen your cardiovascular system, your everyday life. 22 uses easily accessible carbohydrate...
English Manual
Page 23
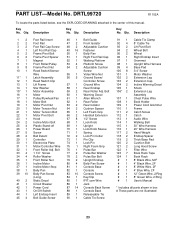
.... Qty. PART LIST-Model No. Key No. Description Key No. Bolt 1 1/4" Screw Roller Washer Front Roller Nut Incline Motor Incline Motor Stop Belly Pan Belly Pan Screw (Long) Static Decal Circuit Breaker Power Cord ... 77 2 Pulse Bar Washer 78 2 Pulse Bar Bolt 79 2 Upright Endcap 80 4 Belly Pan Screw 81 1 Console Base 82 1 Console 83 10 Console Screw 84 1 Key/Clip 85 1 IFIT.com Wire 86 1 Jack 87 14 Console Back Screw 88 1 Console Back 89 1 Releaseable Tie 90 1 Cable Tie Screw 91 1 92 4 93...
.... Qty. PART LIST-Model No. Key No. Description Key No. Bolt 1 1/4" Screw Roller Washer Front Roller Nut Incline Motor Incline Motor Stop Belly Pan Belly Pan Screw (Long) Static Decal Circuit Breaker Power Cord ... 77 2 Pulse Bar Washer 78 2 Pulse Bar Bolt 79 2 Upright Endcap 80 4 Belly Pan Screw 81 1 Console Base 82 1 Console 83 10 Console Screw 84 1 Key/Clip 85 1 IFIT.com Wire 86 1 Jack 87 14 Console Back Screw 88 1 Console Back 89 1 Releaseable Tie 90 1 Cable Tie Screw 91 1 92 4 93...
English Manual
Page 24
... information: • The MODEL NUMBER OF THE PRODUCT (DRTL99720) • The NAME OF THE PRODUCT (PROFORM® C1050 treadmill) • The SERIAL NUMBER OF THE PRODUCT (see the front cover of this manual) • The KEY NUMBER AND DESCRIPTION OF THE PART(S) (see the PART LIST on how long an implied warranty...
... information: • The MODEL NUMBER OF THE PRODUCT (DRTL99720) • The NAME OF THE PRODUCT (PROFORM® C1050 treadmill) • The SERIAL NUMBER OF THE PRODUCT (see the front cover of this manual) • The KEY NUMBER AND DESCRIPTION OF THE PART(S) (see the PART LIST on how long an implied warranty...


