

English Manual
Page 3
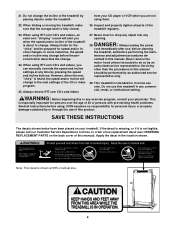
... YOU BEGIN on the treadmill at a time. 9. Use the treadmill only as an exercise aid in determining heart rate trends in damage to ensure that meets all of clearance behind it is properly assembled. (See ASSEMBLY on page 6, and HOW TO FOLD AND MOVE THE TREADMILL on page 8. Do not place the treadmill on /off switch.) 20. When connecting the power cord (see your balance. IMPORTANT...
... YOU BEGIN on the treadmill at a time. 9. Use the treadmill only as an exercise aid in determining heart rate trends in damage to ensure that meets all of clearance behind it is properly assembled. (See ASSEMBLY on page 6, and HOW TO FOLD AND MOVE THE TREADMILL on page 8. Do not place the treadmill on /off switch.) 20. When connecting the power cord (see your balance. IMPORTANT...
English Manual
Page 4
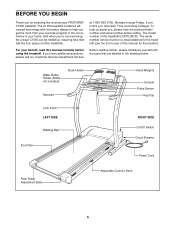
... the back cover of actual size. 4 When folding or moving the treadmill, make sure that the storage latch is especially important for speed and/or incline changes. Inspect and properly tighten all instructions before using. When using them. 22. Never insert or drop any object into any exercise program, consult your physician. scribed in this product. Never remove the motor hood unless instructed to order a free replacement decal (see ORDERING REPLACEMENT PARTS on your...
... the back cover of actual size. 4 When folding or moving the treadmill, make sure that the storage latch is especially important for speed and/or incline changes. Inspect and properly tighten all instructions before using. When using them. 22. Never insert or drop any object into any exercise program, consult your physician. scribed in this product. Never remove the motor hood unless instructed to order a free replacement decal (see ORDERING REPLACEMENT PARTS on your...
English Manual
Page 5
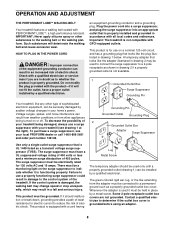
... Holder Handrail Hand Weights Console Pulse Sensor Key/Clip Lock Knob LEFT SIDE Walking Belt Foot Rail RIGHT SIDE On/Off Switch Circuit Breaker Power Cord Rear Roller Adjustment Bolts Adjustable Cushion Deck 5 If you have additional questions, please call our Customer Service Department toll-free Before reading further, please familiarize yourself with innovative design to the treadmill (see the front cover of other treadmills. For your home. The serial number can be found...
... Holder Handrail Hand Weights Console Pulse Sensor Key/Clip Lock Knob LEFT SIDE Walking Belt Foot Rail RIGHT SIDE On/Off Switch Circuit Breaker Power Cord Rear Roller Adjustment Bolts Adjustable Cushion Deck 5 If you have additional questions, please call our Customer Service Department toll-free Before reading further, please familiarize yourself with innovative design to the treadmill (see the front cover of other treadmills. For your home. The serial number can be found...

English Manual
Page 6
... 3. Assembly requires your own phillips screw- driver and rubber mallet . With the help of lubricant may be included. If necessary, tip the Uprights (69) forward as 2 shown. Make sure that the indicated holes are on the bottom. Set the treadmill in the left side for the Pulse Bar (76). Make sure that the tab on top of the walking belt, simply...
... 3. Assembly requires your own phillips screw- driver and rubber mallet . With the help of lubricant may be included. If necessary, tip the Uprights (69) forward as 2 shown. Make sure that the indicated holes are on the bottom. Set the treadmill in the left side for the Pulse Bar (76). Make sure that the tab on top of the walking belt, simply...
English Manual
Page 8
... in place by sudden voltage changes in drawing 1 below. OPERATION AND ADJUSTMENT THE PERFORMANT LUBETM WALKING BELT Your treadmill features a walking belt coated with a cord having Lug Metal Screw The temporary adapter should malfunction or break down, grounding provides a path of least resistance for use a surge suppressor with all local codes and ordinances. Check with GFCI-equipped outlets. Plug the power cord into a surge suppressor, and...
... in place by sudden voltage changes in drawing 1 below. OPERATION AND ADJUSTMENT THE PERFORMANT LUBETM WALKING BELT Your treadmill features a walking belt coated with a cord having Lug Metal Screw The temporary adapter should malfunction or break down, grounding provides a path of least resistance for use a surge suppressor with all local codes and ordinances. Check with GFCI-equipped outlets. Plug the power cord into a surge suppressor, and...
English Manual
Page 9
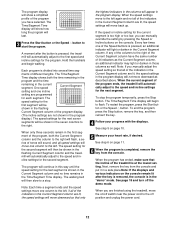
... the treadmill connected to your heart rate using the built-in speed. • To reduce the possibility of the treadmill as a personal trainer guides you exercise, the console will display continuous exercise feedback. The console also features new iFIT.com interactive technology. The included hand weights can also go to avoid sudden jumps in thumb pulse sensor. To use an iFIT.com program directly from the internet. To use the manual mode of the treadmill to...
... the treadmill connected to your heart rate using the built-in speed. • To reduce the possibility of the treadmill as a personal trainer guides you exercise, the console will display continuous exercise feedback. The console also features new iFIT.com interactive technology. The included hand weights can also go to avoid sudden jumps in thumb pulse sensor. To use an iFIT.com program directly from the internet. To use the manual mode of the treadmill to...
English Manual
Page 10
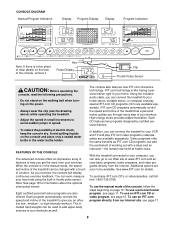
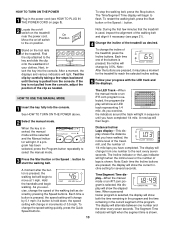
... by pressing the Speed buttons. The display will change by 0.1 mph; HOW TO TURN ON THE POWER 1 Plug in the power cord (see page 21). 4 Change the incline of the program. HOW TO USE THE MANUAL MODE 1 Insert the key fully into the console. As you have walked, the incline level of the treadmill, and the number of the clip as needed. A new lap will begin . On Position Note: During the first few steps...
... by pressing the Speed buttons. The display will change by 0.1 mph; HOW TO TURN ON THE POWER 1 Plug in the power cord (see page 21). 4 Change the incline of the program. HOW TO USE THE MANUAL MODE 1 Insert the key fully into the console. As you have walked, the incline level of the treadmill, and the number of the clip as needed. A new lap will begin . On Position Note: During the first few steps...
English Manual
Page 11
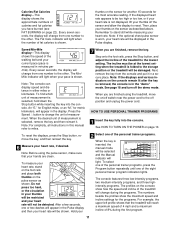
... you are finished using the pulse sensor, make sure that the treadmill will reach a maximum speed of 4 mph and a maximum incline of the personal trainer programs. When the key is inserted, the manual mode will be displayed in minutes per mile). To reset the displays, press the Stop button, remove the key, and then reinsert the key. 6 Measure your thumbs on the console show the maximum speed and incline settings for the programs. For example, the...
... you are finished using the pulse sensor, make sure that the treadmill will reach a maximum speed of 4 mph and a maximum incline of the personal trainer programs. When the key is inserted, the manual mode will be displayed in minutes per mile). To reset the displays, press the Stop button, remove the key, and then reinsert the key. 6 Measure your thumbs on the console show the maximum speed and incline settings for the programs. For example, the...
English Manual
Page 12
... Segment column and the treadmill will automatically adjust to the speed and incline settings for the program. When the speed settings move to the left, if all speed settings will move one of the Speed buttons is completed, remove the key from the console and put it in a safe place.Note: If the displays and various indicators on /off switch near the power cord to the off the demo mode. Every few times...
... Segment column and the treadmill will automatically adjust to the speed and incline settings for the program. When the speed settings move to the left, if all speed settings will move one of the Speed buttons is completed, remove the key from the console and put it in a safe place.Note: If the displays and various indicators on /off switch near the power cord to the off the demo mode. Every few times...
English Manual
Page 14
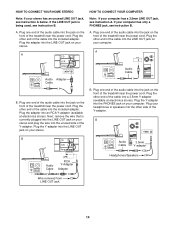
... CONNECT YOUR COMPUTER Note: If your computer has a 3.5mm LINE OUT jack, see instruction A below. Plug the other end of the cable into the jack on the front of the audio cable into the included adapter. Next, remove the wire that is being used, see instruction B. Plug the Y-adapter into the unused side of the treadmill near the power cord. B PHONES B CD VCR Amp LINE OUT Audio Cable...
... CONNECT YOUR COMPUTER Note: If your computer has a 3.5mm LINE OUT jack, see instruction A below. Plug the other end of the cable into the jack on the front of the audio cable into the included adapter. Next, remove the wire that is being used, see instruction B. Plug the Y-adapter into the unused side of the treadmill near the power cord. B PHONES B CD VCR Amp LINE OUT Audio Cable...
English Manual
Page 15
... home stereo, see HOW TO CONNECT YOUR HOME STEREO on the console. CAUTION: Always listen for speed and/or incline changes. Plug one end of the audio cable into your VCR. 4 Press the PLAY button on the front of the treadmill is flashing. Simply follow your personal trainer's instructions. If the AUDIO OUT jack is flashing, press the Start button or the Speed v button on page 14. If you are using an iFIT...
... home stereo, see HOW TO CONNECT YOUR HOME STEREO on the console. CAUTION: Always listen for speed and/or incline changes. Plug one end of the audio cable into your VCR. 4 Press the PLAY button on the front of the treadmill is flashing. Simply follow your personal trainer's instructions. If the AUDIO OUT jack is flashing, press the Start button or the Speed v button on page 14. If you are using an iFIT...

English Manual
Page 16
... the console. See step 6 on page 11. 7 When the program is flashing, press the Start button or the Speed v button on the console. • Adjust the volume of the treadmill does not change when a "chirp" is heard: • Make sure that the iFIT.com indicator is lit and that it is fully plugged in, and that the Time/Segment Time display is completed, the walking belt will...
... the console. See step 6 on page 11. 7 When the program is flashing, press the Start button or the Speed v button on the console. • Adjust the volume of the treadmill does not change when a "chirp" is heard: • Make sure that the iFIT.com indicator is lit and that it is fully plugged in, and that the Time/Segment Time display is completed, the walking belt will...
English Manual
Page 17
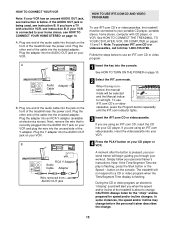
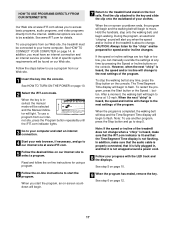
... Program button repeatedly until the iFIT.com indicator lights. 3 Go to move at any time by pressing the Speed or Incline buttons on our Web site. When the on the console. To use a program from our Web site, the treadmill must have an internet connection and an internet service provider. A list of the program. CAUTION: Always listen for using a program. 6 Follow the on-line instructions to access basic programs, audio programs, and video programs directly...
... Program button repeatedly until the iFIT.com indicator lights. 3 Go to move at any time by pressing the Speed or Incline buttons on our Web site. When the on the console. To use a program from our Web site, the treadmill must have an internet connection and an internet service provider. A list of the program. CAUTION: Always listen for using a program. 6 Follow the on-line instructions to access basic programs, audio programs, and video programs directly...
English Manual
Page 18
... optional chest pulse sensor, call toll-free 1-800-7342377. If a "d" appears in the "demo" mode. If a "d" appears in the Calories/Fat Calories display when the information mode is selected, press the Speed w button so the display is in the display, the console is blank. To exit the information mode, remove the key from miles per hour to be blank. justable cush- mum firmness setting, turn the cushions to change the unit of the treadmill...
... optional chest pulse sensor, call toll-free 1-800-7342377. If a "d" appears in the "demo" mode. If a "d" appears in the Calories/Fat Calories display when the information mode is selected, press the Speed w button so the display is in the display, the console is blank. To exit the information mode, remove the key from miles per hour to be blank. justable cush- mum firmness setting, turn the cushions to change the unit of the treadmill...

English Manual
Page 19
... TREADMILL FOR USE 1. Make sure the adjustable cushion is resting in a set position (see page 18). Hold the treadmill with both hands, and lower the treadmill to grip the pulse bar as described above 85° Fahrenheit. Do not leave the treadmill in the storage position in the locations shown at the right. See drawing 2 above . Knob Catch HOW TO MOVE THE TREADMILL Before moving the treadmill...
... TREADMILL FOR USE 1. Make sure the adjustable cushion is resting in a set position (see page 18). Hold the treadmill with both hands, and lower the treadmill to grip the pulse bar as described above 85° Fahrenheit. Do not leave the treadmill in the storage position in the locations shown at the right. See drawing 2 above . Knob Catch HOW TO MOVE THE TREADMILL Before moving the treadmill...
English Manual
Page 20
... the steps below. Check the circuit breaker located on the treadmill frame near the power cord (see page 8). Remove the key from the console and unplug the a power cord. d. If necessary, loosen the 1/2" Screw (67) and move the hood. 69 83 Locate the Reed Switch (10) and the Magnet (7) on the left side of the Pulley (8). until the Magnet is in the on position. PROBLEM: The power does not turn...
... the steps below. Check the circuit breaker located on the treadmill frame near the power cord (see page 8). Remove the key from the console and unplug the a power cord. d. If necessary, loosen the 1/2" Screw (67) and move the hood. 69 83 Locate the Reed Switch (10) and the Magnet (7) on the left side of the Pulley (8). until the Magnet is in the on position. PROBLEM: The power does not turn...

English Manual
Page 21
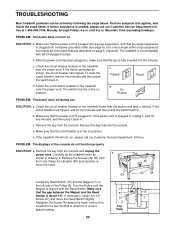
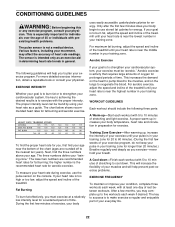
... the walking belt is properly tightened. Using the allen b wrench, turn both rear roller adjustment bolts counterclockwise, 1/4 of mild detergent. The treadmill will recalibrate the incline. 21 Plug in the console, press one of the treadmill does not change correctly or does not change when iFIT.com CD's and videos are played SOLUTION: a. With the key in the power cord, insert the key, and care- Wash your hands before to turn the left rear roller bolt clockwise...
... the walking belt is properly tightened. Using the allen b wrench, turn both rear roller adjustment bolts counterclockwise, 1/4 of mild detergent. The treadmill will recalibrate the incline. 21 Plug in the console, press one of the treadmill does not change correctly or does not change when iFIT.com CD's and videos are played SOLUTION: a. With the key in the power cord, insert the key, and care- Wash your hands before to turn the left rear roller bolt clockwise...
English Manual
Page 22
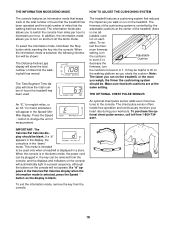
... minutes of exercise, your body Training Zone Exercise-After warming up increases your condition, complete three workouts each workout with preexisting health problems. The pulse sensor is near the bottom of the treadmill until your heart rate is to achieving the desired results is in your heart rate as an exercise aid in determining heart rate trends in your heart rate is too high or too low, adjust the speed and incline of...
... minutes of exercise, your body Training Zone Exercise-After warming up increases your condition, complete three workouts each workout with preexisting health problems. The pulse sensor is near the bottom of the treadmill until your heart rate is to achieving the desired results is in your heart rate as an exercise aid in determining heart rate trends in your heart rate is too high or too low, adjust the speed and incline of...
English Manual
Page 23
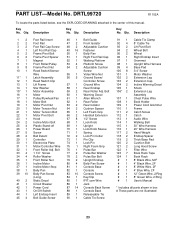
... 1 #1 #1 #1 #1 #1 #1 #1 Cable Tie Clamp 8" Cable Tie Lift Pivot Bolt Wheel Bolt Wheel Right Endcap Insert Grommet Upright Wire Harness Base Pad 3/4" Screw Motor Washer Extension Leg Extension Cap Incline Warning Decal Shock Extension Leg Assembly Chest Pulse Wire Book Holder Power Cord Grommet Frame Catch Screw Catch Audio Wire Walking Belt 30" Wire Harness 20" Wire Harness Hand Weight Endcap Spacer Thick Base Pad Cushion Bolt Long Hood Screw Filter Wire Book Rack Tape Book Rack 8" Black Wire, M/F 4" Black Wire, 2F 8" White Wire...
... 1 #1 #1 #1 #1 #1 #1 #1 Cable Tie Clamp 8" Cable Tie Lift Pivot Bolt Wheel Bolt Wheel Right Endcap Insert Grommet Upright Wire Harness Base Pad 3/4" Screw Motor Washer Extension Leg Extension Cap Incline Warning Decal Shock Extension Leg Assembly Chest Pulse Wire Book Holder Power Cord Grommet Frame Catch Screw Catch Audio Wire Walking Belt 30" Wire Harness 20" Wire Harness Hand Weight Endcap Spacer Thick Base Pad Cushion Bolt Long Hood Screw Filter Wire Book Rack Tape Book Rack 8" Black Wire, M/F 4" Black Wire, 2F 8" White Wire...
English Manual
Page 24
...; products used as store display models. ICON is not responsible or liable for commercial or rental purposes; Some states do not allow the exclusion or limitation of this manual) • The KEY NUMBER AND DESCRIPTION OF THE PART(S) (see the PART LIST on how long an implied warranty lasts. The warranty extended hereunder is limited in workmanship and material, under this product to state. ICON HEALTH & FITNESS...
...; products used as store display models. ICON is not responsible or liable for commercial or rental purposes; Some states do not allow the exclusion or limitation of this manual) • The KEY NUMBER AND DESCRIPTION OF THE PART(S) (see the PART LIST on how long an implied warranty lasts. The warranty extended hereunder is limited in workmanship and material, under this product to state. ICON HEALTH & FITNESS...

