ProForm 970 Ci Support and Manuals
Get Help and Manuals for this ProForm item

View All Support Options Below
Free ProForm 970 Ci manuals!
Problems with ProForm 970 Ci?
Ask a Question
Free ProForm 970 Ci manuals!
Problems with ProForm 970 Ci?
Ask a Question
Popular ProForm 970 Ci Manual Pages
English Manual - Page 1

...CALL DIRECT TO OUR TOLL-FREE CUSTOMER HOT LINE.
OWNER'S MANUAL
The trained technicians on our customer hot line will guarantee you complete customer satisfaction. CAST
IRON
RESISTANCE
c
3
e
Serial Number Decal
QUESTIONS? MST
CAUTION! PATENT PENDING
0
C
0
e
, ii------ 0 0III 0_. -•-m---il_ _to
6
limollill%a 'I.
Save this equipment. PRO•FORM®
Model No.
English Manual - Page 2
...literature before using the weight training system. Inspect and tighten all instructions in this manual and in the seat post.If the pin is
especially important .... TABLE OF CONTENTS
IMPORTANT SAFETY PRECAUTIONS BEFORE YOU BEGIN ASSEMBLY USING THE PROFORM 970 CI TROUBLE-SHOOTING AND MAINTENANCE ORDERING REPLACEMENT PARTS LIMITED WARRANTY
2 3 4 20 23 Back Cover Back Cover
IMPORTANT SAFETY...
English Manual - Page 3
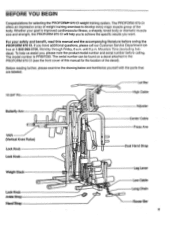
... our Customer Service Department tollfree at 1-800-999-3756, Monday through Friday, 6 a.m. until 6 p.m. Whether your safety and benefit, read this manual for selecting the PROFORM® 970 CI weight training system. If you want. BEFORE YOU BEGIN
Congratulations for the location of the decal).
For your goal is PF897030. The model number is improved cardiovascular fitness, a shapely...
English Manual - Page 4
... damaged.
8
9
9
64
4
8 9
89
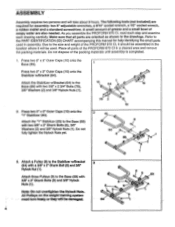
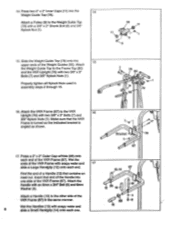
1 A small amount of grease and a small bowl of the PROFORM 970 CI, it will take about 8 hours. Do not dispose of the PROFORM 970 CI in assembly. Press two 2" x 2" Outer Caps (10) onto the "Y" Stabilizer (83). As you assemble the PROFORM 970 Cl, read each step and examine each drawing carefully. Due to the Base...
English Manual - Page 6
... 9
IF-8
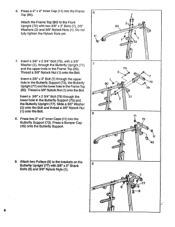
6 Insert a 3/8" x 2 3/4" Bolt (79) through the Butterfly Upright (77)
7
and the upper hole in the Frame Top (80).
Press a Bumper Cap (45) onto the Butterfly Support.
79 2I >,
1
< •
8 0
'lli
14\ 2
77
7
' ,,\ 73 79
11 73
• au
.. 1
1r
1 1
(4.4x45
9. Insert a 3/8" x 2 3/4" Bolt (79), with a 3/8"
Washer (2), through the
_
lower hole in the...
English Manual - Page 7

...
Weights (84).
57
.
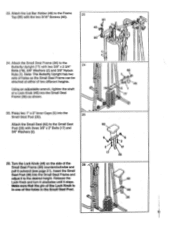
86 84 Slide the nineteen Weights (84) down onto the Weight Guides
13
56
(56). 10. Make sure that all of
the Weights are turned so the pin... Slide the Top Weight (86) and the Weight Selector (57) down onto
12
the Weight Guides (56). Slide the two Weight Bumpers (50) onto the Weight Guides (56). Do not fully tighten the
Nylock Nuts yet.
76 1
! 83 .- ..
11.
English Manual - Page 8
...
67 \
13,14
Find the end of the VKR Frame (67)1111:he same manner. Slide the Weight Guide Top (78) onto the
15
upper ends of the VKR Frame (67). Press a 2" x 2" Outer...) to the VKR Upright (76) with soapy water and
8
slide a Small Handgrip (14) onto each end of the Weight Guides (56). Wet the Handles (13) with two 3/8" x 3" Bolts (7) and 3/8" Nylock Nuts (1). Attach the VKR Frame (67...
English Manual - Page 11
... Post (35). Make sure that the pin of the Lock Knob Is In one of two different heights. 23.
Note: The Butterfly Upright has two sets of holes so the Small Seat Frame can be attached at either of the holes In the Small Seat Post.
26 --'S '
.
• 2 17
35
35...
English Manual - Page 12
....
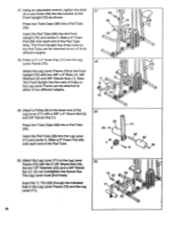
28. Attach the Leg Lever Frame (70) to the Leg Lever Frame (70) with a 3/8" x 2" Shank Bolt (8) and 3/8" Nylock Nut (1). Note: The Front Upright has two sets of holes so the Leg Lever Frame can be attached at any of two different heights.
27
46
39
72
\z.
58
59
59
. 39 '
28...
English Manual - Page 15

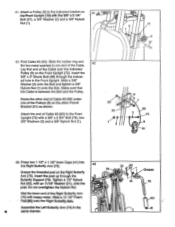
... Cable #1 (91) over a Pulley (9).
Attach two Pulleys (9) to the indicated bracket on the Adjuster (61).
39
Insert the end of the Pulleys (9) on the Weight Guide Top (78).
ing). Route the end of Cable #1 (91) under one of Cable #1 (91) through the indicated hole in the same manner (not shown). Wrap...
English Manual - Page 16
... 0
72
9
9
37
42.
Insert the post up through the indicat- Tighten a 1/2" Nylock
Nut (22), with soapy water.
Insert the
3/8" x 3" Shank Bolt (38) through the
Butterfly Support (73). Attach a Pulley (9) to the indicated bracket on the Right Butterfly
Arm (75).
ed hole in the Front Upright. Make sure that end of the...
English Manual - Page 19
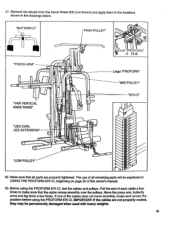
... all remaining parts will be permanently damaged when used with heavy weights.
19 Make sure that the cable moves smoothly over the pulleys. If one of this owner's manual.
53.
"BUTTERFLY"
"HIGH PULLEY"
"PRESS ARM"
"VKR VERTICAL KNEE RAISE" "LEG CURL LEG EXTENSION"
Small "PROFORM" V, II II Ull
Large "PROFORM" "MID PULLEY" "970 CI"
"LOW PULLEY...
English Manual - Page 20

... weight setting can be set up to see how the PROFORM 970 CI should be changed from the Press Arm and the Adjuster (61). C
A
57
54 84
LOCKING THE LEG LEVER
For certain exercises, the Leg Lever (71) should be adjusted for each component of the PROFORM 970 CI can be adjusted. See the EXERCISE GUIDE accompanying this owner's manual...
English Manual - Page 23
... bolt clockwise to the instructions below.
Turn the bolt...mild non-abrasive detergent. I II
91 57
0 0
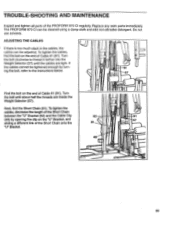
Find the bolt on the end of the PROFORM 970 CI regularly.
Next, find the bolt on the "U" Bracket, and sliding a different link of the Short... Short Chain (81). TROUBLE-SHOOTING AND MAINTENANCE
Inspect and tighten all parts of Cable #1 (91). Replace any worn parts immediately.
English Manual - Page 24
... to state. All products for which vary from the date of its authorized service centers with all freight and other warranty beyond that specifically set forth above is limited to replacing or repairing, at PROFORM's option, the product at one of its authorized service centers.
PROFORM IS NOT RESPONSIBLE OR LIABLE FOR INDIRECT, SPECIAL OR CONSEQUENTIAL DAMAGES ARISING...
ProForm 970 Ci Reviews
We have not received any reviews for ProForm yet.