
User Manual
Page 2
... protection when exercising. 9. Keep children under the age of 12 and pets away from moving parts. 11. Keep hands and feet away from the weight bench at a time. 7. If you are not included.) 10. Do not place more than 365 pounds, including a barbell and weights, on both ends ...of the barbell. (A barbell and weights are performing bench press exercises, your preacher curl bar while the bar is resting on both the right and left weight rests. 13. Always wear athletic shoes for home...
... protection when exercising. 9. Keep children under the age of 12 and pets away from moving parts. 11. Keep hands and feet away from the weight bench at a time. 7. If you are not included.) 10. Do not place more than 365 pounds, including a barbell and weights, on both ends ...of the barbell. (A barbell and weights are performing bench press exercises, your preacher curl bar while the bar is resting on both the right and left weight rests. 13. Always wear athletic shoes for home...
User Manual
Page 4
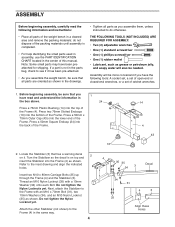
... Locknut (35) as shown. Do not tighten the Nylon Locknut yet. Before beginning assembly, be sure that all parts of the weight bench in the center of the Frame (4). Press a 50mm x 70mm Outer Cap (43) onto the lower end of the Frame. 16 14 4 43 2. Refer to the Frame with a 10mm...instructions: ¥ Place all parts are oriented as grease or petroleum jelly, and soapy water will be more convenient if you assemble the weight bench, be needed. Press a 50mm Square Endcap (24) into the bottom of ratchet wrenches. 1. Attach the other Stabilizer (not shown) to see if it .
... Locknut (35) as shown. Do not tighten the Nylon Locknut yet. Before beginning assembly, be sure that all parts of the weight bench in the center of the Frame (4). Press a 50mm x 70mm Outer Cap (43) onto the lower end of the Frame. 16 14 4 43 2. Refer to the Frame with a 10mm...instructions: ¥ Place all parts are oriented as grease or petroleum jelly, and soapy water will be more convenient if you assemble the weight bench, be needed. Press a 50mm Square Endcap (24) into the bottom of ratchet wrenches. 1. Attach the other Stabilizer (not shown) to see if it .
User Manual
Page 5
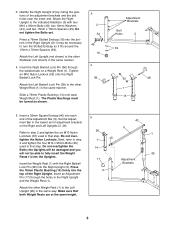
... 15mm x 70mm Spacers (39). Insert a 32mm Square Endcap (40) into the bottom of the adjustment brackets and the bolt holes near the lower end. Press a 76mm Slotted Endcap (16) into each Weight Rest (1). Attach the Left Upright (not shown) to the other Weight Rest (1) to the Left Upright (26... Plastic Bushings must be able to turn the Slotted Endcap so it fits around the 15mm x 70mm Spacers (39). Do not overtighten the Nylon Locknuts. Press the 76mm Plastic Bushing (14) firmly into the Right Upright (2). Next, refer to step 2 and tighten the six M10 Nylon 1 Locknuts (35)...
... 15mm x 70mm Spacers (39). Insert a 32mm Square Endcap (40) into the bottom of the adjustment brackets and the bolt holes near the lower end. Press a 76mm Slotted Endcap (16) into each Weight Rest (1). Attach the Left Upright (not shown) to the other Weight Rest (1) to the Left Upright (26... Plastic Bushings must be able to turn the Slotted Endcap so it fits around the 15mm x 70mm Spacers (39). Do not overtighten the Nylon Locknuts. Press the 76mm Plastic Bushing (14) firmly into the Right Upright (2). Next, refer to step 2 and tighten the six M10 Nylon 1 Locknuts (35)...
User Manual
Page 6
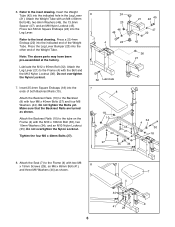
... Screws (29), an M6 x 65mm Bolt (41), 8 and three M6 Washers (44) as shown. Press the Leg Lever Bumper (23) into the Leg Lever. Note: The above parts may have been pre-assembled...that the Backrest Rails are turned as shown. 7 4 44 41 29 6 Do not tighten the Bolts yet. Press two 50mm Square Endcaps (24) into the other end of the Weight Tube. Do not overtighten the Nylon Locknut.... Washers (34), and an M10 Nylon Locknut (35). Attach the Backrest Rails (10) to the inset drawing. Press a 25.4mm Endcap (22) into the indicated hole in the Leg Lever (21). Refer to the tube on...
... Screws (29), an M6 x 65mm Bolt (41), 8 and three M6 Washers (44) as shown. Press the Leg Lever Bumper (23) into the Leg Lever. Note: The above parts may have been pre-assembled...that the Backrest Rails are turned as shown. 7 4 44 41 29 6 Do not tighten the Bolts yet. Press two 50mm Square Endcaps (24) into the other end of the Weight Tube. Do not overtighten the Nylon Locknut.... Washers (34), and an M10 Nylon Locknut (35). Attach the Backrest Rails (10) to the inset drawing. Press a 25.4mm Endcap (22) into the indicated hole in the Leg Lever (21). Refer to the tube on...
User Manual
Page 7
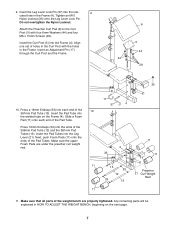
Press a 19mm Endcap (33) into the indi- 9 cated hole in the Frame (4). Tighten an M10 Nylon Locknut (35) onto the Leg Lever Lock Pin. Slide a Foam Pad (11) onto each end of the weight bench are under the preacher curl weight rest. 17 37 4 4 33 11 11 11 13 33 Preacher 12 21... Foam Pads (11) onto the ends of the Pad Tube. Align one set of the 356mm Pad Tube (12) and the 381mm Pad Tubes (13). Press 19mm Endcaps (33) into the Frame (4). Attach the Preacher Curl Pad (6) to the Curl Post (5) with the holes in HOW TO ADJUST THE WEIGHT...
Press a 19mm Endcap (33) into the indi- 9 cated hole in the Frame (4). Tighten an M10 Nylon Locknut (35) onto the Leg Lever Lock Pin. Slide a Foam Pad (11) onto each end of the weight bench are under the preacher curl weight rest. 17 37 4 4 33 11 11 11 13 33 Preacher 12 21... Foam Pads (11) onto the ends of the Pad Tube. Align one set of the 356mm Pad Tube (12) and the 381mm Pad Tubes (13). Press 19mm Endcaps (33) into the Frame (4). Attach the Preacher Curl Pad (6) to the Curl Post (5) with the holes in HOW TO ADJUST THE WEIGHT...


