
User Manual
Page 2
...users of all times. 6. TABLE OF CONTENTS IMPORTANT PRECAUTIONS 2 BEFORE YOU BEGIN 3 ASSEMBLY 4 HOW TO ADJUST THE WEIGHT BENCH 8 PART LIST 10 EXPLODED DRAWING 11 ORDERING REPLACEMENT PARTS Back Cover LIMITED WARRANTY Back Cover Note: A PART IDENTIFICATION ...weight bench. 1. Use the weight bench only on the weight 15. The weight bench is securely seated in guiding the barbell onto the weight rests. 16. Always wear athletic shoes for home use the weight bench in this manual. Always exercise with the weight bench, place the same amount of weight on the preacher curl weight...
...users of all times. 6. TABLE OF CONTENTS IMPORTANT PRECAUTIONS 2 BEFORE YOU BEGIN 3 ASSEMBLY 4 HOW TO ADJUST THE WEIGHT BENCH 8 PART LIST 10 EXPLODED DRAWING 11 ORDERING REPLACEMENT PARTS Back Cover LIMITED WARRANTY Back Cover Note: A PART IDENTIFICATION ...weight bench. 1. Use the weight bench only on the weight 15. The weight bench is securely seated in guiding the barbell onto the weight rests. 16. Always wear athletic shoes for home use the weight bench in this manual. Always exercise with the weight bench, place the same amount of weight on the preacher curl weight...
User Manual
Page 3
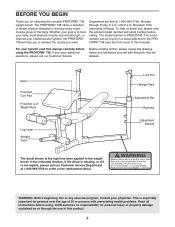
...can be found on a decal attached to the weight bench in the indicated location. If you have additional questions, please call our Customer Service Department at the right has been applied to the PROFORM¨ 738 (see the front cover of this manual). If...existing health problems. Read all instructions before calling. ICON assumes no responsibility for selecting the versatile PROFORM¨ 738 weight bench. Mountain Time (excluding holidays). Lock Pin Weight Rest Adjustment Bar Backrest Adjustment Bracket WARNING: Before beginning this manual carefully before using . For...
...can be found on a decal attached to the weight bench in the indicated location. If you have additional questions, please call our Customer Service Department at the right has been applied to the PROFORM¨ 738 (see the front cover of this manual). If...existing health problems. Read all instructions before calling. ICON assumes no responsibility for selecting the versatile PROFORM¨ 738 weight bench. Mountain Time (excluding holidays). Lock Pin Weight Rest Adjustment Bar Backrest Adjustment Bracket WARNING: Before beginning this manual carefully before using . For...
User Manual
Page 4
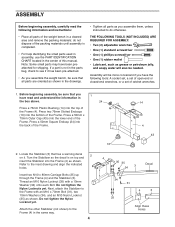
... wrenches. 1. do otherwise. Assembly will also be sure that all parts are oriented as shown in the drawings. ¥ Tighten all parts of the weight bench in the center of this manual. Locate the Stabilizer (3) that has a warning decal 2 on top and insert the Stabilizer into the bottom of the...165; Place all parts as shown. Turn the Stabilizer so the decal is on it has been pre-attached. ¥ As you assemble the weight bench, be more convenient if you assemble them, unless instructed to do not dispose of the packing materials until assembly is not in the parts bag...
... wrenches. 1. do otherwise. Assembly will also be sure that all parts are oriented as shown in the drawings. ¥ Tighten all parts of the weight bench in the center of this manual. Locate the Stabilizer (3) that has a warning decal 2 on top and insert the Stabilizer into the bottom of the...165; Place all parts as shown. Turn the Stabilizer so the decal is on it has been pre-attached. ¥ As you assemble the weight bench, be more convenient if you assemble them, unless instructed to do not dispose of the packing materials until assembly is not in the parts bag...
User Manual
Page 7
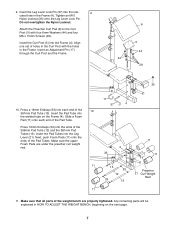
... sure the upper Foam Pads are properly tightened. Attach the Preacher Curl Pad (6) to the Curl Post (5) with the holes in HOW TO ADJUST THE WEIGHT BENCH, beginning on the Frame (4). Insert the Curl Post (5) into the Leg Lever (21). Insert the Pad Tube into each end of the... weight bench are under the preacher curl weight rest. 17 37 4 4 33 11 11 11 13 33 Preacher 12 21 Curl Weight 33 13 Rest 11 11. Insert the Pad Tubes into the Frame (4). Any remaining parts will...
... sure the upper Foam Pads are properly tightened. Attach the Preacher Curl Pad (6) to the Curl Post (5) with the holes in HOW TO ADJUST THE WEIGHT BENCH, beginning on the Frame (4). Insert the Curl Post (5) into the Leg Lever (21). Insert the Pad Tube into each end of the... weight bench are under the preacher curl weight rest. 17 37 4 4 33 11 11 11 13 33 Preacher 12 21 Curl Weight 33 13 Rest 11 11. Insert the Pad Tubes into the Frame (4). Any remaining parts will...
User Manual
Page 8
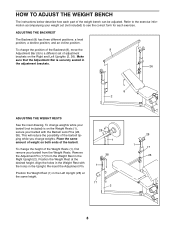
... the Right and Left Uprights (2, 26). Remove the Adjustment Pin (17) from the Weight Rests. Re-insert the Adjustment Pin. Place the same amount of the weight bench can be adjusted. Position the Weight Rest at the same height. 28 1 38 1 17 2 28 1 17 26 8 Make ... your barbell (not included) is securely seated in the Right Upright (2). To change the position of the barbell. To change weights. HOW TO ADJUST THE WEIGHT BENCH The instructions below describe how each exercise. ADJUSTING THE BACKREST The Backrest (8) has three different positions: a level position, a decline...
... the Right and Left Uprights (2, 26). Remove the Adjustment Pin (17) from the Weight Rests. Re-insert the Adjustment Pin. Place the same amount of the weight bench can be adjusted. Position the Weight Rest at the same height. 28 1 38 1 17 2 28 1 17 26 8 Make ... your barbell (not included) is securely seated in the Right Upright (2). To change the position of the barbell. To change weights. HOW TO ADJUST THE WEIGHT BENCH The instructions below describe how each exercise. ADJUSTING THE BACKREST The Backrest (8) has three different positions: a level position, a decline...
User Manual
Page 9
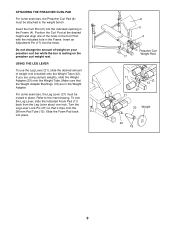
... some exercises, the Leg Lever (21) must be locked in place. Make sure that it clips onto the 381mm Pad Tube (13). Refer to the weight bench. To lock the Leg Lever, slide the indicated Foam Pad (11) back from the Leg Lever about one of the holes in the Curl Post... be attached to the inset drawing. Insert an Adjustment Pin (17) into place. 6 5 4 Preacher Curl Weight Rest 17 11 13 37 21 20 Weight 42 19 9 Do not change the amount of weight (not included) onto the Weight Tube (42). If you are in the Frame (4). Insert the Curl Post (5) into the indicated opening...
... some exercises, the Leg Lever (21) must be locked in place. Make sure that it clips onto the 381mm Pad Tube (13). Refer to the weight bench. To lock the Leg Lever, slide the indicated Foam Pad (11) back from the Leg Lever about one of the holes in the Curl Post... be attached to the inset drawing. Insert an Adjustment Pin (17) into place. 6 5 4 Preacher Curl Weight Rest 17 11 13 37 21 20 Weight 42 19 9 Do not change the amount of weight (not included) onto the Weight Tube (42). If you are in the Frame (4). Insert the Curl Post (5) into the indicated opening...
User Manual
Page 14
PROFORM¨ is authorized by sufficient proof of purchase. Accordingly, the above limitation may not apply to the original purchaser. Mountain Time (excluding holidays). This warranty ... service centers. ICON is limited to give the following information: ¥ The MODEL NUMBER of the product (PFBE30790) ¥ The NAME of the product (PROFORM¨ 738 weight bench) ¥ The SERIAL NUMBER of the product (see the PART LIST on how long an implied warranty lasts. Accordingly, the above limitation may also have...
PROFORM¨ is authorized by sufficient proof of purchase. Accordingly, the above limitation may not apply to the original purchaser. Mountain Time (excluding holidays). This warranty ... service centers. ICON is limited to give the following information: ¥ The MODEL NUMBER of the product (PFBE30790) ¥ The NAME of the product (PROFORM¨ 738 weight bench) ¥ The SERIAL NUMBER of the product (see the PART LIST on how long an implied warranty lasts. Accordingly, the above limitation may also have...


