
User Manual
Page 1
... factory. Serial Number Decal QUESTIONS? CUSTOMER HOT LINE: 1-800-999-3756 Mon.ÐFri., 6 a.m.Ð6 p.m. Save this equipment. Write the serial number in this manual before using this manual for reference. Model No. PFBE30790 Serial No. MST CAUTION Read all precautions and instructions in the space above for future reference. ¨ USER'S MANUAL Visit our website at www.proform.com new products, prizes, fitness tips...
... factory. Serial Number Decal QUESTIONS? CUSTOMER HOT LINE: 1-800-999-3756 Mon.ÐFri., 6 a.m.Ð6 p.m. Save this equipment. Write the serial number in this manual before using this manual for reference. Model No. PFBE30790 Serial No. MST CAUTION Read all precautions and instructions in the space above for future reference. ¨ USER'S MANUAL Visit our website at www.proform.com new products, prizes, fitness tips...
User Manual
Page 2
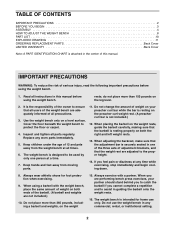
... height. 14. TABLE OF CONTENTS IMPORTANT PRECAUTIONS 2 BEFORE YOU BEGIN 3 ASSEMBLY 4 HOW TO ADJUST THE WEIGHT BENCH 8 PART LIST 10 EXPLODED DRAWING 11 ORDERING REPLACEMENT PARTS Back Cover LIMITED WARRANTY Back Cover Note: A PART IDENTIFICATION CHART is attached in the center of serious injury, read the following important precautions before using the weight bench. rests; Replace any time while exercising, stop immediately and begin cooling down. 8. do not place more than...
... height. 14. TABLE OF CONTENTS IMPORTANT PRECAUTIONS 2 BEFORE YOU BEGIN 3 ASSEMBLY 4 HOW TO ADJUST THE WEIGHT BENCH 8 PART LIST 10 EXPLODED DRAWING 11 ORDERING REPLACEMENT PARTS Back Cover LIMITED WARRANTY Back Cover Note: A PART IDENTIFICATION CHART is attached in the center of serious injury, read the following important precautions before using the weight bench. rests; Replace any time while exercising, stop immediately and begin cooling down. 8. do not place more than...
User Manual
Page 3
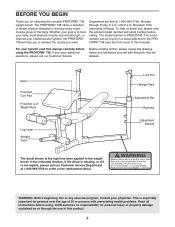
... the product model number and serial number before calling. Lock Pin Weight Rest Adjustment Bar Backrest Adjustment Bracket WARNING: Before beginning this or any exercise program, consult your benefit, read this manual carefully before using the PROFORM¨ 738. The model number is not legible, please call our Customer Service Before reading further, please review the drawing below and familiarize yourself with pre-existing health problems. Read all instructions before using . until 6 p.m. ICON assumes...
... the product model number and serial number before calling. Lock Pin Weight Rest Adjustment Bar Backrest Adjustment Bracket WARNING: Before beginning this or any exercise program, consult your benefit, read this manual carefully before using the PROFORM¨ 738. The model number is not legible, please call our Customer Service Before reading further, please review the drawing below and familiarize yourself with pre-existing health problems. Read all instructions before using . until 6 p.m. ICON assumes...
User Manual
Page 4
... you assemble the weight bench, be sure that you have the following information and instructions: ¥ Place all parts as grease or petroleum jelly, and soapy water will be needed. Press two 76mm Slotted Endcaps (16) into the back of ratchet wrenches. 1. Turn the Stabilizer so the decal is completed. ¥ For help identifying the small parts used in assembly, use the PART IDENTIFICATION CHART located in...
... you assemble the weight bench, be sure that you have the following information and instructions: ¥ Place all parts as grease or petroleum jelly, and soapy water will be needed. Press two 76mm Slotted Endcaps (16) into the back of ratchet wrenches. 1. Turn the Stabilizer so the decal is completed. ¥ For help identifying the small parts used in assembly, use the PART IDENTIFICATION CHART located in...
User Manual
Page 5
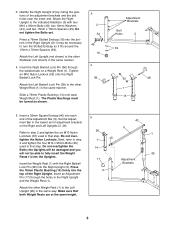
... the Right Upright. 3. Next, refer to the Left Upright (26) in the same manner. 4. Attach the other Weight Rest (1) to step 40 1 3 and tighten the four M10 x 95mm Bolts (49) used in that step. Identify the Right Upright (2) by noting the positions of the Right Upright (2); Insert the Right Barbell Lock Pin (38) through the holes in the same manner. Press a 76mm Slotted...
... the Right Upright. 3. Next, refer to the Left Upright (26) in the same manner. 4. Attach the other Weight Rest (1) to step 40 1 3 and tighten the four M10 x 95mm Bolts (49) used in that step. Identify the Right Upright (2) by noting the positions of the Right Upright (2); Insert the Right Barbell Lock Pin (38) through the holes in the same manner. Press a 76mm Slotted...
User Manual
Page 6
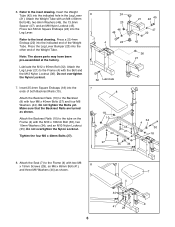
... Screws (29), an M6 x 65mm Bolt (41), 8 and three M6 Washers (44) as shown. Attach the Seat (7) to the Backrest (8) with the Bolt and the M12 Nylon Locknut (36). Lubricate the M12 x 95mm Bolt (32). Do not overtighten the Nylon Locknut. 7. Press two 50mm Square Endcaps (24) into the indicated hole in the Leg Lever (21). Do not tighten the Bolts...
... Screws (29), an M6 x 65mm Bolt (41), 8 and three M6 Washers (44) as shown. Attach the Seat (7) to the Backrest (8) with the Bolt and the M12 Nylon Locknut (36). Lubricate the M12 x 95mm Bolt (32). Do not overtighten the Nylon Locknut. 7. Press two 50mm Square Endcaps (24) into the indicated hole in the Leg Lever (21). Do not tighten the Bolts...
User Manual
Page 7
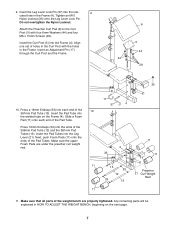
...TO ADJUST THE WEIGHT BENCH, beginning on the Frame (4). 9. Insert the Leg Lever Lock Pin (37) into the ends of the Pad Tubes. Make sure that all parts of the 10 381mm Pad Tube (13). Attach the...15mm Screws (29). Make sure the upper Foam Pads are properly tightened. Insert the Pad Tube into each end of holes in the Frame. Do not overtighten the Nylon Locknut. Insert an Adjustment Pin ... Post (5) into the Leg Lever (21). Press a 19mm Endcap (33) into the welded tube on the next page. 7 Align one set of the Pad Tube. Any remaining parts will be explained in ...
...TO ADJUST THE WEIGHT BENCH, beginning on the Frame (4). 9. Insert the Leg Lever Lock Pin (37) into the ends of the Pad Tubes. Make sure that all parts of the 10 381mm Pad Tube (13). Attach the...15mm Screws (29). Make sure the upper Foam Pads are properly tightened. Insert the Pad Tube into each end of holes in the Frame. Do not overtighten the Nylon Locknut. Insert an Adjustment Pin ... Post (5) into the Leg Lever (21). Press a 19mm Endcap (33) into the welded tube on the next page. 7 Align one set of the Pad Tube. Any remaining parts will be explained in ...
User Manual
Page 8
... (1), secure your weight set of the weight bench can be adjusted. Place the same amount of weight on the Right and Left Uprights (2, 26). To change the position of the Backrest (8), move the 9 Adjustment Bar (9) to a different set (not included) to the exercise information accompanying your barbell with the holes in the Left Upright (26) at the desired height. Re-insert the Adjustment Pin. To change weights. This will...
... (1), secure your weight set of the weight bench can be adjusted. Place the same amount of weight on the Right and Left Uprights (2, 26). To change the position of the Backrest (8), move the 9 Adjustment Bar (9) to a different set (not included) to the exercise information accompanying your barbell with the holes in the Left Upright (26) at the desired height. Re-insert the Adjustment Pin. To change weights. This will...
User Manual
Page 9
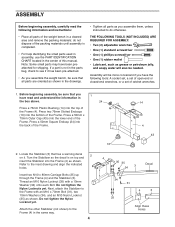
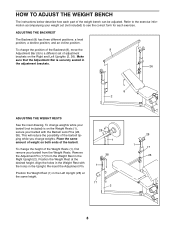
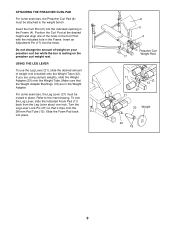
... 13 37 21 20 Weight 42 19 9 Turn the Leg Lever Lock Pin (37) so that the Weight Adapter Bushings (19) are using olympic weights, slide the Weight Adapter (20) onto the Weight Tube. Refer to the weight bench. If you are in the Weight Adapter. Do not change the amount of weight (not included) onto the Weight Tube (42). USING THE LEG LEVER To use the Leg Lever (21), slide the...
... 13 37 21 20 Weight 42 19 9 Turn the Leg Lever Lock Pin (37) so that the Weight Adapter Bushings (19) are using olympic weights, slide the Weight Adapter (20) onto the Weight Tube. Refer to the weight bench. If you are in the Weight Adapter. Do not change the amount of weight (not included) onto the Weight Tube (42). USING THE LEG LEVER To use the Leg Lever (21), slide the...
User Manual
Page 10
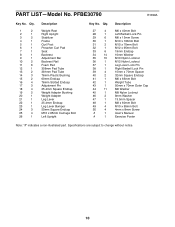
... Weight Rest Right Upright Stabilizer Frame Curl Post Preacher Curl Pad Seat Backrest Adjustment Bar Backrest Rail Foam Pad 356mm Pad Tube 381mm Pad Tube 76mm Plastic Bushing 60mm Endcap 76mm Slotted Endcap Adjustment Pin 25.4mm Square Endcap Weight Adapter Bushing Weight Adapter Leg Lever 25.4mm Endcap Leg Lever Bumper 50mm Square Endcap M10 x 85mm Carriage Bolt Left Upright Key No. Specifications are subject to change...
... Weight Rest Right Upright Stabilizer Frame Curl Post Preacher Curl Pad Seat Backrest Adjustment Bar Backrest Rail Foam Pad 356mm Pad Tube 381mm Pad Tube 76mm Plastic Bushing 60mm Endcap 76mm Slotted Endcap Adjustment Pin 25.4mm Square Endcap Weight Adapter Bushing Weight Adapter Leg Lever 25.4mm Endcap Leg Lever Bumper 50mm Square Endcap M10 x 85mm Carriage Bolt Left Upright Key No. Specifications are subject to change...
User Manual
Page 12
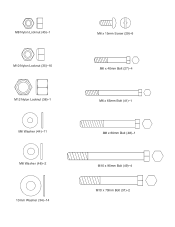
M8 Nylon Locknut (45)Ð1 M10 Nylon Locknut (35)Ð10 M12 Nylon Locknut (36)Ð1 M6 Washer (44)Ð11 M8 Washer (46)Ð2 10mm Washer (34)Ð14 M6 x 15mm Screw (29)Ð6 M6 x 40mm Bolt (27)Ð4 M6 x 65mm Bolt (41)Ð1 M8 x 60mm Bolt (48)Ð1 M10 x 95mm Bolt (49)Ð4 M10 x 70mm Bolt (31)Ð2
M8 Nylon Locknut (45)Ð1 M10 Nylon Locknut (35)Ð10 M12 Nylon Locknut (36)Ð1 M6 Washer (44)Ð11 M8 Washer (46)Ð2 10mm Washer (34)Ð14 M6 x 15mm Screw (29)Ð6 M6 x 40mm Bolt (27)Ð4 M6 x 65mm Bolt (41)Ð1 M8 x 60mm Bolt (48)Ð1 M10 x 95mm Bolt (49)Ð4 M10 x 70mm Bolt (31)Ð2
User Manual
Page 14
... usage or repairs not provided by or attributable to give the following information: ¥ The MODEL NUMBER of the product (PFBE30790) ¥ The NAME of the product (PROFORM¨ 738 weight bench) ¥ The SERIAL NUMBER of the product (see the front cover of this manual) ¥ The KEY NUMBER and DESCRIPTION of the part(s) (see the PART LIST on how long an implied warranty lasts. ICON is not...
... usage or repairs not provided by or attributable to give the following information: ¥ The MODEL NUMBER of the product (PFBE30790) ¥ The NAME of the product (PROFORM¨ 738 weight bench) ¥ The SERIAL NUMBER of the product (see the front cover of this manual) ¥ The KEY NUMBER and DESCRIPTION of the part(s) (see the PART LIST on how long an implied warranty lasts. ICON is not...

