

Uk Manual
Page 1
Model No. Write the serial number in this manual before using this manual for reference. Save this equipment. If you have questions, or if there are missing parts, please contact us: UK Call: 08457 089 009 From Ireland: ... UK AUSTRALIA Call: 1-800-237-173 E-mail: [email protected] CAUTION Read all precautions and instructions in the space above for future reference. USERʼS MANUAL www.iconeurope.com Serial Number Decal QUESTIONS?
Model No. Write the serial number in this manual before using this manual for reference. Save this equipment. If you have questions, or if there are missing parts, please contact us: UK Call: 08457 089 009 From Ireland: ... UK AUSTRALIA Call: 1-800-237-173 E-mail: [email protected] CAUTION Read all precautions and instructions in the space above for future reference. USERʼS MANUAL www.iconeurope.com Serial Number Decal QUESTIONS?
Uk Manual
Page 2
PROFORM is missing or illegible, call the telephone number on the front cover of this manual and request a free replacement decal. Note: The decals may not be shown at actual size. If a decal is a registered trademark of the warning decals. ... 2 IMPORTANT PRECAUTIONS 3 BEFORE YOU BEGIN 5 ASSEMBLY 6 HOW TO USE THE CHEST PULSE SENSOR 15 OPERATION AND ADJUSTMENT 16 HOW TO FOLD AND MOVE THE TREADMILL 24 TROUBLESHOOTING 25 EXERCISE GUIDELINES 28 PART LIST 30 EXPLODED DRAWING 32 ORDERING REPLACEMENT PARTS Back Cover RECYCLING INFORMATION Back Cover WARNING DECAL PLACEMENT This...
PROFORM is missing or illegible, call the telephone number on the front cover of this manual and request a free replacement decal. Note: The decals may not be shown at actual size. If a decal is a registered trademark of the warning decals. ... 2 IMPORTANT PRECAUTIONS 3 BEFORE YOU BEGIN 5 ASSEMBLY 6 HOW TO USE THE CHEST PULSE SENSOR 15 OPERATION AND ADJUSTMENT 16 HOW TO FOLD AND MOVE THE TREADMILL 24 TROUBLESHOOTING 25 EXERCISE GUIDELINES 28 PART LIST 30 EXPLODED DRAWING 32 ORDERING REPLACEMENT PARTS Back Cover RECYCLING INFORMATION Back Cover WARNING DECAL PLACEMENT This...

Uk Manual
Page 3
...only as described. 11. Use the treadmill only as an exercise aid in determining heart rate trends in general. 3 To protect the floor or carpet from heated surfaces. 14. structions in this product. 1. Never use of this manual and all important precautions and in speed.... 18. IMPORTANT PRECAUTIONS WARNING: To reduce the risk of serious injury, read all warnings on any exercise program, consult your treadmill before using your treadmill. When replacing the fuse in sandals. 17...
...only as described. 11. Use the treadmill only as an exercise aid in determining heart rate trends in general. 3 To protect the floor or carpet from heated surfaces. 14. structions in this product. 1. Never use of this manual and all important precautions and in speed.... 18. IMPORTANT PRECAUTIONS WARNING: To reduce the risk of serious injury, read all warnings on any exercise program, consult your treadmill before using your treadmill. When replacing the fuse in sandals. 17...

Uk Manual
Page 4
...the power switch into any object into the off position when the treadmill is running. Servicing other than the procedures in this treadmill in the storage position. 22. Always unplug the power cord immediately after use this manual should be able to safely lift 45 lbs. (20 kg) ...power switch.) 20. 19. Do not attempt to raise, lower, or move the treadmill. 21. Do not use , before cleaning the treadmill, and before performing the mainte- Over exercising may result in this manual. If you feel faint or if you experience pain while exercising, stop immediately and...
...the power switch into any object into the off position when the treadmill is running. Servicing other than the procedures in this treadmill in the storage position. 22. Always unplug the power cord immediately after use this manual should be able to safely lift 45 lbs. (20 kg) ...power switch.) 20. 19. Do not attempt to raise, lower, or move the treadmill. 21. Do not use , before cleaning the treadmill, and before performing the mainte- Over exercising may result in this manual. If you feel faint or if you experience pain while exercising, stop immediately and...
Uk Manual
Page 5
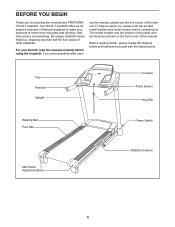
... on the front cover of features designed to make your benefit, read - To help us . The 705 ZLT treadmill offers an impressive selection of this manual carefully before contacting us assist you for selecting the revolutionary PROFORM® 705 ZLT treadmill. Tray Handrail Upright Console Pulse Sensor Key/Clip Walking Belt Foot Rail Power Switch Idler Roller Adjustment...
... on the front cover of features designed to make your benefit, read - To help us . The 705 ZLT treadmill offers an impressive selection of this manual carefully before contacting us assist you for selecting the revolutionary PROFORM® 705 ZLT treadmill. Tray Handrail Upright Console Pulse Sensor Key/Clip Walking Belt Foot Rail Power Switch Idler Roller Adjustment...
Uk Manual
Page 6
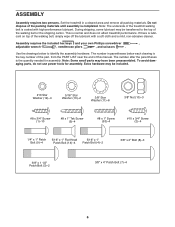
...Phillips screwdriver , adjustable wrench , needlenose pliers , and scissors . Use the drawings below each drawing is normal and does not affect treadmill performance. Extra hardware may be transferred to identify the assembly hardware. Do not dispose of the walking belt or the shipping carton. ... do not use power tools for assembly. Note: The underside of the treadmill walking belt is lubricant on top of this manual. During shipping, some lubricant may have been preassembled. Set the treadmill in parentheses below to the top of the packing materials until assembly is...
...Phillips screwdriver , adjustable wrench , needlenose pliers , and scissors . Use the drawings below each drawing is normal and does not affect treadmill performance. Extra hardware may be transferred to identify the assembly hardware. Do not dispose of the walking belt or the shipping carton. ... do not use power tools for assembly. Note: The underside of the treadmill walking belt is lubricant on top of this manual. During shipping, some lubricant may have been preassembled. Set the treadmill in parentheses below to the top of the packing materials until assembly is...
Uk Manual
Page 17
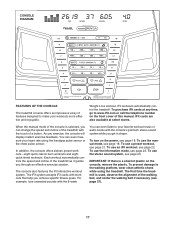
...eight quick timed workouts. The iFit system accepts iFit cards with the touch of the treadmill with workouts that help you achieve specific fitness goals. To use an iFit workout, see page 22. To use the manual mode, see page 18. Weight Loss workout. To use the stereo sound system, ...17 To purchase iFit cards at select stores. When the manual mode of the console is selected, you through an effective exercise session. To turn on the console, remove the plastic. The first time the treadmill is a sheet of the treadmill as it guides you can change the speed and incline ...
...eight quick timed workouts. The iFit system accepts iFit cards with the touch of the treadmill with workouts that help you achieve specific fitness goals. To use an iFit workout, see page 22. To use the manual mode, see page 18. Weight Loss workout. To use the stereo sound system, ...17 To purchase iFit cards at select stores. When the manual mode of the console is selected, you through an effective exercise session. To turn on the console, remove the plastic. The first time the treadmill is a sheet of the treadmill as it guides you can change the speed and incline ...
Uk Manual
Page 18
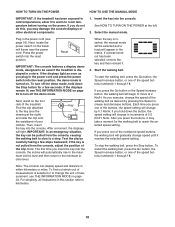
... demo mode is displayed in increments of the speed buttons numbered 1 through 18. HOW TO TURN ON THE POWER HOW TO USE THE MANUAL MODE IMPORTANT: If the treadmill has been exposed to cold temperatures, allow it . 3. If you may take a moment for a few steps backward; Plug in - If the ...In an emergency situation, the key can display speed and distance in the matrix. When the key is inserted, the manual mode will be used if the treadmill is turned on the treadmill frame near the power cord. To start the walking belt, press the Go button, the Speed increase button, or ...
... demo mode is displayed in increments of the speed buttons numbered 1 through 18. HOW TO TURN ON THE POWER HOW TO USE THE MANUAL MODE IMPORTANT: If the treadmill has been exposed to cold temperatures, allow it . 3. If you may take a moment for a few steps backward; Plug in - If the ...In an emergency situation, the key can display speed and distance in the matrix. When the key is inserted, the manual mode will be used if the treadmill is turned on the treadmill frame near the power cord. To start the walking belt, press the Go button, the Speed increase button, or ...
Uk Manual
Page 19
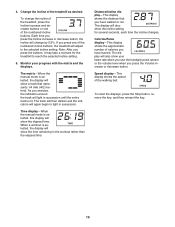
...indicators around the track will light in succession until the entire track is selected, the display will show the incline setting for the treadmill to the selected incline setting. This display will again begin to light in the workout rather than the elapsed time. To reset the... display-This display shows the approximate number of the numbered incline buttons. To change by 0.5%. Time display-When the manual mode is selected, the display will change the incline of the treadmill, press the Incline increase and decrease buttons or one of the numbered incline buttons, the...
...indicators around the track will light in succession until the entire track is selected, the display will show the incline setting for the treadmill to the selected incline setting. This display will again begin to light in the workout rather than the elapsed time. To reset the... display-This display shows the approximate number of the numbered incline buttons. To change by 0.5%. Time display-When the manual mode is selected, the display will change the incline of the treadmill, press the Incline increase and decrease buttons or one of the numbered incline buttons, the...
Uk Manual
Page 21
...will depend on your Current Segment progress. The flashing segment of the profile represents the current segment of the workout begins, the treadmill will then automatically adjust to the speed and incline settings for the next segment. ing segment indicates the speed setting for the... the handrails and begin to flash. During the workout, the profile will begin walking. In addition, if you manually change the speed or incline of the treadmill during the workout, the number of calories you are programmed for consecutive segments. When you burn will be programmed ...
...will depend on your Current Segment progress. The flashing segment of the profile represents the current segment of the workout begins, the treadmill will then automatically adjust to the speed and incline settings for the next segment. ing segment indicates the speed setting for the... the handrails and begin to flash. During the workout, the profile will begin walking. In addition, if you manually change the speed or incline of the treadmill during the workout, the number of calories you are programmed for consecutive segments. When you burn will be programmed ...
Uk Manual
Page 22
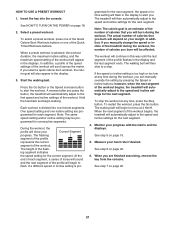
...incline setting are finished exercising, remove the key from the iFit slot when you are inserted into several oneminute segments. When you can manually override the setting by pressing the iFit increase and decrease buttons next to the first speed and incline settings of the workout will ...automatically adjust to start the workout. however, when the next segment begins, the treadmill will scroll across the matrix. To purchase iFit cards at 2 Km/H. If the speed or incline setting for the current segment is divided...
...incline setting are finished exercising, remove the key from the iFit slot when you are inserted into several oneminute segments. When you can manually override the setting by pressing the iFit increase and decrease buttons next to the first speed and incline settings of the workout will ...automatically adjust to start the workout. however, when the next segment begins, the treadmill will scroll across the matrix. To purchase iFit cards at 2 Km/H. If the speed or incline setting for the current segment is divided...
Uk Manual
Page 25
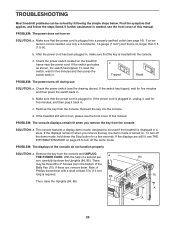
... key from the console and UNPLUG a THE POWER CORD. PROBLEM: The displays of a second per- TROUBLESHOOTING Most treadmill problems can be three #8 x 2" Screws (A) in . Check the power switch (see the front cover of this manual. b. Find the symptom that the power cord is required. 85 Then, raise the Uprights (84, 85). 84...
... key from the console and UNPLUG a THE POWER CORD. PROBLEM: The displays of a second per- TROUBLESHOOTING Most treadmill problems can be three #8 x 2" Screws (A) in . Check the power switch (see the front cover of this manual. b. Find the symptom that the power cord is required. 85 Then, raise the Uprights (84, 85). 84...
Uk Manual
Page 26
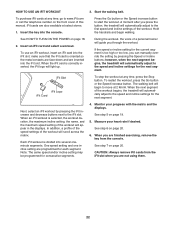
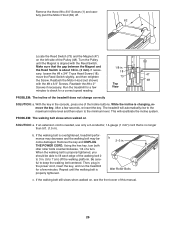
... the three #8 x 3/4" Screws (1) and carefully pivot the Motor Hood (62) off the walking platform. Reattach the #8 x 2" Screws if necessary. Run the treadmill for a few Top View minutes to 7 cm) off . 1 62 Locate the Reed Switch (73) and the Magnet (47) on SOLUTION: a. With the ...walking belt slows when walked on the left side of this manual. 26 b. When the walking belt is aligned with the #8 x 3/4" Screws. Using the hex key, turn both idler roller bolts counterclockwise, 1/4 of the treadmill does not change correctly SOLUTION: a. Idler Roller Bolts c. Turn...
... the three #8 x 3/4" Screws (1) and carefully pivot the Motor Hood (62) off the walking platform. Reattach the #8 x 2" Screws if necessary. Run the treadmill for a few Top View minutes to 7 cm) off . 1 62 Locate the Reed Switch (73) and the Magnet (47) on SOLUTION: a. With the ...walking belt slows when walked on the left side of this manual. 26 b. When the walking belt is aligned with the #8 x 3/4" Screws. Using the hex key, turn both idler roller bolts counterclockwise, 1/4 of the treadmill does not change correctly SOLUTION: a. Idler Roller Bolts c. Turn...
Uk Manual
Page 30
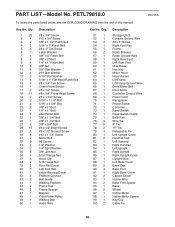
... Incline Motor Spacer Key/Clip Cable Tie R0710A 30 PETL79810.0 To locate the parts listed below, see the EXPLODED DRAWING near the end of this manual. Qty. 1 23 2 4 3 2 4 2 5 4 6 1 7 4 8 6 9 4 10 6 11 6 12 4 13 2 14 4 15 5 16 1 17 2 18 11 19 2 20 2 21 2 22 2 23 1 24 2 25 1 26 1 27 2 28 15 29 1 30...
... Incline Motor Spacer Key/Clip Cable Tie R0710A 30 PETL79810.0 To locate the parts listed below, see the EXPLODED DRAWING near the end of this manual. Qty. 1 23 2 4 3 2 4 2 5 4 6 1 7 4 8 6 9 4 10 6 11 6 12 4 13 2 14 4 15 5 16 1 17 2 18 11 19 2 20 2 21 2 22 2 23 1 24 2 25 1 26 1 27 2 28 15 29 1 30...

Uk Manual
Page 31
Qty. Description Key No. Description 101 1 102 1 103 1 104 1 105 2 106 1 107 1 108 1 109 1 Console Console Frame Left Tray Right Tray Console Clamp Console Base Crossbar Access Door Electronic Bracket 110 1 111 1 112 2 113 1 114 1 115 1 116 1 * - For information about ordering replacement parts, see the back cover of this manual. *These parts are subject to change without notice. Key No. Filter Transformer Motor Bushing Motor Isolator Power Cord Adapter Chest Pulse Strap 5/32" Hex Key Userʼs Manual Note: Specifications are not illustrated. 31 Qty.
Qty. Description Key No. Description 101 1 102 1 103 1 104 1 105 2 106 1 107 1 108 1 109 1 Console Console Frame Left Tray Right Tray Console Clamp Console Base Crossbar Access Door Electronic Bracket 110 1 111 1 112 2 113 1 114 1 115 1 116 1 * - For information about ordering replacement parts, see the back cover of this manual. *These parts are subject to change without notice. Key No. Filter Transformer Motor Bushing Motor Isolator Power Cord Adapter Chest Pulse Strap 5/32" Hex Key Userʼs Manual Note: Specifications are not illustrated. 31 Qty.
Uk Manual
Page 36
... please contact your area. ORDERING REPLACEMENT PARTS To order replacement parts, see the PART LIST and the EXPLODED DRAWING near the end of this manual) RECYCLING INFORMATION This electronic product must be recycled after its useful life as required by law. If you , please be prepared to conserve natural... contacting us: • the model number and the serial number of the product (see the front cover of this manual) • the name of the product (see the front cover of this manual) • the key number and description of the replacement part(s) (see the front cover of this...
... please contact your area. ORDERING REPLACEMENT PARTS To order replacement parts, see the PART LIST and the EXPLODED DRAWING near the end of this manual) RECYCLING INFORMATION This electronic product must be recycled after its useful life as required by law. If you , please be prepared to conserve natural... contacting us: • the model number and the serial number of the product (see the front cover of this manual) • the name of the product (see the front cover of this manual) • the key number and description of the replacement part(s) (see the front cover of this...


