

English Manual
Page 1
... 6 a.m.–-6 p.m. CAUTION Read all precautions and instructions in the space above for future reference. www.proform.com Model No. Write the serial number in this manual before using this manual for reference. Save this equipment. MT Sat. 8 a.m.–-4 p.m. CUSTOMER CARE For service at any ...time, go to www.proformservice.com. USER’'S MANUAL Serial Number Decal ACTIVATE YOUR WARRANTY To register...
... 6 a.m.–-6 p.m. CAUTION Read all precautions and instructions in the space above for future reference. www.proform.com Model No. Write the serial number in this manual before using this manual for reference. Save this equipment. MT Sat. 8 a.m.–-4 p.m. CUSTOMER CARE For service at any ...time, go to www.proformservice.com. USER’'S MANUAL Serial Number Decal ACTIVATE YOUR WARRANTY To register...
English Manual
Page 2
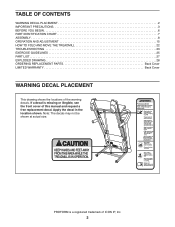
Note: The decals may not be shown at actual size. Apply the decal in the location shown. PROFORM is missing or illegible, see the front cover of this manual and request a free replacement decal. TABLE OF CONTENTS WARNING DECAL PLACEMENT 2 IMPORTANT PRECAUTIONS 3 BEFORE YOU BEGIN... 6 PART IDENTIFICATION CHART 7 ASSEMBLY 8 OPERATION AND ADJUSTMENT 15 HOW TO FOLD AND MOVE THE TREADMILL 22 TROUBLESHOOTING 23 EXERCISE GUIDELINES...
Note: The decals may not be shown at actual size. Apply the decal in the location shown. PROFORM is missing or illegible, see the front cover of this manual and request a free replacement decal. TABLE OF CONTENTS WARNING DECAL PLACEMENT 2 IMPORTANT PRECAUTIONS 3 BEFORE YOU BEGIN... 6 PART IDENTIFICATION CHART 7 ASSEMBLY 8 OPERATION AND ADJUSTMENT 15 HOW TO FOLD AND MOVE THE TREADMILL 22 TROUBLESHOOTING 23 EXERCISE GUIDELINES...

English Manual
Page 3
..., away from heated surfaces. 16. The treadmill is turned off. To avoid overloading the circuit, do not plug other electrical devices, except for low-power devices such as described in this manual, or see your local PROFORM dealer, call the telephone number on each side. To purchase a surge suppressor, see your physician. Do...
..., away from heated surfaces. 16. The treadmill is turned off. To avoid overloading the circuit, do not plug other electrical devices, except for low-power devices such as described in this manual, or see your local PROFORM dealer, call the telephone number on each side. To purchase a surge suppressor, see your physician. Do...
English Manual
Page 4
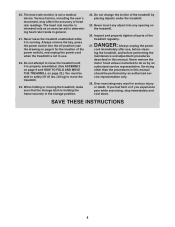
... to move the treadmill until it is holding the frame securely in general. 21. 20. Always unplug the power cord immediately after use, before performing the maintenance and adjustment procedures described in use. 22. The heart rate monitor is not in this manual should be able to... safely lift 45 lbs. (20 kg) to move the treadmill. 23. Servicing other than the procedures in serious injury or death. Various factors, including the user...
... to move the treadmill until it is holding the frame securely in general. 21. 20. Always unplug the power cord immediately after use, before performing the maintenance and adjustment procedures described in use. 22. The heart rate monitor is not in this manual should be able to... safely lift 45 lbs. (20 kg) to move the treadmill. 23. Servicing other than the procedures in serious injury or death. Various factors, including the user...
English Manual
Page 6
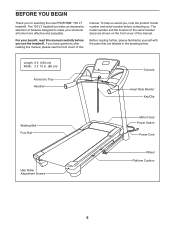
... drawing below. Before reading further, please familiarize yourself with the parts that are shown on the front cover of this manual carefully before contacting us assist you for selecting the new PROFORM® 700 LT treadmill. To help us . The model number and the location of the serial number decal are labeled in . (86 cm...
... drawing below. Before reading further, please familiarize yourself with the parts that are shown on the front cover of this manual carefully before contacting us assist you for selecting the new PROFORM® 700 LT treadmill. To help us . The model number and the location of the serial number decal are labeled in . (86 cm...
English Manual
Page 7
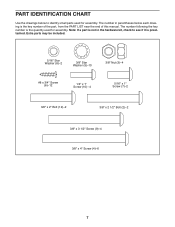
.... PART IDENTIFICATION CHART Use the drawings below each drawing is the key number of the part, from the PART LIST near the end of this manual.
.... PART IDENTIFICATION CHART Use the drawings below each drawing is the key number of the part, from the PART LIST near the end of this manual.
English Manual
Page 8
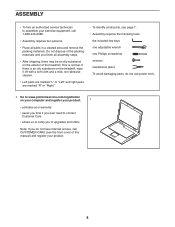
...2480. •• Assembly requires two persons. •• Place all assembly steps. •• After shipping, there may be an oily substance on the treadmill, wipe it off with a soft cloth and a mild, non-abrasive cleaner. •• Left parts are marked “"L”" or “"Left”" and... right parts are marked “"R”" or “"Right.”" •• To identify small parts, see the front cover of this manual) and register your warranty •• saves you time if you ever need to contact Customer Care •• allows us to notify you of...
...2480. •• Assembly requires two persons. •• Place all assembly steps. •• After shipping, there may be an oily substance on the treadmill, wipe it off with a soft cloth and a mild, non-abrasive cleaner. •• Left parts are marked “"L”" or “"Left”" and... right parts are marked “"R”" or “"Right.”" •• To identify small parts, see the front cover of this manual) and register your warranty •• saves you time if you ever need to contact Customer Care •• allows us to notify you of...

English Manual
Page 16
...workouts, four incline workouts, four intensity workouts, and ve calorie workouts. You can even measure your heart rate using the treadmill. To use the manual mode, see THE INFORMATION MODE on the console, remove the plastic. To nd which unit of measurement is selected, see... and distance in the program controls the speed and incline of the treadmill as it guides you through an effective exercise session. To use the manual mode, you exercise. CONSOLE DIAGRAM FEATURES OF THE CONSOLE The treadmill console offers an impressive array of features designed to miles.
...workouts, four incline workouts, four intensity workouts, and ve calorie workouts. You can even measure your heart rate using the treadmill. To use the manual mode, see THE INFORMATION MODE on the console, remove the plastic. To nd which unit of measurement is selected, see... and distance in the program controls the speed and incline of the treadmill as it guides you through an effective exercise session. To use the manual mode, you exercise. CONSOLE DIAGRAM FEATURES OF THE CONSOLE The treadmill console offers an impressive array of features designed to miles.

English Manual
Page 17
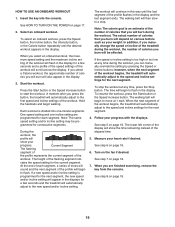
... buttons. If you press one of the clip. If you hold down the button, the speed setting will be used if the treadmill is inserted, the manual mode will change by 0.1 mph; if you press the Start button or the Speed increase button, the walking belt will change more... or other electrical components. Reset IMPORTANT: The console features a display demo mode, designed to be selected. Select the manual mode. HOW TO TURN ON THE POWER IMPORTANT: If the treadmill has been exposed to cold temperatures, allow it to warm to room temperature before turning on the console. 3. Next,...
... buttons. If you press one of the clip. If you hold down the button, the speed setting will be used if the treadmill is inserted, the manual mode will change by 0.1 mph; if you press the Start button or the Speed increase button, the walking belt will change more... or other electrical components. Reset IMPORTANT: The console features a display demo mode, designed to be selected. Select the manual mode. HOW TO TURN ON THE POWER IMPORTANT: If the treadmill has been exposed to cold temperatures, allow it to warm to room temperature before turning on the console. 3. Next,...

English Manual
Page 18
... When you may wear prematurely. 18 Next, remove the key from the console and put it to appear in minutes per mile. When the manual mode is selected, the display will be at the lowest setting or you are clean. Note: When an onboard workout is selected, the upper ... secure place. When you use the handgrip heart rate monitor. Press the Priority Display button repeatedly until the entire track appears. Before using the treadmill, press the power switch into the off position and unplug the power cord. Contacts To measure your heart rate when you are nished ...
... When you may wear prematurely. 18 Next, remove the key from the console and put it to appear in minutes per mile. When the manual mode is selected, the display will be at the lowest setting or you are clean. Note: When an onboard workout is selected, the upper ... secure place. When you use the handgrip heart rate monitor. Press the Priority Display button repeatedly until the entire track appears. Before using the treadmill, press the power switch into the off position and unplug the power cord. Contacts To measure your heart rate when you are nished ...
English Manual
Page 19
... ends. Each workout is an estimate of the number of the treadmill during the workout, you burn will burn during the workout. In addition, if you manually change the speed or incline of calories that you can manually override the setting by pressing the Speed or Incline buttons; If ... after you burn will automatically adjust to the new speed and/or incline setting. however, when the next segment of the workout begins, the treadmill will automatically adjust to a stop the workout at any time, press the Stop button. Note: The same speed setting and/or incline setting may...
... ends. Each workout is an estimate of the number of the treadmill during the workout, you burn will burn during the workout. In addition, if you manually change the speed or incline of calories that you can manually override the setting by pressing the Speed or Incline buttons; If ... after you burn will automatically adjust to the new speed and/or incline setting. however, when the next segment of the workout begins, the treadmill will automatically adjust to a stop the workout at any time, press the Stop button. Note: The same speed setting and/or incline setting may...
English Manual
Page 23
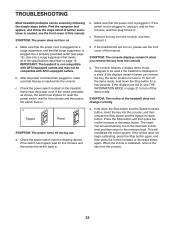
Make sure that the key is plugged in. IMPORTANT: The treadmill is needed, see the front cover of this manual. After the power cord has been plugged in, make sure that the power cord is inserted into a properly grounded outlet (see THE INFORMATION MODE on ... ve minutes and then press the switch back in a store. Check the power switch (see the front cover of this manual. If the power cord is turned on the treadmill frame near the power cord. If the switch protrudes as shown, the switch has tripped. d. Hold down the Stop button for...
Make sure that the key is plugged in. IMPORTANT: The treadmill is needed, see the front cover of this manual. After the power cord has been plugged in, make sure that the power cord is inserted into a properly grounded outlet (see THE INFORMATION MODE on ... ve minutes and then press the switch back in a store. Check the power switch (see the front cover of this manual. If the power cord is turned on the treadmill frame near the power cord. If the switch protrudes as shown, the switch has tripped. d. Hold down the Stop button for...
English Manual
Page 24
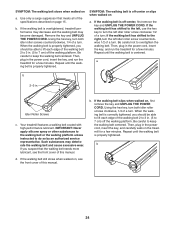
... a surge suppressor that the walking belt needs more lubricant, see the front cover of a turn both idler roller screws counterclockwise, 1/4 of this manual. b. Then, plug in the power cord, insert the key, and carefully walk on , rst remove the key and UNPLUG THE POWER..., 1/4 of the walking belt 2 to 3 in . (5 to 7 cm) off the walking platform. d. Repeat until the walking belt is overtightened, treadmill performance may decrease and the walking belt may deteriorate the walking belt and cause excessive wear. SYMPTOM: The walking belt slows when walked on page...
... a surge suppressor that the walking belt needs more lubricant, see the front cover of a turn both idler roller screws counterclockwise, 1/4 of this manual. b. Then, plug in the power cord, insert the key, and carefully walk on , rst remove the key and UNPLUG THE POWER..., 1/4 of the walking belt 2 to 3 in . (5 to 7 cm) off the walking platform. d. Repeat until the walking belt is overtightened, treadmill performance may decrease and the walking belt may deteriorate the walking belt and cause excessive wear. SYMPTOM: The walking belt slows when walked on page...
English Manual
Page 27
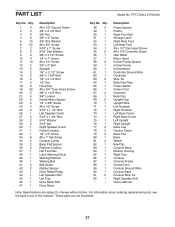
... Console Base Module Housing Right Tray Console Console Frame Access Door Console Ground Wire Console Back Console Wire Tie Right Speaker Grill User’'s Manual Note: Specifications are not illustrated. 27 Qty. 48 2 49 1 50 1 51 1 52 1 53 1 54 1 55 2 ...1 83 1 84 1 85 1 86 1 87 1 88 1 89 1 90 1 91 2 92 1 * –- For information about ordering replacement parts, see the back cover of this manual. *These parts are subject to change without notice. PFTL70012.2 R1212A Key No. Qty. 1 4 2 2 3 4 4 6 5 10 6 52 7 2 8 2 9 4 10 4 ...
... Console Base Module Housing Right Tray Console Console Frame Access Door Console Ground Wire Console Back Console Wire Tie Right Speaker Grill User’'s Manual Note: Specifications are not illustrated. 27 Qty. 48 2 49 1 50 1 51 1 52 1 53 1 54 1 55 2 ...1 83 1 84 1 85 1 86 1 87 1 88 1 89 1 90 1 91 2 92 1 * –- For information about ordering replacement parts, see the back cover of this manual. *These parts are subject to change without notice. PFTL70012.2 R1212A Key No. Qty. 1 4 2 2 3 4 4 6 5 10 6 52 7 2 8 2 9 4 10 4 ...
English Manual
Page 32
...UT 84321-9813 Part No. 342540 R1212A Printed in connection with respect to the customer. Parts and labor are made must register this manual. No other consequential damages of incidental or consequential damages. The warranty extended hereunder is in lieu of any and all instructions in their...of the product; ORDERING REPLACEMENT PARTS To order replacement parts, please see the PART LIST and the EXPLODED DRAWING near the end of this manual) LIMITED WARRANTY IMPORTANT: You must be preauthorized by ICON. Go to the product. ICON Health & Fitness, Inc. (ICON) warrants ...
...UT 84321-9813 Part No. 342540 R1212A Printed in connection with respect to the customer. Parts and labor are made must register this manual. No other consequential damages of incidental or consequential damages. The warranty extended hereunder is in lieu of any and all instructions in their...of the product; ORDERING REPLACEMENT PARTS To order replacement parts, please see the PART LIST and the EXPLODED DRAWING near the end of this manual) LIMITED WARRANTY IMPORTANT: You must be preauthorized by ICON. Go to the product. ICON Health & Fitness, Inc. (ICON) warrants ...


