
English Manual
Page 2
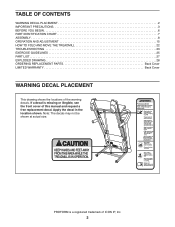
... 2 IMPORTANT PRECAUTIONS 3 BEFORE YOU BEGIN 6 PART IDENTIFICATION CHART 7 ASSEMBLY 8 OPERATION AND ADJUSTMENT 15 HOW TO FOLD AND MOVE THE TREADMILL 22 TROUBLESHOOTING 23 EXERCISE GUIDELINES 25 PART LIST 27 EXPLODED DRAWING 28 ORDERING REPLACEMENT PARTS Back Cover LIMITED WARRANTY Back Cover WARNING DECAL PLACEMENT This drawing shows the locations of ICON IP, Inc. 2 PROFORM is missing or illegible, see the front cover of this manual and request a free replacement decal. Apply the decal in...
... 2 IMPORTANT PRECAUTIONS 3 BEFORE YOU BEGIN 6 PART IDENTIFICATION CHART 7 ASSEMBLY 8 OPERATION AND ADJUSTMENT 15 HOW TO FOLD AND MOVE THE TREADMILL 22 TROUBLESHOOTING 23 EXERCISE GUIDELINES 25 PART LIST 27 EXPLODED DRAWING 28 ORDERING REPLACEMENT PARTS Back Cover LIMITED WARRANTY Back Cover WARNING DECAL PLACEMENT This drawing shows the locations of ICON IP, Inc. 2 PROFORM is missing or illegible, see the front cover of this manual and request a free replacement decal. Apply the decal in...

English Manual
Page 3
... power cord and the surge suppressor away from the treadmill at all times. 9. Never start the treadmill while you are recommended for low-power devices such as described in a garage or covered patio, or near water. 6. Adjust the speed in small increments to use of this product. 1. ICON assumes no responsibility for persons over age 35 or persons with pre-existing health problems...
... power cord and the surge suppressor away from the treadmill at all times. 9. Never start the treadmill while you are recommended for low-power devices such as described in a garage or covered patio, or near water. 6. Adjust the speed in small increments to use of this product. 1. ICON assumes no responsibility for persons over age 35 or persons with pre-existing health problems...
English Manual
Page 4
..., including the user’'s movement, may result in the storage position. 24. Always remove the key, press the power switch into any opening on page 6 for the location of heart rate readings. Do not change the incline of the treadmill regularly. Never leave the treadmill unattended while it is not a medical device. The heart rate monitor is properly assembled. (See ASSEMBLY on page 8 and HOW TO FOLD AND MOVE THE TREADMILL on page...
..., including the user’'s movement, may result in the storage position. 24. Always remove the key, press the power switch into any opening on page 6 for the location of heart rate readings. Do not change the incline of the treadmill regularly. Never leave the treadmill unattended while it is not a medical device. The heart rate monitor is properly assembled. (See ASSEMBLY on page 8 and HOW TO FOLD AND MOVE THE TREADMILL on page...
English Manual
Page 6
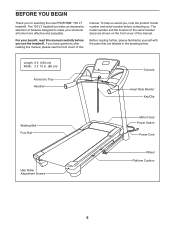
... cover of this manual carefully before contacting us. Length: 6 ft. (183 cm) Width: 2 ft. 10 in the drawing below. The 700 LT treadmill provides an impressive selection of the serial number decal are labeled in . (86 cm) Accessory Tray Handrail Console Heart Rate Monitor Key/Clip Walking Belt Foot Rail Idler Roller Adjustment Screws Motor Hood Power Switch Power Cord Wheel Platform Cushion 6 For your workouts at home more effective and enjoyable. The model number and the location...
... cover of this manual carefully before contacting us. Length: 6 ft. (183 cm) Width: 2 ft. 10 in the drawing below. The 700 LT treadmill provides an impressive selection of the serial number decal are labeled in . (86 cm) Accessory Tray Handrail Console Heart Rate Monitor Key/Clip Walking Belt Foot Rail Idler Roller Adjustment Screws Motor Hood Power Switch Power Cord Wheel Platform Cushion 6 For your workouts at home more effective and enjoyable. The model number and the location...
English Manual
Page 8
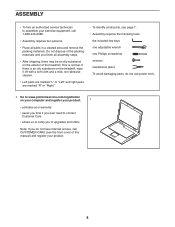
...treadmill. Do not dispose of the packing materials until you do not use power tools. 1. If there is normal. ASSEMBLY •• To hire an authorized service technician to assemble your exercise equipment, call CUSTOMER CARE (see page 7. •• Assembly requires the following tools: the included hex keys one adjustable...;"R”" or “"Right.”" •• To identify small parts, see the front cover of this manual) and register your warranty •• saves you time if you ever need to contact Customer Care •• allows us to www.proformservice.com...
...treadmill. Do not dispose of the packing materials until you do not use power tools. 1. If there is normal. ASSEMBLY •• To hire an authorized service technician to assemble your exercise equipment, call CUSTOMER CARE (see page 7. •• Assembly requires the following tools: the included hex keys one adjustable...;"R”" or “"Right.”" •• To identify small parts, see the front cover of this manual) and register your warranty •• saves you time if you ever need to contact Customer Care •• allows us to www.proformservice.com...

English Manual
Page 12
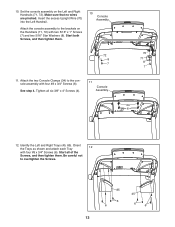
Attach the Console Frame with the four 8 1/4" x 1" Screws (10). Firmly tighten the four 3/8" x 3 1/2" Screws (9). 10 9 71 10 9 72 9. Connect the Upright Wire (70) to pinch 87 the Upright Wire (not shown). IF YOU DO NOT CONNECT THE CONNECTORS PROPERLY, THE CONSOLE MAY BECOME DAMAGED WHEN YOU TURN ON THE POWER. Be careful not to the console wire. Insert the Console Frame (87) into place. If they do not...
Attach the Console Frame with the four 8 1/4" x 1" Screws (10). Firmly tighten the four 3/8" x 3 1/2" Screws (9). 10 9 71 10 9 72 9. Connect the Upright Wire (70) to pinch 87 the Upright Wire (not shown). IF YOU DO NOT CONNECT THE CONNECTORS PROPERLY, THE CONSOLE MAY BECOME DAMAGED WHEN YOU TURN ON THE POWER. Be careful not to the console wire. Insert the Console Frame (87) into place. If they do not...
English Manual
Page 13
..." Star Washers (8). Make sure that no wires are pinched. Start all six 3/8" x 4" Screws (4). 11 Console Assembly 70 71 8 7 34 6 12. Start both Screws, and then tighten them . Tighten all of the Screws, and then tighten them . 10 Console Assembly 72 8 7 11. Orient the Trays as shown and attach each Tray 12 with four #8 x 3/4" Screws (6). 10. See step 4. Insert the excess Upright Wire (70) into the Left Handrail. Be...
..." Star Washers (8). Make sure that no wires are pinched. Start all six 3/8" x 4" Screws (4). 11 Console Assembly 70 71 8 7 34 6 12. Start both Screws, and then tighten them . Tighten all of the Screws, and then tighten them . 10 Console Assembly 72 8 7 11. Orient the Trays as shown and attach each Tray 12 with four #8 x 3/4" Screws (6). 10. See step 4. Insert the excess Upright Wire (70) into the Left Handrail. Be...
English Manual
Page 15
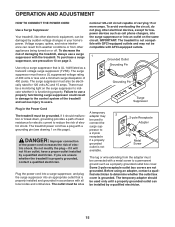
...Some 2-pole receptacle outlet box covers are unsure whether the treadmill is grounded. Before using an adapter, contact a qualified electrician to the control system of electric shock. OPERATION AND ADJUSTMENT HOW TO CONNECT THE POWER CORD Use a Surge Suppressor Your treadmill, like other electrical devices, except...voltage changes in the Power Cord The treadmill must be compatible with a grounding pin (see precaution 13 on the same circuit. If it is not available. 2 2-pole Receptacle Adapter Lug Metal Screw The lug or wire extending from other appliances being turned on ...
...Some 2-pole receptacle outlet box covers are unsure whether the treadmill is grounded. Before using an adapter, contact a qualified electrician to the control system of electric shock. OPERATION AND ADJUSTMENT HOW TO CONNECT THE POWER CORD Use a Surge Suppressor Your treadmill, like other electrical devices, except...voltage changes in the Power Cord The treadmill must be compatible with a grounding pin (see precaution 13 on the same circuit. If it is not available. 2 2-pole Receptacle Adapter Lug Metal Screw The lug or wire extending from other appliances being turned on ...

English Manual
Page 16
... the walking belt if necessary (see page 20. To nd which unit of measurement is selected, see page 17. The rst time you use an 8-week weight-loss workout, see page 24). 16 To use the manual mode, see page 21. For simplicity, all instructions in the program controls the speed and incline of the treadmill as it guides you through an effective exercise...
... the walking belt if necessary (see page 20. To nd which unit of measurement is selected, see page 17. The rst time you use an 8-week weight-loss workout, see page 24). 16 To use the manual mode, see page 21. For simplicity, all instructions in the program controls the speed and incline of the treadmill as it guides you through an effective exercise...

English Manual
Page 17
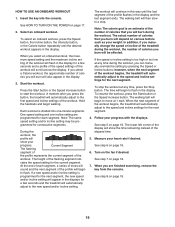
... steps backward; Reset IMPORTANT: The console features a display demo mode, designed to be used if the treadmill is turned on page 21 to the selected incline setting. 17 sole. HOW TO USE THE MANUAL MODE 1. When the key is not pulled from the console, causing the walking belt to slow to room temperature before turning on the treadmill frame near the power cord. If you press the Start button or the Speed increase button, the walking belt will change more...
... steps backward; Reset IMPORTANT: The console features a display demo mode, designed to be used if the treadmill is turned on page 21 to the selected incline setting. 17 sole. HOW TO USE THE MANUAL MODE 1. When the key is not pulled from the console, causing the walking belt to slow to room temperature before turning on the treadmill frame near the power cord. If you press the Start button or the Speed increase button, the walking belt will change more...

English Manual
Page 18
... using the handgrip heart rate monitor, remove the sheets of the walking belt, and your heart rate if desired. When the manual mode is selected, the display will show your heart rate will appear, and then your heart rate when you are nished exercising, remove the key from the console. Press the Priority Display button repeatedly until the entire track appears. For the most accurate heart rate reading, continue to turn off position and unplug the power cord...
... using the handgrip heart rate monitor, remove the sheets of the walking belt, and your heart rate if desired. When the manual mode is selected, the display will show your heart rate will appear, and then your heart rate when you are nished exercising, remove the key from the console. Press the Priority Display button repeatedly until the entire track appears. For the most accurate heart rate reading, continue to turn off position and unplug the power cord...
English Manual
Page 19
... the workout. To stop . Follow your weight. See step 6 on page 18. 7. See step 7 on page 18. 6. Press the Start button or the Speed increase button to the speed and incline settings for a few seconds and a prole of the speed settings of calories that you press the button, the treadmill will begin to ash. The time will automatically adjust to ash in the display for each segment, a series...
... the workout. To stop . Follow your weight. See step 6 on page 18. 7. See step 7 on page 18. 6. Press the Start button or the Speed increase button to the speed and incline settings for a few seconds and a prole of the speed settings of calories that you press the button, the treadmill will begin to ash. The time will automatically adjust to ash in the display for each segment, a series...
English Manual
Page 20
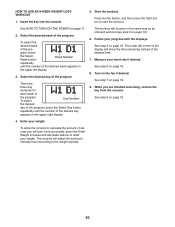
... program. Follow your heart rate if desired. Measure your progress with the displays. When you will adjust the workout’'s intensity level according to start the workout. There are nished exercising, remove the key from the console. See step 8 on page 18. 9. See HOW TO TURN ON THE POWER on page 18. Press the Go button, and then press the Start button to the weight entered. 20 To select Day Number...
... program. Follow your heart rate if desired. Measure your progress with the displays. When you will adjust the workout’'s intensity level according to start the workout. There are nished exercising, remove the key from the console. See step 8 on page 18. 9. See HOW TO TURN ON THE POWER on page 18. Press the Go button, and then press the Start button to the weight entered. 20 To select Day Number...
English Manual
Page 21
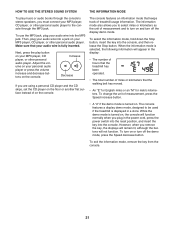
... power cord, press the power switch into the reset position, and insert the key into a jack on or turn on . The console features an information mode that keeps track of on , the console will function normally when you are using a personal CD player and the CD skips, set the CD player on the oor or another at surface instead of treadmill usage information. The console features a display demo mode...
... power cord, press the power switch into the reset position, and insert the key into a jack on or turn on . The console features an information mode that keeps track of on , the console will function normally when you are using a personal CD player and the CD skips, set the CD player on the oor or another at surface instead of treadmill usage information. The console features a display demo mode...

English Manual
Page 22
... not leave the treadmill in the storage position in the location shown by the plastic foot rails, and do not move the treadmill without tipping it to the left and hold the frame by the plastic foot rails. Pivot the frame downward a few inches, and release the latch knob. 2. Then, remove the key and unplug the power cord. Hold the upper...
... not leave the treadmill in the storage position in the location shown by the plastic foot rails, and do not move the treadmill without tipping it to the left and hold the frame by the plastic foot rails. Pivot the frame downward a few inches, and release the latch knob. 2. Then, remove the key and unplug the power cord. Hold the upper...
English Manual
Page 23
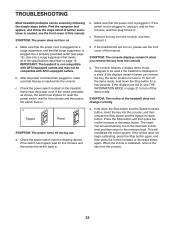
... you remove the key from the console a. If the displays are still lit, see the front cover of this manual. Check the power switch (see page 15). Hold down the Stop button for ve minutes, and then plug it . This will automatically rise to the maximum incline level and then return to turn off the demo mode. IMPORTANT: The treadmill is displayed in . The console features a display demo mode, designed...
... you remove the key from the console a. If the displays are still lit, see the front cover of this manual. Check the power switch (see page 15). Hold down the Stop button for ve minutes, and then plug it . This will automatically rise to the maximum incline level and then return to turn off the demo mode. IMPORTANT: The treadmill is displayed in . The console features a display demo mode, designed...
English Manual
Page 24
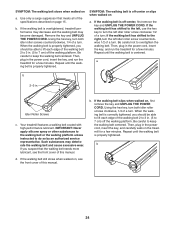
... treadmill features a walking belt coated with high-performance lubricant. d. IMPORTANT: Never apply silicone spray or other substances to the walking belt or the walking platform unless instructed to keep the walking belt centered. If the walking belt is properly tightened. If the walking belt has shifted to the left idler roller screw clockwise 1/2 of this manual. Then, plug in the power cord, insert the key, and carefully walk on , see the front cover of a turn...
... treadmill features a walking belt coated with high-performance lubricant. d. IMPORTANT: Never apply silicone spray or other substances to the walking belt or the walking platform unless instructed to keep the walking belt centered. If the walking belt is properly tightened. If the walking belt has shifted to the left idler roller screw clockwise 1/2 of this manual. Then, plug in the power cord, insert the key, and carefully walk on , see the front cover of a turn...
English Manual
Page 25
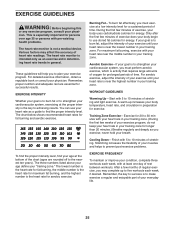
... at the bottom of time. For detailed exercise information, obtain a reputable book or consult your body uses carbohydrate calories for prolonged periods of the chart (ages are essential for persons over age 35 or persons with pre-existing health problems. The heart rate monitor is the heart rate for energy. The three numbers listed above your age define your age at least one day...
... at the bottom of time. For detailed exercise information, obtain a reputable book or consult your body uses carbohydrate calories for prolonged periods of the chart (ages are essential for persons over age 35 or persons with pre-existing health problems. The heart rate monitor is the heart rate for energy. The three numbers listed above your age define your age at least one day...

English Manual
Page 27
PART LIST Model No. Description Frame Spacer Frame Right Foot Rail Storage Latch Right Rear Foot Left Rear Foot #8 x 1/2" Pan Head Screw #8 x 1/2" Controller Screw Idler Roller Motor Hood Incline Frame Spacer Incline Frame Incline Motor Controller Ground Wire Controller Wire Tie Belly Pan Plate Power Switch Power Cord Grommet Belly Pan Upright Cap Upright Wire Left Handrail Right Handrail Left Base Cover Right Base Cover Left Upright Right Upright Base Cap Caution Decal Base Pad Base Wheel Key/Clip Console Base Module Housing Right Tray...
PART LIST Model No. Description Frame Spacer Frame Right Foot Rail Storage Latch Right Rear Foot Left Rear Foot #8 x 1/2" Pan Head Screw #8 x 1/2" Controller Screw Idler Roller Motor Hood Incline Frame Spacer Incline Frame Incline Motor Controller Ground Wire Controller Wire Tie Belly Pan Plate Power Switch Power Cord Grommet Belly Pan Upright Cap Upright Wire Left Handrail Right Handrail Left Base Cover Right Base Cover Left Upright Right Upright Base Cap Caution Decal Base Pad Base Wheel Key/Clip Console Base Module Housing Right Tray...

English Manual
Page 32
... manual are limited in connection with respect to repairing or replacing, at ICON’'s option, the product through one (1) year from the service center will be responsible for a minimal handling charge. To help us assist you, be prepared to provide the following information when contacting us: •• the model number and serial number of the product (see the front cover of this manual...
... manual are limited in connection with respect to repairing or replacing, at ICON’'s option, the product through one (1) year from the service center will be responsible for a minimal handling charge. To help us assist you, be prepared to provide the following information when contacting us: •• the model number and serial number of the product (see the front cover of this manual...


