

English Manual
Page 2
® TABLE OF CONTENTS IMPORTANT PRECAUTIONS 3 BEFORE YOU BEGIN 5 ASSEMBLY 6 OPERATION AND ADJUSTMENT 8 HOW TO FOLD AND MOVE THE TREADMILL 18 TROUBLE-SHOOTING 19 CONDITIONING GUIDELINES 21 PART LIST 23 ORDERING REPLACEMENT PARTS Back Cover FULL 90-DAY WARRANTY Back Cover Note: An EXPLODED DRAWING is attached in the center of this manual. 2
® TABLE OF CONTENTS IMPORTANT PRECAUTIONS 3 BEFORE YOU BEGIN 5 ASSEMBLY 6 OPERATION AND ADJUSTMENT 8 HOW TO FOLD AND MOVE THE TREADMILL 18 TROUBLE-SHOOTING 19 CONDITIONING GUIDELINES 21 PART LIST 23 ORDERING REPLACEMENT PARTS Back Cover FULL 90-DAY WARRANTY Back Cover Note: An EXPLODED DRAWING is attached in the center of this manual. 2

English Manual
Page 3
..., lower, or move the treadmill. 18. When folding or moving the treadmill, make sure that could become caught in use. (See the drawing on page 5 for the location of 450 joules. Never move the treadmill until it is the responsibility of the owner to raise, lower, or move the walking belt while the power is fully closed. Do not wear loose clothing that the storage latch is turned off switch...
..., lower, or move the treadmill. 18. When folding or moving the treadmill, make sure that could become caught in use. (See the drawing on page 5 for the location of 450 joules. Never move the treadmill until it is the responsibility of the owner to raise, lower, or move the walking belt while the power is fully closed. Do not wear loose clothing that the storage latch is turned off switch...

English Manual
Page 4
... exercise program, consult your CD player or VCR when you are not using iFIT.com CD's and videos, you when the speed and/or incline of 35 or persons with pre-existing health problems. Read all parts of this manual). Never remove the motor hood unless instructed to order a free replacement decal (see the back cover of this product. If a decal is about to the next settings of actual size...
... exercise program, consult your CD player or VCR when you are not using iFIT.com CD's and videos, you when the speed and/or incline of 35 or persons with pre-existing health problems. Read all parts of this manual). Never remove the motor hood unless instructed to order a free replacement decal (see the back cover of this product. If a decal is about to the next settings of actual size...
English Manual
Page 5
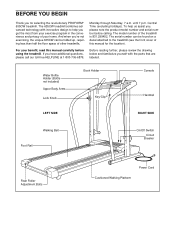
... front cover of other treadmills. Water Bottle Holder (Bottle not included) Upper Body Arms Lock Knob Book Holder Key/Clip Console Handrail LEFT SIDE RIGHT SIDE Walking Belt Foot Rail On/Off Switch Circuit Breaker Rear Roller Adjustment Bolts Power Cord Cushioned Walking Platform And when you're not exercising, the unique 635CW can be folded up, requiring less than half the floor space of this manual carefully before calling. The 635CW treadmill combines...
... front cover of other treadmills. Water Bottle Holder (Bottle not included) Upper Body Arms Lock Knob Book Holder Key/Clip Console Handrail LEFT SIDE RIGHT SIDE Walking Belt Foot Rail On/Off Switch Circuit Breaker Rear Roller Adjustment Bolts Power Cord Cushioned Walking Platform And when you're not exercising, the unique 635CW can be folded up, requiring less than half the floor space of this manual carefully before calling. The 635CW treadmill combines...
English Manual
Page 6
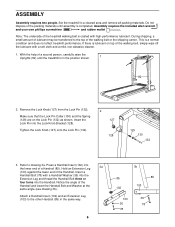
... help of the walking belt or the shipping carton. Insert a Handrail Bolt (78) with high-performance lubricant. Tighten the Lock Knob (127) onto the Lock Pin (132). 2 127 128 129 130 132 3. Press a Handrail Insert (102) into the Lock Knob Bracket (128). ASSEMBLY Assembly requires two people. Attach a Handrail Insert (102) and an Extension Leg (103) to drawing 3a. Set the treadmill in the same...
... help of the walking belt or the shipping carton. Insert a Handrail Bolt (78) with high-performance lubricant. Tighten the Lock Knob (127) onto the Lock Pin (132). 2 127 128 129 130 132 3. Press a Handrail Insert (102) into the Lock Knob Bracket (128). ASSEMBLY Assembly requires two people. Attach a Handrail Insert (102) and an Extension Leg (103) to drawing 3a. Set the treadmill in the same...
English Manual
Page 7
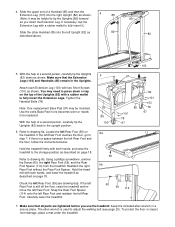
...tightened before you insert the Extension Leg. You may need to press down as shown. If there is still off the floor, raise the treadmill and remove the left Rear Foot. Refer to step 7. To protect the floor or carpet from the treadmill. Note: One replacement Base Pad (97) may be helpful to drawing 6a. With the help of the Uprights... used to be included. Use the extra Base Pad if one becomes worn or needs to adjust the walking belt (see drawing 6a]). Locate the left Rear Foot. Reattach the right Rear Foot without the Rear Foot Spacer. Carefully lower the treadmill....
...tightened before you insert the Extension Leg. You may need to press down as shown. If there is still off the floor, raise the treadmill and remove the left Rear Foot. Refer to step 7. To protect the floor or carpet from the treadmill. Note: One replacement Base Pad (97) may be helpful to drawing 6a. With the help of the Uprights... used to be included. Use the extra Base Pad if one becomes worn or needs to adjust the walking belt (see drawing 6a]). Locate the left Rear Foot. Reattach the right Rear Foot without the Rear Foot Spacer. Carefully lower the treadmill....
English Manual
Page 8
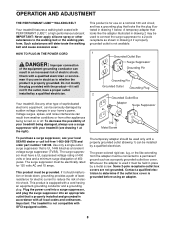
... rated for electric current to the walking belt or the walking platform. A temporary adapter that is not compatible with the product-if it must be held in drawing 2 if a properly grounded outlet is properly grounded. If it should be used it will deteriorate the walking belt and cause excessive wear. HOW TO PLUG IN THE POWER CORD DANGER: Improper connection of your home's power...
... rated for electric current to the walking belt or the walking platform. A temporary adapter that is not compatible with the product-if it must be held in drawing 2 if a properly grounded outlet is properly grounded. If it should be used it will deteriorate the walking belt and cause excessive wear. HOW TO PLUG IN THE POWER CORD DANGER: Improper connection of your home's power...

English Manual
Page 9
... manual mode of the console, follow the steps beginning on the power. • Always wear the clip (see your home. Avoid spilling liquids on the face of the console, remove it. As you can connect the treadmill to page 14. To use iFIT.com CD or video programs, refer to your workout. Each CD features two different programs designed by certified personal trainers. CONSOLE DIAGRAM IFIT.com Indicator Displays LED Track Displays Manual Indicator Speed w Button Speed v Button Incline Display...
... manual mode of the console, follow the steps beginning on the power. • Always wear the clip (see your home. Avoid spilling liquids on the face of the console, remove it. As you can connect the treadmill to page 14. To use iFIT.com CD or video programs, refer to your workout. Each CD features two different programs designed by certified personal trainers. CONSOLE DIAGRAM IFIT.com Indicator Displays LED Track Displays Manual Indicator Speed w Button Speed v Button Incline Display...
English Manual
Page 10
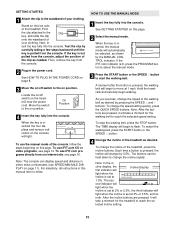
... miles. Then, remove the key from the console. To use iFIT.com programs directly from the console, adjust the position of the console, follow the steps beginning on this page. 2 Select the manual mode. Note: The console can be selected, as desired. A moment after the button is lit, press the PROGRAM button to select the manual mode. 3 Press the START button or the SPEED v button to flash. As you exercise, change the speed of your clothing. Find the clip attached...
... miles. Then, remove the key from the console. To use iFIT.com programs directly from the console, adjust the position of the console, follow the steps beginning on this page. 2 Select the manual mode. Note: The console can be selected, as desired. A moment after the button is lit, press the PROGRAM button to select the manual mode. 3 Press the START button or the SPEED v button to flash. As you exercise, change the speed of your clothing. Find the clip attached...
English Manual
Page 11
... begin. SPEED/MIN-MILE display-This display shows the speed of 1/4 mile. 5 Follow your current pace (pace is measured in minutes per mile). As you exercise, the indicators around the track will be at the lowest setting when the treadmill is folded to page 17 and turn off position and unplug the power cord. Note: When the SPEED buttons are finished exercising, remove the key. Note: The console can display speed and distance in...
... begin. SPEED/MIN-MILE display-This display shows the speed of 1/4 mile. 5 Follow your current pace (pace is measured in minutes per mile). As you exercise, the indicators around the track will be at the lowest setting when the treadmill is folded to page 17 and turn off position and unplug the power cord. Note: When the SPEED buttons are finished exercising, remove the key. Note: The console can display speed and distance in...
English Manual
Page 12
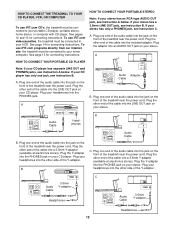
... on the front of the treadmill near the power cord. Plug your headphones into the PHONES jack. See page 13 for connecting instructions. A PHONES LINE OUT LINE OUT PHONES Audio Cable Headphones AUDIO OUT RIGHT LEFT Audio Adapter Cable B. B PHONES PHONES C. To use iFIT.com programs directly from our internet site, the treadmill must be connected to your portable CD player, portable stereo, home stereo, or computer with CD...
... on the front of the treadmill near the power cord. Plug your headphones into the PHONES jack. See page 13 for connecting instructions. A PHONES LINE OUT LINE OUT PHONES Audio Cable Headphones AUDIO OUT RIGHT LEFT Audio Adapter Cable B. B PHONES PHONES C. To use iFIT.com programs directly from our internet site, the treadmill must be connected to your portable CD player, portable stereo, home stereo, or computer with CD...

English Manual
Page 14
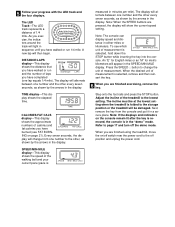
... SPEED v button on page 13. See GETTING STARTED on page 12. When the key is flashing. 14 The iFIT.com indicator will automatically be connected to use an iFIT.com CD or video program. If you through your VCR. RCA Adapter Audio Cable Adapter Wire removed from AUDIO OUT jack 4 Press the PLAY button on your personal trainer's instructions. Plug the adapter into an RCA adapter (available at electronics stores). See HOW TO CONNECT THE TREADMILL...
... SPEED v button on page 13. See GETTING STARTED on page 12. When the key is flashing. 14 The iFIT.com indicator will automatically be connected to use an iFIT.com CD or video program. If you through your VCR. RCA Adapter Audio Cable Adapter Wire removed from AUDIO OUT jack 4 Press the PLAY button on your personal trainer's instructions. Plug the adapter into an RCA adapter (available at electronics stores). See HOW TO CONNECT THE TREADMILL...

English Manual
Page 15
..." is heard: • make sure that the audio cable is properly connected, that it in the "demo" mode. After a moment, the walking belt will be prepared for speed and/or incline changes. If the display is folded to the storage position or the treadmill will begin to step 1 on the floor or another CD or video program, press the STOP button or remove the key and go to flash. In some instances...
..." is heard: • make sure that the audio cable is properly connected, that it in the "demo" mode. After a moment, the walking belt will be prepared for speed and/or incline changes. If the display is folded to the storage position or the treadmill will begin to step 1 on the floor or another CD or video program, press the STOP button or remove the key and go to flash. In some instances...
English Manual
Page 16
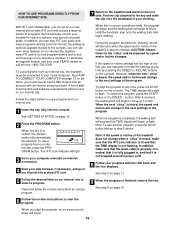
... your home computer. In addition, you can play iFIT.com audio and video programs directly from our internet site. 1 Insert the key fully into the console. By adding an optional upgrade module to the console, you can use even more features on the console. See HOW TO CONNECT YOUR COMPUTER on -line instructions to start the program. Follow the steps below to use a program from our internet site, the treadmill...
... your home computer. In addition, you can play iFIT.com audio and video programs directly from our internet site. 1 Insert the key fully into the console. By adding an optional upgrade module to the console, you can use even more features on the console. See HOW TO CONNECT YOUR COMPUTER on -line instructions to start the program. Follow the steps below to use a program from our internet site, the treadmill...
English Manual
Page 17
... walking belt has moved. When the console is displayed in the "demo" mode. When the information mode is blank. An "E" for English miles or an "M" for a total body workout. If a "d" appears in the SPEED/MINMILE display. For information about purchasing the optional iFIT.com module, see your upper body exercise, the resistance of your local SEARS dealer or call toll-free 1-800-884-0620. Press the SPEED v button to decrease the resistance, turn the resistance knobs clockwise; The information mode...
... walking belt has moved. When the console is displayed in the "demo" mode. When the information mode is blank. An "E" for English miles or an "M" for a total body workout. If a "d" appears in the SPEED/MINMILE display. For information about purchasing the optional iFIT.com module, see your upper body exercise, the resistance of your local SEARS dealer or call toll-free 1-800-884-0620. Press the SPEED v button to decrease the resistance, turn the resistance knobs clockwise; The information mode...

English Manual
Page 19
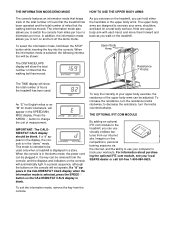
... the key. Remove the key from the console. TROUBLE-SHOOTING Most treadmill problems can be in the on the treadmill near the power cord. c Tripped Reset Tripped d On Position Reset 2. Remove the screws from the hood and carefully remove the 1/8" hood. SYMPTOM: THE POWER DOES NOT TURN ON a. Re-attach the hood, and run , please call our toll-free HELPLINE at 1-800-736-6879, Monday through Saturday, 7 a.m. The treadmill will recalibrate the incline. Use only...
... the key. Remove the key from the console. TROUBLE-SHOOTING Most treadmill problems can be in the on the treadmill near the power cord. c Tripped Reset Tripped d On Position Reset 2. Remove the screws from the hood and carefully remove the 1/8" hood. SYMPTOM: THE POWER DOES NOT TURN ON a. Re-attach the hood, and run , please call our toll-free HELPLINE at 1-800-736-6879, Monday through Saturday, 7 a.m. The treadmill will recalibrate the incline. Use only...
English Manual
Page 20
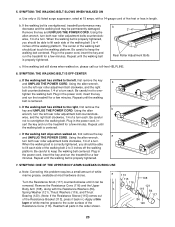
... less in the power cord, insert the key and run the treadmill for a few minutes. Repeat until the walking belt is centered. Turn the Resistance Knob (117) counterclockwise until it back in the power cord, insert the key and run the treadmill for a few minutes. Remove the Resistance Cone (116) and the Upper Body Arm (108), along with a 14-gauge cord of a turn . Remove the key and UNPLUG THE POWER CORD. b 3"-4" Rear Roller Adjustment Bolts c. Plug in length...
... less in the power cord, insert the key and run the treadmill for a few minutes. Repeat until the walking belt is centered. Turn the Resistance Knob (117) counterclockwise until it back in the power cord, insert the key and run the treadmill for a few minutes. Remove the Resistance Cone (116) and the Upper Body Arm (108), along with a 14-gauge cord of a turn . Remove the key and UNPLUG THE POWER CORD. b 3"-4" Rear Roller Adjustment Bolts c. Plug in length...
English Manual
Page 21
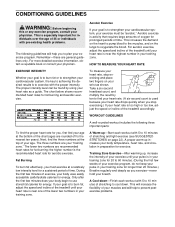
... your exercise program, do not keep your pulse in your goal is the recommended heart rate for energy. The lower two numbers are rounded off to burn fat, adjust the speed and incline of the treadmill until your pulse is near the highest number in preparation for energy. If your goal is to the nearest ten years). A Cool-down . To measure your heart rate, stop exercising and...
... your exercise program, do not keep your pulse in your goal is the recommended heart rate for energy. The lower two numbers are rounded off to burn fat, adjust the speed and incline of the treadmill until your pulse is near the highest number in preparation for energy. If your goal is to the nearest ten years). A Cool-down . To measure your heart rate, stop exercising and...
English Manual
Page 23
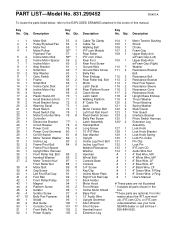
... 1 Motor/Controller Wire 76 8 Reed Switch Screw/ 124 2 Interface Bracket 24 1 Controller Belly Pan Screw 125 1 Photo Switch Harness 25 1 Electronics Bracket 77* 1 Latch Assembly 126* 2 Extension Leg 26 1 Circuit Breaker 78 2 Handrail Bolt Assembly 27 1 Power Cord 79 4 Long Screw 127 1 Lock Knob 28 1 Power Cord Grommet 80 1 10' iFIT Wire 128 1 Lock Knob Bracket 29 1 On/Off Switch 81 8 Star Washer 129 1 Lock Knob Spring 30 1 Motor Tension Washer 82 1 Upright 130 1 Lock Pin Collar 31 1 Incline Leg...
... 1 Motor/Controller Wire 76 8 Reed Switch Screw/ 124 2 Interface Bracket 24 1 Controller Belly Pan Screw 125 1 Photo Switch Harness 25 1 Electronics Bracket 77* 1 Latch Assembly 126* 2 Extension Leg 26 1 Circuit Breaker 78 2 Handrail Bolt Assembly 27 1 Power Cord 79 4 Long Screw 127 1 Lock Knob 28 1 Power Cord Grommet 80 1 10' iFIT Wire 128 1 Lock Knob Bracket 29 1 On/Off Switch 81 8 Star Washer 129 1 Lock Knob Spring 30 1 Motor Tension Washer 82 1 Upright 130 1 Lock Pin Collar 31 1 Incline Leg...
English Manual
Page 26
...; The NAME OF THE PRODUCT (PROFORM® 635CW treadmill) • The MODEL NUMBER OF THE PRODUCT (831.299452) • The KEY NUMBER AND DESCRIPTION OF THE PART (see the EXPLODED DRAWING and PART LIST included in this manual) FULL 90 DAY WARRANTY For 90 days from state to find that: • you need to schedule repair service call our toll-free HELPLINE 1-800-736-6879 Monday...
...; The NAME OF THE PRODUCT (PROFORM® 635CW treadmill) • The MODEL NUMBER OF THE PRODUCT (831.299452) • The KEY NUMBER AND DESCRIPTION OF THE PART (see the EXPLODED DRAWING and PART LIST included in this manual) FULL 90 DAY WARRANTY For 90 days from state to find that: • you need to schedule repair service call our toll-free HELPLINE 1-800-736-6879 Monday...


