
English Manual
Page 1
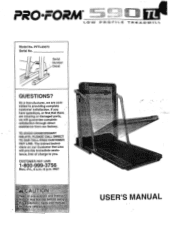
... customer satisfaction. MST 1.:-- ,,,e'egt ize a% ns. , Read all ,,,,i0§wv i4,:miv.:,„u,,,c,„ liafiktt Trir- :m.k..ei-4,-ni:,:O0tVr.0::•o::,.sPip::mXAi:tXiYmaiii.;f:e.4b.:i,..e. TREADMILL Model No. Number -
... customer satisfaction. MST 1.:-- ,,,e'egt ize a% ns. , Read all ,,,,i0§wv i4,:miv.:,„u,,,c,„ liafiktt Trir- :m.k..ei-4,-ni:,:O0tVr.0::•o::,.sPip::mXAi:tXiYmaiii.;f:e.4b.:i,..e. TREADMILL Model No. Number -

English Manual
Page 2
...less Never allow more amps Nii„other'6ppllari6e should use the. lit on the admill at could become caught In the treadmill. Trfletr04irgi. :;04.: .,...,9AM)0 th .•itieeO(6**0:Tofiiiwiit to the center of bums ire electric shock or injury o persons,... read t owing important precautions and Information before operating:the treadmill he treadmill op as esdiibed in al. treadmill with bare feet only stnolcings, or in sandals',' :a., he responsibility; iateCkNunAdTeMr t::::;14, $.atnehd•e0tcureoSavCde•...
...less Never allow more amps Nii„other'6ppllari6e should use the. lit on the admill at could become caught In the treadmill. Trfletr04irgi. :;04.: .,...,9AM)0 th .•itieeO(6**0:Tofiiiwiit to the center of bums ire electric shock or injury o persons,... read t owing important precautions and Information before operating:the treadmill he treadmill op as esdiibed in al. treadmill with bare feet only stnolcings, or in sandals',' :a., he responsibility; iateCkNunAdTeMr t::::;14, $.atnehd•e0tcureoSavCde•...

English Manual
Page 3
... A WARNING! • Never allow children to play on /off " pos•eitlii.o.anhCw'r''h''en not;irl.Se K01±Y...0 vcation'O. on or around treadmill. • Storage latch must be fully engaged before folding treadmillinto storage position_ 0OO • • '0 c:1" • Ac 0 3 folding or,...free, to emo e• the "off wa awl ch to order a free replacement decal (see ORDERING REPLACEMENT PARTS on your treadmill. any::C erciat, ren - avthaseramirot,ueslx?,:PerlicfOisl1eP4:.9;'v4.1„0i.A..:,,.r.ii,ci.s'.ee,,e!,"ut,0n,er:s.ar:o#flqf!r1i,li,,•pY...
... A WARNING! • Never allow children to play on /off " pos•eitlii.o.anhCw'r''h''en not;irl.Se K01±Y...0 vcation'O. on or around treadmill. • Storage latch must be fully engaged before folding treadmillinto storage position_ 0OO • • '0 c:1" • Ac 0 3 folding or,...free, to emo e• the "off wa awl ch to order a free replacement decal (see ORDERING REPLACEMENT PARTS on your treadmill. any::C erciat, ren - avthaseramirot,ueslx?,:PerlicfOisl1eP4:.9;'v4.1„0i.A..:,,.r.ii,ci.s'.ee,,e!,"ut,0n,er:s.ar:o#flqf!r1i,li,,•pY...

English Manual
Page 4
... PFTL59070. For your home. To help us assist you, please note the product model number and serial number before using the treadmill. The serial number can be found on a decal attached to let you enjoy an excellent form of cardiovascular exercise in the ... reading further, please review the drawing below and familiarize yourself with innovative design to the treadmill (see the front cover of your benefit, read this manual for selecting the PROFORM® 590 TL treadmill. The 590 TL combines advanced technology with the labeled parts. Mountain Time (excluding holidays)....
... PFTL59070. For your home. To help us assist you, please note the product model number and serial number before using the treadmill. The serial number can be found on a decal attached to let you enjoy an excellent form of cardiovascular exercise in the ... reading further, please review the drawing below and familiarize yourself with innovative design to the treadmill (see the front cover of your benefit, read this manual for selecting the PROFORM® 590 TL treadmill. The 590 TL combines advanced technology with the labeled parts. Mountain Time (excluding holidays)....
English Manual
Page 5
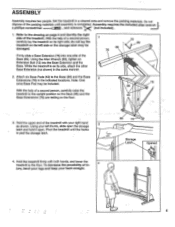
.... Firmly slide a Base Extension (76) into the Base Extension and the Base. Note: One extra Base Pad may be included. Pivot the treadmill until assembly is past the storage latch. 4. Hold the upper end of the packing materials until the frame is completed. Assembly requires the included alien...your right hand as shown. To decrease the possibility of the Base (86). ASSEMBLY Assembly requires two people. With the help of the treadmill. do not lay the treadmill on the floor. 76 86 .43 3. Attach six Base Pads (43) to the upright position so the Base (86) and ...
.... Firmly slide a Base Extension (76) into the Base Extension and the Base. Note: One extra Base Pad may be included. Pivot the treadmill until assembly is past the storage latch. 4. Hold the upper end of the packing materials until the frame is completed. Assembly requires the included alien...your right hand as shown. To decrease the possibility of the Base (86). ASSEMBLY Assembly requires two people. With the help of the treadmill. do not lay the treadmill on the floor. 76 86 .43 3. Attach six Base Pads (43) to the upright position so the Base (86) and ...
English Manual
Page 6
...sure that all four Screws in the Frame (83). Note: To protect the floor or carpet, place a mat under the treadmill. Follow the instructions to HOW TO FOLD THE TREADMILL FOR STORAGE on the back cover. 6 Press the Adhesive Clip onto the Base (86) in the Handrail Bracket and the ...Handrail Bracket (not shown). 8. To order a mat, see ORDERING REPLACEMENT PARTS on page 10. Refer to fold the treadmill. Firmly tighten all parts are tightened before you use the treadmill. Press the Allen Wrench (89) into the right Handrail Bracket (42) and the Frame (83). Thread two more Handrail...
...sure that all four Screws in the Frame (83). Note: To protect the floor or carpet, place a mat under the treadmill. Follow the instructions to HOW TO FOLD THE TREADMILL FOR STORAGE on the back cover. 6 Press the Adhesive Clip onto the Base (86) in the Handrail Bracket and the ...Handrail Bracket (not shown). 8. To order a mat, see ORDERING REPLACEMENT PARTS on page 10. Refer to fold the treadmill. Firmly tighten all parts are tightened before you use the treadmill. Press the Allen Wrench (89) into the right Handrail Bracket (42) and the Frame (83). Thread two more Handrail...

English Manual
Page 7
... the power cord into a surge protector, and plug the surge protector into an appropriate outlet that looks like any other type of your treadmill. 0 Grounding Plug Grounding Plug 0° Surge protectors are sold at 15 amps, with a 2 14-gauge cord of 0,° Lug...surges, spikes, and noise interference can_re-sult from weather conditions or from the adapter must be grounded. Grounded Outlet Box Grounding Pin Treadmill Power Cord cluded) with PERFORMANT LURE"", a high-performance lubricant. listed surge protector, rated at most hardware stores and department stores. ...
... the power cord into a surge protector, and plug the surge protector into an appropriate outlet that looks like any other type of your treadmill. 0 Grounding Plug Grounding Plug 0° Surge protectors are sold at 15 amps, with a 2 14-gauge cord of 0,° Lug...surges, spikes, and noise interference can_re-sult from weather conditions or from the adapter must be grounded. Grounded Outlet Box Grounding Pin Treadmill Power Cord cluded) with PERFORMANT LURE"", a high-performance lubricant. listed surge protector, rated at most hardware stores and department stores. ...
English Manual
Page 8
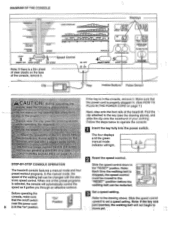
e. e of .the treadmill.- and on page 7.) L.,. Make sure that Before eratin . •X*:. ON OFF • • ON OPP 0 4 a. 5c ) SELECT MODE START 'STOP .5:3B TIME " Li3 DIST./ PULSE -. ...
e. e of .the treadmill.- and on page 7.) L.,. Make sure that Before eratin . •X*:. ON OFF • • ON OPP 0 4 a. 5c ) SELECT MODE START 'STOP .5:3B TIME " Li3 DIST./ PULSE -. ...

English Manual
Page 10
...and place your thumb at the right. cline, hold down again on the- Next, unplug the power cord. To decrease the possibility of the treadmill, if desired. The TIME display will show an "E" or an "M," indicating miles or kilometers (see SPEED DISPLAY on the pulse sensor as shown... another 15 seconds for the most accu- Press down the START/ STOP button while inserting the key into the conSole. In addition, move the treadmill. 1. Displays the trtn I LL-I distance you are finished, remove the key. If the KPH indicator ap- Note: The DISTANCE/PULSE display ...
...and place your thumb at the right. cline, hold down again on the- Next, unplug the power cord. To decrease the possibility of the treadmill, if desired. The TIME display will show an "E" or an "M," indicating miles or kilometers (see SPEED DISPLAY on the pulse sensor as shown... another 15 seconds for the most accu- Press down the START/ STOP button while inserting the key into the conSole. In addition, move the treadmill. 1. Displays the trtn I LL-I distance you are finished, remove the key. If the KPH indicator ap- Note: The DISTANCE/PULSE display ...

English Manual
Page 11
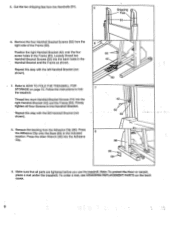
...locations Indicated by the arrows. Make sure that the storage latch Is closed fully over the frame guide. HOW TO MOVE THE TREADMILL Before moving the treadmill. Make sure that the storage latch closes fully over the frame guide. 1. Place one foot on the front wheels. Hold...oo Base Front Wheels Storage Latch Opened 00 Do not hold the treadmill firmly. Keep the treadmill out of the treadmill with both hands, and lower the treadmill to the position shown and hold here ( . • 11 HOWTO LOWER THE TREADMILL FOR USE 1. Caution: To avoid pinching your left thumb, ...
...locations Indicated by the arrows. Make sure that the storage latch Is closed fully over the frame guide. HOW TO MOVE THE TREADMILL Before moving the treadmill. Make sure that the storage latch closes fully over the frame guide. 1. Place one foot on the front wheels. Hold...oo Base Front Wheels Storage Latch Opened 00 Do not hold the treadmill firmly. Keep the treadmill out of the treadmill with both hands, and lower the treadmill to the position shown and hold here ( . • 11 HOWTO LOWER THE TREADMILL FOR USE 1. Caution: To avoid pinching your left thumb, ...
English Manual
Page 12
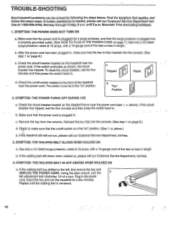
...(See 1. above .) e. If the circuit breaker has tripped, wait for five minutes and then press the switch back in. TROUBLE-SHOOTING Most treadmill problems can be in the "on" position. Check the on/off switch is plugged in. Make sure that the power cord is plugged into ...c Tripped d "On" Position Reset PI ) 2. d. Plug in length. d. If further assistance is centered. 12 Check the circuit breaker located on the treadmill frame near the power cord. Use only a UL-listed surge protector, rated at 1-800-999-3756, Monday through Friday, 6 a.m. If the walking belt ...
...(See 1. above .) e. If the circuit breaker has tripped, wait for five minutes and then press the switch back in. TROUBLE-SHOOTING Most treadmill problems can be in the "on" position. Check the on/off switch is plugged in. Make sure that the power cord is plugged into ...c Tripped d "On" Position Reset PI ) 2. d. Plug in length. d. If further assistance is centered. 12 Check the circuit breaker located on the treadmill frame near the power cord. Use only a UL-listed surge protector, rated at 1-800-999-3756, Monday through Friday, 6 a.m. If the walking belt ...

English Manual
Page 13
SYMPTOM: THE TREADMILL SITS UNEVENLY ON THE FLOOR a. Using the alien wrench, turn the left adjustment bolt counterclockwise 1/4 of a turn. Make sure that the six base pads are attached to the right, first remove the key and UNPLUG THE POWER CORD. Plug in the power cord, insert the key and run the treadmill for a few minutes. Repeat until the walking belt is centered. 5. b. If the walking belt has shifted to the treadmill (see assembly step 2 on page 5). 13
SYMPTOM: THE TREADMILL SITS UNEVENLY ON THE FLOOR a. Using the alien wrench, turn the left adjustment bolt counterclockwise 1/4 of a turn. Make sure that the six base pads are attached to the right, first remove the key and UNPLUG THE POWER CORD. Plug in the power cord, insert the key and run the treadmill for a few minutes. Repeat until the walking belt is centered. 5. b. If the walking belt has shifted to the treadmill (see assembly step 2 on page 5). 13

English Manual
Page 16
... must be prepared to give the following information: • The MODEL NUMBER OF THE PRODUCT (PFTL59070). • The NAME OF THE PRODUCT (PROFORM. 590 TL treadmill). • The SERIAL NUMBER OF THE PRODUCT (see the front cover of this manual). • The KEY NUMBER OF THE PART(S) (see...or abnormal usage or repairs not provided by ICON. This warranty extends only to products used as store display models. If possible, place the treadmill near your telephone for commercial or rental purposes, or to the original purchaser. LIMITED WARRANTY ICON Health & Fitness, Inc. (ICON), warrants ...
... must be prepared to give the following information: • The MODEL NUMBER OF THE PRODUCT (PFTL59070). • The NAME OF THE PRODUCT (PROFORM. 590 TL treadmill). • The SERIAL NUMBER OF THE PRODUCT (see the front cover of this manual). • The KEY NUMBER OF THE PART(S) (see...or abnormal usage or repairs not provided by ICON. This warranty extends only to products used as store display models. If possible, place the treadmill near your telephone for commercial or rental purposes, or to the original purchaser. LIMITED WARRANTY ICON Health & Fitness, Inc. (ICON), warrants ...


