
English Manual
Page 1
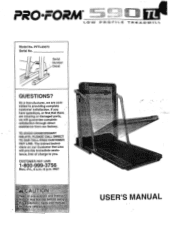
...; USER'S MANUAL PFTL59070 Serial No. TREADMILL Model No. Serial - Decal QUESTIONS? If you • have questions, or find that there are missing or damaged parts, we are committed to you. Mt.r.,MSSMO.*.:4; CUSTOMER HOT LINE: 1-800-999-3756 Mon.-Fri., 6 a.m.-6 p.m. PR FOR VOZOSZORffiat xker.4,a%W?!i:1; TO AVOID UNNECESSARY DELAYS, PLEASE CALL DIRECT TO OUR TOLL-FREE CUSTOMER HOT LINE. The trained...
...; USER'S MANUAL PFTL59070 Serial No. TREADMILL Model No. Serial - Decal QUESTIONS? If you • have questions, or find that there are missing or damaged parts, we are committed to you. Mt.r.,MSSMO.*.:4; CUSTOMER HOT LINE: 1-800-999-3756 Mon.-Fri., 6 a.m.-6 p.m. PR FOR VOZOSZORffiat xker.4,a%W?!i:1; TO AVOID UNNECESSARY DELAYS, PLEASE CALL DIRECT TO OUR TOLL-FREE CUSTOMER HOT LINE. The trained...

English Manual
Page 2
... YOU BEGIN ASSEMBLY OPERATION AND ADJUSTMENT HOW TO FOLD AND MOVE THE TREADMILL TROUBLE-SHOOTING CONDITIONING GUIDELINES ORDERING REPLACEMENT PARTS LIMITED WARRANTY 2 4 5 7 10 12 14 Back Cover Back Cover Note: An EXPLODED DRAWING and SPART LIST are attached to avoid sudden jumps In speed ofthe-piknerto:PF.1.4P r:thata' ll users of this treadmill eie adequate ormed of this manual. ear appropriate exercise clothing when :usin` the treadmill Do not...
... YOU BEGIN ASSEMBLY OPERATION AND ADJUSTMENT HOW TO FOLD AND MOVE THE TREADMILL TROUBLE-SHOOTING CONDITIONING GUIDELINES ORDERING REPLACEMENT PARTS LIMITED WARRANTY 2 4 5 7 10 12 14 Back Cover Back Cover Note: An EXPLODED DRAWING and SPART LIST are attached to avoid sudden jumps In speed ofthe-piknerto:PF.1.4P r:thata' ll users of this treadmill eie adequate ormed of this manual. ear appropriate exercise clothing when :usin` the treadmill Do not...

English Manual
Page 3
... legible, please call our Customer Service Department, toll-free, to order a free replacement decal (see ORDERING REPLACEMENT PARTS on /off wa awl ch to play on or around treadmill. • Storage latch must be fully engaged before folding treadmillinto storage position_ 0OO • • '0 c:1" • Ac 0 3 Apply thsAiecal in . on the back cover of this treadmill in the location shown. • •• A WARNING...
... legible, please call our Customer Service Department, toll-free, to order a free replacement decal (see ORDERING REPLACEMENT PARTS on /off wa awl ch to play on or around treadmill. • Storage latch must be fully engaged before folding treadmillinto storage position_ 0OO • • '0 c:1" • Ac 0 3 Apply thsAiecal in . on the back cover of this treadmill in the location shown. • •• A WARNING...

English Manual
Page 4
... privacy of the treadmill is not included) RIGHT SIDE Foot Rails Front Wheel 0 Cushioned Walking Platform Walking Belt Rear Roller Adjustment Bolt 4 And when you're not exercising, the unique 590 TL can be folded up, requiring less than half the floor space of this manual carefully before calling. Console Accessory Tray Towel Rack Storage Latch 0 Key/Clip Handrails LEFT SIDE Power Cord Uprights On/Off Switch Circuit Breaker Water...
... privacy of the treadmill is not included) RIGHT SIDE Foot Rails Front Wheel 0 Cushioned Walking Platform Walking Belt Rear Roller Adjustment Bolt 4 And when you're not exercising, the unique 590 TL can be folded up, requiring less than half the floor space of this manual carefully before calling. Console Accessory Tray Towel Rack Storage Latch 0 Key/Clip Handrails LEFT SIDE Power Cord Uprights On/Off Switch Circuit Breaker Water...
English Manual
Page 5
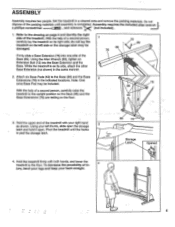
...bend your legs and keep your back straight. ( 86 76 Storage Latch Opened oo a lt _ . 5 Using the Allen Wrench (89), tighten an Extension Bolt (13) into one side of a second person, carefully lay the treadmill on its right side; With the help of the Base (86). ASSEMBLY Assembly requires two...Base. Using your right hand as shown. do not lay the treadmill on its left thumb, slide open the storage 3 latch and hold it open. Pivot the treadmill until assembly is past the storage latch. 4. Refer to the floor. Attach six Base Pads (43) to the upright position ...
...bend your legs and keep your back straight. ( 86 76 Storage Latch Opened oo a lt _ . 5 Using the Allen Wrench (89), tighten an Extension Bolt (13) into one side of a second person, carefully lay the treadmill on its right side; With the help of the Base (86). ASSEMBLY Assembly requires two...Base. Using your right hand as shown. do not lay the treadmill on its left thumb, slide open the storage 3 latch and hold it open. Pivot the treadmill until assembly is past the storage latch. 4. Refer to the floor. Attach six Base Pads (43) to the upright position ...
English Manual
Page 6
... instructions to HOW TO FOLD THE TREADMILL FOR STORAGE on the back cover. 6 Thread two more Handrail Bracket Screws (.52) into the Adhesive Clip. 42 52 83 _.....- . 86 90 ----4z1 . 89 9. Press the Allen Wrench (89) into the right Handrail Bracket (42) and the Frame (83). To order a mat, see ORDERING REPLACEMENT PARTS on page 10. Firmly tighten all parts are tightened...
... instructions to HOW TO FOLD THE TREADMILL FOR STORAGE on the back cover. 6 Thread two more Handrail Bracket Screws (.52) into the Adhesive Clip. 42 52 83 _.....- . 86 90 ----4z1 . 89 9. Press the Allen Wrench (89) into the right Handrail Bracket (42) and the Frame (83). To order a mat, see ORDERING REPLACEMENT PARTS on page 10. Firmly tighten all parts are tightened...

English Manual
Page 7
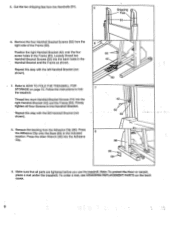
... walking belt or the walking platform. being damaged, always use on or cff. Grounded Outlet Box Grounding Pin Treadmill Power Cord cluded) with PERFORMANT LURE"", a high-performance lubricant. electric shock. Ma•ri ff you,are in - Voltage surges, spikes, and noise interference can_re-sult from weather conditions or from the adapter must be installed by sudden voltage changes in your treadmill being turned...
... walking belt or the walking platform. being damaged, always use on or cff. Grounded Outlet Box Grounding Pin Treadmill Power Cord cluded) with PERFORMANT LURE"", a high-performance lubricant. electric shock. Ma•ri ff you,are in - Voltage surges, spikes, and noise interference can_re-sult from weather conditions or from the adapter must be installed by sudden voltage changes in your treadmill being turned...
English Manual
Page 8
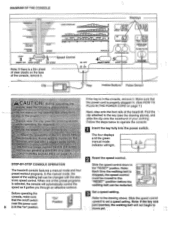
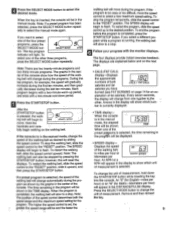
...;X*:. "MW MAIIMft THUMB PULSE Clip Key Incline Buttons Pulse Sensor If the key is properly plugged in the console, remove it . and on page 7.) L.,. rawin a 01/. IN THE POWER CORD on ewnralking beltwhen Next, step onto the-foot-rails of your clothing. tie :operattn g:• re slide the clip onto the waistband of .the treadmill.- DIAGRAM OF THE CONSOLE Displays "C. clip attached to operate the console: us $ sma ncreme...
...;X*:. "MW MAIIMft THUMB PULSE Clip Key Incline Buttons Pulse Sensor If the key is properly plugged in the console, remove it . and on page 7.) L.,. rawin a 01/. IN THE POWER CORD on ewnralking beltwhen Next, step onto the-foot-rails of your clothing. tie :operattn g:• re slide the clip onto the waistband of .the treadmill.- DIAGRAM OF THE CONSOLE Displays "C. clip attached to operate the console: us $ sma ncreme...
English Manual
Page 9
.... display-Displays the approximate numbers of the console. planation of the other . Arrows in the display will show which unit control to the "RESET" position, slide it upward, and of measurement is running, the walking belt programs, press the will change automatically during the program as desired by the graphs in the manual mode. TIME fully begin to flash. When one number to select a new maximum speed setting...
.... display-Displays the approximate numbers of the console. planation of the other . Arrows in the display will show which unit control to the "RESET" position, slide it upward, and of measurement is running, the walking belt programs, press the will change automatically during the program as desired by the graphs in the manual mode. TIME fully begin to flash. When one number to select a new maximum speed setting...

English Manual
Page 10
... straight. To exit the information mode, remove the key from the console. Caution: You must be displayed. If the KPH indicator ap- Note: The DISTANCE/PULSE display also shows your back. To use the pulse sensor, stand on the foot rails and place your thumb at this mode, hold down the START/ STOP button while inserting the key into the conSole. scribed above. To change the in a secure place...
... straight. To exit the information mode, remove the key from the console. Caution: You must be displayed. If the KPH indicator ap- Note: The DISTANCE/PULSE display also shows your back. To use the pulse sensor, stand on the foot rails and place your thumb at this mode, hold down the START/ STOP button while inserting the key into the conSole. scribed above. To change the in a secure place...

English Manual
Page 11
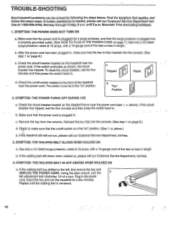
... guide. 1. Hold the treadmill firmly with your back straight. Storage Latch Frame Guide Closed oo Base Front Wheels Storage Latch Opened 00 Do not hold it rolls freely on the base, and carefully lower the treadmill until the frame is resting in the locations Indicated by the arrows. Tilt the treadmill back until it open. To decrease the possibility of injury, bend your legs...
... guide. 1. Hold the treadmill firmly with your back straight. Storage Latch Frame Guide Closed oo Base Front Wheels Storage Latch Opened 00 Do not hold it rolls freely on the base, and carefully lower the treadmill until the frame is resting in the locations Indicated by the arrows. Tilt the treadmill back until it open. To decrease the possibility of injury, bend your legs...
English Manual
Page 12
... Friday, 6 a.m. Using the alien wrench, turn . Check the circuit breaker located on the treadmill near the power cord. Reinsert the key fully into the console. (See step 1 on /off switch is plugged into a properly grounded outlet. (See HOW TO PLUG IN THE POWER CORD on , please call our Customer Service Department tollfree at the front of five feet or less in . d. If the walking belt has shifted...
... Friday, 6 a.m. Using the alien wrench, turn . Check the circuit breaker located on the treadmill near the power cord. Reinsert the key fully into the console. (See step 1 on /off switch is plugged into a properly grounded outlet. (See HOW TO PLUG IN THE POWER CORD on , please call our Customer Service Department tollfree at the front of five feet or less in . d. If the walking belt has shifted...

English Manual
Page 13
Make sure that the six base pads are attached to the right, first remove the key and UNPLUG THE POWER CORD. Repeat until the walking belt is centered. 5. Using the alien wrench, turn the left adjustment bolt counterclockwise 1/4 of a turn. SYMPTOM: THE TREADMILL SITS UNEVENLY ON THE FLOOR a. If the walking belt has shifted to the treadmill (see assembly step 2 on page 5). 13 b. Plug in the power cord, insert the key and run the treadmill for a few minutes.
Make sure that the six base pads are attached to the right, first remove the key and UNPLUG THE POWER CORD. Repeat until the walking belt is centered. 5. Using the alien wrench, turn the left adjustment bolt counterclockwise 1/4 of a turn. SYMPTOM: THE TREADMILL SITS UNEVENLY ON THE FLOOR a. If the walking belt has shifted to the treadmill (see assembly step 2 on page 5). 13 b. Plug in the power cord, insert the key and run the treadmill for a few minutes.
English Manual
Page 14
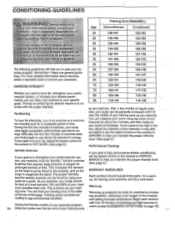
... to bum fat, adjust the speed control on the console to help you exercise, your pulse immediately. Warm-up Warming up (see SUGGESTED STRETCHES on the console to PERFORMANCE to FAT BURN. (See page 8.) Aerobic Exercise If your maximum possible heart rate. Remember-these are listed according to 10 minutes of exercise, your body uses easily accessible carbohydrate calories for exercise by using the pulse sensor. During the...
... to bum fat, adjust the speed control on the console to help you exercise, your pulse immediately. Warm-up Warming up (see SUGGESTED STRETCHES on the console to PERFORMANCE to FAT BURN. (See page 8.) Aerobic Exercise If your maximum possible heart rate. Remember-these are listed according to 10 minutes of exercise, your body uses easily accessible carbohydrate calories for exercise by using the pulse sensor. During the...
English Manual
Page 15
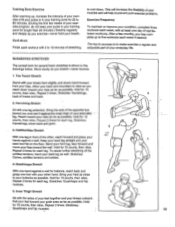
...your groin area as far as well. The key to success is to make exercise a regular and enjoyable part of your muscles and will help to prevent post-exercise problems. Exercise Frequency To maintain or improve your condition, complete three workouts each leg. Bring your heel as possible. Stretches: Quadriceps...the other hand. Quadriceps Stretch With one leg in front of your exercise program, do not keep your pulse in the drawings below. Hold for balance, reach back and grasp one leg extended. Repeat 3 times for each workout with your training zone for 15 counts, then relax. ...
...your groin area as far as well. The key to success is to make exercise a regular and enjoyable part of your muscles and will help to prevent post-exercise problems. Exercise Frequency To maintain or improve your condition, complete three workouts each leg. Bring your heel as possible. Stretches: Quadriceps...the other hand. Quadriceps Stretch With one leg in front of your exercise program, do not keep your pulse in the drawings below. Hold for balance, reach back and grasp one leg extended. Repeat 3 times for each workout with your training zone for 15 counts, then relax. ...

English Manual
Page 16
... ICON Health & Fitness, Inc. Some states do not allow limitations on how long an implied warranty lasts. This warranty gives you . When ordering parts, please be prepared to give the following information: • The MODEL NUMBER OF THE PRODUCT (PFTL59070). • The NAME OF THE PRODUCT (PROFORM. 590 TL treadmill). • The SERIAL NUMBER OF THE PRODUCT (see the front cover of this manual). • The KEY NUMBER...
... ICON Health & Fitness, Inc. Some states do not allow limitations on how long an implied warranty lasts. This warranty gives you . When ordering parts, please be prepared to give the following information: • The MODEL NUMBER OF THE PRODUCT (PFTL59070). • The NAME OF THE PRODUCT (PROFORM. 590 TL treadmill). • The SERIAL NUMBER OF THE PRODUCT (see the front cover of this manual). • The KEY NUMBER...
English Manual
Page 17
REMOVE THIS EXPLODED DRAWING AND PART LIST FROM THE MANUAL Save this EXPLODED DRAWING and PART LIST for future reference. 0 ge• Note: Specifications are subject to change without notice. For information about ordering replacement parts, see the back cover of the User's Manual.
REMOVE THIS EXPLODED DRAWING AND PART LIST FROM THE MANUAL Save this EXPLODED DRAWING and PART LIST for future reference. 0 ge• Note: Specifications are subject to change without notice. For information about ordering replacement parts, see the back cover of the User's Manual.

English Manual
Page 19
... Bracket Screw Circuit Breaker Storage Latch Bracket Storage Latch Electronics Bracket Belt Guide Rear Roller Front Roller/Pulley Foot Rail Handrail Left Handrail Arm Hood Speed Knob Console Cover Console 67 1 Motor 68 1 Motor Belt 69 1 Incline Motor 70 1 Power Cord 71 1 Grommet 72 1 Wire Harness 73 1 8" Wire Harness 74 2 Wire Harness Grommet 75 1 Shock 76 2 Base Extension 77 1 Power Supply w/Clips 78 1 Controller 79 1 Incline Leg 80 1 Belly Pan 81 1 Endcap Plug 82 1 Rear Roller Cover 83 1 Frame 84 1 Walking Platform 85 1 Console Base 86 1 Upright/Base...
... Bracket Screw Circuit Breaker Storage Latch Bracket Storage Latch Electronics Bracket Belt Guide Rear Roller Front Roller/Pulley Foot Rail Handrail Left Handrail Arm Hood Speed Knob Console Cover Console 67 1 Motor 68 1 Motor Belt 69 1 Incline Motor 70 1 Power Cord 71 1 Grommet 72 1 Wire Harness 73 1 8" Wire Harness 74 2 Wire Harness Grommet 75 1 Shock 76 2 Base Extension 77 1 Power Supply w/Clips 78 1 Controller 79 1 Incline Leg 80 1 Belly Pan 81 1 Endcap Plug 82 1 Rear Roller Cover 83 1 Frame 84 1 Walking Platform 85 1 Console Base 86 1 Upright/Base...

