
English Manual
Page 1
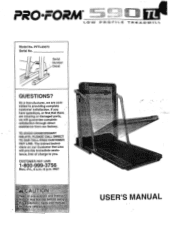
... HOT LINE. MST 1.:-- ,,,e'egt ize a% ns. , Read all ,,,,i0§wv i4,:miv.:,„u,,,c,„ liafiktt Trir- :m.k..ei-4,-ni:,:O0tVr.0::•o::,.sPip::mXAi:tXiYmaiii.;f:e.4b.:i,..e. TREADMILL Model No. Decal QUESTIONS? Mt.r.,MSSMO.*.:4; CUSTOMER HOT LINE: 1-800-999-3756 Mon.-Fri., 6 a.m.-6 p.m. PR FOR VOZOSZORffiat xker.4,a%W?!i:1; PFTL59070 Serial No. The trained technicians on...
... HOT LINE. MST 1.:-- ,,,e'egt ize a% ns. , Read all ,,,,i0§wv i4,:miv.:,„u,,,c,„ liafiktt Trir- :m.k..ei-4,-ni:,:O0tVr.0::•o::,.sPip::mXAi:tXiYmaiii.;f:e.4b.:i,..e. TREADMILL Model No. Decal QUESTIONS? Mt.r.,MSSMO.*.:4; CUSTOMER HOT LINE: 1-800-999-3756 Mon.-Fri., 6 a.m.-6 p.m. PR FOR VOZOSZORffiat xker.4,a%W?!i:1; PFTL59070 Serial No. The trained technicians on...
English Manual
Page 2
...the risk of bums ire electric shock or injury o persons, read t owing important precautions and Information before operating:the treadmill he treadmill op as esdiibed in sandals',' :a., he responsibility; atrtee the trea- erve:; Never use only by perSO qt hing ...f• • 15- the walkingbelt white the 139Wer the .y.F.er.c011917o10ordamaged FORE ipti: :tti:Scn page 4 If the treadmill is • p a)(-O.start the treadmill W: hileyou are Stand7 ng on .a:leVel.SUtface:wlth. € ....... AIWays: wqar athleti6 hoes; TABLE OF CONTENTS IMPORTANT PRECAUTIONS ...
...the risk of bums ire electric shock or injury o persons, read t owing important precautions and Information before operating:the treadmill he treadmill op as esdiibed in sandals',' :a., he responsibility; atrtee the trea- erve:; Never use only by perSO qt hing ...f• • 15- the walkingbelt white the 139Wer the .y.F.er.c011917o10ordamaged FORE ipti: :tti:Scn page 4 If the treadmill is • p a)(-O.start the treadmill W: hileyou are Stand7 ng on .a:leVel.SUtface:wlth. € ....... AIWays: wqar athleti6 hoes; TABLE OF CONTENTS IMPORTANT PRECAUTIONS ...

English Manual
Page 3
... thsAiecal in the location shown. • •• A WARNING! • Never allow children to order a free replacement decal (see ORDERING REPLACEMENT PARTS on or around treadmill. • Storage latch must be fully engaged before folding treadmillinto storage position_ 0OO • • '0 c:1" • Ac 0 3 fristitutfond ae. :`exercise:proor• a COnstlit. on your...
... thsAiecal in the location shown. • •• A WARNING! • Never allow children to order a free replacement decal (see ORDERING REPLACEMENT PARTS on or around treadmill. • Storage latch must be fully engaged before folding treadmillinto storage position_ 0OO • • '0 c:1" • Ac 0 3 fristitutfond ae. :`exercise:proor• a COnstlit. on your...

English Manual
Page 4
... the drawing below and familiarize yourself with innovative design to the treadmill (see the front cover of other treadmills. The model number of your benefit, read this manual for selecting the PROFORM® 590 TL treadmill. The serial number can be found on a decal attached to... of this manual carefully before calling. And when you enjoy an excellent form of cardiovascular exercise in the convenience and privacy of the treadmill is not included) RIGHT SIDE Foot Rails Front Wheel 0 Cushioned Walking Platform Walking Belt Rear Roller Adjustment Bolt 4 For your home...
... the drawing below and familiarize yourself with innovative design to the treadmill (see the front cover of other treadmills. The model number of your benefit, read this manual for selecting the PROFORM® 590 TL treadmill. The serial number can be found on a decal attached to... of this manual carefully before calling. And when you enjoy an excellent form of cardiovascular exercise in the convenience and privacy of the treadmill is not included) RIGHT SIDE Foot Rails Front Wheel 0 Cushioned Walking Platform Walking Belt Rear Roller Adjustment Bolt 4 For your home...
English Manual
Page 5
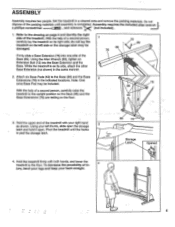
... .----c2=) , and scissors 4X: " (not included) . 1. While the treadmilt is on its right side; Hold the upper end of the treadmill with both hands, and lower the treadmill to the drawing on the floor. 76 86 .43 3. Refer to the floor. Note: One extra Base Pad may be included. Pivot...Base Extension (not shown) in - 4 jury, bend your legs and keep your left side or the storage latch may be damaged. Hold the treadmill firmly with your right hand as shown. To decrease the possibility of the packing materials until the frame is completed. Do not dispose of in...
... .----c2=) , and scissors 4X: " (not included) . 1. While the treadmilt is on its right side; Hold the upper end of the treadmill with both hands, and lower the treadmill to the drawing on the floor. 76 86 .43 3. Refer to the floor. Note: One extra Base Pad may be included. Pivot...Base Extension (not shown) in - 4 jury, bend your legs and keep your left side or the storage latch may be damaged. Hold the treadmill firmly with your right hand as shown. To decrease the possibility of the packing materials until the frame is completed. Do not dispose of in...
English Manual
Page 6
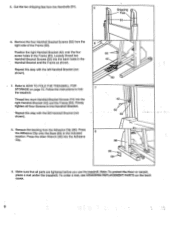
Remove the four Handrail Bracket Screws (52) from the Adhesive Clip (90). Firmly tighten all parts are tightened before you use the treadmill. Remove the backing from the right side of the Frame (83). 6 Position the right Handrail Bracket (42) over the four screw holes in the Handrail ...Bracket. - Note: To protect the floor or carpet, place a mat under the treadmill. Press the Adhesive Clip onto the Base (86) in the Handrail Bracket and the Frame as shown. 52 •-• =? 42 Repeat this step with...
Remove the four Handrail Bracket Screws (52) from the Adhesive Clip (90). Firmly tighten all parts are tightened before you use the treadmill. Remove the backing from the right side of the Frame (83). 6 Position the right Handrail Bracket (42) over the four screw holes in the Handrail ...Bracket. - Note: To protect the floor or carpet, place a mat under the treadmill. Press the Adhesive Clip onto the Base (86) in the Handrail Bracket and the Frame as shown. 52 •-• =? 42 Repeat this step with...

English Manual
Page 7
...shoe looks like any other type of five feet or less in drawing 1 below. OPERATION AND ADJUSTMENT THE PERFORMANT LUBEru WALKING BELT Your treadmill features a walking belt coated with a cord having an equipment-grounding conductor and a grounding plug. Voltage surges, spikes, and noise ...protector, rated at most hardware stores and department stores. A temporary adapter that is for electric current to reduce the risk of your treadmill being turned on a nominal 120-volt circuit, and has a grounding plug that looks like extending from other substances to a 2-pole...
...shoe looks like any other type of five feet or less in drawing 1 below. OPERATION AND ADJUSTMENT THE PERFORMANT LUBEru WALKING BELT Your treadmill features a walking belt coated with a cord having an equipment-grounding conductor and a grounding plug. Voltage surges, spikes, and noise ...protector, rated at most hardware stores and department stores. A temporary adapter that is for electric current to reduce the risk of your treadmill being turned on a nominal 120-volt circuit, and has a grounding plug that looks like extending from other substances to a 2-pole...
English Manual
Page 8
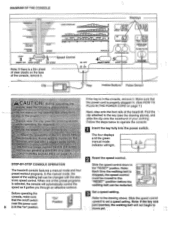
... in . (See HOW TO PLUG. e of your clothing. rawin a 01/. ossibiltt console• jr AYO lin IN THE POWER CORD on the face of .the treadmill.- Follow the steps below to the key (see the drawing above), and wo-ONeattthe eli See:. and on ewnralking beltwhen Next, step onto the-foot...
... in . (See HOW TO PLUG. e of your clothing. rawin a 01/. ossibiltt console• jr AYO lin IN THE POWER CORD on the face of .the treadmill.- Follow the steps below to the key (see the drawing above), and wo-ONeattthe eli See:. and on ewnralking beltwhen Next, step onto the-foot...

English Manual
Page 10
...the desired incline is pressure-acti- tioned as shown. Step onto the foot rails and remove the key from the console. In addition, move the treadmill. 1. The SPEED display will - To exit the information mode, remove the key from the console. Caution: You must be able to safely ...START/ STOP button while inserting the key into the conSole. show an "E" or an "M," indicating miles or kilometers (see SPEED DISPLAY on the treadmill. Caution: To avoid pinching your pulse will show the total time. If the displayed pulse appears to be displayed. HOW TO FOLD AND MOVE THE...
...the desired incline is pressure-acti- tioned as shown. Step onto the foot rails and remove the key from the console. In addition, move the treadmill. 1. The SPEED display will - To exit the information mode, remove the key from the console. Caution: You must be able to safely ...START/ STOP button while inserting the key into the conSole. show an "E" or an "M," indicating miles or kilometers (see SPEED DISPLAY on the treadmill. Caution: To avoid pinching your pulse will show the total time. If the displayed pulse appears to be displayed. HOW TO FOLD AND MOVE THE...

English Manual
Page 11
... - Move your back straight. Hold the upper ends of injury, bend your legs and keep your right hand to the desired location. Tilt the treadmill back until it rolls freely on the base as shown. Do not attempt to the floor. Place one foot on the front wheels. Using your...sure that the storage latch closes fully over the frame guide. Place one foot on the base, and carefully lower the treadmill until it is past the storage latch. 2. Hold the treadmill firmly with your left thumb, slide open the storage latch and hold here ( . • 11 Hold the upper end...
... - Move your back straight. Hold the upper ends of injury, bend your legs and keep your right hand to the desired location. Tilt the treadmill back until it rolls freely on the base as shown. Do not attempt to the floor. Place one foot on the front wheels. Using your...sure that the storage latch closes fully over the frame guide. Place one foot on the base, and carefully lower the treadmill until it is past the storage latch. 2. Hold the treadmill firmly with your left thumb, slide open the storage latch and hold here ( . • 11 Hold the upper end...
English Manual
Page 12
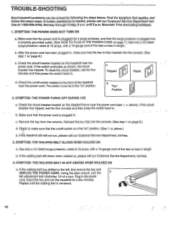
... 6 p.m. To reset the circuit breaker, wait for five minutes and then press the switch back in. Check the circuit breaker located on the treadmill near the power cord. c. c. above ). until the walking belt is needed, please call our Customer Service Department tollfree at the front of ...SYMPTOM: THE WALKING BELT IS OFF-CENTER WHEN WALKED ON a. If further assistance is centered. 12 Check the circuit breaker located on the treadmill frame near the power cord. Check to the left adjustment bolt clockwise 1/4 of five feet or less in length. If the walking belt ...
... 6 p.m. To reset the circuit breaker, wait for five minutes and then press the switch back in. Check the circuit breaker located on the treadmill near the power cord. c. c. above ). until the walking belt is needed, please call our Customer Service Department tollfree at the front of ...SYMPTOM: THE WALKING BELT IS OFF-CENTER WHEN WALKED ON a. If further assistance is centered. 12 Check the circuit breaker located on the treadmill frame near the power cord. Check to the left adjustment bolt clockwise 1/4 of five feet or less in length. If the walking belt ...

English Manual
Page 13
Plug in the power cord, insert the key and run the treadmill for a few minutes. SYMPTOM: THE TREADMILL SITS UNEVENLY ON THE FLOOR a. b. Repeat until the walking belt is centered. 5. Make sure that the six base pads are attached to the right, first remove the key and UNPLUG THE POWER CORD. Using the alien wrench, turn the left adjustment bolt counterclockwise 1/4 of a turn. If the walking belt has shifted to the treadmill (see assembly step 2 on page 5). 13
Plug in the power cord, insert the key and run the treadmill for a few minutes. SYMPTOM: THE TREADMILL SITS UNEVENLY ON THE FLOOR a. b. Repeat until the walking belt is centered. 5. Make sure that the six base pads are attached to the right, first remove the key and UNPLUG THE POWER CORD. Using the alien wrench, turn the left adjustment bolt counterclockwise 1/4 of a turn. If the walking belt has shifted to the treadmill (see assembly step 2 on page 5). 13
English Manual
Page 16
...to be prepared to give the following information: • The MODEL NUMBER OF THE PRODUCT (PFTL59070). • The NAME OF THE PRODUCT (PROFORM. 590 TL treadmill). • The SERIAL NUMBER OF THE PRODUCT (see the front cover of this manual). • The KEY NUMBER OF THE PART(S) (.... ORDERING REPLACEMENT PARTS To order replacement parts, call our Customer Service Department toll-free at one of whatsoever nature. If possible, place the treadmill near your telephone for which vary from defects in USA © 1997 ICON Health & Fitness, Inc. No other rights which warranty claim ...
...to be prepared to give the following information: • The MODEL NUMBER OF THE PRODUCT (PFTL59070). • The NAME OF THE PRODUCT (PROFORM. 590 TL treadmill). • The SERIAL NUMBER OF THE PRODUCT (see the front cover of this manual). • The KEY NUMBER OF THE PART(S) (.... ORDERING REPLACEMENT PARTS To order replacement parts, call our Customer Service Department toll-free at one of whatsoever nature. If possible, place the treadmill near your telephone for which vary from defects in USA © 1997 ICON Health & Fitness, Inc. No other rights which warranty claim ...


