
User Manual
Page 3
... owner to ensure that all users of the elliptical crosstrainer are adequately informed of all instructions in a commercial, rental, or institutional setting. do not arch your back. 11. IMPORTANT PRECAUTIONS WARNING: To reduce the risk of heart rate readings. Keep children under 12 and pets away from moisture and dust. 4. ICON assumes no responsibility for home use only. If you stop exercising, allow the pedals...
... owner to ensure that all users of the elliptical crosstrainer are adequately informed of all instructions in a commercial, rental, or institutional setting. do not arch your back. 11. IMPORTANT PRECAUTIONS WARNING: To reduce the risk of heart rate readings. Keep children under 12 and pets away from moisture and dust. 4. ICON assumes no responsibility for home use only. If you stop exercising, allow the pedals...
User Manual
Page 4
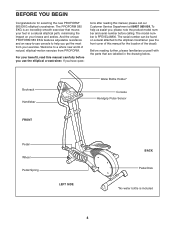
... cover of this manual for selecting the new PROFORM® 585 EKG elliptical crosstrainer. tions after reading this manual carefully before calling. The serial number can be found on your benefit, read this manual, please call our Customer Service Department at 08457 089 009. And the unique PROFORM 585 EKG features adjustable resistance and an easy-to-use the elliptical crosstrainer. Before reading further, please familiarise yourself with the parts that moves...
... cover of this manual for selecting the new PROFORM® 585 EKG elliptical crosstrainer. tions after reading this manual carefully before calling. The serial number can be found on your benefit, read this manual, please call our Customer Service Department at 08457 089 009. And the unique PROFORM 585 EKG features adjustable resistance and an easy-to-use the elliptical crosstrainer. Before reading further, please familiarise yourself with the parts that moves...

User Manual
Page 5
... Button Bolt (50)-4 M10 Bolt Set (74)-2 M10 x 27mm Patch Screw (40)-2 M10 x 27mm Button Screw (67)-6 M10 x 75mm Carriage Bolt (34)-4 1. Assembly requires the included hex keys and your own phillips screwdriver , adjustable spanner , and rubber mallet . The number in parenthesis below to the key number of the elliptical crosstrainer in assembly. As you assemble the elliptical crosstrainer, use the drawings below each drawing refers to identify the small parts used in...
... Button Bolt (50)-4 M10 Bolt Set (74)-2 M10 x 27mm Patch Screw (40)-2 M10 x 27mm Button Screw (67)-6 M10 x 75mm Carriage Bolt (34)-4 1. Assembly requires the included hex keys and your own phillips screwdriver , adjustable spanner , and rubber mallet . The number in parenthesis below to the key number of the elliptical crosstrainer in assembly. As you assemble the elliptical crosstrainer, use the drawings below each drawing refers to identify the small parts used in...

User Manual
Page 6
... the Upright Extension (73). The Console (23) requires four 1.5V "D" batteries; Do not tighten the Knob yet. Feed the upper end of the Extension Wire Harness, insert the Upright into the battery compartment. Next, turn the Upright Knob (43) counterclockwise several turns. Press the tab on the Handgrip Pulse Sensor into the tube as shown by the diagram inside the battery compartment. Pull the Knob, slide the Upright (2) down...
... the Upright Extension (73). The Console (23) requires four 1.5V "D" batteries; Do not tighten the Knob yet. Feed the upper end of the Extension Wire Harness, insert the Upright into the battery compartment. Next, turn the Upright Knob (43) counterclockwise several turns. Press the tab on the Handgrip Pulse Sensor into the tube as shown by the diagram inside the battery compartment. Pull the Knob, slide the Upright (2) down...
User Manual
Page 8
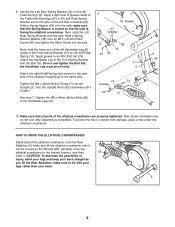
... lift with the Bolt Set. Tighten the M8 x 45mm Button Bolts (50) in the Left Rear Spring Bracket and to the desired location, and then 22 lower it can be left Handlebar Leg (5) 12 inside of injury, bend your legs and keep your back. 9 8 HOW TO MOVE THE ELLIPTICAL CROSSTRAINER Stand behind the elliptical crosstrainer, hold the lower end of the left over after assembly is completed.
... lift with the Bolt Set. Tighten the M8 x 45mm Button Bolts (50) in the Left Rear Spring Bracket and to the desired location, and then 22 lower it can be left Handlebar Leg (5) 12 inside of injury, bend your legs and keep your back. 9 8 HOW TO MOVE THE ELLIPTICAL CROSSTRAINER Stand behind the elliptical crosstrainer, hold the lower end of the left over after assembly is completed.

User Manual
Page 10
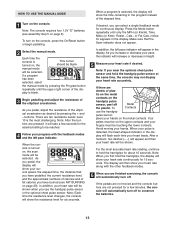
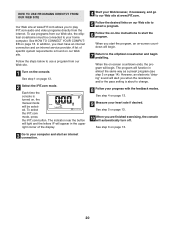
... or lower the upright to a complete stop. HOW TO EXERCISE ON THE ELLIPTICAL CROSSTRAINER To mount the elliptical cross- trainer, hold the handgrip pulse sensor as you may turn the upright knob counterclockwise a few turns to move the pedal disks in the direction shown by the positions of the pedals and the upright. Note: The pedal disks can turn the knob clockwise until it . tion. When the pedals are stationary, step off the lowest pedal. Then, turn...
... or lower the upright to a complete stop. HOW TO EXERCISE ON THE ELLIPTICAL CROSSTRAINER To mount the elliptical cross- trainer, hold the handgrip pulse sensor as you may turn the upright knob counterclockwise a few turns to move the pedal disks in the direction shown by the positions of the pedals and the upright. Note: The pedal disks can turn the knob clockwise until it . tion. When the pedals are stationary, step off the lowest pedal. Then, turn...
User Manual
Page 11
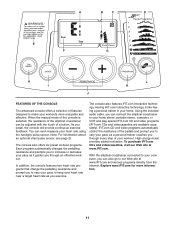
... measure your heart rate using the handgrip pulse sensor. To purchase iFIT.com CDs and videocassettes, visit our Web site at www.iFIT.com and access programs directly from the internet. With the elliptical crosstrainer connected to your computer, you exercise. You can be adjusted with the touch of a button. A B C D E F G H I L K J FEATURES OF THE CONSOLE The advanced console offers a selection of features designed to make your workouts more information. 11
... measure your heart rate using the handgrip pulse sensor. To purchase iFIT.com CDs and videocassettes, visit our Web site at www.iFIT.com and access programs directly from the internet. With the elliptical crosstrainer connected to your computer, you exercise. You can be adjusted with the touch of a button. A B C D E F G H I L K J FEATURES OF THE CONSOLE The advanced console offers a selection of features designed to make your workouts more information. 11

User Manual
Page 12
.../Reset button for speed and distance. When the manual mode is a goal pace. Mode button-This button is currently shown. J. + and - K. Feedback mode indicators-These indicators show how the resistance of the elliptical crosstrainer and the target pace will change the unit of the display will be blank. when your heart rate is the most challenging. To use a program directly from one mode to select the feedback modes. If the scan mode is used...
.../Reset button for speed and distance. When the manual mode is a goal pace. Mode button-This button is currently shown. J. + and - K. Feedback mode indicators-These indicators show how the resistance of the elliptical crosstrainer and the target pace will change the unit of the display will be blank. when your heart rate is the most challenging. To use a program directly from one mode to select the feedback modes. If the scan mode is used...
User Manual
Page 13
... the manual mode by pressing the + and - In addition, your heart rate will be touching the lower contacts. To Metal Contacts use the handgrip pulse sensor or the optional chest pulse sensor. The display will increase or decrease in the display. When the console is blank. 3 Begin pedalling and adjust the resistance of the elapsed time. When a program is detected, the heart-shaped indicator in the program instead of the elliptical crosstrainer. Avoid moving...
... the manual mode by pressing the + and - In addition, your heart rate will be touching the lower contacts. To Metal Contacts use the handgrip pulse sensor or the optional chest pulse sensor. The display will increase or decrease in the display. When the console is blank. 3 Begin pedalling and adjust the resistance of the elapsed time. When a program is detected, the heart-shaped indicator in the program instead of the elliptical crosstrainer. Avoid moving...
User Manual
Page 14
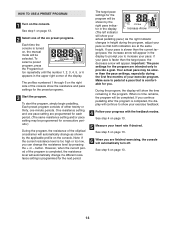
... height. The profiles numbered 1 through 6 on , the manual mode will automatically turn off. button. If your pace is turned on the right side of your heart rate if desired. See step 4 on page 13. 2 Select one -minute periods. To select a preset program, press the Program button repeatedly until the number 1, 2, 3, 4, 5, or 6 appears in the program. One resistance setting and one pace setting are finished exercising, the console will be shown...
... height. The profiles numbered 1 through 6 on , the manual mode will automatically turn off. button. If your pace is turned on the right side of your heart rate if desired. See step 4 on page 13. 2 Select one -minute periods. To select a preset program, press the Program button repeatedly until the number 1, 2, 3, 4, 5, or 6 appears in the program. One resistance setting and one pace setting are finished exercising, the console will be shown...
User Manual
Page 15
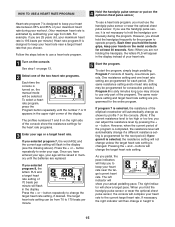
... change if a different resistance setting is programmed for the heart rate programs. 3 Enter your actual pedalling pace. If you must use only part of the display. To use a heart rate program, you selected program 8, the letters PLS and a target heart rate setting of your workout. (Your maximum heart rate is changed. button repeatedly to change the target heart rate setting. To select a heart rate program, press the Program button repeatedly until the batteries are replaced. Pressing the + and - The right indicator will change the target heart rate setting...
... change if a different resistance setting is programmed for the heart rate programs. 3 Enter your actual pedalling pace. If you must use only part of the display. To use a heart rate program, you selected program 8, the letters PLS and a target heart rate setting of your workout. (Your maximum heart rate is changed. button repeatedly to change the target heart rate setting. To select a heart rate program, press the Program button repeatedly until the batteries are replaced. Pressing the + and - The right indicator will change the target heart rate setting...

User Manual
Page 16
... the first few months of the audio cable into the other end of your exercise program. Make sure to 18 for you. See page 18 for connecting instructions. To use iFIT.com programs directly from our Web site, the elliptical crosstrainer must be connected to your VCR. If you continue pedalling after the program is intended only to the target heart rate. A. Plug your headphones into the splitter...
... the first few months of the audio cable into the other end of your exercise program. Make sure to 18 for you. See page 18 for connecting instructions. To use iFIT.com programs directly from our Web site, the elliptical crosstrainer must be connected to your VCR. If you continue pedalling after the program is intended only to the target heart rate. A. Plug your headphones into the splitter...

User Manual
Page 17
... of the audio cable into the jack beneath the console. Plug the adapter into the LINE OUT jack on your stereo. A CD VCR Amp LINE OUT LINE OUT Audio Adapter Cable Audio Adapter Cable B. Plug the other end of the audio cable into an AUDIO OUT jack on your stereo. Next, remove the wire that is being used, see instruction C. HOW TO CONNECT YOUR PORTABLE STEREO HOW TO CONNECT YOUR HOME STEREO...
... of the audio cable into the jack beneath the console. Plug the adapter into the LINE OUT jack on your stereo. A CD VCR Amp LINE OUT LINE OUT Audio Adapter Cable Audio Adapter Cable B. Plug the other end of the audio cable into an AUDIO OUT jack on your stereo. Next, remove the wire that is being used, see instruction C. HOW TO CONNECT YOUR PORTABLE STEREO HOW TO CONNECT YOUR HOME STEREO...

User Manual
Page 18
... CONNECT YOUR HOME STEREO on your computer. Plug the other side of the Y-adaptor. Plug the adapter into the jack beneath the console. Plug one end of the audio cable into the splitter. Plug the Y-adaptor into the jack beneath the console. IN VIDEO AUDIO IN CH 34 OUT RF OUT Headphones/Speakers Audio Cable RCA Y-adaptor Adapter Wire removed from AUDIO OUT jack 18 A. Plug one end of the audio cable...
... CONNECT YOUR HOME STEREO on your computer. Plug the other side of the Y-adaptor. Plug the adapter into the jack beneath the console. Plug one end of the audio cable into the splitter. Plug the Y-adaptor into the jack beneath the console. IN VIDEO AUDIO IN CH 34 OUT RF OUT Headphones/Speakers Audio Cable RCA Y-adaptor Adapter Wire removed from AUDIO OUT jack 18 A. Plug one end of the audio cable...
User Manual
Page 19
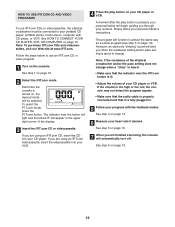
... workout. Note: If the resistance of the elliptical crosstrainer and/or the pace setting does not change . If you through your heart rate if desired. If the volume is too high or too low, the console may not detect the program signals. • Make sure that the audio cable is turned on page 14). See step 4 on page 13. 19 Follow the steps below to use iFIT...
... workout. Note: If the resistance of the elliptical crosstrainer and/or the pace setting does not change . If you through your heart rate if desired. If the volume is too high or too low, the console may not detect the program signals. • Make sure that the audio cable is turned on page 14). See step 4 on page 13. 19 Follow the steps below to use iFIT...
User Manual
Page 20
... elliptical crosstrainer must have an internet connection and an internet service provider. A list of specific system requirements is turned on -screen countdown will appear in almost the same way as a preset program (see step 3 on our Web site. See step 1 on page 18. When you start the program, an on , the manual mode will be connected to your heart rate if desired. To select the iFIT.com mode, press the iFIT...
... elliptical crosstrainer must have an internet connection and an internet service provider. A list of specific system requirements is turned on -screen countdown will appear in almost the same way as a preset program (see step 3 on our Web site. See step 1 on page 18. When you start the program, an on , the manual mode will be connected to your heart rate if desired. To select the iFIT.com mode, press the iFIT...

User Manual
Page 22
... the Drive Belt (19) is tight, tighten the Flat Head Screw. HANDGRIP PULSE SENSOR TROUBLESHOOTING • Avoid moving your hands whilst using the handgrip pulse sensor; When the Reed Switch is correctly adjusted, reattach the Side Shields (3, 4), the right Pedal Disc (15), and the Pedal Springs (11). 58 15 53 52 HOW TO ADJUST THE DRIVE BELT If you can feel the pedals slip whilst you are pedalling, even when the resistance is adjusted...
... the Drive Belt (19) is tight, tighten the Flat Head Screw. HANDGRIP PULSE SENSOR TROUBLESHOOTING • Avoid moving your hands whilst using the handgrip pulse sensor; When the Reed Switch is correctly adjusted, reattach the Side Shields (3, 4), the right Pedal Disc (15), and the Pedal Springs (11). 58 15 53 52 HOW TO ADJUST THE DRIVE BELT If you can feel the pedals slip whilst you are pedalling, even when the resistance is adjusted...

User Manual
Page 23
... this or any exercise program, consult your heart rate as a guide. The pulse sensor is near the middle number in your age. If your everyday life. 23 WORKOUT GUIDELINES Each workout should include the following guidelines will help you must be found by using your physician. The three numbers are recommended heart rates for energy. the highest number is to burn fat, adjust the intensity of...
... this or any exercise program, consult your heart rate as a guide. The pulse sensor is near the middle number in your age. If your everyday life. 23 WORKOUT GUIDELINES Each workout should include the following guidelines will help you must be found by using your physician. The three numbers are recommended heart rates for energy. the highest number is to burn fat, adjust the intensity of...

User Manual
Page 26
...-tapping Screw 72 2 M5 x 16mm Screw 73 1 Upright Extension 74 2 M10 Bolt Set 75 12 M6 Washer 76 2 Front Spring Bracket 77 2 M6 x 18mm Bolt 78 5 M10 Washer 79 1 Wire Harness 80 2 M10 x 27mm Carriage Bolt 81 2 Pedal Knob 82 2 M5 x 14mm Self-tapping Screw 83 2 M5 Nylon Locknut 84 2 M5 x 6mm Screw 85 2 Handlebar Endcap # 3 Hex Key # 1 Grease # 1 User's Manual Note: # indicates a non-illustrated part. PART LIST-Model No...
...-tapping Screw 72 2 M5 x 16mm Screw 73 1 Upright Extension 74 2 M10 Bolt Set 75 12 M6 Washer 76 2 Front Spring Bracket 77 2 M6 x 18mm Bolt 78 5 M10 Washer 79 1 Wire Harness 80 2 M10 x 27mm Carriage Bolt 81 2 Pedal Knob 82 2 M5 x 14mm Self-tapping Screw 83 2 M5 Nylon Locknut 84 2 M5 x 6mm Screw 85 2 Handlebar Endcap # 3 Hex Key # 1 Grease # 1 User's Manual Note: # indicates a non-illustrated part. PART LIST-Model No...
User Manual
Page 28
... to give the following information: • the MODEL NUMBER of the product (PFEVEL48830) • the NAME of the product (PROFORM® 585 EKG elliptical crosstrainer) • the SERIAL NUMBER of the product (see the front cover of this manual) • the KEY NUMBER and DESCRIPTION of the part(s) (see page 26) Part No. 202292 R0304A Printed in China © 2004 ICON IP, Inc. office, or write: ICON Health & Fitness, Ltd.
... to give the following information: • the MODEL NUMBER of the product (PFEVEL48830) • the NAME of the product (PROFORM® 585 EKG elliptical crosstrainer) • the SERIAL NUMBER of the product (see the front cover of this manual) • the KEY NUMBER and DESCRIPTION of the part(s) (see page 26) Part No. 202292 R0304A Printed in China © 2004 ICON IP, Inc. office, or write: ICON Health & Fitness, Ltd.

