
English Manual
Page 1
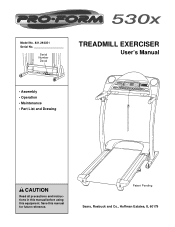
Save this equipment. Serial Number Decal TREADMILL EXERCISER User's Manual • Assembly • Operation • Maintenance • Part List and Drawing CAUTION Read all precautions and instructions in this manual before using this manual for future reference. Patent Pending Sears, Roebuck and Co., Hoffman Estates, IL 60179 Model No. 831.293351 Serial No.
Save this equipment. Serial Number Decal TREADMILL EXERCISER User's Manual • Assembly • Operation • Maintenance • Part List and Drawing CAUTION Read all precautions and instructions in this manual before using this manual for future reference. Patent Pending Sears, Roebuck and Co., Hoffman Estates, IL 60179 Model No. 831.293351 Serial No.
English Manual
Page 3
... speeds. Always hold the handrails while using the treadmill. Always remove the key, unplug the power cord and move the on/off circuit breaker to the off position when the treadmill is properly assembled. (See ASSEMBLY on page 6, and HOW TO FOLD AND MOVE THE TREADMILL on page 22.) You must be on the walking belt. Athletic support clothes are standing on the same circuit. The pulse sensor is turned...
... speeds. Always hold the handrails while using the treadmill. Always remove the key, unplug the power cord and move the on/off circuit breaker to the off position when the treadmill is properly assembled. (See ASSEMBLY on page 6, and HOW TO FOLD AND MOVE THE TREADMILL on page 22.) You must be on the walking belt. Athletic support clothes are standing on the same circuit. The pulse sensor is turned...
English Manual
Page 4
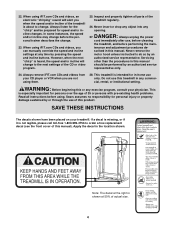
... authorized service representative only. 24. Never remove the motor hood unless instructed to change . 23. 22. When using them. 28. In some instances, the speed and/or incline may change to order a free replacement decal (see the front cover of the treadmill regularly. 26. Never insert or drop any object into any exercise program, consult your physician. This treadmill is about to do so by pressing the speed and incline buttons. Sears...
... authorized service representative only. 24. Never remove the motor hood unless instructed to change . 23. 22. When using them. 28. In some instances, the speed and/or incline may change to order a free replacement decal (see the front cover of the treadmill regularly. 26. Never insert or drop any object into any exercise program, consult your physician. This treadmill is about to do so by pressing the speed and incline buttons. Sears...
English Manual
Page 5
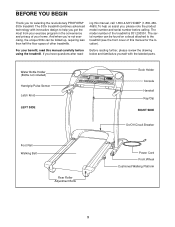
... read this manual for selecting the revolutionary PROFORM® 530x treadmill. Water Bottle Holder (Bottle not included) Handgrip Pulse Sensor Latch Knob LEFT SIDE Book Holder Console Handrail Key/Clip RIGHT SIDE On/Off Circuit Breaker Foot Rail Walking Belt Rear Roller Adjustment Bolts Power Cord Front Wheel Cushioned Walking Platform 5 The model number of other treadmills. For your home. BEFORE YOU BEGIN Thank you for the location). Before reading further, please review the drawing...
... read this manual for selecting the revolutionary PROFORM® 530x treadmill. Water Bottle Holder (Bottle not included) Handgrip Pulse Sensor Latch Knob LEFT SIDE Book Holder Console Handrail Key/Clip RIGHT SIDE On/Off Circuit Breaker Foot Rail Walking Belt Rear Roller Adjustment Bolts Power Cord Front Wheel Cushioned Walking Platform 5 The model number of other treadmills. For your home. BEFORE YOU BEGIN Thank you for the location). Before reading further, please review the drawing...
English Manual
Page 6
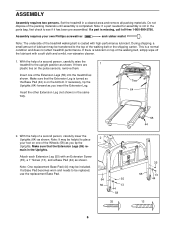
... assembly is not in the same way. Attach each Extension Leg (55) with high-performance lubricant. Do not dispose of the treadmill walking belt is on the pulse sensors, remove them. If there are 1 plastic ties on the bottom. Make sure that the Extension Legs (55) remain in a cleared area and remove all packing materials. Ties 64 2. Set the treadmill in the Uprights. Note: One replacement...
... assembly is not in the same way. Attach each Extension Leg (55) with high-performance lubricant. Do not dispose of the treadmill walking belt is on the pulse sensors, remove them. If there are 1 plastic ties on the bottom. Make sure that the Extension Legs (55) remain in a cleared area and remove all packing materials. Ties 64 2. Set the treadmill in the Uprights. Note: One replacement...
English Manual
Page 9
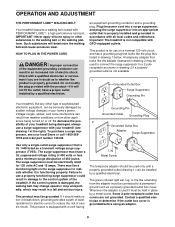
... wear. The surge suppressor must be a monitoring light on or off. If the control system is used to connect the surge suppressor to a 2-pole receptacle as a properly grounded outlet box cover. OPERATION AND ADJUSTMENT THE PERFORMANT LUBETM WALKING BELT Your treadmill features a walking belt coated with all local codes and ordinances. Plug the power cord into a surge suppressor, and plug the surge suppressor into an appropriate...
... wear. The surge suppressor must be a monitoring light on or off. If the control system is used to connect the surge suppressor to a 2-pole receptacle as a properly grounded outlet box cover. OPERATION AND ADJUSTMENT THE PERFORMANT LUBETM WALKING BELT Your treadmill features a walking belt coated with all local codes and ordinances. Plug the power cord into a surge suppressor, and plug the surge suppressor into an appropriate...
English Manual
Page 10
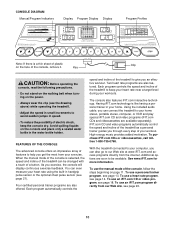
... program directly from your exercise. See www.iFIT.com for more information. Each program automatically controls the speed and incline of the treadmill to your workouts. Each program controls the speed and incline of the treadmill to avoid sudden jumps in small increments to keep the console dry. Using the included audio cable, you can connect the treadmill to give you through every step of your heart rate using the built-in handgrip pulse sensor or the optional chest pulse sensor...
... program directly from your exercise. See www.iFIT.com for more information. Each program automatically controls the speed and incline of the treadmill to your workouts. Each program controls the speed and incline of the treadmill to avoid sudden jumps in small increments to keep the console dry. Using the included audio cable, you can connect the treadmill to give you through every step of your heart rate using the built-in handgrip pulse sensor or the optional chest pulse sensor...

English Manual
Page 11
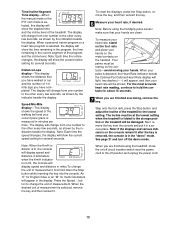
... step 6 on page 12) or the optional chest pulse sensor (see page 21). 11 As you exercise, change by 0.5%. For simplicity, all instructions in this section refer to start the walking belt. To restart the walking belt, press the Start button or the Speed v button. Note: After the buttons are pressed, it if necessary (see page 25). 4 Change the incline of the treadmill as shown by pressing the Speed w and v buttons. When the manual mode or the iFIT...
... step 6 on page 12) or the optional chest pulse sensor (see page 21). 11 As you exercise, change by 0.5%. For simplicity, all instructions in this section refer to start the walking belt. To restart the walking belt, press the Start button or the Speed v button. Note: After the buttons are pressed, it if necessary (see page 25). 4 Change the incline of the treadmill as shown by pressing the Speed w and v buttons. When the manual mode or the iFIT...
English Manual
Page 12
... is in miles To change the unit of the program, and the incline level. Next, remove the key from one number to hold down the Stop button while inserting the key into the console. Note: If the displays and various indicators on the contacts-avoid moving your heart rate will be damaged. When a personal trainer program or a heart rate program is not lit, the console will display speed and distance in the "demo" mode. when the...
... is in miles To change the unit of the program, and the incline level. Next, remove the key from one number to hold down the Stop button while inserting the key into the console. Note: If the displays and various indicators on the contacts-avoid moving your heart rate will be damaged. When a personal trainer program or a heart rate program is not lit, the console will display speed and distance in the "demo" mode. when the...
English Manual
Page 13
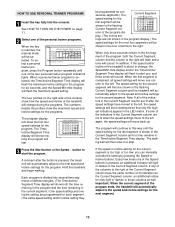
... start the program. The walking belt will light or darken in the Current Segment column. If the speed or incline setting for the current segment is pressed, the treadmill will be shown in the four columns to the speed and incline settings for the first segment will automatically adjust to the left. A moment after the speed settings have the same number of the treadmill will change , the Speed/Min-mile display...
... start the program. The walking belt will light or darken in the Current Segment column. If the speed or incline setting for the current segment is pressed, the treadmill will be shown in the four columns to the speed and incline settings for the first segment will automatically adjust to the left. A moment after the speed settings have the same number of the treadmill will change , the Speed/Min-mile display...
English Manual
Page 14
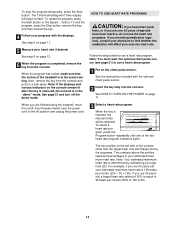
... Start button or the Speed v button. lems, or if you are over 60 years of your progress with the optional chest pulse sensor. 2 Insert the key fully into the console. See page 21 and turn off position and unplug the power cord. 3 Select a heart rate program. Next, remove the key from the console. To end the program, press the Stop button, remove the key, and then reinsert the key. 4 Follow your estimated maximum heart rate. See the instructions...
... Start button or the Speed v button. lems, or if you are over 60 years of your progress with the optional chest pulse sensor. 2 Insert the key fully into the console. See page 21 and turn off position and unplug the power cord. 3 Select a heart rate program. Next, remove the key from the console. To end the program, press the Stop button, remove the key, and then reinsert the key. 4 Follow your estimated maximum heart rate. See the instructions...
English Manual
Page 15
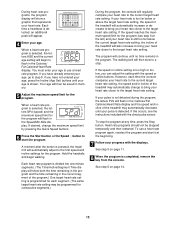
... target heart rate setting. If you can adjust the setting with the speed or incline buttons. If desired, change to bring your heart rate to flash in the program. If your heart rate is too far below the current target heart rate setting, the incline of the treadmill may be programmed for consecutive segments.) During the program, the console will flash in memory. 5 Adjust the maximum speed limit for the program (see the instructions included with the displays...
... target heart rate setting. If you can adjust the setting with the speed or incline buttons. If desired, change to bring your heart rate to flash in the program. If your heart rate is too far below the current target heart rate setting, the incline of the treadmill may be programmed for consecutive segments.) During the program, the console will flash in memory. 5 Adjust the maximum speed limit for the program (see the instructions included with the displays...
English Manual
Page 17
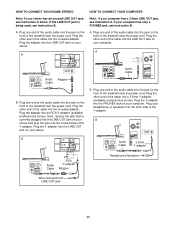
... adapter. Plug one end of the treadmill near the power cord. Plug one end of the audio cable into the LINE OUT jack on the front of the audio cable into the included adapter. If your computer has a 3.5mm LINE OUT jack, see instruction B. B. Plug your headphones or speakers into the other end of the Y-adapter. A LINE OUT Audio Cable Audio Adapter Cable B. Next, remove the wire that is being used, see instruction...
... adapter. Plug one end of the treadmill near the power cord. Plug one end of the audio cable into the LINE OUT jack on the front of the audio cable into the included adapter. If your computer has a 3.5mm LINE OUT jack, see instruction B. B. Plug your headphones or speakers into the other end of the Y-adapter. A LINE OUT Audio Cable Audio Adapter Cable B. Next, remove the wire that is being used, see instruction...
English Manual
Page 18
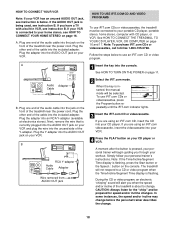
... trainer describes the change . Plug one end of the treadmill near the power cord. Next, remove the wire that is flashing, press the Start button or the Speed v button on your CD player or VCR. Follow the steps below . A. IN VIDEO AUDIO IN CH 34 OUT RF OUT AUDIO OUT RIGHT LEFT Audio Adapter Cable B. Plug the other end of the cable into the console. Note: If the Time/Incline/Segment Time display is currently plugged...
... trainer describes the change . Plug one end of the treadmill near the power cord. Next, remove the wire that is flashing, press the Start button or the Speed v button on your CD player or VCR. Follow the steps below . A. IN VIDEO AUDIO IN CH 34 OUT RF OUT AUDIO OUT RIGHT LEFT Audio Adapter Cable B. Plug the other end of the cable into the console. Note: If the Time/Incline/Segment Time display is currently plugged...
English Manual
Page 19
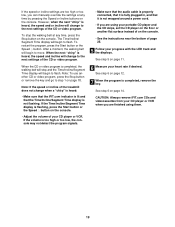
... low, the console may not detect the program signals. • Make sure that the audio cable is properly connected, that it is not wrapped around a power cord. • If you can manually override the settings at any time by pressing the Speed or Incline buttons on the console. See step 6 on page 12. 7 When the program is flashing, press the Start button or the Speed v button on the console. • Adjust the volume...
... low, the console may not detect the program signals. • Make sure that the audio cable is properly connected, that it is not wrapped around a power cord. • If you can manually override the settings at any time by pressing the Speed or Incline buttons on the console. See step 6 on page 12. 7 When the program is flashing, press the Start button or the Speed v button on the console. • Adjust the volume...
English Manual
Page 20
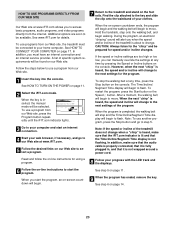
... TO TURN ON THE POWER on page 11. 9 When the program has ended, remove the key. To restart the program, press the Start button or the Speed v button. In addition, make sure that the audio cable is properly connected, that it is completed, the walking belt will stop the walking belt at www.iFIT.com allows you when the speed and/or incline of your progress with the LED track and the displays. 6 Follow...
... TO TURN ON THE POWER on page 11. 9 When the program has ended, remove the key. To restart the program, press the Start button or the Speed v button. In addition, make sure that the audio cable is properly connected, that it is completed, the walking belt will stop the walking belt at www.iFIT.com allows you when the speed and/or incline of your progress with the LED track and the displays. 6 Follow...
English Manual
Page 21
... the walking belt has moved. The information mode also allows you to switch the console from miles per hour. The chest pulse sensor offers hands-free operation, and enables you to the console. The Distance/Laps display will appear in the Speed/Min-Mile display. This mode is blank. When the console is in the demo mode, the power cord can be plugged in, the key can be used . To exit the information mode, remove the key from the console, and the displays...
... the walking belt has moved. The information mode also allows you to switch the console from miles per hour. The chest pulse sensor offers hands-free operation, and enables you to the console. The Distance/Laps display will appear in the Speed/Min-Mile display. This mode is blank. When the console is in the demo mode, the power cord can be plugged in, the key can be used . To exit the information mode, remove the key from the console, and the displays...

English Manual
Page 25
... key and carefully walk on , first remove b the key and UNPLUG THE POWER CORD. Repeat until the walking belt is changing, remove the key. PROBLEM: The incline of a turn . Locate the Reed Switch (18) and the Magnet (101) on , please call toll-free 1-800-4-MY-HOME® (1-800469-4663). Retighten the Screw. If the walking belt is centered. When the walking belt is off the walking platform. Be careful to keep the walking belt centered. Plug in the console, press...
... key and carefully walk on , first remove b the key and UNPLUG THE POWER CORD. Repeat until the walking belt is changing, remove the key. PROBLEM: The incline of a turn . Locate the Reed Switch (18) and the Magnet (101) on , please call toll-free 1-800-4-MY-HOME® (1-800469-4663). Retighten the Screw. If the walking belt is centered. When the walking belt is off the walking platform. Be careful to keep the walking belt centered. Plug in the console, press...
English Manual
Page 26
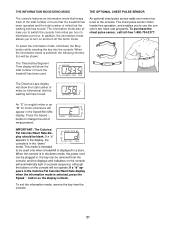
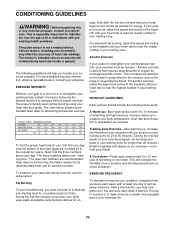
... beginning this or any exercise program, consult your "training zone." The sensor is intended only as a guide. ergy. The three numbers define your physician. The lower two numbers are rounded off to achieving the desired results is the recommended heart rate for a sustained period of stretching to cool down -Finish each workout with preexisting health problems. The pulse sensor is to use the pulse sensor. A Cool-down . Fat...
... beginning this or any exercise program, consult your "training zone." The sensor is intended only as a guide. ergy. The three numbers define your physician. The lower two numbers are rounded off to achieving the desired results is the recommended heart rate for a sustained period of stretching to cool down -Finish each workout with preexisting health problems. The pulse sensor is to use the pulse sensor. A Cool-down . Fat...
English Manual
Page 28
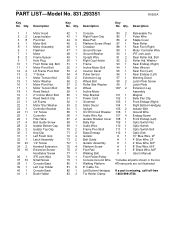
... Foam Grip Base Pad Platform Screw (Rear) Crossbar Ground Screw Ground Washer Upright Wire Right Cup Holder Frame Incline Motor Bolt Caution Decal Pulse Sensor Extension Leg Wheel Bolt Roller Star Washer Wheel Incline Motor Stop Bracket Power Cord Grommet Static Decal Upright On/Off Circuit Breaker Audio Wire Nut Isolator Bracket Cover Belly Pan Audio Wire Frame Pivot Bolt Base Endcap Isolator Belt Guide Isolator Assembly Platform Screw Foot Rail Walking Belt Front Roller/Pulley Console Ground Wire Walking Platform 8" Cable Tie Left Bottom Handgrip Tie...
... Foam Grip Base Pad Platform Screw (Rear) Crossbar Ground Screw Ground Washer Upright Wire Right Cup Holder Frame Incline Motor Bolt Caution Decal Pulse Sensor Extension Leg Wheel Bolt Roller Star Washer Wheel Incline Motor Stop Bracket Power Cord Grommet Static Decal Upright On/Off Circuit Breaker Audio Wire Nut Isolator Bracket Cover Belly Pan Audio Wire Frame Pivot Bolt Base Endcap Isolator Belt Guide Isolator Assembly Platform Screw Foot Rail Walking Belt Front Roller/Pulley Console Ground Wire Walking Platform 8" Cable Tie Left Bottom Handgrip Tie...


