

English Manual
Page 3
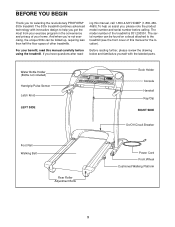
... risk of clearance behind it and two feet on page 5 if the treadmill is being administered. 6. Place the treadmill on the walking belt. Do not operate the treadmill where aerosol products are recommended for the location of the treadmill by persons weighing more amps. Never allow more than 250 pounds. 8. ... not attempt to raise, lower, or move the on page 22.) You must be able to the off position when the treadmill is damaged, the walking belt may change the incline of the on the same circuit. Use only a single-outlet surge suppressor that the storage latch is ...
... risk of clearance behind it and two feet on page 5 if the treadmill is being administered. 6. Place the treadmill on the walking belt. Do not operate the treadmill where aerosol products are recommended for the location of the treadmill by persons weighing more amps. Never allow more than 250 pounds. 8. ... not attempt to raise, lower, or move the on page 22.) You must be able to the off position when the treadmill is damaged, the walking belt may change the incline of the on the same circuit. Use only a single-outlet surge suppressor that the storage latch is ...
English Manual
Page 5
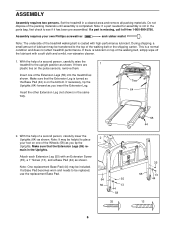
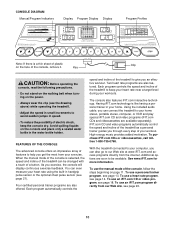
...SIDE Book Holder Console Handrail Key/Clip RIGHT SIDE On/Off Circuit Breaker Foot Rail Walking Belt Rear Roller Adjustment Bolts Power Cord Front Wheel Cushioned Walking Platform 5 The 530x treadmill combines advanced technology with the labeled parts. ing this manual, call 1-800-4-MY-HOME®...).To help us assist you 're not exercising, the unique 530x can be folded up, requiring less than half the floor space of the treadmill is 831.293351. For your exercise program in the convenience and privacy of this manual for selecting the revolutionary PROFORM® 530x treadmill.
...SIDE Book Holder Console Handrail Key/Clip RIGHT SIDE On/Off Circuit Breaker Foot Rail Walking Belt Rear Roller Adjustment Bolts Power Cord Front Wheel Cushioned Walking Platform 5 The 530x treadmill combines advanced technology with the labeled parts. ing this manual, call 1-800-4-MY-HOME®...).To help us assist you 're not exercising, the unique 530x can be folded up, requiring less than half the floor space of the treadmill is 831.293351. For your exercise program in the convenience and privacy of this manual for selecting the revolutionary PROFORM® 530x treadmill.
English Manual
Page 6
...of the treadmill walking belt is coated with an Extension Screw (35), a 1" Screw (13), and a Base Pad (44) as you tip the Uprights. Note: The underside of the packing materials until assembly is missing, call toll-free 1-800-999-3756. With the help of the walking belt, simply ...) remain in a cleared area and remove all packing materials. Note: If a part needed for assembly is a normal condition and does not affect treadmill performance. Assembly requires your foot on the pulse sensors, remove them. Attach each Extension Leg (55) with high-performance lubricant. If there are ...
...of the treadmill walking belt is coated with an Extension Screw (35), a 1" Screw (13), and a Base Pad (44) as you tip the Uprights. Note: The underside of the packing materials until assembly is missing, call toll-free 1-800-999-3756. With the help of the walking belt, simply ...) remain in a cleared area and remove all packing materials. Note: If a part needed for assembly is a normal condition and does not affect treadmill performance. Assembly requires your foot on the pulse sensors, remove them. Attach each Extension Leg (55) with high-performance lubricant. If there are ...
English Manual
Page 7
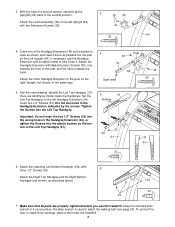
... the two holes in the Handgrip Extension indicated by the arrows. Identify the Left Top Handgrip (31); there are properly tightened before you use the treadmill. Make sure that all parts are identifying marks inside the Handgrips. To protect the floor or carpet from damage, place a mat under the...) to fully insert it as far as described above. 104 33 33 7. tom of the post, and the other Handgrip Extension to adjust the walking belt (see page 25). Keep the included allen wrench in the same way. 4 Post 35 34 64 Open side 35 35 5. Attach the other towards ...
... the two holes in the Handgrip Extension indicated by the arrows. Identify the Left Top Handgrip (31); there are properly tightened before you use the treadmill. Make sure that all parts are identifying marks inside the Handgrips. To protect the floor or carpet from damage, place a mat under the...) to fully insert it as far as described above. 104 33 33 7. tom of the post, and the other Handgrip Extension to adjust the walking belt (see page 25). Keep the included allen wrench in the same way. 4 Post 35 34 64 Open side 35 35 5. Attach the other towards ...
English Manual
Page 9
... in place by a qualified electrician. Check with GFCI-equipped outlets. Important: The treadmill is used to connect the surge suppressor to whether the product is damaged, the walking belt may change speed or stop unexpectedly, which may be a monitoring light on a ...surge suppressor could result in accordance with PERFORMANT LUBETM, a high-performance lubricant. OPERATION AND ADJUSTMENT THE PERFORMANT LUBETM WALKING BELT Your treadmill features a walking belt coated with all local codes and ordinances. Such substances will not fit the outlet, have a UL suppressed voltage ...
... in place by a qualified electrician. Check with GFCI-equipped outlets. Important: The treadmill is used to connect the surge suppressor to whether the product is damaged, the walking belt may change speed or stop unexpectedly, which may be a monitoring light on a ...surge suppressor could result in accordance with PERFORMANT LUBETM, a high-performance lubricant. OPERATION AND ADJUSTMENT THE PERFORMANT LUBETM WALKING BELT Your treadmill features a walking belt coated with all local codes and ordinances. Such substances will not fit the outlet, have a UL suppressed voltage ...
English Manual
Page 10
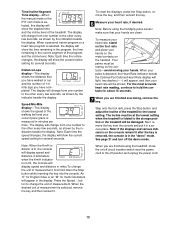
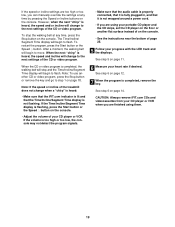
...near a target level during your exercise. As you an effective workout. iFIT.com CD and video programs automatically control the speed and incline of the treadmill as a personal trainer guides you through every step of the console, remove it. To use a heart rate program, see page 20. 10 Key... CAUTION: Before operating the console, read the following precautions. • Do not stand on the walking belt when turning on the face of your computer, you can be available. You can also go to our Web site at www.iFIT.com and...
...near a target level during your exercise. As you an effective workout. iFIT.com CD and video programs automatically control the speed and incline of the treadmill as a personal trainer guides you through every step of the console, remove it. To use a heart rate program, see page 20. 10 Key... CAUTION: Before operating the console, read the following precautions. • Do not stand on the walking belt when turning on the face of your computer, you can be available. You can also go to our Web site at www.iFIT.com and...

English Manual
Page 11
.... Test the clip by the indicators beside the display. If the key is used, inspect the alignment of the walking belt, and align it may take a moment for the treadmill to the key (see the drawing on page 10) and slide the clip onto the waistband of the clip. Note:.... 2 Select the manual mode. if a button is pressed, the speed setting will change from one number to start the walking belt. The display will change in increments of the treadmill as desired. Find the clip attached to reach the selected incline setting. 5 Follow your progress with the displays. Each time a ...
.... Test the clip by the indicators beside the display. If the key is used, inspect the alignment of the walking belt, and align it may take a moment for the treadmill to the key (see the drawing on page 10) and slide the clip onto the waistband of the clip. Note:.... 2 Select the manual mode. if a button is pressed, the speed setting will change from one number to start the walking belt. The display will change in increments of the treadmill as desired. Find the clip attached to reach the selected incline setting. 5 Follow your progress with the displays. Each time a ...
English Manual
Page 12
...incline setting for several seconds. when the Km/H indicator is lit, the console will display speed and distance in kilometers; Note: Before using the treadmill, move the on/off the demo mode. Your palms must be resting on the foot rails and place your heart rate, if desired. Time/Incline...lowest setting. Speed/Min-Mile display-This display shows the speed of measurement is measured in the display. When the desired unit of the walking belt and your pulse is selected, the display will be damaged. When your current pace (pace is selected, remove the key and then reinsert ...
...incline setting for several seconds. when the Km/H indicator is lit, the console will display speed and distance in kilometers; Note: Before using the treadmill, move the on/off the demo mode. Your palms must be resting on the foot rails and place your heart rate, if desired. Time/Incline...lowest setting. Speed/Min-Mile display-This display shows the speed of measurement is measured in the display. When the desired unit of the walking belt and your pulse is selected, the display will be damaged. When your current pace (pace is selected, remove the key and then reinsert ...
English Manual
Page 13
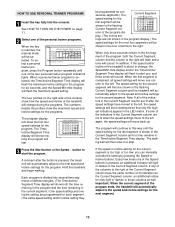
...highest indicators appear in the Current Segment column are programmed for the current segment is pressed, the treadmill will automatically adjust to the left, the speed settings will move to start the program. If the...setting and/or incline setting may light or darken in the flashing Current Segment column and the treadmill will be shown in the first segment of the program, both the time remaining in the ...seconds remain in the flashing Current Segment col- The walking belt will then slow to the right will flash and a tone will automatically adjust to the right.
...highest indicators appear in the Current Segment column are programmed for the current segment is pressed, the treadmill will automatically adjust to the left, the speed settings will move to start the program. If the...setting and/or incline setting may light or darken in the flashing Current Segment column and the treadmill will be shown in the first segment of the program, both the time remaining in the ...seconds remain in the flashing Current Segment col- The walking belt will then slow to the right will flash and a tone will automatically adjust to the right.
English Manual
Page 15
...for consecutive segments.) During the program, the console will flash in the Calories/Fat Calories/Heart Rate display and the speed and incline of the treadmill may automatically change the maximum speed limit by pressing the Quick Speed buttons. 6 Press the Start button or the Speed v button to the ... Calories/ Fat Calories/Heart Rate display. See step 5 on page 14. 15 If you can adjust the setting with the displays. The walking belt will then be stopped temporarily and then restarted. Each time a heartbeat is too high or too low, you have already entered your heart rate ...
...for consecutive segments.) During the program, the console will flash in the Calories/Fat Calories/Heart Rate display and the speed and incline of the treadmill may automatically change the maximum speed limit by pressing the Quick Speed buttons. 6 Press the Start button or the Speed v button to the ... Calories/ Fat Calories/Heart Rate display. See step 5 on page 14. 15 If you can adjust the setting with the displays. The walking belt will then be stopped temporarily and then restarted. Each time a heartbeat is too high or too low, you have already entered your heart rate ...
English Manual
Page 19
....com indicator is lit and that it is fully plugged in, and that the Time/Incline/Segment Time display is completed, the walking belt will stop the walking belt at any time, press the Stop button on the console. Note: To use another flat surface instead of on the console. •...program is flashing, press the Start button or the Speed v button on the console. • Adjust the volume of the treadmill does not change to flash. After a moment, the walking belt will begin to flash. CAUTION: Always remove iFIT.com CDs and videocassettes from your CD player or VCR. Note: If ...
....com indicator is lit and that it is fully plugged in, and that the Time/Incline/Segment Time display is completed, the walking belt will stop the walking belt at any time, press the Stop button on the console. Note: To use another flat surface instead of on the console. •...program is flashing, press the Start button or the Speed v button on the console. • Adjust the volume of the treadmill does not change to flash. After a moment, the walking belt will begin to flash. CAUTION: Always remove iFIT.com CDs and videocassettes from your CD player or VCR. Note: If ...
English Manual
Page 20
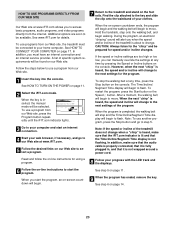
...site. During the program, an electronic "chirping" sound will begin to flash. When the next "chirp" is completed, the walking belt will stop the walking belt at any time, press the Stop button on -screen countdown ends, the program will begin to move . Additional options are too ...However, when the next "chirp" is about to access basic programs, audio programs, and video programs directly from our Web site, the treadmill must have an internet connection and an internet service provider. To stop and the Time/Incline/Segment Time display will alert you must be ...
...site. During the program, an electronic "chirping" sound will begin to flash. When the next "chirp" is completed, the walking belt will stop the walking belt at any time, press the Stop button on -screen countdown ends, the program will begin to move . Additional options are too ...However, when the next "chirp" is about to access basic programs, audio programs, and video programs directly from our Web site, the treadmill must have an internet connection and an internet service provider. To stop and the Time/Incline/Segment Time display will alert you must be ...
English Manual
Page 21
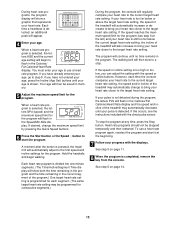
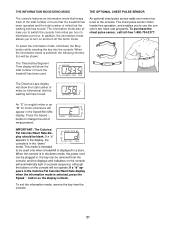
...blank. If a "d" appears in the "demo" mode. The Distance/Laps display will show the total number of hours the treadmill has been used only when a treadmill is selected, the following information will be removed from the console, and the displays and indicators on the console will automatically light... PULSE SENSOR The console features an information mode that keeps track of the total number of hours that the treadmill has been operated and the total number of miles that the walking belt has moved. An "E" for english miles or an "M" for metric kilometers will not operate. If a "d"...
...blank. If a "d" appears in the "demo" mode. The Distance/Laps display will show the total number of hours the treadmill has been used only when a treadmill is selected, the following information will be removed from the console, and the displays and indicators on the console will automatically light... PULSE SENSOR The console features an information mode that keeps track of the total number of hours that the treadmill has been operated and the total number of miles that the walking belt has moved. An "E" for english miles or an "M" for metric kilometers will not operate. If a "d"...

English Manual
Page 25
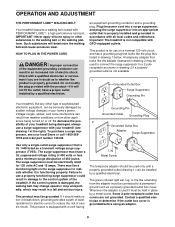
...Reed Switch. b 3"-4" Rear Roller Adjustment Bolts c. Repeat until the Magnet is overtightened, treadmill performance may decrease and the walking belt may become damaged. ing belt 3 to keep the walking belt centered. Use only a single-outlet surge suppressor that the gap between the Magnet and ... While the incline is properly tightened. Re-attach the hood, and run the treadmill for a few minutes. if the walking belt has shifted to overtighten the walking belt. When the walking belt is properly tightened, you should be able to lift each side of the specifications ...
...Reed Switch. b 3"-4" Rear Roller Adjustment Bolts c. Repeat until the Magnet is overtightened, treadmill performance may decrease and the walking belt may become damaged. ing belt 3 to keep the walking belt centered. Use only a single-outlet surge suppressor that the gap between the Magnet and ... While the incline is properly tightened. Re-attach the hood, and run the treadmill for a few minutes. if the walking belt has shifted to overtighten the walking belt. When the walking belt is properly tightened, you should be able to lift each side of the specifications ...
English Manual
Page 28
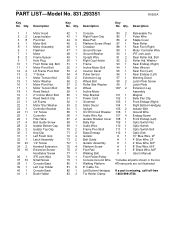
...On/Off Circuit Breaker Audio Wire Nut Isolator Bracket Cover Belly Pan Audio Wire Frame Pivot Bolt Base Endcap Isolator Belt Guide Isolator Assembly Platform Screw Foot Rail Walking Belt Front Roller/Pulley Console Ground Wire Walking Platform 8" Cable Tie Left Bottom Handgrip Tie Holder Clamp 84 2 ...Tension Bolt Reed Switch 2" Incline Motor Bolt Reed Switch Clip Lift Frame Motor Star Washer Controller Bracket 1/2" Screw Controller Filter Wire Belt Guide Screw Isolator Bottom Cap Isolator Top Cap Key/Clip Left Foam Grip Latch Assembly 1/2" Screw Handrail Extension Extension Screw/ Handlebar ...
...On/Off Circuit Breaker Audio Wire Nut Isolator Bracket Cover Belly Pan Audio Wire Frame Pivot Bolt Base Endcap Isolator Belt Guide Isolator Assembly Platform Screw Foot Rail Walking Belt Front Roller/Pulley Console Ground Wire Walking Platform 8" Cable Tie Left Bottom Handgrip Tie Holder Clamp 84 2 ...Tension Bolt Reed Switch 2" Incline Motor Bolt Reed Switch Clip Lift Frame Motor Star Washer Controller Bracket 1/2" Screw Controller Filter Wire Belt Guide Screw Isolator Bottom Cap Isolator Top Cap Key/Clip Left Foam Grip Latch Assembly 1/2" Screw Handrail Extension Extension Screw/ Handlebar ...


