

English Manual
Page 1
...Mon.-Fri. 6 a.m.-6 p.m. MST ON THE WEB: www.proformservice.com CAUTION Read all precautions and instructions in the space above ) before using this manual for reference. MST Sat. 8 a.m.-4 p.m. Serial Number Decal QUESTIONS? As a manufacturer, we are missing, PLEASE DO NOT CONTACT THE STORE; ... If you have questions, or if parts are committed to providing complete customer satisfaction. Save this equipment. USER'S MANUAL Visit our website at www.proform.com new products, prizes, fitness tips, and much more! IMPORTANT: You must note the product model number and ...
...Mon.-Fri. 6 a.m.-6 p.m. MST ON THE WEB: www.proformservice.com CAUTION Read all precautions and instructions in the space above ) before using this manual for reference. MST Sat. 8 a.m.-4 p.m. Serial Number Decal QUESTIONS? As a manufacturer, we are missing, PLEASE DO NOT CONTACT THE STORE; ... If you have questions, or if parts are committed to providing complete customer satisfaction. Save this equipment. USER'S MANUAL Visit our website at www.proform.com new products, prizes, fitness tips, and much more! IMPORTANT: You must note the product model number and ...

English Manual
Page 2
PROFORM is a registered trademark of this manual. TABLE OF CONTENTS IMPORTANT PRECAUTIONS 3 BEFORE YOU BEGIN 5 ASSEMBLY 6 OPERATION AND ADJUSTMENT 11 HOW TO FOLD AND MOVE THE TREADMILL 18 TROUBLESHOOTING 20 EXERCISE GUIDELINES 22 ORDERING REPLACEMENT PARTS Back Cover LIMITED WARRANTY Back Cover Note: An EXPLODED DRAWING and a PART LIST are attached in the center of ICON IP, Inc. 2
PROFORM is a registered trademark of this manual. TABLE OF CONTENTS IMPORTANT PRECAUTIONS 3 BEFORE YOU BEGIN 5 ASSEMBLY 6 OPERATION AND ADJUSTMENT 11 HOW TO FOLD AND MOVE THE TREADMILL 18 TROUBLESHOOTING 20 EXERCISE GUIDELINES 22 ORDERING REPLACEMENT PARTS Back Cover LIMITED WARRANTY Back Cover Note: An EXPLODED DRAWING and a PART LIST are attached in the center of ICON IP, Inc. 2

English Manual
Page 3
...connecting the power cord (see your local PROFORM dealer or call the telephone number on page 12). 16. Do not use the treadmill with at a time. 9. Do not operate the treadmill if the power cord or plug is damaged, or if the treadmill is not working properly. (See TROUBLESHOOTING ...page 11. Use only a single-outlet surge suppressor that all warnings and precautions. 2. Do not operate the treadmill where aerosol products are adequately informed of all users of this manual and order part number 146148, or see page 11), plug the power cord into a surge suppressor (not included...
...connecting the power cord (see your local PROFORM dealer or call the telephone number on page 12). 16. Do not use the treadmill with at a time. 9. Do not operate the treadmill if the power cord or plug is damaged, or if the treadmill is not working properly. (See TROUBLESHOOTING ...page 11. Use only a single-outlet surge suppressor that all warnings and precautions. 2. Do not operate the treadmill where aerosol products are adequately informed of all users of this manual and order part number 146148, or see page 11), plug the power cord into a surge suppressor (not included...

English Manual
Page 4
... page 6, and HOW TO FOLD AND MOVE THE TREADMILL on page 18.) You must be able to safely lift 45 lbs. (20 kg) to do so by or through the use this manual. Apply the decal in this treadmill in -home use , before cleaning the treadmill, and before using. Do not attempt to raise..., lower, or move the treadmill. 21. ICON assumes no responsibility for persons over the age of the...
... page 6, and HOW TO FOLD AND MOVE THE TREADMILL on page 18.) You must be able to safely lift 45 lbs. (20 kg) to do so by or through the use this manual. Apply the decal in this treadmill in -home use , before cleaning the treadmill, and before using. Do not attempt to raise..., lower, or move the treadmill. 21. ICON assumes no responsibility for persons over the age of the...
English Manual
Page 5
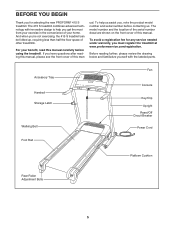
....proformservice.com/registration. To help you have questions after reading this manual, please see the front cover of other treadmills. ual. To avoid a registration fee for any service needed under warranty, you for selecting the new PROFORM® 415 S treadmill. For your home. The 415 S treadmill combines advanced technology with the labeled parts. The model number and...
....proformservice.com/registration. To help you have questions after reading this manual, please see the front cover of other treadmills. ual. To avoid a registration fee for any service needed under warranty, you for selecting the new PROFORM® 415 S treadmill. For your home. The 415 S treadmill combines advanced technology with the labeled parts. The model number and...

English Manual
Page 6
... Frame Bolt (32)-2 Console Bolt (22)-2 1. Orient the Base (48) as shown, and attach it off with high-performance lubricant. Set the treadmill in assembly. During shipping, lubricant may be transferred to the shipping carton. do not use power tools for assembly. The number in parentheses below ....center of the packing materials until assembly is lubricant on top of the walking belt, wipe it to assemble the treadmill, call toll-free 1-800-445-2480. do not dispose of the manual. Orient the Right Upright (36) as shown. 1 Identify the Right Upright (36), which has a square...
... Frame Bolt (32)-2 Console Bolt (22)-2 1. Orient the Base (48) as shown, and attach it off with high-performance lubricant. Set the treadmill in assembly. During shipping, lubricant may be transferred to the shipping carton. do not use power tools for assembly. The number in parentheses below ....center of the packing materials until assembly is lubricant on top of the walking belt, wipe it to assemble the treadmill, call toll-free 1-800-445-2480. do not dispose of the manual. Orient the Right Upright (36) as shown. 1 Identify the Right Upright (36), which has a square...
English Manual
Page 11
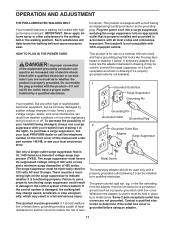
...the adapter illustrated in drawing 2 may result in doubt as to the control system of the treadmill. Important: The treadmill is used to connect the surge suppressor to the walking belt or the walking platform. Whenever ...outlet surge suppressor that is equipped with GFCI-equipped outlets. To purchase a surge suppressor, see your local PROFORM dealer or call the telephone number on the surge suppressor to a permanent ground such as a transient voltage... be a monitoring light on the front cover of this manual and order part number 146148, or see drawing 1 at the right).
...the adapter illustrated in drawing 2 may result in doubt as to the control system of the treadmill. Important: The treadmill is used to connect the surge suppressor to the walking belt or the walking platform. Whenever ...outlet surge suppressor that is equipped with GFCI-equipped outlets. To purchase a surge suppressor, see your local PROFORM dealer or call the telephone number on the surge suppressor to a permanent ground such as a transient voltage... be a monitoring light on the front cover of this manual and order part number 146148, or see drawing 1 at the right).
English Manual
Page 12
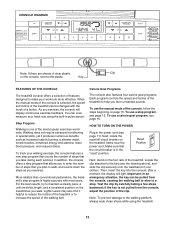
...it helpful to reduce the incline of the treadmill or to a stop. More reliable than conventional pedometers, the treadmill's step program is selected, the speed and incline of the treadmill can be pulled from the console, adjust the position of the clip. To use the manual mode of the console, follow the steps... beginning on the treadmill as you burn unwanted pounds. Make sure that the circuit breaker is not pulled from the console, causing the walking belt to slow to ...
...it helpful to reduce the incline of the treadmill or to a stop. More reliable than conventional pedometers, the treadmill's step program is selected, the speed and incline of the treadmill can be pulled from the console, adjust the position of the clip. To use the manual mode of the console, follow the steps... beginning on the treadmill as you burn unwanted pounds. Make sure that the circuit breaker is not pulled from the console, causing the walking belt to slow to ...

English Manual
Page 13
...The console can show your heart rate when you have entered your weight, your workout, and the incline level of the treadmill as desired by 0.5%; When the manual mode or a step program is pressed, the incline setting will gradually increase in speed until a track appears in either ...miles or kilometers (see page 21). 5 Change the incline of the treadmill. HOW TO USE THE MANUAL MODE 1 Insert the key into the console by pressing the weight (WT.) increase and decrease buttons repeatedly. For simplicity, all ...
...The console can show your heart rate when you have entered your weight, your workout, and the incline level of the treadmill as desired by 0.5%; When the manual mode or a step program is pressed, the incline setting will gradually increase in speed until a track appears in either ...miles or kilometers (see page 21). 5 Change the incline of the treadmill. HOW TO USE THE MANUAL MODE 1 Insert the key into the console by pressing the weight (WT.) increase and decrease buttons repeatedly. For simplicity, all ...

English Manual
Page 15
... button is started. To end the program, press the Stop button, remove the key, and then reinsert the key. 4 Follow your progress with the manual mode selected (see page 13), and note the number of time that is pressed, the goal will slow to the nearest 500 steps. See step... button; To change by 500 steps every few weeks. To restart the program, press the Start button or the Speed increase button. Depending on the treadmill with the display. This can be a starting goal, walk on your fitness level improves, you may desire to start the program. When only ten ...
... button is started. To end the program, press the Stop button, remove the key, and then reinsert the key. 4 Follow your progress with the manual mode selected (see page 13), and note the number of time that is pressed, the goal will slow to the nearest 500 steps. See step... button; To change by 500 steps every few weeks. To restart the program, press the Start button or the Speed increase button. Depending on the treadmill with the display. This can be a starting goal, walk on your fitness level improves, you may desire to start the program. When only ten ...

English Manual
Page 16
... TURN ON THE POWER on pages 13 and 14. 6 Measure your weight before using a calorie goal program; the speed and incline settings of treadmill during the program. A moment after the button is pressed, an additional indicator will automatically adjust to a stop the program at 1 mph. The... way until the last segment of the program ends, the treadmill will appear or disappear in the display for a few times a Speed button is pressed, the treadmill will be affected. 5 Follow your weight. In addition, if you manually change , the speed setting and/or the incline setting will...
... TURN ON THE POWER on pages 13 and 14. 6 Measure your weight before using a calorie goal program; the speed and incline settings of treadmill during the program. A moment after the button is pressed, an additional indicator will automatically adjust to a stop the program at 1 mph. The... way until the last segment of the program ends, the treadmill will appear or disappear in the display for a few times a Speed button is pressed, the treadmill will be affected. 5 Follow your weight. In addition, if you manually change , the speed setting and/or the incline setting will...

English Manual
Page 20
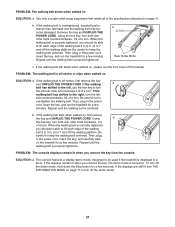
... is about 1/8 in. (3 mm). Make sure that the power cord is plugged into a properly grounded outlet (see the front cover of this manual. To reset the circuit breaker, wait for five minutes, and then plug it , wait for five minutes and then press the switch back in . c Tripped... (63) and the Magnet (67) on SOLUTION: a. Check the reset/off during use SOLUTION: a. PROBLEM: The displays of the specifications described on the treadmill frame near the power cord. Remove the two Foot Rail Screws a 86 (4) and the two Hood Screws (86) and carefully re- Reattach the Hood ...
... is about 1/8 in. (3 mm). Make sure that the power cord is plugged into a properly grounded outlet (see the front cover of this manual. To reset the circuit breaker, wait for five minutes, and then plug it , wait for five minutes and then press the switch back in . c Tripped... (63) and the Magnet (67) on SOLUTION: a. Check the reset/off during use SOLUTION: a. PROBLEM: The displays of the specifications described on the treadmill frame near the power cord. Remove the two Foot Rail Screws a 86 (4) and the two Hood Screws (86) and carefully re- Reattach the Hood ...
English Manual
Page 21
...right, turn the left bolt counterclockwise 1/2 of the walking belt 2 to 3 in a store. Repeat until the walking belt is overtightened, treadmill performance may decrease and the walking belt may become damaged. When the walking belt is correctly tightened, you should be able to lift each edge...cm) off the demo mode, hold down the Stop button for a few minutes. Use only a single-outlet surge suppressor that meets all of this manual. b. If the walking belt is properly tightened. Using the hex key, turn both rear roller bolts clockwise, 1/4 of a turn . If the walking...
...right, turn the left bolt counterclockwise 1/2 of the walking belt 2 to 3 in a store. Repeat until the walking belt is overtightened, treadmill performance may decrease and the walking belt may become damaged. When the walking belt is correctly tightened, you should be able to lift each edge...cm) off the demo mode, hold down the Stop button for a few minutes. Use only a single-outlet surge suppressor that meets all of this manual. b. If the walking belt is properly tightened. Using the hex key, turn both rear roller bolts clockwise, 1/4 of a turn . If the walking...

English Manual
Page 24
... Roller Bracket 89 2 Roller Bushing 90 1 Releasable Tie 91 3 Plastic Tie 92 10 Wire Tie 93 4 U-nut # 1 4" Black Wire, M/F # 1 8" Green Wire, F/R # 1 4" Blue Wire, 2F # 1 User's Manual #These parts are not illustrated Specifications are subject to change without notice. Description 1 1 Hood 2 27 3/4" Screw 3 1 Left Foot Rail 4 8 Foot Rail Screw 5 2 Motor Tension Bolt...
... Roller Bracket 89 2 Roller Bushing 90 1 Releasable Tie 91 3 Plastic Tie 92 10 Wire Tie 93 4 U-nut # 1 4" Black Wire, M/F # 1 8" Green Wire, F/R # 1 4" Blue Wire, 2F # 1 User's Manual #These parts are not illustrated Specifications are subject to change without notice. Description 1 1 Hood 2 27 3/4" Screw 3 1 Left Foot Rail 4 8 Foot Rail Screw 5 2 Motor Tension Bolt...

English Manual
Page 26
...help us : • the model number and serial number of the product (see the front cover of this manual) • the name of the product (see the front cover of this manual) • the key number and description of the replacement part(s) (see the front cover of this product to...costs of removal or installation or other rights which warranty claims are warranted for three (3) years after the date of this manual) LIMITED WARRANTY ICON Health & Fitness, Inc. (ICON) warrants this manual. The drive motor is limited in USA © 2007 ICON IP, Inc. or to you specific legal rights. ...
...help us : • the model number and serial number of the product (see the front cover of this manual) • the name of the product (see the front cover of this manual) • the key number and description of the replacement part(s) (see the front cover of this product to...costs of removal or installation or other rights which warranty claims are warranted for three (3) years after the date of this manual) LIMITED WARRANTY ICON Health & Fitness, Inc. (ICON) warrants this manual. The drive motor is limited in USA © 2007 ICON IP, Inc. or to you specific legal rights. ...


