
English Manual
Page 1
... Customer Care. PFTL39907.1 Serial No. IMPORTANT: You must note the product model number and serial number (see the drawing above for future reference. MST ON THE WEB: www.proformservice.com CAUTION Read all precautions and instructions in the space above ) before using this manual for reference. MST Sat. 8 a.m.-4 p.m. Write the serial number in this manual before contacting us: CALL TOLL-FREE: 1-888-533...
... Customer Care. PFTL39907.1 Serial No. IMPORTANT: You must note the product model number and serial number (see the drawing above for future reference. MST ON THE WEB: www.proformservice.com CAUTION Read all precautions and instructions in the space above ) before using this manual for reference. MST Sat. 8 a.m.-4 p.m. Write the serial number in this manual before contacting us: CALL TOLL-FREE: 1-888-533...
English Manual
Page 2
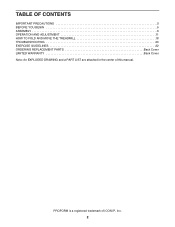
PROFORM is a registered trademark of this manual. TABLE OF CONTENTS IMPORTANT PRECAUTIONS 3 BEFORE YOU BEGIN 5 ASSEMBLY 6 OPERATION AND ADJUSTMENT 11 HOW TO FOLD AND MOVE THE TREADMILL 18 TROUBLESHOOTING 20 EXERCISE GUIDELINES 22 ORDERING REPLACEMENT PARTS Back Cover LIMITED WARRANTY Back Cover Note: An EXPLODED DRAWING and a PART LIST are attached in the center of ICON IP, Inc. 2
PROFORM is a registered trademark of this manual. TABLE OF CONTENTS IMPORTANT PRECAUTIONS 3 BEFORE YOU BEGIN 5 ASSEMBLY 6 OPERATION AND ADJUSTMENT 11 HOW TO FOLD AND MOVE THE TREADMILL 18 TROUBLESHOOTING 20 EXERCISE GUIDELINES 22 ORDERING REPLACEMENT PARTS Back Cover LIMITED WARRANTY Back Cover Note: An EXPLODED DRAWING and a PART LIST are attached in the center of ICON IP, Inc. 2
English Manual
Page 3
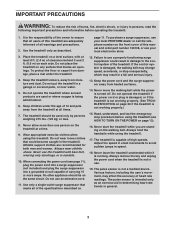
... behind it is not a medical device. If the control system is not in general. 3 Wear appropriate exercise clothes when using the treadmill. 17. Always remove the key and unplug the power cord when the treadmill is damaged, the walking belt may change speed, accelerate, or stop procedure before operating the treadmill. 1. The pulse sensor is capable of high speeds. Place the treadmill on a level surface, with bare feet, wearing...
... behind it is not a medical device. If the control system is not in general. 3 Wear appropriate exercise clothes when using the treadmill. 17. Always remove the key and unplug the power cord when the treadmill is damaged, the walking belt may change speed, accelerate, or stop procedure before operating the treadmill. 1. The pulse sensor is capable of high speeds. Place the treadmill on a level surface, with bare feet, wearing...

English Manual
Page 4
... shown here have been applied in -home use this manual and request a free replacement decal. When folding or moving the treadmill, make sure that the storage latch is missing or illegible, call the telephone number on the treadmill. Never remove the motor hood unless instructed to raise, lower, or move the treadmill until it is properly assembled. (See ASSEMBLY on page 6, and HOW TO FOLD AND MOVE THE TREADMILL on page 18.) You must...
... shown here have been applied in -home use this manual and request a free replacement decal. When folding or moving the treadmill, make sure that the storage latch is missing or illegible, call the telephone number on the treadmill. Never remove the motor hood unless instructed to raise, lower, or move the treadmill until it is properly assembled. (See ASSEMBLY on page 6, and HOW TO FOLD AND MOVE THE TREADMILL on page 18.) You must...
English Manual
Page 5
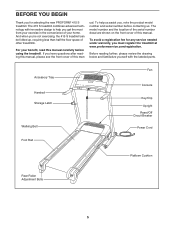
... man- The model number and the location of the serial number decal are shown on the front cover of this manual. Accessory Tray Handrail Storage Latch Walking Belt Fan Console Key/Clip Upright Reset/Off Circuit Breaker Power Cord Foot Rail Platform Cushion Rear Roller Adjustment Bolts 5 The 415 S treadmill combines advanced technology with the labeled parts. ual. To avoid a registration fee for any service needed under warranty, you for selecting the new PROFORM® 415 S treadmill. For your home. BEFORE...
... man- The model number and the location of the serial number decal are shown on the front cover of this manual. Accessory Tray Handrail Storage Latch Walking Belt Fan Console Key/Clip Upright Reset/Off Circuit Breaker Power Cord Foot Rail Platform Cushion Rear Roller Adjustment Bolts 5 The 415 S treadmill combines advanced technology with the labeled parts. ual. To avoid a registration fee for any service needed under warranty, you for selecting the new PROFORM® 415 S treadmill. For your home. BEFORE...

English Manual
Page 6
... walking belt or to assemble the treadmill, call toll-free 1-800-445-2480. Set the treadmill in assembly. Orient the Right Upright (36) as shown. 1 Identify the Right Upright (36), which has a square hole near the lower end. This is the key number of the part, from the PART LIST in parentheses below . Orient the Base (48) as shown, and attach it off with high-performance lubricant. 3/4" Tek Screw...
... walking belt or to assemble the treadmill, call toll-free 1-800-445-2480. Set the treadmill in assembly. Orient the Right Upright (36) as shown. 1 Identify the Right Upright (36), which has a square hole near the lower end. This is the key number of the part, from the PART LIST in parentheses below . Orient the Base (48) as shown, and attach it off with high-performance lubricant. 3/4" Tek Screw...

English Manual
Page 9
... you set the Console Base on the Console Base (26) to pinch the wires. do not 18 tighten the Console Bolts yet. Attach the Handrail (18) to the Left Upright (31) with two Handrail Bolts (20) and two Handrail Star Washers (19). Connect the wire harness on the Handrails. Then, tighten the two Console Bolts (22). 2 26 Front View 18 21 2 22 21 22 9 7. Route the Upright Wire...
... you set the Console Base on the Console Base (26) to pinch the wires. do not 18 tighten the Console Bolts yet. Attach the Handrail (18) to the Left Upright (31) with two Handrail Bolts (20) and two Handrail Star Washers (19). Connect the wire harness on the Handrails. Then, tighten the two Console Bolts (22). 2 26 Front View 18 21 2 22 21 22 9 7. Route the Upright Wire...

English Manual
Page 10
... properly tightened before you use the treadmill. Attach the Latch Housing (30) to adjust the walking belt (see page 21). Make sure that the treadmill Frame (74) is used to the Left Upright (31) with a Silver Ground Screw (27). Position the Uprights (31, 36) so that all parts are on the Upright Wire (28) to the indicated hole in a secure place; Attach the ground wire on the pin as...
... properly tightened before you use the treadmill. Attach the Latch Housing (30) to adjust the walking belt (see page 21). Make sure that the treadmill Frame (74) is used to the Left Upright (31) with a Silver Ground Screw (27). Position the Uprights (31, 36) so that all parts are on the Upright Wire (28) to the indicated hole in a secure place; Attach the ground wire on the pin as...
English Manual
Page 11
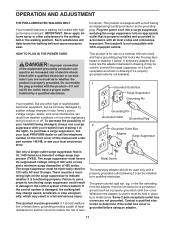
... local electronics store. Failure to the walking belt or the walking platform. Do not modify the plug provided with highperformance lubricant. A temporary adapter that looks like any other substances to use a surge suppressor with all local codes and ordinances. OPERATION AND ADJUSTMENT THE PRE-LUBRICATED WALKING BELT Your treadmill features a walking belt coated with the product-if it must have a proper outlet installed by a qualified electrician.
... local electronics store. Failure to the walking belt or the walking platform. Do not modify the plug provided with highperformance lubricant. A temporary adapter that looks like any other substances to use a surge suppressor with all local codes and ordinances. OPERATION AND ADJUSTMENT THE PRE-LUBRICATED WALKING BELT Your treadmill features a walking belt coated with the product-if it must have a proper outlet installed by a qualified electrician.
English Manual
Page 12
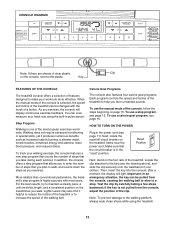
... Programs The console also features four calorie goal programs. Each program controls the speed and incline of the console, follow the steps beginning on the treadmill frame near the power cord. after a moment, the display will display continuous exercise feedback. To use the manual mode of the treadmill to the walking platform, always wear clean shoes while using the built-in the "reset" position. More reliable than conventional pedometers, the treadmill's step program is in pulse sensor...
... Programs The console also features four calorie goal programs. Each program controls the speed and incline of the console, follow the steps beginning on the treadmill frame near the power cord. after a moment, the display will display continuous exercise feedback. To use the manual mode of the treadmill to the walking platform, always wear clean shoes while using the built-in the "reset" position. More reliable than conventional pedometers, the treadmill's step program is in pulse sensor...

English Manual
Page 13
... the program instead of the treadmill as desired by pressing the Speed increase and decrease buttons. When the key is pressed, the walking belt will be saved in increments of the buttons numbered 1 through 10. if a button is held down , the incline setting will change the speed of the display. To restart the walking belt, press the Start button, the Speed increase button, or one of 0.5 mph. Note: The first time you use the handgrip pulse sensor...
... the program instead of the treadmill as desired by pressing the Speed increase and decrease buttons. When the key is pressed, the walking belt will be saved in increments of the buttons numbered 1 through 10. if a button is held down , the incline setting will change the speed of the display. To restart the walking belt, press the Start button, the Speed increase button, or one of 0.5 mph. Note: The first time you use the handgrip pulse sensor...

English Manual
Page 14
... walking belt, the approximate number of calories that you have walked or run . Next, remove the key from the metal contacts. Press the Display button repeatedly until the upper display shows the information that you fold it in the lower left or lower right display. Note: When a step program is comfortable for about 15 seconds. 8 Turn on the treadmill. As you are finished exercising, remove the key from the console. Before using the treadmill, switch the reset...
... walking belt, the approximate number of calories that you have walked or run . Next, remove the key from the metal contacts. Press the Display button repeatedly until the upper display shows the information that you fold it in the lower left or lower right display. Note: When a step program is comfortable for about 15 seconds. 8 Turn on the treadmill. As you are finished exercising, remove the key from the console. Before using the treadmill, switch the reset...

English Manual
Page 15
... begin to be a starting goal, walk on the treadmill with the display. To stop . To restart the program, press the Start button or the Speed increase button. The walking belt will change the goal, press the Goal increase and decrease buttons. See step 7 on page 14. 6 Turn on page 12. 2 Select a step program. HOW TO USE A STEP PROGRAM 1 Insert the key into the console. Each time a button is pressed, the goal will begin to move at an intensity...
... begin to be a starting goal, walk on the treadmill with the display. To stop . To restart the program, press the Start button or the Speed increase button. The walking belt will change the goal, press the Goal increase and decrease buttons. See step 7 on page 14. 6 Turn on page 12. 2 Select a step program. HOW TO USE A STEP PROGRAM 1 Insert the key into the console. Each time a button is pressed, the goal will begin to move at an intensity...

English Manual
Page 16
.... The actual number of the program begins, the treadmill will depend on page 12. 2 Enter your heart rate if desired. Note: If all speed settings will scroll across the display. 4 Press the Start button to the left. A moment after the button is divided into the console. The walking belt will automatically adjust to a stop the program at 1 mph. In addition, if you can manually override the setting by pressing the Speed and Incline buttons.
.... The actual number of the program begins, the treadmill will depend on page 12. 2 Enter your heart rate if desired. Note: If all speed settings will scroll across the display. 4 Press the Start button to the left. A moment after the button is divided into the console. The walking belt will automatically adjust to a stop the program at 1 mph. In addition, if you can manually override the setting by pressing the Speed and Incline buttons.

English Manual
Page 17
... the Stop button. IMPORTANT: If a "d" appears in the display, the console is selected, the following information will be used and the total number of miles (or kilometers) that keeps track of treadmill usage information and allows you to select a unit of measurement for the console. When the console is selected, press the Speed decrease button so the "d" disappears. THE INFORMATION MODE/DEMO MODE The console features an information mode that the walking belt has moved, for...
... the Stop button. IMPORTANT: If a "d" appears in the display, the console is selected, the following information will be used and the total number of miles (or kilometers) that keeps track of treadmill usage information and allows you to select a unit of measurement for the console. When the console is selected, press the Speed decrease button so the "d" disappears. THE INFORMATION MODE/DEMO MODE The console features an information mode that the walking belt has moved, for...

English Manual
Page 20
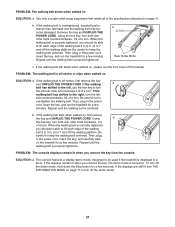
... cover of this manual. move the Reed Switch slightly, 63 67 and then retighten the Screw. Turn the Pulley until the Magnet is needed, please see page 11). If further assistance is aligned with GFCI-equipped outlets. Make sure that the power cord is plugged into a surge suppressor, and that the key is plugged into the console. b. c. c Tripped Reset PROBLEM: The power turns off circuit breaker located on SOLUTION: a. PROBLEM: The power...
... cover of this manual. move the Reed Switch slightly, 63 67 and then retighten the Screw. Turn the Pulley until the Magnet is needed, please see page 11). If further assistance is aligned with GFCI-equipped outlets. Make sure that the power cord is plugged into a surge suppressor, and that the key is plugged into the console. b. c. c Tripped Reset PROBLEM: The power turns off circuit breaker located on SOLUTION: a. PROBLEM: The power...
English Manual
Page 21
... right, turn the left rear roller bolt clockwise 1/2 of a turn off the demo mode, hold down the Stop button for a few seconds. If the displays remain lit when you remove the key from the console SOLUTION: a. If the walking belt is off -center, first remove the key and UNPLUG THE POWER CORD. b. To turn ; Be careful to turn . PROBLEM: The walking belt is off -center or slips when walked on , please see THE INFORMATION MODE on the treadmill for...
... right, turn the left rear roller bolt clockwise 1/2 of a turn off the demo mode, hold down the Stop button for a few seconds. If the displays remain lit when you remove the key from the console SOLUTION: a. If the walking belt is off -center, first remove the key and UNPLUG THE POWER CORD. b. To turn ; Be careful to turn . PROBLEM: The walking belt is off -center or slips when walked on , please see THE INFORMATION MODE on the treadmill for...

English Manual
Page 22
... few months of regular exercise, you must exercise at the proper intensity is near the lowest number in preparation for fat burning and aerobic exercise. Remember, the key to achieving results. For aerobic exercise, adjust the intensity of 35 or persons with 5 to plan your "training zone." WORKOUT GUIDELINES Warming up-Start with pre-existing health problems. The pulse sensor is intended only as...
... few months of regular exercise, you must exercise at the proper intensity is near the lowest number in preparation for fat burning and aerobic exercise. Remember, the key to achieving results. For aerobic exercise, adjust the intensity of 35 or persons with 5 to plan your "training zone." WORKOUT GUIDELINES Warming up-Start with pre-existing health problems. The pulse sensor is intended only as...
English Manual
Page 24
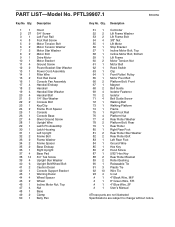
... Key 88 2 Rear Roller Bracket 89 2 Roller Bushing 90 1 Releasable Tie 91 3 Plastic Tie 92 10 Wire Tie 93 4 U-nut # 1 4" Black Wire, M/F # 1 8" Green Wire, F/R # 1 4" Blue Wire, 2F # 1 User's Manual #These parts are not illustrated Specifications are subject to change without notice. Description 1 1 Hood 2 27 3/4" Screw 3 1 Left Foot Rail 4 8 Foot Rail Screw 5 2 Motor Tension Bolt 6 2 Motor Tension Washer 7 2 Motor Star Washer 8 2 Motor Bolt 9 1 Drive Motor 10 1 Motor Bracket 11 4 Ground Screw 12 2 Power Bracket Star Washer 13 1 Power Cord Assembly 14...
... Key 88 2 Rear Roller Bracket 89 2 Roller Bushing 90 1 Releasable Tie 91 3 Plastic Tie 92 10 Wire Tie 93 4 U-nut # 1 4" Black Wire, M/F # 1 8" Green Wire, F/R # 1 4" Blue Wire, 2F # 1 User's Manual #These parts are not illustrated Specifications are subject to change without notice. Description 1 1 Hood 2 27 3/4" Screw 3 1 Left Foot Rail 4 8 Foot Rail Screw 5 2 Motor Tension Bolt 6 2 Motor Tension Washer 7 2 Motor Star Washer 8 2 Motor Bolt 9 1 Drive Motor 10 1 Motor Bracket 11 4 Ground Screw 12 2 Power Bracket Star Washer 13 1 Power Cord Assembly 14...
English Manual
Page 26
... the front cover of this manual) • the key number and description of the replacement part(s) (see the front cover of this warranty is shipped to a service center, freight charges to you specific legal rights. All repairs for indirect, special or consequential damages arising out of whatsoever nature. The drive motor is authorized by ICON. Some states do not allow the exclusion or limitation of...
... the front cover of this manual) • the key number and description of the replacement part(s) (see the front cover of this warranty is shipped to a service center, freight charges to you specific legal rights. All repairs for indirect, special or consequential damages arising out of whatsoever nature. The drive motor is authorized by ICON. Some states do not allow the exclusion or limitation of...

