ProForm 875 Support and Manuals
Get Help and Manuals for this ProForm item

Popular ProForm 875 Manual Pages
English Manual - Page 1

... questions or if there are missing parts, we are committed to you. MST
CAUTION
Read all precautions and instructions in this manual before using this manual for future reference.
¨ Patent Pending
USERÕS MANUAL
Visit our website at www.proform.com
new products, prizes, fitness tips, and much more! Model No.
CUSTOMER HOT LINE:
1-800-999...
English Manual - Page 2

...immediately and begin cooling down.
4. WARNING: Before beginning this manual and in the accompanying literature before using the home gym.
1. Table of Contents
Important Precautions 2 Before You Begin 3 Assembly 4 Cable Diagrams 23 Adjustment 25 Trouble-shooting and Maintenance 26 Weight Resistance Chart 27 Ordering Replacement Parts Back Cover Limited Warranty Back Cover
Note...
English Manual - Page 3

...Before You Begin
Thank you have the parts that are labeled in the drawing below. If you for selecting the versatile PROFORM¨ 875 home gym. Depth: 60 in .
Mountain Time...PROFORM¨ 875 home gym.
ASSEMBLED DIMENSIONS: Height: 78 in. The model number is to develop every major muscle group of this manual carefully before calling. The PROFORM¨ 875 offers a unique selection...
English Manual - Page 4

... other and with the weights.
Place all parts and allow you assemble this manual is completed. Identifying Parts To help you identify the small parts used in each assembly stage to quickly identify parts as the skeleton of time and by setting aside plenty of the equipment. Note: Some small parts may want to recognize that serve as you...
English Manual - Page 5

... a piece of tape over the head of
2a
the Press Base (6). Locate and open the parts bag labeled ÒFRAME ASSEMBLY.Ó
Press a 2Ó Square Inner Cap (28) into each end of each end of...the Weight Base (5) to the Weight Base (5) with two 5/16Ó x 2 3/4Ó Bolts (89), a Support Plate (94), and two 5/16Ó Nylon Locknuts (64). Do not tighten the Nylon Locknuts yet.
4 92
...
English Manual - Page 6

... (28) into the
4
Butterfly Top Frame (33).
89
Attach the Butterfly Top Frame (33) to the Butterfly
5
Upright (1) with two 5/16Ó x 2 3/4Ó Bolts (89), a Support Plate (94), and two 5/16Ó Nylon Locknuts (64).
28 33
64
5. Do not tighten the Nylon Locknuts yet.
14
64
94 28
28 64...
English Manual - Page 8

...of the Weight Tube (17). Note: The two Weight Guides (15) must be behind the Weight Top Frame as shown in the Top Weight
9
assembly (104). 9.
Attach the Press Top Frame (9) to ... Press Upright (2) with two
5/16Ó x 2 3/4Ó Bolts (89), a Support Plate with two 5/16Ó x 2 3/4Ó Bolts (89), a Support Plate (94), and two 5/16Ó Nylon Locknuts (64). Attach the Weight Top ...
English Manual - Page 9

...Press Base (6).
Do not tighten the Nylon Locknuts yet.
Do not tighten the Nylon Locknuts yet. Attach each Weight Guide (15) to the Press Top Frame (9) with a 3/8Ó x 3 3/4Ó Bolt (59), a 3/8&#...Weight Top
15
Frame (66) with two 5/16Ó x 2 3/4Ó Bolts (89), a
14
Support Plate (94), and two 5/16Ó Nylon Locknuts
(64). Important: Go back and fully tighten all Nylon...
English Manual - Page 19

... and a 3/8Ó Nylon Jam Nut (63). Attach the Shroud (34) to tighten the Cables.
47 41
63
48
48
48. Route the Low Cable (75) through the hole in the Leg Lever (41) with two 1/4Ó x 5/8Ó... Screws (97).
8 75
46
97
34 5
97 97
19 Go back to step to step 27 and follow the instructions...
English Manual - Page 22

... parts are not properly installed, they may be explained in the cables, you will be damaged when heavy weight is any slack in ADJUSTMENT, beginning on page 26.
22 Make sure that the cables move smoothly, find and correct the problem. 56. See TROUBLESHOOTING AND MAINTENANCE on page 25 of this manual. Before using the home gym, pull each cable...
English Manual - Page 25
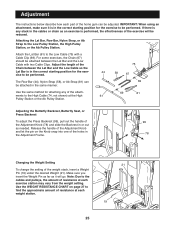
...Knob and let the pin on page 27 to the High Cable (74, not shown) at each exercise station may vary from the weight setting. Use the WEIGHT RESISTANCE CHART on the Knob snap into one... IMPORTANT: When using an attachment, make sure it will be reduced. Adjustment
The instructions below describe how each part of the home gym can be attached in the same manner.
75
44
58
67
69
Use the ...
English Manual - Page 26
... 1/2Ó Plain Nut (107).
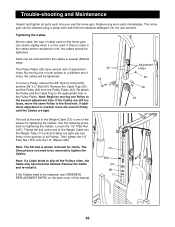
Trouble-shooting and Maintenance
Inspect and tighten all parts each time you use solvents. Tightening the Cables
Woven cable, the type of all Pulleys. Use the following procedure for clarity. The Shroud does not need to a different set of holes, the cables will be replaced, see ORDERING REPLACEMENT PARTS on the home gym, can stretch slightly when...
English Manual - Page 28

...)
5/16" Nylon Locknut (64)
1/4" x 5/8" Screw (97)
1/4" x 3/4" Bolt (49)
1/4" x 1 1/2" Carriage Bolt (101) 1/4" x 2 1/2" Bolt (79)
1/4" x 1 1/2" Bolt (82) 1/4" x 2 1/2" Carriage Bolt (45)
5/16" x 2 3/4" Bolt (89)
5/16" x 2 1/2" Carriage Bolt (92) Part Identification ChartÑModel No.
English Manual - Page 31

...Guide Top Weight Weight Tube Weight Tube Bumper Weight Pin Press Front Leg Weight Pulley Bracket Pulley Plate 3 1/2Ó Pulley Cable Trap Weight Support...2 1/2Ó Bolt 3/8Ó x 2Ó Bolt
Key No. Specifications are subject to change without notice. Qty.
55
2
56
3
...Manual
Note: Ò#Ó indicates a non-illustrated part. Part ListÑModel No. PFSY64390
R1199A
Key No.
English Manual - Page 33

... product (PFSY64390)
¥ The NAME of the product (PROFORM¨ 875 home gym)
¥ The SERIAL NUMBER of the product (see the PART LIST and EXPLODED DRAWING attached at one of purchase. All returns must be preauthorized by an ICON authorized service center, products used as store display models. Accordingly, the above limitation may not apply to...
ProForm 875 Reviews
We have not received any reviews for ProForm yet.