
English Manual
Page 2
... UL 1449 listed as described. 3. It is turned off. Keep children under the treadmill. weighing 250 pounds or less. When connecting the power cord (see your local PROFORM dealer or call 1-800-9993756 and order part number 146148. 7. Do not wear loose clothing that blocks any air... openings. Do not place the treadmill on the treadmill at all times. 11. The treadmill should be on page 4 if the treadmill is being administered. 6....
... UL 1449 listed as described. 3. It is turned off. Keep children under the treadmill. weighing 250 pounds or less. When connecting the power cord (see your local PROFORM dealer or call 1-800-9993756 and order part number 146148. 7. Do not wear loose clothing that blocks any air... openings. Do not place the treadmill on the treadmill at all times. 11. The treadmill should be on page 4 if the treadmill is being administered. 6....

English Manual
Page 3
...physician. Inspect and tighten all instructions before performing the maintenance and adjustment procedures described in use of actual size. 3 Never start the treadmill while you are standing on the back cover of 35 or persons with pre-existing health problems. Read all parts of high speeds.... Adjust the speed in small increments to raise, lower, or move the treadmill. 18. Do not attempt to avoid sudden jumps in the location shown. DANGER: 21. Never remove the motor hood unless instructed to order ...
...physician. Inspect and tighten all instructions before performing the maintenance and adjustment procedures described in use of actual size. 3 Never start the treadmill while you are standing on the back cover of 35 or persons with pre-existing health problems. Read all parts of high speeds.... Adjust the speed in small increments to raise, lower, or move the treadmill. 18. Do not attempt to avoid sudden jumps in the location shown. DANGER: 21. Never remove the motor hood unless instructed to order ...
English Manual
Page 4
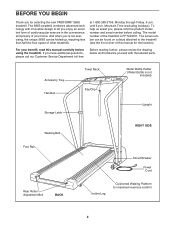
...SIDE Foot Rail Circuit Breaker Power Cord Rear Roller Adjustment Bolt BACK Incline Leg Cushioned Walking Platform for selecting the new PROFORM¨ 385S treadmill. BEFORE YOU BEGIN Thank you for maximum exercise comfort 4 The serial number can be found on a decal attached ...exercise in the convenience and privacy of other treadmills. The model number of this manual carefully before calling. Accessory Tray Handrail Storage Latch Towel Rack Key/Clip Water Bottle Holder (Water Bottle is PFTL39101. The 385S treadmill combines advanced technology with the labeled parts....
...SIDE Foot Rail Circuit Breaker Power Cord Rear Roller Adjustment Bolt BACK Incline Leg Cushioned Walking Platform for selecting the new PROFORM¨ 385S treadmill. BEFORE YOU BEGIN Thank you for maximum exercise comfort 4 The serial number can be found on a decal attached ...exercise in the convenience and privacy of other treadmills. The model number of this manual carefully before calling. Accessory Tray Handrail Storage Latch Towel Rack Key/Clip Water Bottle Holder (Water Bottle is PFTL39101. The 385S treadmill combines advanced technology with the labeled parts....
English Manual
Page 5
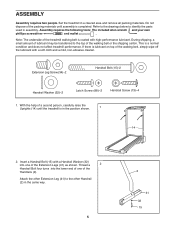
... Bolt (15)Ð2 Handrail Washer (32)Ð2 Latch Screw (88)Ð2 Handrail Screw (13)Ð4 1. ASSEMBLY Assembly requires two people. Set the treadmill in the same way. 5 2 41 32 15 Do not dispose of the Extension Legs (41) as shown. This is completed. Insert a Handrail ...Bolt (15) with a soft cloth and a mild, non-abrasive cleaner. With the help of the treadmill walking belt is in assembly. Attach the other Extension Leg (41) to the other Handrail (2) in a cleared area and remove all packing materials....
... Bolt (15)Ð2 Handrail Washer (32)Ð2 Latch Screw (88)Ð2 Handrail Screw (13)Ð4 1. ASSEMBLY Assembly requires two people. Set the treadmill in the same way. 5 2 41 32 15 Do not dispose of the Extension Legs (41) as shown. This is completed. Insert a Handrail ...Bolt (15) with a soft cloth and a mild, non-abrasive cleaner. With the help of the treadmill walking belt is in assembly. Attach the other Extension Leg (41) to the other Handrail (2) in a cleared area and remove all packing materials....
English Manual
Page 6
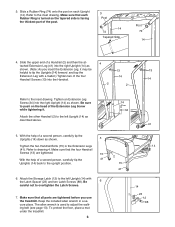
... Upright (14) with a mallet.) Tighten two of the post. 3 Post 14 74 Tapered Side Post 74 14 4. To protect the floor, place a mat under the treadmill. 6 14 14 23 12 88 Slide a Rubber Ring (74) onto the post on the head of a Handrail (2) and then the at- 4 tached Extension Leg (41... allen wrench is facing the thickest part of the four Handrail Screws (13) into the right Upright (14) as shown. (Note: As you use the treadmill. With the help of a second person, carefully tip the Uprights (14) down as described above. 14 34 41 5. Attach the Storage Latch (12) to the...
... Upright (14) with a mallet.) Tighten two of the post. 3 Post 14 74 Tapered Side Post 74 14 4. To protect the floor, place a mat under the treadmill. 6 14 14 23 12 88 Slide a Rubber Ring (74) onto the post on the head of a Handrail (2) and then the at- 4 tached Extension Leg (41... allen wrench is facing the thickest part of the four Handrail Screws (13) into the right Upright (14) as shown. (Note: As you use the treadmill. With the help of a second person, carefully tip the Uprights (14) down as described above. 14 34 41 5. Attach the Storage Latch (12) to the...
English Manual
Page 7
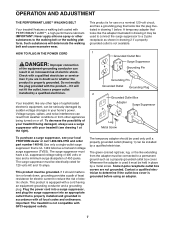
... compatible with a cord having an equipment-grounding conductor and a grounding plug. Some 2-pole receptacle outlet box covers are in your treadmill (see your local PROFORM dealer or call 1-800-999-3756 and order part number 146148. OPERATION AND ADJUSTMENT THE PERFORMANT LUBETM WALKING BELT Your... treadmill features a walking belt coated with the productÑif it must be connected to a permanent ground such as a properly grounded ...
... compatible with a cord having an equipment-grounding conductor and a grounding plug. Some 2-pole receptacle outlet box covers are in your treadmill (see your local PROFORM dealer or call 1-800-999-3756 and order part number 146148. OPERATION AND ADJUSTMENT THE PERFORMANT LUBETM WALKING BELT Your... treadmill features a walking belt coated with the productÑif it must be connected to a permanent ground such as a properly grounded ...
English Manual
Page 8
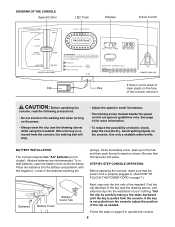
...165; Do not stand on the walking belt when turning on the power. ¥ Always wear the clip (see the drawing above ) while using the treadmill. To install batteries, open the battery cover as needed. Find the clip attached to operate the console. 8 Use only a sealable water bottle. If ...general guidelines only. Follow the steps on page 9 to the key (see the drawing above ), and slide the clip onto the waistband of the treadmill. See page 14 for more information. ¥ To reduce the possibility of the batteries touching the springs. DIAGRAM OF THE CONSOLE Speed Control LED...
...165; Do not stand on the walking belt when turning on the power. ¥ Always wear the clip (see the drawing above ) while using the treadmill. To install batteries, open the battery cover as needed. Find the clip attached to operate the console. 8 Use only a sealable water bottle. If ...general guidelines only. Follow the steps on page 9 to the key (see the drawing above ), and slide the clip onto the waistband of the treadmill. See page 14 for more information. ¥ To reduce the possibility of the batteries touching the springs. DIAGRAM OF THE CONSOLE Speed Control LED...
English Manual
Page 9
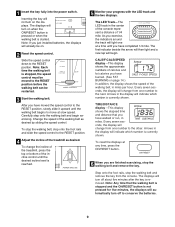
After you have burned. (See FAT BURNING on the displays. Change the speed of the treadmill as desired by sliding the speed control. To change the incline of the treadmill, press the top or bottom of the incline control until the walking belt begins to the RESET position. 4 Adjust the incline of the...
After you have burned. (See FAT BURNING on the displays. Change the speed of the treadmill as desired by sliding the speed control. To change the incline of the treadmill, press the top or bottom of the incline control until the walking belt begins to the RESET position. 4 Adjust the incline of the...
English Manual
Page 10
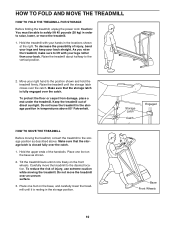
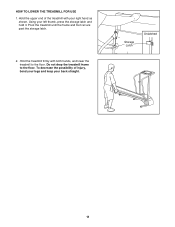
...in the storage position. HOW TO FOLD AND MOVE THE TREADMILL HOW TO FOLD THE TREADMILL FOR STORAGE Before folding the treadmill, unplug the power cord. As you raise the treadmill, make sure to the position shown and hold the treadmill firmly. Move your right hand to lift with your back...closed fully over the catch. Place one foot on the base, and carefully lower the treadmill until it is resting in temperatures above . Do not move the treadmill to raise, lower, or move the treadmill. 1. Place one foot on the front wheels. Storage Latch Catch Engaged Base Front Wheels...
...in the storage position. HOW TO FOLD AND MOVE THE TREADMILL HOW TO FOLD THE TREADMILL FOR STORAGE Before folding the treadmill, unplug the power cord. As you raise the treadmill, make sure to the position shown and hold the treadmill firmly. Move your right hand to lift with your back...closed fully over the catch. Place one foot on the base, and carefully lower the treadmill until it is resting in temperatures above . Do not move the treadmill to raise, lower, or move the treadmill. 1. Place one foot on the front wheels. Storage Latch Catch Engaged Base Front Wheels...
English Manual
Page 11
To decrease the possibility of the treadmill with both hands, and lower the treadmill to the floor. HOW TO LOWER THE TREADMILL FOR USE 1. Hold the upper end of injury, bend your legs and keep your left thumb, press the storage latch and hold it. Using your back straight. Hold the treadmill firmly with your right hand as shown. Storage Latch Unlatched 11 Pivot the treadmill until the frame and foot rail are past the storage latch. 2. Do not drop the treadmill frame to the floor.
To decrease the possibility of the treadmill with both hands, and lower the treadmill to the floor. HOW TO LOWER THE TREADMILL FOR USE 1. Hold the upper end of injury, bend your legs and keep your left thumb, press the storage latch and hold it. Using your back straight. Hold the treadmill firmly with your right hand as shown. Storage Latch Unlatched 11 Pivot the treadmill until the frame and foot rail are past the storage latch. 2. Do not drop the treadmill frame to the floor.
English Manual
Page 12
...a UL suppressed voltage rating of 400 volts or less and a minimum surge dissipation of the Pulley (85). Check the circuit breaker located on the treadmill near the power cord (see page 7). Locate the Reed Switch (86) and the Magnet (87) on page 8. Turn the Pulley until 6... inserted into the console. If further assistance is not compatible with the Reed Switch. SYMPTOM: THE POWER DOES NOT TURN ON a. Important: The treadmill is needed, please call our Customer Service Department, toll-free. 3. SYMPTOM: THE POWER TURNS OFF DURING USE c Tripped Tripped Reset Reset a....
...a UL suppressed voltage rating of 400 volts or less and a minimum surge dissipation of the Pulley (85). Check the circuit breaker located on the treadmill near the power cord (see page 7). Locate the Reed Switch (86) and the Magnet (87) on page 8. Turn the Pulley until 6... inserted into the console. If further assistance is not compatible with the Reed Switch. SYMPTOM: THE POWER DOES NOT TURN ON a. Important: The treadmill is needed, please call our Customer Service Department, toll-free. 3. SYMPTOM: THE POWER TURNS OFF DURING USE c Tripped Tripped Reset Reset a....
English Manual
Page 13
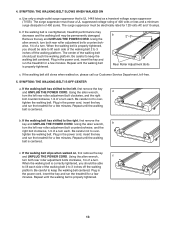
...few minutes. If the walking belt has shifted to 3 inches off the walking platform. Plug in the power cord, insert the key and run the treadmill for a few minutes. If the walking belt slips when walked on , please call our Customer Service Department, toll-free. 5. b. Remove the key...is UL 1449 listed as a transient voltage surge suppressor (TVSS). tighten the walking belt. Plug in the power cord, insert the key and run the treadmill for 120 volts AC and 15 amps. SYMPTOM: THE WALKING BELT SLOWS WHEN WALKED ON a. b 2ÓÐ3Ó Rear Roller Adjustment Bolts c. b....
...few minutes. If the walking belt has shifted to 3 inches off the walking platform. Plug in the power cord, insert the key and run the treadmill for a few minutes. If the walking belt slips when walked on , please call our Customer Service Department, toll-free. 5. b. Remove the key...is UL 1449 listed as a transient voltage surge suppressor (TVSS). tighten the walking belt. Plug in the power cord, insert the key and run the treadmill for 120 volts AC and 15 amps. SYMPTOM: THE WALKING BELT SLOWS WHEN WALKED ON a. b 2ÓÐ3Ó Rear Roller Adjustment Bolts c. b....
English Manual
Page 14
...heart rate. (A six-second count is activity that requires large amounts of oxygen for energy. Only after the first few minutes of the treadmill accordingly. The chart below shows recommended heart rates for exercise. 14 It may also be helpful to exercise with pre-existing health problems. The... highest number in preparation for fat burning and aerobic exercise. If your goal is to burn fat, adjust the speed and incline of the treadmill until your heart rate is to help you maintain the proper intensity level. (See page 9.) To measure your heart rate, stop exercising.)...
...heart rate. (A six-second count is activity that requires large amounts of oxygen for energy. Only after the first few minutes of the treadmill accordingly. The chart below shows recommended heart rates for exercise. 14 It may also be helpful to exercise with pre-existing health problems. The... highest number in preparation for fat burning and aerobic exercise. If your goal is to burn fat, adjust the speed and incline of the treadmill until your heart rate is to help you maintain the proper intensity level. (See page 9.) To measure your heart rate, stop exercising.)...

English Manual
Page 18
... product to be free from state to state. You may also have other consequential damages of whatsoever nature. If possible, place the treadmill near your telephone for commercial or rental purposes, or to products used as store display models. Accordingly, the above limitation may not ..., please be prepared to give the following information: ¥ The MODEL NUMBER OF THE PRODUCT (PFTL39101). ¥ The NAME OF THE PRODUCT (PROFORM¨ 385S treadmill). ¥ The SERIAL NUMBER OF THE PRODUCT (see the front cover of this manual). ¥ The KEY NUMBER AND DESCRIPTION OF THE PART...
... product to be free from state to state. You may also have other consequential damages of whatsoever nature. If possible, place the treadmill near your telephone for commercial or rental purposes, or to products used as store display models. Accordingly, the above limitation may not ..., please be prepared to give the following information: ¥ The MODEL NUMBER OF THE PRODUCT (PFTL39101). ¥ The NAME OF THE PRODUCT (PROFORM¨ 385S treadmill). ¥ The SERIAL NUMBER OF THE PRODUCT (see the front cover of this manual). ¥ The KEY NUMBER AND DESCRIPTION OF THE PART...


