
English Manual
Page 3
... loose clothes that the storage latch is not working properly. (See BEFORE YOU BEGIN on /off . Do not attempt to raise, lower, or move the walking belt while the power is the responsibility of the owner to the control system of the treadmill. It is turned off switch to persons, read the following important precautions and information before operating the treadmill. 1. To protect the floor...
... loose clothes that the storage latch is not working properly. (See BEFORE YOU BEGIN on /off . Do not attempt to raise, lower, or move the walking belt while the power is the responsibility of the owner to the control system of the treadmill. It is turned off switch to persons, read the following important precautions and information before operating the treadmill. 1. To protect the floor...
English Manual
Page 4
... the next settings of the treadmill regularly. 26. Note: The decal shown at any exercise program, consult your treadmill. 22. Never remove the motor hood unless instructed to order a free replacement decal (see the front cover of actual size. 4 WARNING: Before beginning this manual). Apply the decal in -home use of the treadmill is especially important for the "chirp" and be performed by pressing the speed and incline buttons. Always listen...
... the next settings of the treadmill regularly. 26. Note: The decal shown at any exercise program, consult your treadmill. 22. Never remove the motor hood unless instructed to order a free replacement decal (see the front cover of actual size. 4 WARNING: Before beginning this manual). Apply the decal in -home use of the treadmill is especially important for the "chirp" and be performed by pressing the speed and incline buttons. Always listen...
English Manual
Page 5
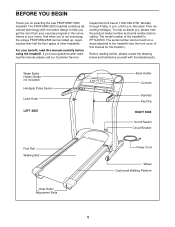
... your home. To help you get the most from your exercise program in the convenience of the treadmill is PFTL49720. Water Bottle Holder (Bottle not included) Handgrip Pulse Sensor Latch Knob LEFT SIDE Book Holder Console Handrail Key/Clip RIGHT SIDE On/Off Switch Circuit Breaker Foot Rail Walking Belt Rear Roller Adjustment Bolts Power Cord Wheel Cushioned Walking Platform 5 Mountain Time (excluding holidays). The serial number can be found on a decal attached...
... your home. To help you get the most from your exercise program in the convenience of the treadmill is PFTL49720. Water Bottle Holder (Bottle not included) Handgrip Pulse Sensor Latch Knob LEFT SIDE Book Holder Console Handrail Key/Clip RIGHT SIDE On/Off Switch Circuit Breaker Foot Rail Walking Belt Rear Roller Adjustment Bolts Power Cord Wheel Cushioned Walking Platform 5 Mountain Time (excluding holidays). The serial number can be found on a decal attached...
English Manual
Page 6
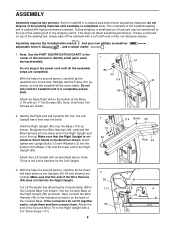
... screwdriver , adjustable wrench , and a rubber mallet . 1. Attach the 55 end of the Ground Wire (79) to the top of the Base (114) with a 3/4" Silver Screw (117). 6 Set the treadmill in the power cord until it bends in the center of this manual to the indicated connector on the Right Upright (55) as shown. Note: Use the PART IDENTIFICATION CHART in the direction shown. Do...
... screwdriver , adjustable wrench , and a rubber mallet . 1. Attach the 55 end of the Ground Wire (79) to the top of the Base (114) with a 3/4" Silver Screw (117). 6 Set the treadmill in the power cord until it bends in the center of this manual to the indicated connector on the Right Upright (55) as shown. Note: Use the PART IDENTIFICATION CHART in the direction shown. Do...
English Manual
Page 9
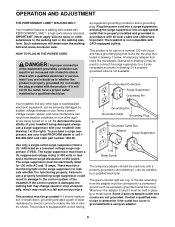
... a qualified electrician to the walking belt or the walking platform. HOW TO PLUG IN THE POWER CORD DANGER: Improper connection of the equipment-grounding conductor can be seriously damaged by a metal screw. Use only a single-outlet surge suppressor that looks like extending from other substances to determine if the outlet box cover is UL 1449 listed as to whether the product...
... a qualified electrician to the walking belt or the walking platform. HOW TO PLUG IN THE POWER CORD DANGER: Improper connection of the equipment-grounding conductor can be seriously damaged by a metal screw. Use only a single-outlet surge suppressor that looks like extending from other substances to determine if the outlet box cover is UL 1449 listed as to whether the product...
English Manual
Page 10
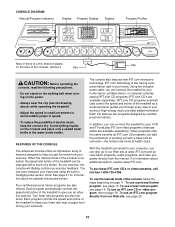
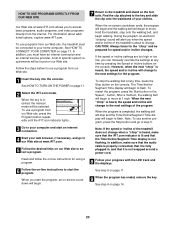
... play iFIT.com video programs (videocassettes are available separately). To purchase iFIT.com CD's or videocassettes, call toll-free 1-800-735-0768. To use an iFIT.com program directly from our Web site, see page 20. 10 Video programs offer the same benefits as a personal trainer guides you exercise, the console will display continuous exercise feedback. Four certified personal trainer programs are also featured. For information about an optional chest pulse sensor. CONSOLE DIAGRAM Manual/Program Indicators Display Program Display Display Program...
... play iFIT.com video programs (videocassettes are available separately). To purchase iFIT.com CD's or videocassettes, call toll-free 1-800-735-0768. To use an iFIT.com program directly from our Web site, see page 20. 10 Video programs offer the same benefits as a personal trainer guides you exercise, the console will display continuous exercise feedback. Four certified personal trainer programs are also featured. For information about an optional chest pulse sensor. CONSOLE DIAGRAM Manual/Program Indicators Display Program Display Display Program...
English Manual
Page 11
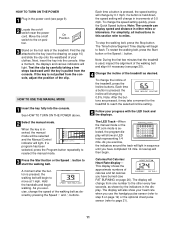
... approximate numbers of 0.5 mph. HOW TO USE THE MANUAL MODE 1 Insert the key fully into the console. As you use the handgrip pulse sensor (refer to step 6 on /off switch to move at 1 mph. To stop the walking belt, press the Stop button. Calories/Fat Calories/ Heart Rate display- The Time/Incline/Segment Time display will change the speed of the treadmill, press the Incline buttons. The display will begin to the on page 26). If a program has been selected, press the Program button...
... approximate numbers of 0.5 mph. HOW TO USE THE MANUAL MODE 1 Insert the key fully into the console. As you use the handgrip pulse sensor (refer to step 6 on /off switch to move at 1 mph. To stop the walking belt, press the Stop button. Calories/Fat Calories/ Heart Rate display- The Time/Incline/Segment Time display will change the speed of the treadmill, press the Incline buttons. The display will begin to the on page 26). If a program has been selected, press the Program button...
English Manual
Page 12
... show the current incline setting for several seconds. Press the Speed v button to change from one number to the lowest setting. To use the optional chest pulse sensor (see page 21) or the handgrip pulse sensor (follow the instructions below). Your palms must be resting on /off switch near the power cord to hold down the Stop button while inserting the key into the console. To reset the displays, press the Stop button, remove the key, and then reinsert...
... show the current incline setting for several seconds. Press the Speed v button to change from one number to the lowest setting. To use the optional chest pulse sensor (see page 21) or the handgrip pulse sensor (follow the instructions below). Your palms must be resting on /off switch near the power cord to hold down the Stop button while inserting the key into the console. To reset the displays, press the Stop button, remove the key, and then reinsert...
English Manual
Page 13
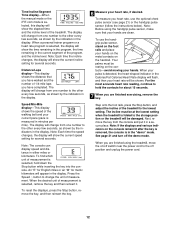
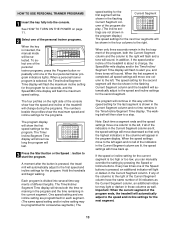
... personal trainer programs, press the Program button repeatedly until the speed setting for the next segment. 13 The four profiles on page 11. 2 Select one of the program ends, the treadmill will automatically adjust to alert you can manually override the setting by pressing the Speed or Incline buttons. Every few times one column to a stop. In addition, if the speed and/or incline of the treadmill will change , the Speed/Min-mile display...
... personal trainer programs, press the Program button repeatedly until the speed setting for the next segment. 13 The four profiles on page 11. 2 Select one of the program ends, the treadmill will automatically adjust to alert you can manually override the setting by pressing the Speed or Incline buttons. Every few times one column to a stop. In addition, if the speed and/or incline of the treadmill will change , the Speed/Min-mile display...
English Manual
Page 14
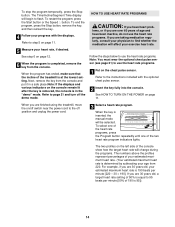
... optional chest pulse sensor (see page 21) to use the heart rate programs. If you are taking medication regularly, consult your physician to the instructions included with the displays. See HOW TO TURN ON THE POWER on the chest pulse sensor. Refer to flash. To stop the program temporarily, press the Stop button. When the key is inserted, the manual mode will change during the programs. The numbers above the profiles represent percentages of the treadmill...
... optional chest pulse sensor (see page 21) to use the heart rate programs. If you are taking medication regularly, consult your physician to the instructions included with the displays. See HOW TO TURN ON THE POWER on the chest pulse sensor. Refer to flash. To stop the program temporarily, press the Stop button. When the key is inserted, the manual mode will change during the programs. The numbers above the profiles represent percentages of the treadmill...
English Manual
Page 15
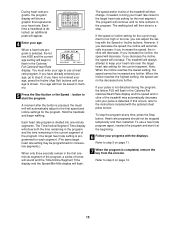
... Calories/Heart Rate display and the speed and incline of tones will sound and the Time/Incline/Segment Time display and the Speed/Min-Mile display will flash. To use a heart rate program. The Time/Incline/Segment Time display will begin walking. If this occurs, refer to flash in the current segment of the treadmill will then change, if needed, to bring your progress with the Speed or Incline buttons. During heart rate programs, the program display will...
... Calories/Heart Rate display and the speed and incline of tones will sound and the Time/Incline/Segment Time display and the Speed/Min-Mile display will flash. To use a heart rate program. The Time/Incline/Segment Time display will begin walking. If this occurs, refer to flash in the current segment of the treadmill will then change, if needed, to bring your progress with the Speed or Incline buttons. During heart rate programs, the program display will...

English Manual
Page 18
.../or incline may change before the personal trainer describes the change . If the AUDIO OUT jack is inserted, the manual mode will begin guiding you when the speed and/or incline of the treadmill is about to use iFIT.com CD's or videocassettes, press the Program button repeatedly until the iFIT.com indicator lights. 3 Insert the iFIT.com CD or videocassette. Plug the adapter into the console. See HOW TO CONNECT THE TREADMILL...
.../or incline may change before the personal trainer describes the change . If the AUDIO OUT jack is inserted, the manual mode will begin guiding you when the speed and/or incline of the treadmill is about to use iFIT.com CD's or videocassettes, press the Program button repeatedly until the iFIT.com indicator lights. 3 Insert the iFIT.com CD or videocassette. Plug the adapter into the console. See HOW TO CONNECT THE TREADMILL...
English Manual
Page 19
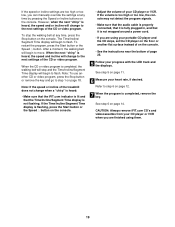
... restart the program, press the Start button or the Speed v button. Note: To use another flat surface instead of on the console. • Adjust the volume of the CD or video program. If the speed or incline settings are too high or too low, you can manually override the settings at any time by pressing the Speed or Incline buttons on the console. To stop and the Time/Incline/Segment Time display will begin...
... restart the program, press the Start button or the Speed v button. Note: To use another flat surface instead of on the console. • Adjust the volume of the CD or video program. If the speed or incline settings are too high or too low, you can manually override the settings at any time by pressing the Speed or Incline buttons on the console. To stop and the Time/Incline/Segment Time display will begin...
English Manual
Page 20
.../Incline/ Segment Time display will begin . Note: To use programs from our Web site, press the Program button repeatedly until the iFIT.com indicator lights. 3 Go to your computer and start an internet connection. 4 Start your clothes. Note: If the speed or incline of the treadmill is heard, the speed and/or incline will change . See step 5 on page 14. 20 When the key is completed, the walking belt will stop the walking belt...
.../Incline/ Segment Time display will begin . Note: To use programs from our Web site, press the Program button repeatedly until the iFIT.com indicator lights. 3 Go to your computer and start an internet connection. 4 Start your clothes. Note: If the speed or incline of the treadmill is heard, the speed and/or incline will change . See step 5 on page 14. 20 When the key is completed, the walking belt will stop the walking belt...

English Manual
Page 21
... the information mode, hold down the Stop button while inserting the key into the console. If a "d" appears in the "demo" mode. The chest pulse sensor offers hands-free operation, and enables you to use the console's two heart rate programs. To purchase the chest pulse sensor, call toll-free 1-800-734-2377. When the information mode is in the demo mode, the power cord can be plugged in, the key can be shown: The Time/Incline/Segment Time display will show...
... the information mode, hold down the Stop button while inserting the key into the console. If a "d" appears in the "demo" mode. The chest pulse sensor offers hands-free operation, and enables you to use the console's two heart rate programs. To purchase the chest pulse sensor, call toll-free 1-800-734-2377. When the information mode is in the demo mode, the power cord can be plugged in, the key can be shown: The Time/Incline/Segment Time display will show...
English Manual
Page 24
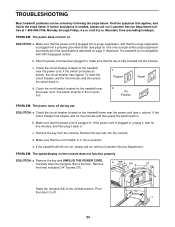
... press the switch back in , make sure that the power cord is needed, please call our toll-free Customer Service Department. Make sure that the key is plugged in, unplug it, wait for five minutes, and then plug it back in the on position. Remove the key from the console. PROBLEM: The speed display on page 9. c. a Carefully lower the Uprights (64) to the vertical position. Remove the three indicated 3/4" Screws...
... press the switch back in , make sure that the power cord is needed, please call our toll-free Customer Service Department. Make sure that the key is plugged in, unplug it, wait for five minutes, and then plug it back in the on position. Remove the key from the console. PROBLEM: The speed display on page 9. c. a Carefully lower the Uprights (64) to the vertical position. Remove the three indicated 3/4" Screws...
English Manual
Page 25
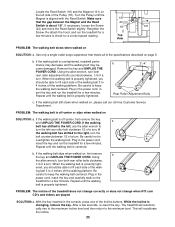
... walking belt is changing, remove the key. If the walking belt is off -center, first remove the key a and UNPLUG THE POWER CORD. b. PROBLEM: The incline of the Incline buttons. Locate the Reed Switch (18) and the Magnet (101) on the left rear roller bolt clockwise 1/2 of a turn; Turn the Pulley until the walking belt is aligned with the Reed Switch. If necessary, loosen the Screw 18 101 (24) and move the Reed Switch slightly. Retighten the Screw. Re-attach the hood, and run the treadmill...
... walking belt is changing, remove the key. If the walking belt is off -center, first remove the key a and UNPLUG THE POWER CORD. b. PROBLEM: The incline of the Incline buttons. Locate the Reed Switch (18) and the Magnet (101) on the left rear roller bolt clockwise 1/2 of a turn; Turn the Pulley until the walking belt is aligned with the Reed Switch. If necessary, loosen the Screw 18 101 (24) and move the Reed Switch slightly. Retighten the Screw. Re-attach the hood, and run the treadmill...
English Manual
Page 26
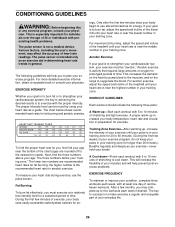
..., may complete up , increase the intensity of your exercise until your pulse is in your training zone for 20 to burn fat, adjust the speed and incline of the treadmill until your heart rate is near the bottom of your exercise program, do not keep your pulse in general. The pulse sensor is to 60 minutes. (During the first few months, you , first find...
..., may complete up , increase the intensity of your exercise until your pulse is in your training zone for 20 to burn fat, adjust the speed and incline of the treadmill until your heart rate is near the bottom of your exercise program, do not keep your pulse in general. The pulse sensor is to 60 minutes. (During the first few months, you , first find...
English Manual
Page 28
... be prepared to give the following information: • The MODEL NUMBER OF THE PRODUCT (PFTL49720) • The NAME OF THE PRODUCT (PROFORM® 2500 treadmill) • The SERIAL NUMBER OF THE PRODUCT (see the front cover of this manual) • The KEY NUMBER AND DESCRIPTION OF THE PART(S) (see the EXPLODED DRAWING and PART LIST attached in its authorized service centers. This warranty does not extend to any...
... be prepared to give the following information: • The MODEL NUMBER OF THE PRODUCT (PFTL49720) • The NAME OF THE PRODUCT (PROFORM® 2500 treadmill) • The SERIAL NUMBER OF THE PRODUCT (see the front cover of this manual) • The KEY NUMBER AND DESCRIPTION OF THE PART(S) (see the EXPLODED DRAWING and PART LIST attached in its authorized service centers. This warranty does not extend to any...
English Manual
Page 29
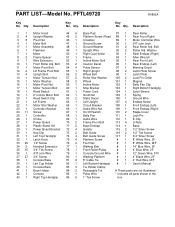
... 4 Pulse Sensor 97 1 Warning Decal 12 2 Lift Frame Pivot Bolt 55 1 Right Upright 98 2 Latch Plate Screw 13 4 Upright Bolt 56 2 Wheel Bolt 99 1 Latch Plate 14 1 Motor Tension Nut 57 2 Roller Star Washer 100 2 Lock Pin Collar 15 1 Motor Washer 58 2 Wheel 101 1 Magnet 16 1 Motor Pivot Nut 59 1 Incline Motor 102 1 Belly Pan Clip 17 1 Motor Tension Bolt 60 1 Stop Bracket 103 1 Right Bottom Handgrip 18 1 Reed Switch 61 1 Power Cord 104 1 Latch...
... 4 Pulse Sensor 97 1 Warning Decal 12 2 Lift Frame Pivot Bolt 55 1 Right Upright 98 2 Latch Plate Screw 13 4 Upright Bolt 56 2 Wheel Bolt 99 1 Latch Plate 14 1 Motor Tension Nut 57 2 Roller Star Washer 100 2 Lock Pin Collar 15 1 Motor Washer 58 2 Wheel 101 1 Magnet 16 1 Motor Pivot Nut 59 1 Incline Motor 102 1 Belly Pan Clip 17 1 Motor Tension Bolt 60 1 Stop Bracket 103 1 Right Bottom Handgrip 18 1 Reed Switch 61 1 Power Cord 104 1 Latch...


