
English Manual
Page 1
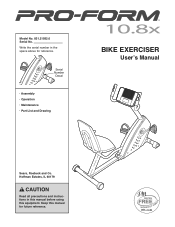
Model No. 831.21932.0 Serial No. Hoffman Estates, IL 60179 CAUTION Read all precautions and instructions in the space above for future reference. Keep this equipment. Write the serial number in this manual before using this manual for reference. Serial Number Decal • Assembly • Operation • Maintenance • Part List and Drawing BIKE EXERCISER Userʼs Manual Sears, Roebuck and Co.
Model No. 831.21932.0 Serial No. Hoffman Estates, IL 60179 CAUTION Read all precautions and instructions in the space above for future reference. Keep this equipment. Write the serial number in this manual before using this manual for reference. Serial Number Decal • Assembly • Operation • Maintenance • Part List and Drawing BIKE EXERCISER Userʼs Manual Sears, Roebuck and Co.
English Manual
Page 2
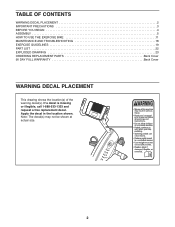
If a decal is missing or illegible, call 1-888-533-1333 and request a free replacement decal. Apply the decal in the location shown. TABLE OF CONTENTS WARNING DECAL PLACEMENT 2 IMPORTANT PRECAUTIONS 3 BEFORE YOU BEGIN 4 ASSEMBLY 5 HOW TO USE THE EXERCISE BIKE 11 MAINTENANCE AND TROUBLESHOOTING 18 EXERCISE GUIDELINES 19 PART LIST 22 EXPLODED DRAWING 23 ORDERING REPLACEMENT PARTS Back Cover 90 DAY FULL WARRANTY Back Cover WARNING DECAL PLACEMENT This drawing shows the location(s) of the warning decal(s). Note: The decal(s) may not be shown at actual size. 2
If a decal is missing or illegible, call 1-888-533-1333 and request a free replacement decal. Apply the decal in the location shown. TABLE OF CONTENTS WARNING DECAL PLACEMENT 2 IMPORTANT PRECAUTIONS 3 BEFORE YOU BEGIN 4 ASSEMBLY 5 HOW TO USE THE EXERCISE BIKE 11 MAINTENANCE AND TROUBLESHOOTING 18 EXERCISE GUIDELINES 19 PART LIST 22 EXPLODED DRAWING 23 ORDERING REPLACEMENT PARTS Back Cover 90 DAY FULL WARRANTY Back Cover WARNING DECAL PLACEMENT This drawing shows the location(s) of the warning decal(s). Note: The decal(s) may not be shown at actual size. 2
English Manual
Page 3
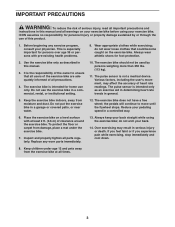
... any worn parts immediately. 13. Always wear athletic shoes for home use only. The exercise bike is intended for foot protection. 2. The exercise bike should not be used by or through the use the exercise bike in a commercial, rental, or institutional setting. 10. Various factors, including the user's movement, may result in a garage or covered patio, or...
... any worn parts immediately. 13. Always wear athletic shoes for home use only. The exercise bike is intended for foot protection. 2. The exercise bike should not be used by or through the use the exercise bike in a commercial, rental, or institutional setting. 10. Various factors, including the user's movement, may result in a garage or covered patio, or...
English Manual
Page 4
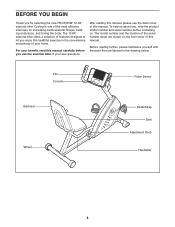
...home. BEFORE YOU BEGIN Thank you use the exercise bike. Before reading further, please familiarize yourself with the parts that are shown on the front cover of the most effective exercises for selecting the new PROFORM® 10.8X exercise bike. Fan Console Pulse Sensor Backrest Wheel Pedal/Strap... Seat Adjustment Knob Handlebar 4 If you enjoy this healthful exercise in the drawing below. The model number and ...
...home. BEFORE YOU BEGIN Thank you use the exercise bike. Before reading further, please familiarize yourself with the parts that are shown on the front cover of the most effective exercises for selecting the new PROFORM® 10.8X exercise bike. Fan Console Pulse Sensor Backrest Wheel Pedal/Strap... Seat Adjustment Knob Handlebar 4 If you enjoy this healthful exercise in the drawing below. The model number and ...
English Manual
Page 5
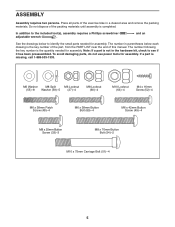
Do not dispose of the exercise bike in a cleared area and remove the packing materials. Note: If a part is not in parentheses below to identify the small parts needed for assembly. In ...
Do not dispose of the exercise bike in a cleared area and remove the packing materials. Note: If a part is not in parentheses below to identify the small parts needed for assembly. In ...
English Manual
Page 10
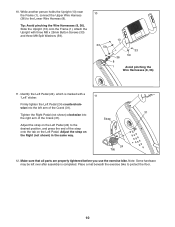
Make sure that all parts are properly tightened before you use the exercise bike. 10. Tip: Avoid pinching the Wire Harnesses (8, 36). Note: Some hardware...left over after assembly is marked with three M8 x 25mm Button Screws (33) and three M8 Split Washers (59). 10 33 59 13 33 59 36 8 1 Avoid pinching the Wire Harnesses (8, 36) 11. Attach the Upright with ...(24) to the desired position, and press the end of the Crank (31). Place a mat beneath the exercise bike to the Lower Wire Harness (8). While another person holds the Upright (13) near the Frame (1), connect the ...
Make sure that all parts are properly tightened before you use the exercise bike. 10. Tip: Avoid pinching the Wire Harnesses (8, 36). Note: Some hardware...left over after assembly is marked with three M8 x 25mm Button Screws (33) and three M8 Split Washers (59). 10 33 59 13 33 59 36 8 1 Avoid pinching the Wire Harnesses (8, 36) 11. Attach the Upright with ...(24) to the desired position, and press the end of the Crank (31). Place a mat beneath the exercise bike to the Lower Wire Harness (8). While another person holds the Upright (13) near the Frame (1), connect the ...
English Manual
Page 11
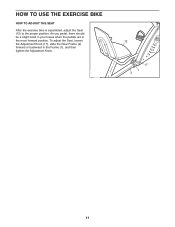
HOW TO USE THE EXERCISE BIKE HOW TO ADJUST THE SEAT After the exercise bike is assembled, adjust the Seat (12) to the proper position. To adjust the Seat, loosen the Adjustment Knob (17), slide the Rear Frame (2) forward or backward in the most forward position. As you pedal, there should be a slight bend in your knees when the pedals are in the Frame (1), and then tighten the Adjustment Knob. 12 17 1 2 11
HOW TO USE THE EXERCISE BIKE HOW TO ADJUST THE SEAT After the exercise bike is assembled, adjust the Seat (12) to the proper position. To adjust the Seat, loosen the Adjustment Knob (17), slide the Rear Frame (2) forward or backward in the most forward position. As you pedal, there should be a slight bend in your knees when the pedals are in the Frame (1), and then tighten the Adjustment Knob. 12 17 1 2 11
English Manual
Page 18
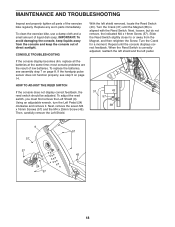
... Screws (57) and the M4 x 25mm Screw (45). IMPORTANT: To avoid damaging the console, keep the console out of the exercise bike regularly. Turn the Crank (31) until the console displays correct feedback. MAINTENANCE AND TROUBLESHOOTING Inspect and properly tighten all the batteries at the... same time; To clean the exercise bike, use a damp cloth and a small amount of low batteries. If the console display becomes dim, replace all parts of direct ...
... Screws (57) and the M4 x 25mm Screw (45). IMPORTANT: To avoid damaging the console, keep the console out of the exercise bike regularly. Turn the Crank (31) until the console displays correct feedback. MAINTENANCE AND TROUBLESHOOTING Inspect and properly tighten all the batteries at the... same time; To clean the exercise bike, use a damp cloth and a small amount of low batteries. If the console display becomes dim, replace all parts of direct ...
English Manual
Page 24
...800-4-MY-HOME® (1-800-469-4663) to arrange for free repair (or replacement if repair proves impossible). This warranty does not apply when the bike exerciser is used commercially or for the location of your nearest Sears Parts & Repair Center. 1-800-488-1222 Call anytime, day or night (U.S.A. For Sears ... LLC ® Marca Registrada / TM Marca de Fábrica / SM Marca de Servicio de Sears Brands, LLC 90 DAY FULL WARRANTY If this Sears bike exerciser fails due to a defect in items like garage door openers and water heaters. 1-800-4-MY-HOME® (1-800-469-4663) Call anytime, day or ...
...800-4-MY-HOME® (1-800-469-4663) to arrange for free repair (or replacement if repair proves impossible). This warranty does not apply when the bike exerciser is used commercially or for the location of your nearest Sears Parts & Repair Center. 1-800-488-1222 Call anytime, day or night (U.S.A. For Sears ... LLC ® Marca Registrada / TM Marca de Fábrica / SM Marca de Servicio de Sears Brands, LLC 90 DAY FULL WARRANTY If this Sears bike exerciser fails due to a defect in items like garage door openers and water heaters. 1-800-4-MY-HOME® (1-800-469-4663) Call anytime, day or ...


