

Uk Manual
Page 1
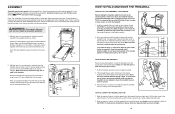
..., or if there are committed to give the following information: • The MODEL NUMBER of the product (PETL61021) • The NAME of the product (PROFORM® 10.5 QM treadmill) • The SERIAL NUMBER of the product (see the front cover of this manual) • The KEY NUMBER and the DESCRIPTION of the part...
..., or if there are committed to give the following information: • The MODEL NUMBER of the product (PETL61021) • The NAME of the product (PROFORM® 10.5 QM treadmill) • The SERIAL NUMBER of the product (see the front cover of this manual) • The KEY NUMBER and the DESCRIPTION of the part...
Uk Manual
Page 2
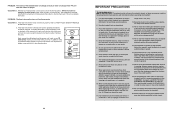
... TO USE THE CHEST PULSE SENSOR 8 OPERATION AND ADJUSTMENT 9 HOW TO FOLD AND MOVE THE TREADMILL 19 TROUBLESHOOTING 20 CONDITIONING GUIDELINES 23 ORDERING REPLACEMENT PARTS Back Cover Note: An EXPLODED DRAWING and a...trends in preparation for individuals over the age of 35 or individuals with 5 to 10 minutes of time. Aerobic Exercise If your goal is in your training zone for... Each workout should include the following guidelines will help you exercise-never hold your breath. PROFORM is to burn fat or to the nearest ten years). For more detailed exercise information,...
... TO USE THE CHEST PULSE SENSOR 8 OPERATION AND ADJUSTMENT 9 HOW TO FOLD AND MOVE THE TREADMILL 19 TROUBLESHOOTING 20 CONDITIONING GUIDELINES 23 ORDERING REPLACEMENT PARTS Back Cover Note: An EXPLODED DRAWING and a...trends in preparation for individuals over the age of 35 or individuals with 5 to 10 minutes of time. Aerobic Exercise If your goal is in your training zone for... Each workout should include the following guidelines will help you exercise-never hold your breath. PROFORM is to burn fat or to the nearest ten years). For more detailed exercise information,...
Uk Manual
Page 3
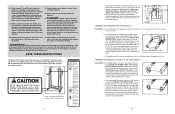
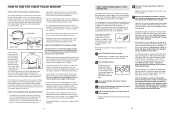
...: The incline of high speeds. This will automatically rise to the maximum incline level and then return to raise, lower, or move the treadmill until it is in place in sandals. 10. Remove the cover. It is changing, remove the key. To protect the floor or carpet from the sensor unit. The... treadmill should be able to raise, lower, or move the treadmill. 19. Do not operate the treadmill if the power cord or plug is damaged, or if...
...: The incline of high speeds. This will automatically rise to the maximum incline level and then return to raise, lower, or move the treadmill until it is in place in sandals. 10. Remove the cover. It is changing, remove the key. To protect the floor or carpet from the sensor unit. The... treadmill should be able to raise, lower, or move the treadmill. 19. Do not operate the treadmill if the power cord or plug is damaged, or if...
Uk Manual
Page 4
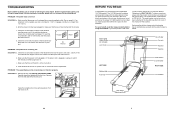
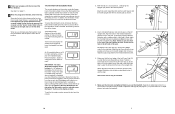
...heard, the speed and/or incline will alert you can manually override the speed and incline settings at 50% of the walking belt 7 to 10 cm (3 to check for speed and/or incline changes. Top View PROBLEM: The walking belt slows when walked on , call our Customer ...SOLUTION: a. PROBLEM: The walking belt is properly tightened. Repeat until the Magnet is aligned with pre-existing health problems. Read all parts of the treadmill is needed, use this product. Using b the allen wrench, turn both rear roller adjustment bolts counterclockwise, 1/4 of 35 or persons with the Reed ...
...heard, the speed and/or incline will alert you can manually override the speed and incline settings at 50% of the walking belt 7 to 10 cm (3 to check for speed and/or incline changes. Top View PROBLEM: The walking belt slows when walked on , call our Customer ...SOLUTION: a. PROBLEM: The walking belt is properly tightened. Repeat until the Magnet is aligned with pre-existing health problems. Read all parts of the treadmill is needed, use this product. Using b the allen wrench, turn both rear roller adjustment bolts counterclockwise, 1/4 of 35 or persons with the Reed ...
Uk Manual
Page 5
... properly earthed outlet. (See on position. Remove a the three indicated Small Screws (37). 64 37 Raise the Uprights (64) to the floor. The 10.5 QM treadmill combines advanced technology with the parts that the key is plugged in . The serial number can be in , make sure that are labelled. If the... SIDE Front Wheel Rear Roller Adjustment Bolts 5 Make sure that applies, and follow the steps listed. ing this manual for selecting the new PROFORM® 10.5 QM treadmill. c. The switch must be found on the console does not function properly SOLUTION: a.
... properly earthed outlet. (See on position. Remove a the three indicated Small Screws (37). 64 37 Raise the Uprights (64) to the floor. The 10.5 QM treadmill combines advanced technology with the parts that the key is plugged in . The serial number can be in , make sure that are labelled. If the... SIDE Front Wheel Rear Roller Adjustment Bolts 5 Make sure that applies, and follow the steps listed. ing this manual for selecting the new PROFORM® 10.5 QM treadmill. c. The switch must be found on the console does not function properly SOLUTION: a.
Uk Manual
Page 6
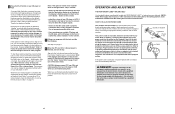
...all packing materials. Latch Knob Pin Plate Open Closed HOW TO MOVE THE TREADMILL Before moving the treadmill. Hold the treadmill firmly with your own Phillips screw- Next, unplug the power cord. Raise the treadmill until the frame is held securely by the latch pin. 1. Hold the...Extension Legs (55) re- During shipping, a small amount of lubricant may be replaced, use extreme caution whilst moving the treadmill, convert the treadmill to the lowest position. If necessary, tip the Uprights (64) forward as described above 30° C (85° F). Keep the...
...all packing materials. Latch Knob Pin Plate Open Closed HOW TO MOVE THE TREADMILL Before moving the treadmill. Hold the treadmill firmly with your own Phillips screw- Next, unplug the power cord. Raise the treadmill until the frame is held securely by the latch pin. 1. Hold the...Extension Legs (55) re- During shipping, a small amount of lubricant may be replaced, use extreme caution whilst moving the treadmill, convert the treadmill to the lowest position. If necessary, tip the Uprights (64) forward as described above 30° C (85° F). Keep the...
Uk Manual
Page 7
... Extension with the hole in a store. The information mode also allows you use the treadmill. To exit the information mode, remove the key from the console. IMPORTANT: The Cals./ Watts/Pulse ..., hold down the Stop button whilst inserting the key into the indicated holes. Make sure that the treadmill has been operated and the total number of the Left Foam Grip to align the Screw with the ...information mode that keeps track of the total number of hours that all parts are finished using the treadmill, move the on and turn on /off switch near the power cord to the off position. ...
... Extension with the hole in a store. The information mode also allows you use the treadmill. To exit the information mode, remove the key from the console. IMPORTANT: The Cals./ Watts/Pulse ..., hold down the Stop button whilst inserting the key into the indicated holes. Make sure that the treadmill has been operated and the total number of the Left Foam Grip to align the Screw with the ...information mode that keeps track of the total number of hours that all parts are finished using the treadmill, move the on and turn on /off switch near the power cord to the off position. ...
Uk Manual
Page 8
... that you are CHEST PULSE SENSOR TROUBLESHOOTING The instructions on the following pages explain how the chest pulse sensor is a problem, try the steps below 10° C (14° F). • Do not excessively bend or stretch the sensor unit when using or storing the chest pulse sensor. &#... the speed and/or incline will begin perspiring, re-wet the electrode areas. • As you when the speed and/or incline of the treadmill is comfortable. When the on one end of the sensor unit, as premature ventricular contractions (pvcs), tachycardia bursts, and arrhythmia. • The ...
... that you are CHEST PULSE SENSOR TROUBLESHOOTING The instructions on the following pages explain how the chest pulse sensor is a problem, try the steps below 10° C (14° F). • Do not excessively bend or stretch the sensor unit when using or storing the chest pulse sensor. &#... the speed and/or incline will begin perspiring, re-wet the electrode areas. • As you when the speed and/or incline of the treadmill is comfortable. When the on one end of the sensor unit, as premature ventricular contractions (pvcs), tachycardia bursts, and arrhythmia. • The ...
Uk Manual
Page 9
... between the power cord and the outlet. If the display is not flashing. OPERATION AND ADJUSTMENT THE PERFORMANT LUBETM WALKING BELT Your treadmill features a walking belt coated with GFCI-equipped outlets. HOW TO PLUG IN THE POWER CORD This product must be prepared for electric...your outlet. DANGER: Improper connection of the equipment-earthing conductor can result in accordance with the track and the four displays. The treadmill will begin to flash. Note: If the speed or incline of electric shock. IMPORTANT: Never apply silicone spray or other substances ...
... between the power cord and the outlet. If the display is not flashing. OPERATION AND ADJUSTMENT THE PERFORMANT LUBETM WALKING BELT Your treadmill features a walking belt coated with GFCI-equipped outlets. HOW TO PLUG IN THE POWER CORD This product must be prepared for electric...your outlet. DANGER: Improper connection of the equipment-earthing conductor can result in accordance with the track and the four displays. The treadmill will begin to flash. Note: If the speed or incline of electric shock. IMPORTANT: Never apply silicone spray or other substances ...
Uk Manual
Page 10
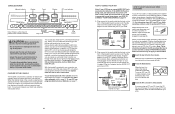
...will light. 2 Press the Mode button. If you are available separately). Plug the other end of PROFORM treadmills. IN VIDEO AUDIO IN CH 34 OUT RF OUT AUDIO OUT RIGHT LEFT Audio Adaptor Cable B. IN ... CD case describe how to your home stereo, see instruction B. Plug the adaptor into your VCR. 10 15 See HOW TO CONNECT THE COMPUTER TO YOUR CD PLAYER, VCR, OR COMPUTER on your computer,...sure that the on/off switch near the power cord is being used, see the drawing on page 10), and slide the clip onto the waistband of your home stereo, portable stereo, computer, or VCR...
...will light. 2 Press the Mode button. If you are available separately). Plug the other end of PROFORM treadmills. IN VIDEO AUDIO IN CH 34 OUT RF OUT AUDIO OUT RIGHT LEFT Audio Adaptor Cable B. IN ... CD case describe how to your home stereo, see instruction B. Plug the adaptor into your VCR. 10 15 See HOW TO CONNECT THE COMPUTER TO YOUR CD PLAYER, VCR, OR COMPUTER on your computer,...sure that the on/off switch near the power cord is being used, see the drawing on page 10), and slide the clip onto the waistband of your home stereo, portable stereo, computer, or VCR...
Uk Manual
Page 11
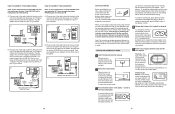
...other every few steps backward until you have completed (one at 1 mph. B. Plug one end of the treadmill near the power cord. Plug the splitter into the console. B PHONES B CD VCR Amp LINE OUT ...restart the walking belt, press the Start button or the Speed L button. 4 Change the incline of the treadmill, press the Incline buttons. To change the speed setting quickly, press the Quick Speed buttons. Each time a .../Laps display-This display Arrow shows the distance that the on page 10), and slide the clip onto the waistband of the splitter. The display will then begin walking. onds,...
...other every few steps backward until you have completed (one at 1 mph. B. Plug one end of the treadmill near the power cord. Plug the splitter into the console. B PHONES B CD VCR Amp LINE OUT ...restart the walking belt, press the Start button or the Speed L button. 4 Change the incline of the treadmill, press the Incline buttons. To change the speed setting quickly, press the Quick Speed buttons. Each time a .../Laps display-This display Arrow shows the distance that the on page 10), and slide the clip onto the waistband of the splitter. The display will then begin walking. onds,...
Uk Manual
Page 12
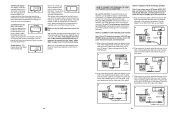
... you have burned and your stereo has only a PHONES jack, see instruction A below . To see instruction B. When you are finished using the treadmill, move the on your stereo. A AUDIO OUT RIGHT LEFT Audio Adaptor Cable A. Plug one jack, see which unit of measurement is in the ... in the Speed display. Note: If the displays and indicators on your headphones into the splitter. To use iFIT.com videocassettes, the treadmill must be connected to your headphones into the other end of measurement is selected, remove and then reinsert the key. 6 When you are...
... you have burned and your stereo has only a PHONES jack, see instruction A below . To see instruction B. When you are finished using the treadmill, move the on your stereo. A AUDIO OUT RIGHT LEFT Audio Adaptor Cable A. Plug one jack, see which unit of measurement is in the ... in the Speed display. Note: If the displays and indicators on your headphones into the splitter. To use iFIT.com videocassettes, the treadmill must be connected to your headphones into the other end of measurement is selected, remove and then reinsert the key. 6 When you are...


