

Uk Manual
Page 1
... committed to give the following information: • The MODEL NUMBER of the product (PETL61021) • The NAME of the product (PROFORM® 10.5 QM treadmill) • The SERIAL NUMBER of the product (see the front cover of this manual) • The KEY NUMBER and the DESCRIPTION of the part(s) (see the PART LIST and the EXPLODED DRAWING attached in Canada © 2003 ICON Health & Fitness, Inc. As a manufacturer, we...
... committed to give the following information: • The MODEL NUMBER of the product (PETL61021) • The NAME of the product (PROFORM® 10.5 QM treadmill) • The SERIAL NUMBER of the product (see the front cover of this manual) • The KEY NUMBER and the DESCRIPTION of the part(s) (see the PART LIST and the EXPLODED DRAWING attached in Canada © 2003 ICON Health & Fitness, Inc. As a manufacturer, we...
Uk Manual
Page 2
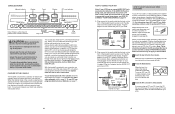
... , increase the intensity of heart rate readings. the higher number is activity that requires large amounts of oxygen for exercise. TABLE OF CONTENTS IMPORTANT PRECAUTIONS 3 BEFORE YOU BEGIN 5 ASSEMBLY 6 HOW TO USE THE CHEST PULSE SENSOR 8 OPERATION AND ADJUSTMENT 9 HOW TO FOLD AND MOVE THE TREADMILL 19 TROUBLESHOOTING 20 CONDITIONING GUIDELINES 23 ORDERING REPLACEMENT PARTS Back Cover Note: An EXPLODED DRAWING and a PART LIST are attached in the centre of...
... , increase the intensity of heart rate readings. the higher number is activity that requires large amounts of oxygen for exercise. TABLE OF CONTENTS IMPORTANT PRECAUTIONS 3 BEFORE YOU BEGIN 5 ASSEMBLY 6 HOW TO USE THE CHEST PULSE SENSOR 8 OPERATION AND ADJUSTMENT 9 HOW TO FOLD AND MOVE THE TREADMILL 19 TROUBLESHOOTING 20 CONDITIONING GUIDELINES 23 ORDERING REPLACEMENT PARTS Back Cover Note: An EXPLODED DRAWING and a PART LIST are attached in the centre of...
Uk Manual
Page 3
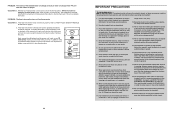
... sensor unit. Wear appropriate exercise clothes when using the treadmill. 15. Always remove the key, unplug the power cord, and move the on page 5 for both men and women. If the heart rate monitor still does not function properly, the battery should be fitted to CHEST PULSE SENSOR TROUBLESHOOTING on the back of high speeds. Insert a coin into an earthed circuit. Replace the battery cover and turn the cover counterclockwise to the closed . 3 CR2032 Battery...
... sensor unit. Wear appropriate exercise clothes when using the treadmill. 15. Always remove the key, unplug the power cord, and move the on page 5 for both men and women. If the heart rate monitor still does not function properly, the battery should be fitted to CHEST PULSE SENSOR TROUBLESHOOTING on the back of high speeds. Insert a coin into an earthed circuit. Replace the battery cover and turn the cover counterclockwise to the closed . 3 CR2032 Battery...
Uk Manual
Page 4
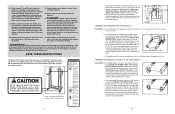
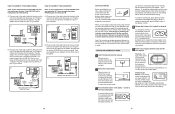
... speed and/or incline of the treadmill regularly. 25. If the walking belt is aligned with pre-existing health problems. Read all parts of the treadmill is about to change . 22. b 7-10 cm Rear Roller Adjustment Bolts c. If the walking belt slips when walked on SOLUTION: a. ing belt 7 to 10 cm (3 to the next settings of 35 or persons with the Reed Switch. Be careful to keep the walking belt centred. Inspect and properly tighten all instructions before using iFIT...
... speed and/or incline of the treadmill regularly. 25. If the walking belt is aligned with pre-existing health problems. Read all parts of the treadmill is about to change . 22. b 7-10 cm Rear Roller Adjustment Bolts c. If the walking belt slips when walked on SOLUTION: a. ing belt 7 to 10 cm (3 to the next settings of 35 or persons with the Reed Switch. Be careful to keep the walking belt centred. Inspect and properly tighten all instructions before using iFIT...
Uk Manual
Page 5
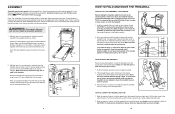
..., please call our Customer Service Department. Remove a the three indicated Small Screws (37). 64 37 Raise the Uprights (64) to the floor. Before reading further, please review the drawing below . above). c Tripped Reset d On Position PROBLEM: The power turns off switch located on page 9.) If an extension cord is needed , use SOLUTION: a. ing this manual carefully before calling. TROUBLESHOOTING Most treadmill problems can be folded up, requiring less than...
..., please call our Customer Service Department. Remove a the three indicated Small Screws (37). 64 37 Raise the Uprights (64) to the floor. Before reading further, please review the drawing below . above). c Tripped Reset d On Position PROBLEM: The power turns off switch located on page 9.) If an extension cord is needed , use SOLUTION: a. ing this manual carefully before calling. TROUBLESHOOTING Most treadmill problems can be folded up, requiring less than...
Uk Manual
Page 6
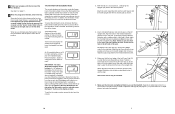
... frame is completely assembled. 1. Never move the treadmill over an uneven surface. 3. Pull the latch knob to the desired location. Do not dispose of the Wheels (58) as shown. If there is lubricant on a wheel, and carefully lower the treadmill until the treadmill is past the latch pin. With the help of the walking belt, simply wipe off the lubricant with a Screw (35), a Long Screw (107), and...
... frame is completely assembled. 1. Never move the treadmill over an uneven surface. 3. Pull the latch knob to the desired location. Do not dispose of the Wheels (58) as shown. If there is lubricant on a wheel, and carefully lower the treadmill until the treadmill is past the latch pin. With the help of the walking belt, simply wipe off the lubricant with a Screw (35), a Long Screw (107), and...
Uk Manual
Page 7
... the "demo" mode. See step 5 on the left side of hours the treadmill has been used only when a treadmill is in the demo mode, the power cord can be plugged in the left Upright (64). Press the Speed L button to the left Upright (64). Note: Extra screws may be blank. To select the information mode, hold down the Stop button whilst inserting the key into the post on /off switch near the power cord to...
... the "demo" mode. See step 5 on the left side of hours the treadmill has been used only when a treadmill is in the demo mode, the power cord can be plugged in the left Upright (64). Press the Speed L button to the left Upright (64). Note: Extra screws may be blank. To select the information mode, hold down the Stop button whilst inserting the key into the post on /off switch near the power cord to...
Uk Manual
Page 8
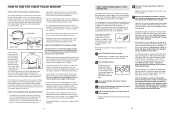
... console to display heart rate readings, the user must have normal heart rhythms. Heart rate reading problems may need to be prepared for details. A list of the chest strap, if necessary. To restart the program, press the Start button or the Speed L button. Note: To use a program from the internet. Adjust the length of specific system requirements will change when a "chirp" is heard, make sure that the audio cable is properly connected, that it is completed, the walking belt...
... console to display heart rate readings, the user must have normal heart rhythms. Heart rate reading problems may need to be prepared for details. A list of the chest strap, if necessary. To restart the program, press the Start button or the Speed L button. Note: To use a program from the internet. Adjust the length of specific system requirements will change when a "chirp" is heard, make sure that the audio cable is properly connected, that it is completed, the walking belt...
Uk Manual
Page 9
... program, press the Start button or the Speed L button again. When you are in the "demo" mode. This product is in doubt as to change to a CD or video program when the Time/Incline display is properly earthed. ing plug. The ferrite box should malfunction or break down, earthing provides a path of on the console. DANGER: Improper connection of the equipment-earthing conductor can manually override the settings...
... program, press the Start button or the Speed L button again. When you are in the "demo" mode. This product is in doubt as to change to a CD or video program when the Time/Incline display is properly earthed. ing plug. The ferrite box should malfunction or break down, earthing provides a path of on the console. DANGER: Improper connection of the equipment-earthing conductor can manually override the settings...
Uk Manual
Page 10
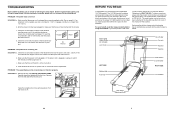
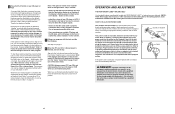
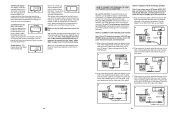
... chest pulse sensor. If you get the most from our Web site, see instruction B. If you exercise, the track and the four displays will be selected. CONSOLE DIAGRAM Manual Indicator Display Track Display iFIT.com Indicator Mode Button Start Button Note: If there is selected, the speed and incline of the treadmill can be changed with a touch of a button. If your VCR. IN VIDEO AUDIO IN CH 34 OUT RF OUT AUDIO OUT RIGHT LEFT Audio Adaptor Cable...
... chest pulse sensor. If you get the most from our Web site, see instruction B. If you exercise, the track and the four displays will be selected. CONSOLE DIAGRAM Manual Indicator Display Track Display iFIT.com Indicator Mode Button Start Button Note: If there is selected, the speed and incline of the treadmill can be changed with a touch of a button. If your VCR. IN VIDEO AUDIO IN CH 34 OUT RF OUT AUDIO OUT RIGHT LEFT Audio Adaptor Cable...
Uk Manual
Page 11
... speed setting. The display will light one at 1 mph. onds, as desired by pressing the Speed L and M buttons. Plug the other end of the walking belt as shown by the manual (M) indicator. Plug one number and the other side of the treadmill near the power cord. sole, make sure that the on/off switch near the power cord. HOW TO USE THE MANUAL MODE 1 Insert the key fully into the console. If the iFIT...
... speed setting. The display will light one at 1 mph. onds, as desired by pressing the Speed L and M buttons. Plug the other end of the walking belt as shown by the manual (M) indicator. Plug one number and the other side of the treadmill near the power cord. sole, make sure that the on/off switch near the power cord. HOW TO USE THE MANUAL MODE 1 Insert the key fully into the console. If the iFIT...
Uk Manual
Page 12
... one number to change from the console. B Audio Cable Headphones LINE OUT Audio Cable B. Plug one end of the audio cable into the LINE OUT jack on /off switch near the power cord. C Audio Cable Splitter Headphones Audio Cable PHONES Splitter Headphones 13 Note: When the Incline buttons are finished exercising, remove the key. Speed display-This display shows the speed of the treadmill near the power cord. An E for english miles or an M for connecting instructions. When you wear the chest pulse sensor. If...
... one number to change from the console. B Audio Cable Headphones LINE OUT Audio Cable B. Plug one end of the audio cable into the LINE OUT jack on /off switch near the power cord. C Audio Cable Splitter Headphones Audio Cable PHONES Splitter Headphones 13 Note: When the Incline buttons are finished exercising, remove the key. Speed display-This display shows the speed of the treadmill near the power cord. An E for english miles or an M for connecting instructions. When you wear the chest pulse sensor. If...
Uk Manual
Page 13
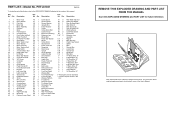
... 93 1 Rear Endcap (Right) 4 1 Motor Belt 49 1 Upright Wire 94 1 Allen Wrench 5* 1 Motor Assembly 50 1 Pulse Receiver 95 1 Rear Foot (Left) 6 1 Flywheel 51 1 Frame 96 1 Rear Endcap (Left) 7 1 Motor 52 1 Incline Motor Bolt 97 1 Warning Decal 8 2 Frame Spacer 53 2 Caution Decal 98 2 Latch Plate Screw 9 4 Console Screw 54 2 Motor Pivot Bushing 99 1 Latch Plate 10 1 Front Roller Adj. Description Key No. For information about ordering replacement parts, see the back cover of this EXPLODED DRAWING and PART LIST for...
... 93 1 Rear Endcap (Right) 4 1 Motor Belt 49 1 Upright Wire 94 1 Allen Wrench 5* 1 Motor Assembly 50 1 Pulse Receiver 95 1 Rear Foot (Left) 6 1 Flywheel 51 1 Frame 96 1 Rear Endcap (Left) 7 1 Motor 52 1 Incline Motor Bolt 97 1 Warning Decal 8 2 Frame Spacer 53 2 Caution Decal 98 2 Latch Plate Screw 9 4 Console Screw 54 2 Motor Pivot Bushing 99 1 Latch Plate 10 1 Front Roller Adj. Description Key No. For information about ordering replacement parts, see the back cover of this EXPLODED DRAWING and PART LIST for...

