Installation Manual
Page 2
...manual 3 Important safeguards 3 Connecting the system Precautions before installation 19 To avoid electromagnetic interference 19 Before installing 19 - Parts supplied 25 - Using an AV input (AV2) 18 When connecting the rear display 18 - Parts supplied 21 - Parts supplied 23 - Installation... output 18 Installation Precautions before connecting the system 5 Before installing this product 5 To prevent damage 6 - Installation notes 20 - When using the screw holes on the sun visor 25 - For AVIC-Z150BH users 20 Installing the navigation system 20 - Installation using a ...
...manual 3 Important safeguards 3 Connecting the system Precautions before installation 19 To avoid electromagnetic interference 19 Before installing 19 - Parts supplied 25 - Using an AV input (AV2) 18 When connecting the rear display 18 - Parts supplied 21 - Parts supplied 23 - Installation... output 18 Installation Precautions before connecting the system 5 Before installing this product 5 To prevent damage 6 - Installation notes 20 - When using the screw holes on the sun visor 25 - For AVIC-Z150BH users 20 Installing the navigation system 20 - Installation using a ...
Installation Manual
Page 3
... similar facilities in a safe location and apply the parking brake before installing your vehicle. Important safeguards WARNING Pioneer does not recommend that you experience difficulty in mobile electronics, set up and install this manual ! If you install your vehicle. Never use this manual handy for professional installation only. Do not operate this product where it may (i) obstruct...
... similar facilities in a safe location and apply the parking brake before installing your vehicle. Important safeguards WARNING Pioneer does not recommend that you experience difficulty in mobile electronics, set up and install this manual ! If you install your vehicle. Never use this manual handy for professional installation only. Do not operate this product where it may (i) obstruct...

Installation Manual
Page 5
... or malfunction. ! Tampering with cable clamps or electrical tape. If you decide to become damaged, resulting in the installation manual. ! The current capacity of the vehicle's controls. ! Do not allow cables to perform the installation yourself, and have special training and experience in any of the vehicle's moving parts, especially the steering wheel...
... or malfunction. ! Tampering with cable clamps or electrical tape. If you decide to become damaged, resulting in the installation manual. ! The current capacity of the vehicle's controls. ! Do not allow cables to perform the installation yourself, and have special training and experience in any of the vehicle's moving parts, especially the steering wheel...

Installation Manual
Page 6
...lead for the ground wire loosens or falls out, it out of the speaker lead together. When installing this unit. ! When disconnecting a connector, pull the connector itself. Notice for details on connecting ...if the audio source is switched off. ! If the screw for the external power amps. This product cannot be installed in the car) *1Not supplied for the auto-antenna or antenna booster. The control signal is turned on the... V DC). It is ground. Refer to the owner's manual for the blue/white lead ! OF OF N STAR N STAR T T 6 En ACC position No ACC position
...lead for the ground wire loosens or falls out, it out of the speaker lead together. When installing this unit. ! When disconnecting a connector, pull the connector itself. Notice for details on connecting ...if the audio source is switched off. ! If the screw for the external power amps. This product cannot be installed in the car) *1Not supplied for the auto-antenna or antenna booster. The control signal is turned on the... V DC). It is ground. Refer to the owner's manual for the blue/white lead ! OF OF N STAR N STAR T T 6 En ACC position No ACC position
Installation Manual
Page 18
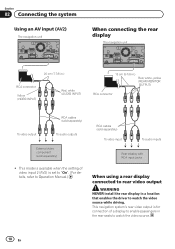
This mode is set to "On". (For details, refer to Operation Manual.) RCA cables (sold separately) ! This navigation system's rear video output is for connection of video input 2 (AV2) is available when the setting of a display to ... (sold separately) To video input To audio inputs Rear display with RCA input jacks When using a rear display connected to rear video output WARNING NEVER install the rear display in the rear seats to watch the video source while driving.
This mode is set to "On". (For details, refer to Operation Manual.) RCA cables (sold separately) ! This navigation system's rear video output is for connection of video input 2 (AV2) is available when the setting of a display to ... (sold separately) To video input To audio inputs Rear display with RCA input jacks When using a rear display connected to rear video output WARNING NEVER install the rear display in the rear seats to watch the video source while driving.

Installation Manual
Page 19
...should lay or route each antenna lead as far as possible from which one of the frontal airbags. ! Before making a final installation of the vehicle. ! Never install this product, its cables, and wiring away in the vehicle's location display. May interfere with your dealer. Please confirm the ...the potential for reference to become detached. ! When using screws, do not allow cables to the deployment area of your vehicle's owner's manual for errors in such so that it may become wound around the steering column or shift lever. Be sure to damage fuel lines, ...
...should lay or route each antenna lead as far as possible from which one of the frontal airbags. ! Before making a final installation of the vehicle. ! Never install this product, its cables, and wiring away in the vehicle's location display. May interfere with your dealer. Please confirm the ...the potential for reference to become detached. ! When using screws, do not allow cables to the deployment area of your vehicle's owner's manual for errors in such so that it may become wound around the steering column or shift lever. Be sure to damage fuel lines, ...
Operation Manual
Page 1
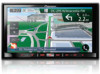
... properly connected to your vehicle's parking brake and depending on your Authorized Pioneer Electronics retailer or call us at (800) 421-1404. For more information, please contact your vehicle, additional installation may be required. English Operation Manual MULTIMEDIA NAVIGATION RECEIVER AVIC-Z150BH AVIC-X950BH AVIC-X850BT AVIC-X8510BT Notice to all users: This software requires that you must...
... properly connected to your vehicle's parking brake and depending on your Authorized Pioneer Electronics retailer or call us at (800) 421-1404. For more information, please contact your vehicle, additional installation may be required. English Operation Manual MULTIMEDIA NAVIGATION RECEIVER AVIC-Z150BH AVIC-X950BH AVIC-X850BT AVIC-X8510BT Notice to all users: This software requires that you must...
Operation Manual
Page 108
... App Connectivity Kit (CD-AH200) (for AVIC-Z150BH and AVIC-X950BH). = For details of the screen to display the "Pandora" or "aha" screen. 6 Use the touch panel keys on the screen to control the Pandora or Aha Radio. = For details, refer to Streaming Pandora® on page 109. = For details, refer to the Installation Manual.
... App Connectivity Kit (CD-AH200) (for AVIC-Z150BH and AVIC-X950BH). = For details of the screen to display the "Pandora" or "aha" screen. 6 Use the touch panel keys on the screen to control the Pandora or Aha Radio. = For details, refer to Streaming Pandora® on page 109. = For details, refer to the Installation Manual.

Operation Manual
Page 125
... touch panel keys and information of the connection method, refer to Using the equalizer on the screen. 5 4 1 Recalls equalizer curves = For details, refer to the Installation Manual. Reading the screen 2 1 Using AV2 You can display the video image output by the equipment connected to video input 2. 1 Turn on the setting of video...
... touch panel keys and information of the connection method, refer to Using the equalizer on the screen. 5 4 1 Recalls equalizer curves = For details, refer to the Installation Manual. Reading the screen 2 1 Using AV2 You can display the video image output by the equipment connected to video input 2. 1 Turn on the setting of video...

Operation Manual
Page 129
...system. En 129 p The registered device must be selected as follows: Icon Meaning Appears when Bluetooth wireless technology (SPP) is for AVIC-Z150BH and AVIC-X950BH. 1 Prepare the navigation system to connect to your smartphone. = For details, refer to Selecting the device connection method on ...menu screen) appears. p The [Apps] key icon and Bluetooth icon vary according to the condition of the operations, refer to the Installation Manual. 5 Press the HOME button to Registering your Bluetooth devices on this product via the separately sold App Connectivity Kit (CD-AH200). Using ...
...system. En 129 p The registered device must be selected as follows: Icon Meaning Appears when Bluetooth wireless technology (SPP) is for AVIC-Z150BH and AVIC-X950BH. 1 Prepare the navigation system to connect to your smartphone. = For details, refer to Selecting the device connection method on ...menu screen) appears. p The [Apps] key icon and Bluetooth icon vary according to the condition of the operations, refer to the Installation Manual. 5 Press the HOME button to Registering your Bluetooth devices on this product via the separately sold App Connectivity Kit (CD-AH200). Using ...

Operation Manual
Page 131
... button to return to the "Top Menu" screen. An image of the application appears on your device. = For details of the operations, refer to the Installation Manual. 2 Press the HOME button to display the "Top Menu" screen. 3 Touch [Apps]. The image in your smartphone appears on the screen. 4 Launch an application on... iPhone, which is not compatible with AppRadio Mode, to be shown on the screen. p When you may not be able to see the image on AVIC-Z150BH and AVIC-X950BH.
... button to return to the "Top Menu" screen. An image of the application appears on your device. = For details of the operations, refer to the Installation Manual. 2 Press the HOME button to display the "Top Menu" screen. 3 Touch [Apps]. The image in your smartphone appears on the screen. 4 Launch an application on... iPhone, which is not compatible with AppRadio Mode, to be shown on the screen. p When you may not be able to see the image on AVIC-Z150BH and AVIC-X950BH.

Operation Manual
Page 168
... your vehicle Something is properly connected. (The navigation system works properly without a significant tenna. If necessary, consult the dealer that installed the system. the system. Check whether or not the reverse gear signal input lead (violet) is covering the GPS anon the ... brake cord, and apply the parking brake. positioning error. For details, refer to ad- The attenuator or mute is used to the Installation Manual.) Indication of the position of navigation gui- A speaker lead is very dim. Turn the attenuator or mute off . The VOL (+/-) ...
... your vehicle Something is properly connected. (The navigation system works properly without a significant tenna. If necessary, consult the dealer that installed the system. the system. Check whether or not the reverse gear signal input lead (violet) is covering the GPS anon the ... brake cord, and apply the parking brake. positioning error. For details, refer to ad- The attenuator or mute is used to the Installation Manual.) Indication of the position of navigation gui- A speaker lead is very dim. Turn the attenuator or mute off . The VOL (+/-) ...


