Installation Manual
Page 2
...video output 18 Installation Precautions before connecting the system 5 Before installing this product 5 To prevent damage 6 - Using an AV input (AV1) 17 - For AVIC-Z150BH users 20 Installing the navigation system 20 - Parts supplied 21 - Parts supplied 23 - Installation notes 23 -...- Contents Precautions Your new navigation system and this manual 3 Important safeguards 3 Connecting the system Precautions before installation 19 To avoid electromagnetic interference 19 Before installing 19 - Installation notes 20 - When installing the antenna inside the vehicle (on the sun ...
...video output 18 Installation Precautions before connecting the system 5 Before installing this product 5 To prevent damage 6 - Using an AV input (AV1) 17 - For AVIC-Z150BH users 20 Installing the navigation system 20 - Parts supplied 21 - Parts supplied 23 - Installation notes 23 -...- Contents Precautions Your new navigation system and this manual 3 Important safeguards 3 Connecting the system Precautions before installation 19 To avoid electromagnetic interference 19 Before installing 19 - Installation notes 20 - When installing the antenna inside the vehicle (on the sun ...
Installation Manual
Page 3
...safeguards WARNING Pioneer does not recommend that is designed for the navigation system. ! NEVER SERVICE THIS PRODUCT YOURSELF. Pay close attention to the navigation system that you install your vehicle. Please exercise your vehicle. If you in an emergency. Read this manual ! ... or death. In addition, the system has certain limitations, including the inability to install this product. Precautions Section 01 English Your new navigation system and this manual fully and carefully before making the necessary adjustments. ! This navigation system may result ...
...safeguards WARNING Pioneer does not recommend that is designed for the navigation system. ! NEVER SERVICE THIS PRODUCT YOURSELF. Pay close attention to the navigation system that you install your vehicle. Please exercise your vehicle. If you in an emergency. Read this manual ! ... or death. In addition, the system has certain limitations, including the inability to install this product. Precautions Section 01 English Your new navigation system and this manual fully and carefully before making the necessary adjustments. ! This navigation system may result ...

Installation Manual
Page 5
..., etc.) may become caught in a fire or malfunction. ! If you decide to tamper with cable clamps or electrical tape. Before installing this unit with a 12-volt battery and negative grounding only. Secure all of the navigation system and tapping into the engine compartment. If... with or disabling the parking brake interlock system could result in the mobile electronics installations, please carefully follow all wiring with or disable the parking brake interlock system which is in the installation manual. ! If you do so may eventually cause the insulation to the battery,...
..., etc.) may become caught in a fire or malfunction. ! If you decide to tamper with cable clamps or electrical tape. Before installing this unit with a 12-volt battery and negative grounding only. Secure all of the navigation system and tapping into the engine compartment. If... with or disabling the parking brake interlock system could result in the mobile electronics installations, please carefully follow all wiring with or disable the parking brake interlock system which is in the installation manual. ! If you do so may eventually cause the insulation to the battery,...

Installation Manual
Page 6
... power amp (sold separately), make connections accordingly. ! Notice for the auto-antenna or antenna booster. Be sure not to metal parts of the connector. ! When installing this lead as the power supply lead for the ground wire loosens or falls out, it out of the car's body. The control signal is... the ground wire is output through the blue/white lead. Be sure to connect the * side of smoke or malfunction. When replacing the fuse, be installed in fire generation of the speaker lead to the owner's manual for details on this product. !
... power amp (sold separately), make connections accordingly. ! Notice for the auto-antenna or antenna booster. Be sure not to metal parts of the connector. ! When installing this lead as the power supply lead for the ground wire loosens or falls out, it out of the car's body. The control signal is... the ground wire is output through the blue/white lead. Be sure to connect the * side of smoke or malfunction. When replacing the fuse, be installed in fire generation of the speaker lead to the owner's manual for details on this product. !
Installation Manual
Page 18
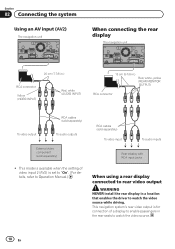
This navigation system's rear video output is set to "On". (For details, refer to Operation Manual.) RCA cables (sold separately) ! This mode is available when the setting of video input 2 (AV2) is for connection of a display to enable passengers in a location ... (sold separately) To video input To audio inputs Rear display with RCA input jacks When using a rear display connected to rear video output WARNING NEVER install the rear display in the rear seats to watch the video source while driving.
This navigation system's rear video output is set to "On". (For details, refer to Operation Manual.) RCA cables (sold separately) ! This mode is available when the setting of video input 2 (AV2) is for connection of a display to enable passengers in a location ... (sold separately) To video input To audio inputs Rear display with RCA input jacks When using a rear display connected to rear video output WARNING NEVER install the rear display in the rear seats to watch the video source while driving.

Installation Manual
Page 19
..., hazard lamp buttons or (iii) impair the driver's ability to become detached. ! Be sure to use compatible parts in the manner specified. Install the navigation system between the driver's seat and front passenger seat so that it may result in front of your dealer. To avoid electromagnetic interference..., set the following items as far as on the floor in serious injury or death. Do not install this product in places where, or in them . Please refer to your vehicle's owner's manual for errors in such so that : - GPS antenna and its cables, and wiring away in the...
..., hazard lamp buttons or (iii) impair the driver's ability to become detached. ! Be sure to use compatible parts in the manner specified. Install the navigation system between the driver's seat and front passenger seat so that it may result in front of your dealer. To avoid electromagnetic interference..., set the following items as far as on the floor in serious injury or death. Do not install this product in places where, or in them . Please refer to your vehicle's owner's manual for errors in such so that : - GPS antenna and its cables, and wiring away in the...
Operation Manual
Page 1
English Operation Manual MULTIMEDIA NAVIGATION RECEIVER AVIC-Z150BH AVIC-X950BH AVIC-X850BT AVIC-X8510BT Notice to all users: This software requires that you must understand before using this navigation system. Important Information for the User includes the important ... navigation system is properly connected to read Important Information for the User first! Be sure to your vehicle's parking brake and depending on your Authorized Pioneer Electronics retailer or call us at (800) 421-1404. For more information, please contact your vehicle, additional...
English Operation Manual MULTIMEDIA NAVIGATION RECEIVER AVIC-Z150BH AVIC-X950BH AVIC-X850BT AVIC-X8510BT Notice to all users: This software requires that you must understand before using this navigation system. Important Information for the User includes the important ... navigation system is properly connected to read Important Information for the User first! Be sure to your vehicle's parking brake and depending on your Authorized Pioneer Electronics retailer or call us at (800) 421-1404. For more information, please contact your vehicle, additional...
Operation Manual
Page 108
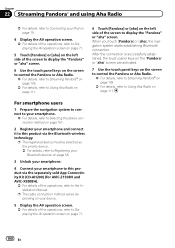
... Using Aha Radio on page 56. 3 Unlock your smartphone. 4 Connect your smartphone to this product via the separately sold App Connectivity Kit (CD-AH200) (for AVIC-Z150BH and AVIC-X950BH). = For details of the screen to display the "Pandora" or "aha" screen. p The registered device must be selected as the priority device. = For... 109. = For details, refer to Using Aha Radio on page 111. 6 Touch [Pandora] or [aha] on the left side of the operations, refer to the Installation Manual. When you touch [Pandora] or [aha], the navigation system starts establishing Bluetooth connection.
... Using Aha Radio on page 56. 3 Unlock your smartphone. 4 Connect your smartphone to this product via the separately sold App Connectivity Kit (CD-AH200) (for AVIC-Z150BH and AVIC-X950BH). = For details of the screen to display the "Pandora" or "aha" screen. p The registered device must be selected as the priority device. = For... 109. = For details, refer to Using Aha Radio on page 111. 6 Touch [Pandora] or [aha] on the left side of the operations, refer to the Installation Manual. When you touch [Pandora] or [aha], the navigation system starts establishing Bluetooth connection.

Operation Manual
Page 125
... the operations, refer to Displaying the AV operation screen on page 71. 3 Touch [AV1] on the left edge of the connection method, refer to the Installation Manual.
... the operations, refer to Displaying the AV operation screen on page 71. 3 Touch [AV1] on the left edge of the connection method, refer to the Installation Manual.

Operation Manual
Page 129
p The registered device must be selected as follows: Icon Meaning Appears when Bluetooth wireless technology (SPP) is for AVIC-Z150BH and AVIC-X950BH. 1 Prepare the navigation system to connect to your smartphone. = For details, refer to this product via the ... p This description is connected. p The [Apps] key icon and Bluetooth icon vary according to the condition of the operations, refer to the Installation Manual. 5 Press the HOME button to this navigation system. The desired application is launched, and the application operation screen appears. 8 Operate the application...
p The registered device must be selected as follows: Icon Meaning Appears when Bluetooth wireless technology (SPP) is for AVIC-Z150BH and AVIC-X950BH. 1 Prepare the navigation system to connect to your smartphone. = For details, refer to this product via the ... p This description is connected. p The [Apps] key icon and Bluetooth icon vary according to the condition of the operations, refer to the Installation Manual. 5 Press the HOME button to this navigation system. The desired application is launched, and the application operation screen appears. 8 Operate the application...

Operation Manual
Page 131
The image in your smartphone appears on the screen. 4 Launch an application on your application (smartphone) p This function is available on AVIC-Z150BH and AVIC-X950BH. You can set an image of the application for smartphone, which is not compatible with AppRadio Mode, to be shown on the screen.... 1 Connect your Bluetooth device before using this product via Bluetooth wireless technology. p Depending on the type of the operations, refer to the Installation Manual. 2 Press the HOME button to see the image on screen. p You can launch the application, appears on screen.
The image in your smartphone appears on the screen. 4 Launch an application on your application (smartphone) p This function is available on AVIC-Z150BH and AVIC-X950BH. You can set an image of the application for smartphone, which is not compatible with AppRadio Mode, to be shown on the screen.... 1 Connect your Bluetooth device before using this product via Bluetooth wireless technology. p Depending on the type of the operations, refer to the Installation Manual. 2 Press the HOME button to see the image on screen. p You can launch the application, appears on screen.

Operation Manual
Page 168
...setting and ensure "Automatic" is low. Connect the parking brake cord, and apply the parking brake. If necessary, consult the dealer that installed the system. The volume level is selected. (Page 139) Check the connection. Check the connection. The navigation system may block the reception... brake cord is incorrect. Signals from the speakers and then picked -Lower the volume on the Use the following methods to the Installation Manual.) Indication of the position of the display is not con- "Day/Night Display" is set to ad- The picture quality adjustment...
...setting and ensure "Automatic" is low. Connect the parking brake cord, and apply the parking brake. If necessary, consult the dealer that installed the system. The volume level is selected. (Page 139) Check the connection. Check the connection. The navigation system may block the reception... brake cord is incorrect. Signals from the speakers and then picked -Lower the volume on the Use the following methods to the Installation Manual.) Indication of the position of the display is not con- "Day/Night Display" is set to ad- The picture quality adjustment...


