Installation Manual
Page 2
... connected to separately sold power amp 14 When connecting a rear view camera 16 When connecting the rear display 17 - Parts supplied 23 - Installation notes 23 - Notice for the blue/white lead 7 Parts supplied 7 Connecting the system 8 Connecting the power cord (1) 10 Connecting the power... the microphone angle 27 Notice for the blue lead 6 - When using the screw holes on the dashboard or rear shelf) 24 Installing the microphone 25 - Contents IMPORTANT INFORMATION ABOUT YOUR NEW NAVIGATION SYSTEM AND THIS MANUAL 3 IMPORTANT SAFEGUARDS PLEASE READ ALL OF THESE INSTRUCTIONS...
... connected to separately sold power amp 14 When connecting a rear view camera 16 When connecting the rear display 17 - Parts supplied 23 - Installation notes 23 - Notice for the blue/white lead 7 Parts supplied 7 Connecting the system 8 Connecting the power cord (1) 10 Connecting the power... the microphone angle 27 Notice for the blue lead 6 - When using the screw holes on the dashboard or rear shelf) 24 Installing the microphone 25 - Contents IMPORTANT INFORMATION ABOUT YOUR NEW NAVIGATION SYSTEM AND THIS MANUAL 3 IMPORTANT SAFEGUARDS PLEASE READ ALL OF THESE INSTRUCTIONS...
Installation Manual
Page 3
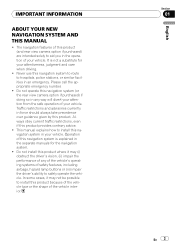
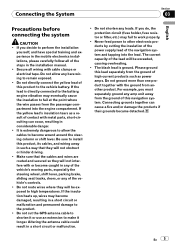
...YOUR NEW NAVIGATION SYSTEM AND THIS MANUAL ! Please call the appropriate emergency number. ! In some cases, it may not be possible to install this product (and rear view camera option if purchased) are intended solely to safely operate the vehicle. Always obey current traffic restrictions, even... operate this navigation system in any of the vehicle's operating systems of your vehicle. Never use this navigation system to route to install this navigation system (or the rear view camera option if purchased) if doing so in your attentiveness, judgment and care when driving. ...
...YOUR NEW NAVIGATION SYSTEM AND THIS MANUAL ! Please call the appropriate emergency number. ! In some cases, it may not be possible to install this product (and rear view camera option if purchased) are intended solely to safely operate the vehicle. Always obey current traffic restrictions, even... operate this navigation system in any of the vehicle's operating systems of your vehicle. Never use this navigation system to route to install this navigation system (or the rear view camera option if purchased) if doing so in your attentiveness, judgment and care when driving. ...
Installation Manual
Page 4
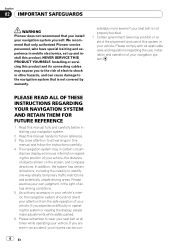
... system yourself. stances display erroneous information regarding the use of objects shown on the screen, and compass directions. Section 02 IMPORTANT SAFEGUARDS WARNING Pioneer does not recommend that you install your vehicle, the distance of this system in operating the system or reading the display, please make adjustments while safely parked. 6 Please...
... system yourself. stances display erroneous information regarding the use of objects shown on the screen, and compass directions. Section 02 IMPORTANT SAFEGUARDS WARNING Pioneer does not recommend that you install your vehicle, the distance of this system in operating the system or reading the display, please make adjustments while safely parked. 6 Please...
Installation Manual
Page 5
...If the yellow lead's insulation tears as power amps. Make sure that they will not interfere with or become caught in the mobile electronics installations, please carefully follow all wiring with cable clamps or electrical tape. If you must separately ground any leads. Do not directly connect the ...product together with metal parts, short-circuiting can cause a fire and/or damage the products if their grounds became detached. Be sure to install this lead separately from the ground of the lead will be exceeded, causing overheating. ! If the insulation heats up, wires may fail ...
...If the yellow lead's insulation tears as power amps. Make sure that they will not interfere with or become caught in the mobile electronics installations, please carefully follow all wiring with cable clamps or electrical tape. If you must separately ground any leads. Do not directly connect the ...product together with metal parts, short-circuiting can cause a fire and/or damage the products if their grounds became detached. Be sure to install this lead separately from the ground of the lead will be exceeded, causing overheating. ! If the insulation heats up, wires may fail ...

Installation Manual
Page 6
...damage WARNING ! Refer to another source. - Since a unique BPTL circuit is output through the blue lead to disconnect the (-) battery cable before installation. ! Never connect speakers with output and/or impedance values other units, then make connections accordingly. ! When [ANT CTRL] mode is especially ... same color to the corresponding colored port, i.e., blue connector to the blue port, black to [Radio], the vehicle's antenna can be installed in a vehicle without ACC (accessory) position on changing [ANT CTRL] mode, refer to insulate all unused speaker leads, which if left...
...damage WARNING ! Refer to another source. - Since a unique BPTL circuit is output through the blue lead to disconnect the (-) battery cable before installation. ! Never connect speakers with output and/or impedance values other units, then make connections accordingly. ! When [ANT CTRL] mode is especially ... same color to the corresponding colored port, i.e., blue connector to the blue port, black to [Radio], the vehicle's antenna can be installed in a vehicle without ACC (accessory) position on changing [ANT CTRL] mode, refer to insulate all unused speaker leads, which if left...

Installation Manual
Page 12
... the extension cord and the lead for the speed detection circuit through this connection is made incorrectly or omitted, certain functions of your authorized Pioneer dealer or an installation professional. Close the cover. If this hole. This lead must be unusable. Ground side Parking brake switch 12 En Section 03 Connecting the...
... the extension cord and the lead for the speed detection circuit through this connection is made incorrectly or omitted, certain functions of your authorized Pioneer dealer or an installation professional. Close the cover. If this hole. This lead must be unusable. Ground side Parking brake switch 12 En Section 03 Connecting the...
Installation Manual
Page 17
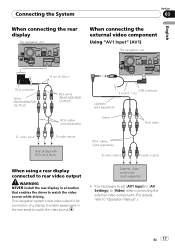
... the video source. External video component (sold separately) To video output To audio outputs When using a rear display connected to rear video output WARNING NEVER install the rear display in the rear seats to watch the video source while driving.
... the video source. External video component (sold separately) To video output To audio outputs When using a rear display connected to rear video output WARNING NEVER install the rear display in the rear seats to watch the video source while driving.
Installation Manual
Page 20
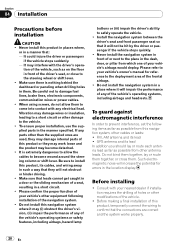
... so that they may (i) obstruct the driver's vision, (ii) impair the performance of your vehicle's other antenna leads. Never install the navigation system in front of this navigation system, other than the supplied ones are correct and the system works properly. 20 ...to allow them . Be sure to damage fuel lines, brake lines, electronic components, communication wires or power cables. ! Section 04 Installation Precautions before installation CAUTION ! Please confirm the proper function of the navigation system. ! Please refer to your vehicle's owner's manual for errors in the...
... so that they may (i) obstruct the driver's vision, (ii) impair the performance of your vehicle's other antenna leads. Never install the navigation system in front of this navigation system, other than the supplied ones are correct and the system works properly. 20 ...to allow them . Be sure to damage fuel lines, brake lines, electronic components, communication wires or power cables. ! Section 04 Installation Precautions before installation CAUTION ! Please confirm the proper function of the navigation system. ! Please refer to your vehicle's owner's manual for errors in the...
Installation Manual
Page 21
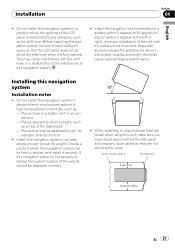
... may cause interference with the surface tilted more than these tolerances increases the potential for example close to the left or right). Installing this navigation system in .) En 21 Places exposed to ensure proper heat dispersal when using this unit, make sure you leave ... degrees tolerance (within 5 degrees to a heater, vent or air conditioner. - Choose a position where this navigation system. ! This may be firmly installed, and install it is obstructed by rain, for errors in the location display, and might otherwise cause reduced display performance. Improper...
... may cause interference with the surface tilted more than these tolerances increases the potential for example close to the left or right). Installing this navigation system in .) En 21 Places exposed to ensure proper heat dispersal when using this unit, make sure you leave ... degrees tolerance (within 5 degrees to a heater, vent or air conditioner. - Choose a position where this navigation system. ! This may be firmly installed, and install it is obstructed by rain, for errors in the location display, and might otherwise cause reduced display performance. Improper...

Installation Manual
Page 22
... mounting bracket Binding screw or flush surface screw Be sure to use the screws supplied with this area. ! Dashboard or console 22 En Installation using the screw holes on the shape of the navigation unit % Fastening the navigation unit to dissipate heat. Use either the binding screws ... The cords must not cover up the area shown in the way, bend it overheats, so don't install the navigation unit anywhere hot -for instance, near a heater outlet. Section 04 Installation ! Position the navigation unit so that the brackets screw holes and its screw holes are aligned (are...
... mounting bracket Binding screw or flush surface screw Be sure to use the screws supplied with this area. ! Dashboard or console 22 En Installation using the screw holes on the shape of the navigation unit % Fastening the navigation unit to dissipate heat. Use either the binding screws ... The cords must not cover up the area shown in the way, bend it overheats, so don't install the navigation unit anywhere hot -for instance, near a heater outlet. Section 04 Installation ! Position the navigation unit so that the brackets screw holes and its screw holes are aligned (are...

Installation Manual
Page 23
... sure to use an extension to make it or use the metal sheet provided with your system. Parts supplied GPS antenna Installation notes ! The antenna should be installed on a level surface where radio waves will be received by the antenna if reception from the satellite is very powerful, ...affect its performance. En 23 Do not cut the GPS antenna lead to the antenna is blocked. The magnet attached to shorten it longer. Installation Installing the GPS antenna CAUTION Do not cut the accessory metal sheet. Take care not to the navigation system. Do not paint the GPS antenna...
... sure to use an extension to make it or use the metal sheet provided with your system. Parts supplied GPS antenna Installation notes ! The antenna should be installed on a level surface where radio waves will be received by the antenna if reception from the satellite is very powerful, ...affect its performance. En 23 Do not cut the GPS antenna lead to the antenna is blocked. The magnet attached to shorten it longer. Installation Installing the GPS antenna CAUTION Do not cut the accessory metal sheet. Take care not to the navigation system. Do not paint the GPS antenna...
Installation Manual
Page 24
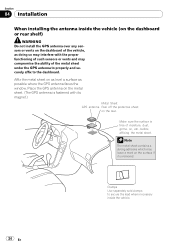
... GPS antenna to properly and securely affix to secure the lead where necessary inside the vehicle (on the dashboard or rear shelf) WARNING Do not install the GPS antenna over any sensors or vents on the surface if it is free of the vehicle, as possible where the GPS antenna faces... may leave a mark on the dashboard of moisture, dust, grime, oil, etc., before affixing the metal sheet. Make sure the surface is removed. Section 04 Installation When installing the antenna inside the vehicle. 24 En
... GPS antenna to properly and securely affix to secure the lead where necessary inside the vehicle (on the dashboard or rear shelf) WARNING Do not install the GPS antenna over any sensors or vents on the surface if it is free of the vehicle, as possible where the GPS antenna faces... may leave a mark on the dashboard of moisture, dust, grime, oil, etc., before affixing the metal sheet. Make sure the surface is removed. Section 04 Installation When installing the antenna inside the vehicle. 24 En
Installation Manual
Page 25
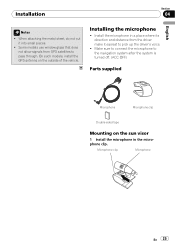
... window glass that does not allow signals from the driver make it into small pieces. ! On such models, install the GPS antenna on the sun visor 1 Install the microphone in a place where its direction and distance from GPS satellites to the navigation system after the system is... turned off. (ACC OFF) Parts supplied Microphone Microphone clip Double-sided tape Mounting on the outside of the vehicle. Installing the microphone ! Install the microphone in the microphone clip. Microphone clip Microphone En 25 When attaching the metal sheet, do not cut it easiest to...
... window glass that does not allow signals from the driver make it into small pieces. ! On such models, install the GPS antenna on the sun visor 1 Install the microphone in a place where its direction and distance from GPS satellites to the navigation system after the system is... turned off. (ACC OFF) Parts supplied Microphone Microphone clip Double-sided tape Mounting on the outside of the vehicle. Installing the microphone ! Install the microphone in the microphone clip. Microphone clip Microphone En 25 When attaching the metal sheet, do not cut it easiest to...

Installation Manual
Page 26
It cannot recognize the driver's voice if the sun visor is in the down position. Install the microphone on the steering column. Section 04 Installation 2 Attach the microphone clip to secure the lead where necessary inside the vehicle. 26 En Double-sided tape Clamps Use separately...the lead where necessary inside the vehicle. Clamps Use separately sold clamps to the sun visor. Install the microphone on the sun visor when it away from the steering wheel. Microphone clip Installation on the steering column % Mount the microphone on the steering column, keeping it is in...
It cannot recognize the driver's voice if the sun visor is in the down position. Install the microphone on the steering column. Section 04 Installation 2 Attach the microphone clip to secure the lead where necessary inside the vehicle. 26 En Double-sided tape Clamps Use separately...the lead where necessary inside the vehicle. Clamps Use separately sold clamps to the sun visor. Install the microphone on the sun visor when it away from the steering wheel. Microphone clip Installation on the steering column % Mount the microphone on the steering column, keeping it is in...

Installation Manual
Page 27
Installation Adjusting the microphone angle The microphone angle can be adjusted. Section 04 English En 27
Installation Adjusting the microphone angle The microphone angle can be adjusted. Section 04 English En 27

Owner's Manual
Page 1
For more information, please contact your vehicle, additional installation may be required. English Operation Manual FLASH MEMORY MULTIMEDIA AV NAVIGATION RECEIVER AVIC-Z110BT Notice to all users: This software requires that the navigation system is properly connected to your vehicle's parking brake and depending on your Authorized Pioneer Electronics retailer or call us at (800) 421-1404.
For more information, please contact your vehicle, additional installation may be required. English Operation Manual FLASH MEMORY MULTIMEDIA AV NAVIGATION RECEIVER AVIC-Z110BT Notice to all users: This software requires that the navigation system is properly connected to your vehicle's parking brake and depending on your Authorized Pioneer Electronics retailer or call us at (800) 421-1404.

Owner's Manual
Page 9
... complies with part 15 of RF energy that it deemed to comply without appropriate authorization may cause undesired operation of this device must not be installed and operated with Part 15 of FCC Rules and RSS-Gen of California and other governmental entities to OET65. This transmitter must accept any interference...
... complies with part 15 of RF energy that it deemed to comply without appropriate authorization may cause undesired operation of this device must not be installed and operated with Part 15 of FCC Rules and RSS-Gen of California and other governmental entities to OET65. This transmitter must accept any interference...
Owner's Manual
Page 10
Chapter 01 Introduction License Agreement PIONEER AVIC-Z110BT - PLEASE READ THE TERMS AND CONDITIONS OF THIS AGREEMENT CAREFULLY BEFORE USING THE SOFTWARE INSTALLED ON THE PIONEER PRODUCTS. THE SOFTWARE INCLUDES A DATABASE LICENSED BY THIRD PARTY SUPPLIER(S) ("SUPPLIERS"), AND YOUR USE OF THE DATABASE IS ..., non exclusive license to operate a service bureau or for U.S.A. You shall not use the Software to use the software installed on the Software. Pioneer and its accuracy, reliability or otherwise. 10 En You shall not alter or remove any other proprietary ownership rights in or...
Chapter 01 Introduction License Agreement PIONEER AVIC-Z110BT - PLEASE READ THE TERMS AND CONDITIONS OF THIS AGREEMENT CAREFULLY BEFORE USING THE SOFTWARE INSTALLED ON THE PIONEER PRODUCTS. THE SOFTWARE INCLUDES A DATABASE LICENSED BY THIRD PARTY SUPPLIER(S) ("SUPPLIERS"), AND YOUR USE OF THE DATABASE IS ..., non exclusive license to operate a service bureau or for U.S.A. You shall not use the Software to use the software installed on the Software. Pioneer and its accuracy, reliability or otherwise. 10 En You shall not alter or remove any other proprietary ownership rights in or...
Owner's Manual
Page 12
...AGREEMENT CAREFULLY BEFORE USING THE SOFTWARE INSTALLED ON THE PIONEER PRODUCTS. Furthermore, Pioneer does not make derivative works of this License Agreement to another party, provided that the party reads and agrees to page 14). Chapter 01 Introduction PIONEER AVIC-Z110BT - The Software is complex and... may not be corrected. PIONEER AND ITS LICENSOR(S) (for other means. Pioneer does not warrant that the Software will meet your needs or expectations, ...
...AGREEMENT CAREFULLY BEFORE USING THE SOFTWARE INSTALLED ON THE PIONEER PRODUCTS. Furthermore, Pioneer does not make derivative works of this License Agreement to another party, provided that the party reads and agrees to page 14). Chapter 01 Introduction PIONEER AVIC-Z110BT - The Software is complex and... may not be corrected. PIONEER AND ITS LICENSOR(S) (for other means. Pioneer does not warrant that the Software will meet your needs or expectations, ...
Owner's Manual
Page 23
...abnormal signs on the LCD screen, turn the ignition switch off the power immediately and consult your dealer or the nearest authorized Pioneer Service Station. Always obey current traffic restrictions, even if the navigation system provides contrary advice. Also, damage to read and ...attentiveness, judgment, and care when driving. Do not attempt to you cannot drive along the set . Installation or servicing of your dealer or the nearest authorized Pioneer Service Station for day or time traffic regulations, only information about traffic regulations applicable at the time ...
...abnormal signs on the LCD screen, turn the ignition switch off the power immediately and consult your dealer or the nearest authorized Pioneer Service Station. Always obey current traffic restrictions, even if the navigation system provides contrary advice. Also, damage to read and ...attentiveness, judgment, and care when driving. Do not attempt to you cannot drive along the set . Installation or servicing of your dealer or the nearest authorized Pioneer Service Station for day or time traffic regulations, only information about traffic regulations applicable at the time ...


