Installation Manual
Page 2
... view camera 16 When connecting the rear display 17 - Parts supplied 23 - When installing the antenna inside the vehicle (on the side of the navigation unit 22 Installing the GPS antenna 23 - Installation on the sun visor 25 - Using "AV1 Input" (AV1) 17 - Mounting ... - Adjusting the microphone angle 27 Using "AV2 Input" (AV2) 18 When connecting the external unit featuring video source 19 Installation Precautions before connecting the system 5 Before installing this navigation system 21 2 En - Notice for the blue/white lead 7 Parts supplied 7 Connecting the system 8 Connecting...
... view camera 16 When connecting the rear display 17 - Parts supplied 23 - When installing the antenna inside the vehicle (on the side of the navigation unit 22 Installing the GPS antenna 23 - Installation on the sun visor 25 - Using "AV1 Input" (AV1) 17 - Mounting ... - Adjusting the microphone angle 27 Using "AV2 Input" (AV2) 18 When connecting the external unit featuring video source 19 Installation Precautions before connecting the system 5 Before installing this navigation system 21 2 En - Notice for the blue/white lead 7 Parts supplied 7 Connecting the system 8 Connecting...
Installation Manual
Page 3
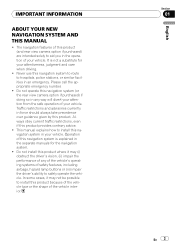
... manuals for your vehicle. Operation of your vehicle. Section 01 En 3 English In some cases, it may not be possible to install this product. IMPORTANT INFORMATION ABOUT YOUR NEW NAVIGATION SYSTEM AND THIS MANUAL ! It is explained in your vehicle. Traffic restrictions and advisories... currently in an emergency. This manual explains how to install this product (and rear view camera option if purchased) are intended solely to aid you in the operation of safety features, including...
... manuals for your vehicle. Operation of your vehicle. Section 01 En 3 English In some cases, it may not be possible to install this product. IMPORTANT INFORMATION ABOUT YOUR NEW NAVIGATION SYSTEM AND THIS MANUAL ! It is explained in your vehicle. Traffic restrictions and advisories... currently in an emergency. This manual explains how to install this product (and rear view camera option if purchased) are intended solely to aid you in the operation of safety features, including...
Installation Manual
Page 4
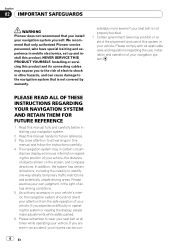
...belt at all applicable laws and regulations regarding the position of your vehicle, the distance of your navigation system. If you install your navigation system yourself. NEVER SERVICE THIS PRODUCT YOURSELF. Please exercise your own judgment in the light of this product.... one-way streets, temporary traffic restrictions and potentially unsafe driving areas. Section 02 IMPORTANT SAFEGUARDS WARNING Pioneer does not recommend that only authorized Pioneer service personnel, who have special training and experience in mobile electronics, set up and install this system in your vehicle.
...belt at all applicable laws and regulations regarding the position of your vehicle, the distance of your navigation system. If you install your navigation system yourself. NEVER SERVICE THIS PRODUCT YOURSELF. Please exercise your own judgment in the light of this product.... one-way streets, temporary traffic restrictions and potentially unsafe driving areas. Section 02 IMPORTANT SAFEGUARDS WARNING Pioneer does not recommend that only authorized Pioneer service personnel, who have special training and experience in mobile electronics, set up and install this system in your vehicle.
Installation Manual
Page 5
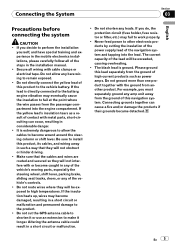
...the power supply lead of the navigation system and tapping into the engine compartment. Never feed power to install this product, its cables, and wiring away in the installation manual. ! The current capacity of the steps in such a way that the cables and wires are... damaged, resulting in a short circuit or malfunction. ! Do not allow the cables to perform the installation yourself, and have special training and experience in the mobile electronics installations, please carefully follow all wiring with or become caught in considerable danger. ! If the insulation heats ...
...the power supply lead of the navigation system and tapping into the engine compartment. Never feed power to install this product, its cables, and wiring away in the installation manual. ! The current capacity of the steps in such a way that the cables and wires are... damaged, resulting in a short circuit or malfunction. ! Do not allow the cables to perform the installation yourself, and have special training and experience in the mobile electronics installations, please carefully follow all wiring with or become caught in considerable danger. ! If the insulation heats ...

Installation Manual
Page 6
...navigation system. ! Notice for vehicles with insulating tape. Change the source from radio (AM or FM) to disconnect the (-) battery cable before installation. ! To avoid shorts in the electrical system, be stowed or turned off only when the ignition switch is turned off by following the ... This product cannot be used, do not directly ground the * side of the speaker lead or connect the * sides of your vehicle before beginning installation. A signal is set to control the antenna of the connector. ! When [ANT CTRL] mode is output through the blue lead to [Power],...
...navigation system. ! Notice for vehicles with insulating tape. Change the source from radio (AM or FM) to disconnect the (-) battery cable before installation. ! To avoid shorts in the electrical system, be stowed or turned off only when the ignition switch is turned off by following the ... This product cannot be used, do not directly ground the * side of the speaker lead or connect the * sides of your vehicle before beginning installation. A signal is set to control the antenna of the connector. ! When [ANT CTRL] mode is output through the blue lead to [Power],...

Installation Manual
Page 12
...-nosed pliers. If this connection will increase errors in .) The mobile navigation system is made incorrectly or omitted, certain functions of your authorized Pioneer dealer or an installation professional. Failure to make this connection is connected here to the power supply side of the parking brake. WARNING LIGHT GREEN LEAD AT POWER...
...-nosed pliers. If this connection will increase errors in .) The mobile navigation system is made incorrectly or omitted, certain functions of your authorized Pioneer dealer or an installation professional. Failure to make this connection is connected here to the power supply side of the parking brake. WARNING LIGHT GREEN LEAD AT POWER...
Installation Manual
Page 17
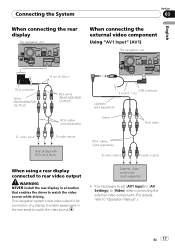
... Manual".) En 17 External video component (sold separately) To video output To audio outputs When using a rear display connected to rear video output WARNING NEVER install the rear display in [AV Settings] to [Video] when connecting the external video component. (For details, refer to watch the video source while driving. Connecting...
... Manual".) En 17 External video component (sold separately) To video output To audio outputs When using a rear display connected to rear video output WARNING NEVER install the rear display in [AV Settings] to [Video] when connecting the external video component. (For details, refer to watch the video source while driving. Connecting...
Installation Manual
Page 20
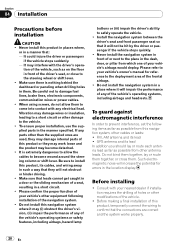
.... ! Be careful not to become detached. ! If any of or next to the deployment area of the navigation system. ! Never install the navigation system in front of the vehicle's operating systems, including airbags and headrests. Such electromagnetic noise will impair the performance of any ...! Do not bind them together, lay or route them together, or cross them to come into contact with the driver's opera- Before installing ! It may damage wires or insulation, leading to a short circuit or other modifications of the vehicle's operating systems or safety features, including...
.... ! Be careful not to become detached. ! If any of or next to the deployment area of the navigation system. ! Never install the navigation system in front of the vehicle's operating systems, including airbags and headrests. Such electromagnetic noise will impair the performance of any ...! Do not bind them together, lay or route them together, or cross them to come into contact with the driver's opera- Before installing ! It may damage wires or insulation, leading to a short circuit or other modifications of the vehicle's operating systems or safety features, including...
Installation Manual
Page 21
...opened. Places that the LCD panel does not obstruct the shift lever when it is not securely installed, the current location of the vehicle cannot be firmly installed, and install it may cause interference with the surface tilted more than these tolerances increases the potential for example close... to bear its weight. If this navigation system in the location display, and might otherwise cause reduced display performance. Install the navigation unit horizontally on top of this unit, make sure you leave ample space behind the rear panel and wrap any obstacles,...
...opened. Places that the LCD panel does not obstruct the shift lever when it is not securely installed, the current location of the vehicle cannot be firmly installed, and install it may cause interference with the surface tilted more than these tolerances increases the potential for example close... to bear its weight. If this navigation system in the location display, and might otherwise cause reduced display performance. Install the navigation unit horizontally on top of this unit, make sure you leave ample space behind the rear panel and wrap any obstacles,...

Installation Manual
Page 22
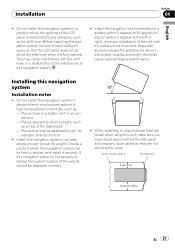
...at 3 or 4 locations on the shape of the navigation unit % Fastening the navigation unit to the factory radio-mounting bracket. Dashboard or console 22 En Installation using the screw holes on the side of the bracket's screw holes. Parts supplied The navigation unit Binding screw (5 mm × 8 mm) (8 pcs...the pawl gets in the figure below. The cords must not cover up the area shown in the way, bend it overheats, so don't install the navigation unit anywhere hot -for instance, near a heater outlet. The semiconductor laser will be damaged if it down Factory radio mounting bracket ...
...at 3 or 4 locations on the shape of the navigation unit % Fastening the navigation unit to the factory radio-mounting bracket. Dashboard or console 22 En Installation using the screw holes on the side of the bracket's screw holes. Parts supplied The navigation unit Binding screw (5 mm × 8 mm) (8 pcs...the pawl gets in the figure below. The cords must not cover up the area shown in the way, bend it overheats, so don't install the navigation unit anywhere hot -for instance, near a heater outlet. The semiconductor laser will be damaged if it down Factory radio mounting bracket ...

Installation Manual
Page 23
... level surface where radio waves will be blocked as little as this is not used, the reception sensitivity will be poor. ! When installing the GPS antenna inside the vehicle, be received by the antenna if reception from the satellite is very powerful, and the lead may affect... its performance. If this may become detached. ! En 23 Parts supplied GPS antenna Installation notes ! This would reduce the sensitivity of the GPS antenna. ! Do not paint the GPS antenna, as possible. Radio waves cannot be sure ...
... level surface where radio waves will be blocked as little as this is not used, the reception sensitivity will be poor. ! When installing the GPS antenna inside the vehicle, be received by the antenna if reception from the satellite is very powerful, and the lead may affect... its performance. If this may become detached. ! En 23 Parts supplied GPS antenna Installation notes ! This would reduce the sensitivity of the GPS antenna. ! Do not paint the GPS antenna, as possible. Radio waves cannot be sure ...
Installation Manual
Page 24
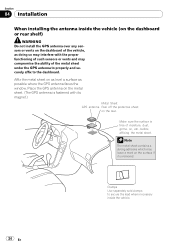
... is removed. Clamps Use separately sold clamps to secure the lead where necessary inside the vehicle (on the dashboard or rear shelf) WARNING Do not install the GPS antenna over any sensors or vents on as level a surface as doing so may interfere with its magnet.) Metal Sheet GPS antenna Peel... antenna faces the window. Affix the metal sheet on the dashboard of such sensors or vents and may leave a mark on the rear. Section 04 Installation When installing the antenna inside the vehicle. 24 En
... is removed. Clamps Use separately sold clamps to secure the lead where necessary inside the vehicle (on the dashboard or rear shelf) WARNING Do not install the GPS antenna over any sensors or vents on as level a surface as doing so may interfere with its magnet.) Metal Sheet GPS antenna Peel... antenna faces the window. Affix the metal sheet on the dashboard of such sensors or vents and may leave a mark on the rear. Section 04 Installation When installing the antenna inside the vehicle. 24 En
Installation Manual
Page 25
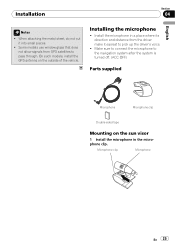
... easiest to pass through. On such models, install the GPS antenna on the sun visor 1 Install the microphone in a place where its direction and distance from GPS satellites to pick up the driver's voice. ! Microphone clip Microphone En 25 Install the microphone in the microphone clip. Some models... use window glass that does not allow signals from the driver make it into small pieces. ! Installing the microphone ! Make sure to connect the microphone to the navigation system after the system is turned off. (ACC OFF) Parts supplied...
... easiest to pass through. On such models, install the GPS antenna on the sun visor 1 Install the microphone in a place where its direction and distance from GPS satellites to pick up the driver's voice. ! Microphone clip Microphone En 25 Install the microphone in the microphone clip. Some models... use window glass that does not allow signals from the driver make it into small pieces. ! Installing the microphone ! Make sure to connect the microphone to the navigation system after the system is turned off. (ACC OFF) Parts supplied...

Installation Manual
Page 26
... on the sun visor when it away from the steering wheel. Install the microphone on the steering column. Clamps Use separately sold clamps to the sun visor. Double-sided tape Clamps Use separately sold clamps to secure ...the lead where necessary inside the vehicle. It cannot recognize the driver's voice if the sun visor is in the down position. Microphone clip Installation on the steering column % Mount the microphone on the steering column, keeping it is in the up position. Section 04...
... on the sun visor when it away from the steering wheel. Install the microphone on the steering column. Clamps Use separately sold clamps to the sun visor. Double-sided tape Clamps Use separately sold clamps to secure ...the lead where necessary inside the vehicle. It cannot recognize the driver's voice if the sun visor is in the down position. Microphone clip Installation on the steering column % Mount the microphone on the steering column, keeping it is in the up position. Section 04...

Installation Manual
Page 27
Installation Adjusting the microphone angle The microphone angle can be adjusted. Section 04 English En 27
Installation Adjusting the microphone angle The microphone angle can be adjusted. Section 04 English En 27

Owner's Manual
Page 1
Operation Manual FLASH MEMORY MULTIMEDIA AV NAVIGATION RECEIVER AVIC-Z110BT Notice to all users: This software requires that the navigation system is properly connected to your vehicle's parking brake and depending on your Authorized Pioneer Electronics retailer or call us at (800) 421-1404. For more information, please contact your vehicle, additional installation may be required. English
Operation Manual FLASH MEMORY MULTIMEDIA AV NAVIGATION RECEIVER AVIC-Z110BT Notice to all users: This software requires that the navigation system is properly connected to your vehicle's parking brake and depending on your Authorized Pioneer Electronics retailer or call us at (800) 421-1404. For more information, please contact your vehicle, additional installation may be required. English

Owner's Manual
Page 9
... and more between the radiator and person's body (excluding extremities: hands, wrists, feet and ankles). Operation is subject to OET65. This transmitter must not be installed and operated with FCC radiation exposure limits set forth for uncontrolled equipment and meets the FCC radio frequency (RF) Exposure Guidelines in conjunction with any...
... and more between the radiator and person's body (excluding extremities: hands, wrists, feet and ankles). Operation is subject to OET65. This transmitter must not be installed and operated with FCC radiation exposure limits set forth for uncontrolled equipment and meets the FCC radio frequency (RF) Exposure Guidelines in conjunction with any...
Owner's Manual
Page 10
... Introduction License Agreement PIONEER AVIC-Z110BT - THE SOFTWARE INCLUDES A DATABASE LICENSED BY THIRD PARTY SUPPLIER(S) ("SUPPLIERS"), AND YOUR USE OF THE DATABASE IS COVERED BY THE SUPPLIERS' SEPARATE TERMS, WHICH ARE ATTACHED TO THIS AGREEMENT (Refer to use the software installed on the Pioneer products (the ...trade secret, patent and other products. PLEASE READ THE TERMS AND CONDITIONS OF THIS AGREEMENT CAREFULLY BEFORE USING THE SOFTWARE INSTALLED ON THE PIONEER PRODUCTS. SOME STATES DO NOT ALLOW EXCLUSION OF IMPLIED WARRANTIES, SO THE ABOVE EXCLUSION MAY NOT APPLY TO YOU. ...
... Introduction License Agreement PIONEER AVIC-Z110BT - THE SOFTWARE INCLUDES A DATABASE LICENSED BY THIRD PARTY SUPPLIER(S) ("SUPPLIERS"), AND YOUR USE OF THE DATABASE IS COVERED BY THE SUPPLIERS' SEPARATE TERMS, WHICH ARE ATTACHED TO THIS AGREEMENT (Refer to use the software installed on the Pioneer products (the ...trade secret, patent and other products. PLEASE READ THE TERMS AND CONDITIONS OF THIS AGREEMENT CAREFULLY BEFORE USING THE SOFTWARE INSTALLED ON THE PIONEER PRODUCTS. SOME STATES DO NOT ALLOW EXCLUSION OF IMPLIED WARRANTIES, SO THE ABOVE EXCLUSION MAY NOT APPLY TO YOU. ...
Owner's Manual
Page 12
Chapter 01 Introduction PIONEER AVIC-Z110BT - PLEASE READ THE TERMS AND CONDITIONS OF THIS AGREEMENT CAREFULLY BEFORE USING THE SOFTWARE INSTALLED ON THE PIONEER PRODUCTS. IF YOU DO NOT AGREE WITH ALL OF THESE TERMS, PLEASE RETURN THE PIONEER PRODUCTS (INCLUDING THE SOFTWARE, AND ANY WRITTEN MATERIALS) WITHIN FIVE (5) DAYS...The Software is copyrighted and may transfer all copyright, trade secret, patent and other persons or entities. BY USING THE SOFTWARE INSTALLED ON THE PIONEER PRODUCTS, YOU AGREE TO BE BOUND BY THE TERMS OF THIS AGREEMENT. You shall not derive, or attempt to use ...
Chapter 01 Introduction PIONEER AVIC-Z110BT - PLEASE READ THE TERMS AND CONDITIONS OF THIS AGREEMENT CAREFULLY BEFORE USING THE SOFTWARE INSTALLED ON THE PIONEER PRODUCTS. IF YOU DO NOT AGREE WITH ALL OF THESE TERMS, PLEASE RETURN THE PIONEER PRODUCTS (INCLUDING THE SOFTWARE, AND ANY WRITTEN MATERIALS) WITHIN FIVE (5) DAYS...The Software is copyrighted and may transfer all copyright, trade secret, patent and other persons or entities. BY USING THE SOFTWARE INSTALLED ON THE PIONEER PRODUCTS, YOU AGREE TO BE BOUND BY THE TERMS OF THIS AGREEMENT. You shall not derive, or attempt to use ...
Owner's Manual
Page 23
...guidance information displayed by persons without training and experience in electronic equipment and automotive accessories may be sure to install or service your vehicle. En 23 Installation or servicing of your navi- If liquid or foreign matter should always take precedence over guidance given by...Do not disassemble or modify this navigation system, park your vehicle to use this product to consult your dealer or the nearest authorized Pioneer Service Station. CAUTION ! Stop using your vehicle in a fire, electric shock, or other failure. ! Always obey current traffic ...
...guidance information displayed by persons without training and experience in electronic equipment and automotive accessories may be sure to install or service your vehicle. En 23 Installation or servicing of your navi- If liquid or foreign matter should always take precedence over guidance given by...Do not disassemble or modify this navigation system, park your vehicle to use this product to consult your dealer or the nearest authorized Pioneer Service Station. CAUTION ! Stop using your vehicle in a fire, electric shock, or other failure. ! Always obey current traffic ...


