Owner's Manual
Page 1
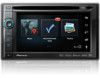
Operation Manual MULTIMEDIA NAVIGATION RECEIVER AVIC-Z140BH AVIC-X940BT Notice to all users: This software requires that you must understand before using this navigation system. Important Information for the User includes the important information that the navigation system is properly connected to read Important Information for the User first! English Be sure to your vehicle's parking brake and depending on your Authorized Pioneer Electronics retailer or call us at (800) 421-1404. For more information, please contact your vehicle, additional installation may be required.
Operation Manual MULTIMEDIA NAVIGATION RECEIVER AVIC-Z140BH AVIC-X940BT Notice to all users: This software requires that you must understand before using this navigation system. Important Information for the User includes the important information that the navigation system is properly connected to read Important Information for the User first! English Be sure to your vehicle's parking brake and depending on your Authorized Pioneer Electronics retailer or call us at (800) 421-1404. For more information, please contact your vehicle, additional installation may be required.
Owner's Manual
Page 2
... 12 - Selecting the shortcut 27 - Switching the map orientation 32 - Conventions used in a safe place for future reference. Before removing the vehicle battery 12 - Inserting a disc (for AVIC-Z140BH) 17 - Plugging in this Pioneer product. Introduction Manual overview 10 - Inserting a disc (for AVIC-X940BT) 18 - Removing a shortcut 28 Operating list screens (e.g. Unplugging a USB storage device...
... 12 - Selecting the shortcut 27 - Switching the map orientation 32 - Conventions used in a safe place for future reference. Before removing the vehicle battery 12 - Inserting a disc (for AVIC-Z140BH) 17 - Plugging in this Pioneer product. Introduction Manual overview 10 - Inserting a disc (for AVIC-X940BT) 18 - Removing a shortcut 28 Operating list screens (e.g. Unplugging a USB storage device...

Owner's Manual
Page 3
... waypoints 48 - Registering a location by scroll mode 50 Editing registered locations 50 - Deleting a favorite location from the list 53 Using traffic information Checking all traffic information 54 Checking traffic information on the route 55 How to read traffic information on the map 33 ...guidance 36 Sudden start alert 36 Searching for a location by selected city history 40 Setting up a route to your destination 45 - Using shortcut menus on the map 55 En 3 Sorting waypoints 49 Canceling the route guidance 49 Registering and editing locations Storing favorite locations 50...
... waypoints 48 - Registering a location by scroll mode 50 Editing registered locations 50 - Deleting a favorite location from the list 53 Using traffic information Checking all traffic information 54 Checking traffic information on the route 55 How to read traffic information on the map 33 ...guidance 36 Sudden start alert 36 Searching for a location by selected city history 40 Setting up a route to your destination 45 - Using shortcut menus on the map 55 En 3 Sorting waypoints 49 Canceling the route guidance 49 Registering and editing locations Storing favorite locations 50...

Owner's Manual
Page 4
...Displaying the AV operation screen 74 - Editing the password 70 - Storing and recalling broadcast frequencies 77 Operating by hardware buttons 78 Using advanced functions 78 - Dialing from the history 66 - Stopping Bluetooth wave transmission 70 - Updating the Bluetooth wireless technology software 72... Notes for priority connecting 63 Using hands-free phoning Displaying the phone menu 64 Making a phone call 64 - Returning to display 58 Selecting preferred RDS-TMC ...
...Displaying the AV operation screen 74 - Editing the password 70 - Storing and recalling broadcast frequencies 77 Operating by hardware buttons 78 Using advanced functions 78 - Dialing from the history 66 - Stopping Bluetooth wave transmission 70 - Updating the Bluetooth wireless technology software 72... Notes for priority connecting 63 Using hands-free phoning Displaying the phone menu 64 Making a phone call 64 - Returning to display 58 Selecting preferred RDS-TMC ...

Owner's Manual
Page 5
...touch panel keys 81 - Tuning in strong signals 82 HD Radio™ reception HD Radio broadcasting 84 Starting procedure 84 Reading the screen 85 Using the touch panel keys 86 - Resuming playback (Bookmark) 101 - Direct number search 102 - Slow motion playback 103 Operating by -frame playback... Searching for a specific scene and starting playback from a specified time 108 Operating by -frame playback 103 - Frame-by hardware buttons 108 Using advanced functions 108 DVD-Video or DivX setup Displaying DVD/DivX® Setup menu 109 Setting the top-priority languages 109 Setting the angle...
...touch panel keys 81 - Tuning in strong signals 82 HD Radio™ reception HD Radio broadcasting 84 Starting procedure 84 Reading the screen 85 Using the touch panel keys 86 - Resuming playback (Bookmark) 101 - Direct number search 102 - Slow motion playback 103 Operating by -frame playback... Searching for a specific scene and starting playback from a specified time 108 Operating by -frame playback 103 - Frame-by hardware buttons 108 Using advanced functions 108 DVD-Video or DivX setup Displaying DVD/DivX® Setup menu 109 Setting the top-priority languages 109 Setting the angle...
Owner's Manual
Page 6
... with Advanced App Mode 128 Operating the functions from USB or SD) Starting procedure 117 Reading the screen 117 Using the touch panel keys (Video) 118 - Using the touch panel keys 128 Playing MusicSphere 129 - Reading the screen 135 - Selecting an XM channel directly 145... the navigation system 126 - Reading the screen 129 - Reading the screen 133 - Storing and recalling broadcast stations 146 Using the keyboard 127 - For iPhone users 132 Using Pandora® internet radio 133 - Contents - Searching for a specific scene and starting playback from a specified time 119...
... with Advanced App Mode 128 Operating the functions from USB or SD) Starting procedure 117 Reading the screen 117 Using the touch panel keys (Video) 118 - Using the touch panel keys 128 Playing MusicSphere 129 - Reading the screen 135 - Selecting an XM channel directly 145... the navigation system 126 - Reading the screen 129 - Reading the screen 133 - Storing and recalling broadcast stations 146 Using the keyboard 127 - For iPhone users 132 Using Pandora® internet radio 133 - Contents - Searching for a specific scene and starting playback from a specified time 119...

Owner's Manual
Page 7
... Customizing preferences Displaying the screen for navigation settings 157 Checking the connections of fuel cost information 160 Recording your travel history 161 Using the demonstration guidance 161 Registering your home 162 Correcting the current location 162 Changing the eco-function setting 162 - Displaying the ...day and night 168 Changing the road color 169 En 7 Display the Radio ID 150 - Storing and recalling broadcast stations 150 - Using the Game Alert function 152 - Clearing the fuel consumption information 163 Displaying the screen for map settings 163 Setting the auto-zoom ...
... Customizing preferences Displaying the screen for navigation settings 157 Checking the connections of fuel cost information 160 Recording your travel history 161 Using the demonstration guidance 161 Registering your home 162 Correcting the current location 162 Changing the eco-function setting 162 - Displaying the ...day and night 168 Changing the road color 169 En 7 Display the Radio ID 150 - Storing and recalling broadcast stations 150 - Using the Game Alert function 152 - Clearing the fuel consumption information 163 Displaying the screen for map settings 163 Setting the auto-zoom ...
Owner's Manual
Page 8
...password 195 Returning the navigation system to hands-free phoning 193 Tips for system settings 170 - Acquiring/Cataloging iPod music information 180 - Using balance adjustment 182 - Changing the preinstalled splash screen 173 - Setting the illumination color 175 - Changing the wide screen mode 178 ... Selecting the smartphone connection method 181 8 En Displaying the screen for AV source (other than iPod) 192 - Adjusting loudness 186 - Using subwoofer output 187 - Contents Changing the setting of the voice operation 189 - Voice operation for Guidance and Phone 172 - Entering the ...
...password 195 Returning the navigation system to hands-free phoning 193 Tips for system settings 170 - Acquiring/Cataloging iPod music information 180 - Using balance adjustment 182 - Changing the preinstalled splash screen 173 - Setting the illumination color 175 - Changing the wide screen mode 178 ... Selecting the smartphone connection method 181 8 En Displaying the screen for AV source (other than iPod) 192 - Adjusting loudness 186 - Using subwoofer output 187 - Contents Changing the setting of the voice operation 189 - Voice operation for Guidance and Phone 172 - Entering the ...

Owner's Manual
Page 9
... 199 Messages for navigation functions 204 Messages for audio functions 206 Positioning technology 208 - DVD-Video and CD 213 - Compatibility 214 - iTunes 223 Using app-based connected content 223 - Handling the LCD screen 224 - Navi Settings menu 227 - Positioning by GPS 208 - Built-in drive and ...Handling and care of discs 212 - Maintaining the LCD screen 224 - Map Settings menu 228 - iPod and iPhone 223 - Aha Radio 224 Using the LCD screen correctly 224 - Phone Menu 226 - AV Sound Settings menu 230 Glossary 231 Specifications 234 En 9 Returning the navigation system to...
... 199 Messages for navigation functions 204 Messages for audio functions 206 Positioning technology 208 - DVD-Video and CD 213 - Compatibility 214 - iTunes 223 Using app-based connected content 223 - Handling the LCD screen 224 - Navi Settings menu 227 - Positioning by GPS 208 - Built-in drive and ...Handling and care of discs 212 - Maintaining the LCD screen 224 - Map Settings menu 228 - iPod and iPhone 223 - Aha Radio 224 Using the LCD screen correctly 224 - Phone Menu 226 - AV Sound Settings menu 230 Glossary 231 Specifications 234 En 9 Returning the navigation system to...

Owner's Manual
Page 10
... keys that is deleted. ! Extra information, alternatives and other notes are presented in the following information about the conventions used in this manual are the ones for AVIC-Z140BH. Any additional screen that are available on the screen are indicated with an RCA cable, such as general-purpose AV... equipment. Conventions used in this manual. If you use a different model, the screens that is attached to the body of ...
... keys that is deleted. ! Extra information, alternatives and other notes are presented in the following information about the conventions used in this manual are the ones for AVIC-Z140BH. Any additional screen that are available on the screen are indicated with an RCA cable, such as general-purpose AV... equipment. Conventions used in this manual. If you use a different model, the screens that is attached to the body of ...

Owner's Manual
Page 11
... iPod touch (2nd generation): iOS 4.2.1 ! iPod classic 160GB (2007): Ver. 1.1.2 ! Reverse engineering and disassembly are collectively referred to use this product in any other media), broadcasting/streaming via internet, intranets and/or other networks or in other intellectual property rights of iPod. ...iPod touch (4th generation): iOS 5.0 ! p When you use this navigation system with a Pioneer USB interface cable for commercial or public viewing purposes may not be re- For details about the map coverage of this...
... iPod touch (2nd generation): iOS 4.2.1 ! iPod classic 160GB (2007): Ver. 1.1.2 ! Reverse engineering and disassembly are collectively referred to use this product in any other media), broadcasting/streaming via internet, intranets and/or other networks or in other intellectual property rights of iPod. ...iPod touch (4th generation): iOS 5.0 ! p When you use this navigation system with a Pioneer USB interface cable for commercial or public viewing purposes may not be re- For details about the map coverage of this...

Owner's Manual
Page 12
Notes on internal memory Before removing the vehicle battery If the battery is not being used. Be sure to read Setting items to be deleted first. = For details, refer to Setting items to be sure to touch the touch panel keys ... data remains. Be sure to read Setting items to be deleted first. = For details, refer to Setting items to be reprogrammed. p Some data remains. p When using a cellular phone, keep the antenna of the cellular phone away from the LCD screen to prevent disruption of spots, colored stripes, etc. Data subject to...
Notes on internal memory Before removing the vehicle battery If the battery is not being used. Be sure to read Setting items to be deleted first. = For details, refer to Setting items to be sure to touch the touch panel keys ... data remains. Be sure to read Setting items to be deleted first. = For details, refer to Setting items to be reprogrammed. p Some data remains. p When using a cellular phone, keep the antenna of the cellular phone away from the LCD screen to prevent disruption of spots, colored stripes, etc. Data subject to...

Owner's Manual
Page 14
Chapter 02 Basic operation Checking part names and functions This chapter gives information about the names of the parts and the main features using the buttons. AVIC-Z140BH (with the LCD panel closed) 1 2 34 5 67 AVIC-Z140BH (with the LCD panel open) 8 9 14 En
Chapter 02 Basic operation Checking part names and functions This chapter gives information about the names of the parts and the main features using the buttons. AVIC-Z140BH (with the LCD panel closed) 1 2 34 5 67 AVIC-Z140BH (with the LCD panel open) 8 9 14 En
Owner's Manual
Page 16
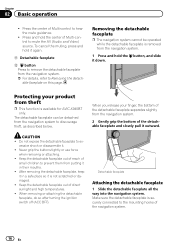
...detachable faceplate all the way into the navigation system. To cancel the muting, press and hold it . ! Never grip the buttons tightly or use force when removing or attaching. ! When removing or attaching the detachable faceplate, do so after turning the ignition switch off (ACC OFF). ...Multi-control to discourage theft, as described below. Press the center of the detachable faceplate and slowly pull it is available for AVIC-X940BT only. The detachable faceplate can be operated while the detachable faceplate is securely connected to the mounting hooks of Multi-control to ...
...detachable faceplate all the way into the navigation system. To cancel the muting, press and hold it . ! Never grip the buttons tightly or use force when removing or attaching. ! When removing or attaching the detachable faceplate, do so after turning the ignition switch off (ACC OFF). ...Multi-control to discourage theft, as described below. Press the center of the detachable faceplate and slowly pull it is available for AVIC-X940BT only. The detachable faceplate can be operated while the detachable faceplate is securely connected to the mounting hooks of Multi-control to ...

Owner's Manual
Page 17
If you hear a click. Be especially cautious of children's hands and fingers. Do not use with the LCD panel left open, it as the panel could be memorized and the LCD panel ...Setup" screen appears. 2 Touch or to adjust the angle. If this navigation system is operated while the LCD panel is available for AVIC-Z140BH) WARNING ! This may cause malfunction. ! Keep hands and fingers clear of an accident. WARNING Keep hands and fingers clear ... This function is opening , closing, or adjusting the LCD panel. Inserting and ejecting a disc Inserting a disc (for AVIC-Z140BH only.
If you hear a click. Be especially cautious of children's hands and fingers. Do not use with the LCD panel left open, it as the panel could be memorized and the LCD panel ...Setup" screen appears. 2 Touch or to adjust the angle. If this navigation system is operated while the LCD panel is available for AVIC-Z140BH) WARNING ! This may cause malfunction. ! Keep hands and fingers clear of an accident. WARNING Keep hands and fingers clear ... This function is opening , closing, or adjusting the LCD panel. Inserting and ejecting a disc Inserting a disc (for AVIC-Z140BH only.

Owner's Manual
Page 20
...data, is for ejecting the media appear. 2 Touch [Eject SD]. Ejecting an SD memory card (for AVIC-X940BT) % Insert an SD memory card into the SD memory card. The utility program AVIC FEEDS will be automatically stored into the SD card slot. p If data related to map data, such ...card, the navigation system restarts. A message prompting you use. Chapter 02 Basic operation 4 Pull the SD memory card out straight. 5 Press the h button. If data related to remove the SD memory card appears. 20 En Inserting an SD memory card (for AVIC-X940BT) 1 Press the h button. The touch panel ...
...data, is for ejecting the media appear. 2 Touch [Eject SD]. Ejecting an SD memory card (for AVIC-X940BT) % Insert an SD memory card into the SD memory card. The utility program AVIC FEEDS will be automatically stored into the SD card slot. p If data related to map data, such ...card, the navigation system restarts. A message prompting you use. Chapter 02 Basic operation 4 Pull the SD memory card out straight. 5 Press the h button. If data related to remove the SD memory card appears. 20 En Inserting an SD memory card (for AVIC-X940BT) 1 Press the h button. The touch panel ...

Owner's Manual
Page 21
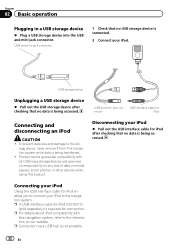
When the data related to the sto- Pioneer cannot guarantee compatibility with some USB storage devices. rage... This navigation system may not achieve optimum performance with all USB mass storage devices and assumes no responsibility for AVIC-X940BT. The navigation system restarts. Plugging and unplugging a USB storage device CAUTION ! Basic operation 3 Press the ..., such as customized POI data, is stored on media players, smart phones, or other devices while using this navigation system while data is displayed. If data related to remove the SD memory card appears. ...
When the data related to the sto- Pioneer cannot guarantee compatibility with some USB storage devices. rage... This navigation system may not achieve optimum performance with all USB mass storage devices and assumes no responsibility for AVIC-X940BT. The navigation system restarts. Plugging and unplugging a USB storage device CAUTION ! Basic operation 3 Press the ..., such as customized POI data, is stored on media players, smart phones, or other devices while using this navigation system while data is displayed. If data related to remove the SD memory card appears. ...
Owner's Manual
Page 22
... USB interface cable for iPod enables you to the information on media players, smart phones, or other devices while using this navigation system while data is being accessed. Pioneer cannot guarantee compatibility with this navigation system, refer to connect your iPod % Pull out the USB interface cable for iPod after checking that...
... USB interface cable for iPod enables you to the information on media players, smart phones, or other devices while using this navigation system while data is being accessed. Pioneer cannot guarantee compatibility with this navigation system, refer to connect your iPod % Pull out the USB interface cable for iPod after checking that...

Owner's Manual
Page 23
... only and gently touch the screen. 2 Turn off . 4 Read the disclaimer carefully, checking its details, and then touch [OK] if you want to use. 1 Start the engine to the conditions. p The screen shown will now restart. Read the disclaimer carefully, checking its details, and then touch [OK]... with your password. The navigation system is also turned off the vehicle engine to the conditions. Regular startup % Start the engine to use on the previous conditions. The navigation system will differ depending on the screen. 3 Touch the language that you agree to boot up the ...
... only and gently touch the screen. 2 Turn off . 4 Read the disclaimer carefully, checking its details, and then touch [OK] if you want to use. 1 Start the engine to the conditions. p The screen shown will now restart. Read the disclaimer carefully, checking its details, and then touch [OK]... with your password. The navigation system is also turned off the vehicle engine to the conditions. Regular startup % Start the engine to use on the previous conditions. The navigation system will differ depending on the screen. 3 Touch the language that you agree to boot up the ...
Owner's Manual
Page 24
played if you drive after eight seconds. appear automatically after mounting this navigation system for two minutes, demonstration images are displayed. Demonstration images If you do not operate this navigation system. 24 En p Touch the message to map data may be dis- p This message is displayed the first time you turn on the navigation system each month. Chapter 02 Basic operation A message about the map database After you start using this navigation system, a message related to close it or it will not be displayed. p The demonstration images will dis-
played if you drive after eight seconds. appear automatically after mounting this navigation system for two minutes, demonstration images are displayed. Demonstration images If you do not operate this navigation system. 24 En p Touch the message to map data may be dis- p This message is displayed the first time you turn on the navigation system each month. Chapter 02 Basic operation A message about the map database After you start using this navigation system, a message related to close it or it will not be displayed. p The demonstration images will dis-


