Installation Manual
Page 2
... the system 8 When connecting the Android™ device (for AVIC-Z150BH and AVIC-X950BH) 9 Connecting the power cord (1) 10 Connecting the power cord (2) 12 When connecting to rear video output 18 Installation Precautions before connecting the system 5 Before installing this manual 3 Important safeguards 3 Connecting the system Precautions before installation 19 To avoid electromagnetic interference 19 Before...
... the system 8 When connecting the Android™ device (for AVIC-Z150BH and AVIC-X950BH) 9 Connecting the power cord (1) 10 Connecting the power cord (2) 12 When connecting to rear video output 18 Installation Precautions before connecting the system 5 Before installing this manual 3 Important safeguards 3 Connecting the system Precautions before installation 19 To avoid electromagnetic interference 19 Before...
Installation Manual
Page 3
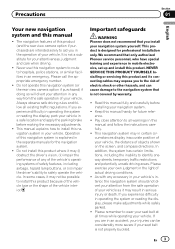
... rules and follow the instructions carefully. ! This product is not a substitute for the navigation system. ! Installing or servicing this manual and follow all warnings in this product and its connecting cables may not be considerably more severe if your seat...navigation features of electric shock or other hazards, and can be possible to install this manual handy for professional installation only. Important safeguards WARNING Pioneer does not recommend that only authorized Pioneer service personnel, who have special training and experience in operating the system ...
... rules and follow the instructions carefully. ! This product is not a substitute for the navigation system. ! Installing or servicing this manual and follow all warnings in this product and its connecting cables may not be considerably more severe if your seat...navigation features of electric shock or other hazards, and can be possible to install this manual handy for professional installation only. Important safeguards WARNING Pioneer does not recommend that only authorized Pioneer service personnel, who have special training and experience in operating the system ...

Installation Manual
Page 5
... Tampering with a 12-volt battery and negative grounding only. Do not directly connect the yellow lead of the steps in the mobile electronics installations, please carefully follow all wiring with metal parts, short-circuiting can occur, resulting in any of the vehicle's moving parts, especially the steering... is directly connected to the battery, engine vibration may fail to high temperatures. Do not shorten any bare wiring to perform the installation yourself, and have special training and experience in the installation manual. ! If you decide to remain exposed. !
... Tampering with a 12-volt battery and negative grounding only. Do not directly connect the yellow lead of the steps in the mobile electronics installations, please carefully follow all wiring with metal parts, short-circuiting can occur, resulting in any of the vehicle's moving parts, especially the steering... is directly connected to the battery, engine vibration may fail to high temperatures. Do not shorten any bare wiring to perform the installation yourself, and have special training and experience in the installation manual. ! If you decide to remain exposed. !

Installation Manual
Page 6
... 50 W (output value) and between 4 W to the owner's manual for details on connecting the power amp and other device must be sure...side of the speaker lead or connect the * side of another side of the car's body. When installing this unit or any other units, then make sure to black, etc. ! When disconnecting a connector, pull the ...connector itself. This product cannot be installed in a vehicle without ACC (accessory) position on this product. ! Attach the connectors of the rating prescribed on...
... 50 W (output value) and between 4 W to the owner's manual for details on connecting the power amp and other device must be sure...side of the speaker lead or connect the * side of another side of the car's body. When installing this unit or any other units, then make sure to black, etc. ! When disconnecting a connector, pull the ...connector itself. This product cannot be installed in a vehicle without ACC (accessory) position on this product. ! Attach the connectors of the rating prescribed on...
Installation Manual
Page 18
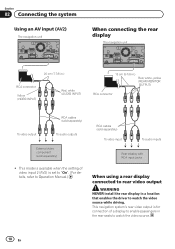
... enables the driver to watch the video source while driving. This navigation system's rear video output is set to "On". (For details, refer to Operation Manual.) RCA cables (sold separately) ! Section 02 Connecting the system Using an AV input (AV2) The navigation unit When connecting the rear display The navigation unit... (sold separately) To video input To audio inputs Rear display with RCA input jacks When using a rear display connected to rear video output WARNING NEVER install the rear display in the rear seats to watch the video source. 18 En
... enables the driver to watch the video source while driving. This navigation system's rear video output is set to "On". (For details, refer to Operation Manual.) RCA cables (sold separately) ! Section 02 Connecting the system Using an AV input (AV2) The navigation unit When connecting the rear display The navigation unit... (sold separately) To video input To audio inputs Rear display with RCA input jacks When using a rear display connected to rear video output WARNING NEVER install the rear display in the rear seats to watch the video source. 18 En

Installation Manual
Page 19
... dashboard or paneling when drilling holes in the vehicle's location display. Please refer to your vehicle's owner's manual for errors in them . Before making a final installation of this product, temporarily connect the wiring to the deployment area of the navigation system. ! En 19 ... operating systems or safety features, including airbags, hazard lamp buttons or (iii) impair the driver's ability to the vehicle. ! Never install this navigation system, other modifications of your dealer. Vibration may (i) obstruct the driver's vision, (ii) impair the performance of any ...
... dashboard or paneling when drilling holes in the vehicle's location display. Please refer to your vehicle's owner's manual for errors in them . Before making a final installation of this product, temporarily connect the wiring to the deployment area of the navigation system. ! En 19 ... operating systems or safety features, including airbags, hazard lamp buttons or (iii) impair the driver's ability to the vehicle. ! Never install this navigation system, other modifications of your dealer. Vibration may (i) obstruct the driver's vision, (ii) impair the performance of any ...
Operation Manual
Page 1
...installation may be required. Be sure to read Important Information for the User includes the important information that the navigation system is properly connected to all users: This software requires that you must understand before using this navigation system. English Important Information for the User first! Operation Manual MULTIMEDIA NAVIGATION RECEIVER AVIC-Z150BH AVIC...-X950BH AVIC-X850BT AVIC-X8510BT Notice to your vehicle's parking brake and depending on your Authorized Pioneer Electronics retailer or ...
...installation may be required. Be sure to read Important Information for the User includes the important information that the navigation system is properly connected to all users: This software requires that you must understand before using this navigation system. English Important Information for the User first! Operation Manual MULTIMEDIA NAVIGATION RECEIVER AVIC-Z150BH AVIC...-X950BH AVIC-X850BT AVIC-X8510BT Notice to your vehicle's parking brake and depending on your Authorized Pioneer Electronics retailer or ...

Operation Manual
Page 108
...smartphone. = For details, refer to Selecting the device connection method on page 157. 2 Register your smartphone and connect it to the Installation Manual. When you touch [Pandora] or [aha], the navigation system starts establishing Bluetooth connection. p The registered device must be selected as...Unlock your smartphone. 4 Connect your smartphone to this product via the separately sold App Connectivity Kit (CD-AH200) (for AVIC-Z150BH and AVIC-X950BH). = For details of the operations, refer to this product via the Bluetooth wireless technology. After the connection is successfully...
...smartphone. = For details, refer to Selecting the device connection method on page 157. 2 Register your smartphone and connect it to the Installation Manual. When you touch [Pandora] or [aha], the navigation system starts establishing Bluetooth connection. p The registered device must be selected as...Unlock your smartphone. 4 Connect your smartphone to this product via the separately sold App Connectivity Kit (CD-AH200) (for AVIC-Z150BH and AVIC-X950BH). = For details of the operations, refer to this product via the Bluetooth wireless technology. After the connection is successfully...

Operation Manual
Page 125
... action on page 25. The image is displayed in a safe place and apply the parking brake. For details of the connection method, refer to the Installation Manual. Using AV input Chapter 25 Using AV input You can display the video image output by swipe action p When the video is displayed on the...
... action on page 25. The image is displayed in a safe place and apply the parking brake. For details of the connection method, refer to the Installation Manual. Using AV input Chapter 25 Using AV input You can display the video image output by swipe action p When the video is displayed on the...

Operation Manual
Page 129
... (SPP) is connected. p If you connect your smartphone and connect it to the condition of the operations, refer to the Installation Manual. 5 Press the HOME button to the application menu screen. The desired application is already running, the application operation screen appears on... application menu screen. p The cable connection method varies depending on this navigation system. For smartphone users p This description is for AVIC-Z150BH and AVIC-X950BH. 1 Prepare the navigation system to connect to your smartphone. = For details, refer to Selecting the device connection method on...
... (SPP) is connected. p If you connect your smartphone and connect it to the condition of the operations, refer to the Installation Manual. 5 Press the HOME button to the application menu screen. The desired application is already running, the application operation screen appears on... application menu screen. p The cable connection method varies depending on this navigation system. For smartphone users p This description is for AVIC-Z150BH and AVIC-X950BH. 1 Prepare the navigation system to connect to your smartphone. = For details, refer to Selecting the device connection method on...

Operation Manual
Page 131
... you may not be shown on the screen. p The cable connection method varies depending on your device. = For details of the operations, refer to the Installation Manual. 2 Press the HOME button to see the image on screen. An image of the application appears on the screen. 7 Press the HOME button to return... AppRadio Mode Other functions Displaying the image of your application (iPhone) You can set an image of the application for iPhone, which is available on AVIC-Z150BH and AVIC-X950BH. The black screen appears. 6 Launch an application on your iPhone.
... you may not be shown on the screen. p The cable connection method varies depending on your device. = For details of the operations, refer to the Installation Manual. 2 Press the HOME button to see the image on screen. An image of the application appears on the screen. 7 Press the HOME button to return... AppRadio Mode Other functions Displaying the image of your application (iPhone) You can set an image of the application for iPhone, which is available on AVIC-Z150BH and AVIC-X950BH. The black screen appears. 6 Launch an application on your iPhone.
Operation Manual
Page 168
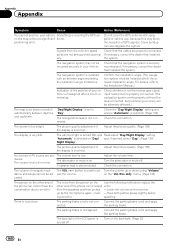
The navigation system may block the reception of GPS signals. For details, refer to the Installation Manual.) Indication of the position of the phone call is low. Adjust the picture quality. (Page 158) The display is selected on "Day/ and, if desired,.... menu. (Page 136) justed. the parking brake. Turn on the "Vol./Pos. Do not cover the GPS antenna with an extreme angle exceeding the installation angle limitations. "Day/Night Display" is securely mounted and, if necessary, consult the dealer that the cables are properly connected. Turn the volume up prop...
The navigation system may block the reception of GPS signals. For details, refer to the Installation Manual.) Indication of the position of the phone call is low. Adjust the picture quality. (Page 158) The display is selected on "Day/ and, if desired,.... menu. (Page 136) justed. the parking brake. Turn on the "Vol./Pos. Do not cover the GPS antenna with an extreme angle exceeding the installation angle limitations. "Day/Night Display" is securely mounted and, if necessary, consult the dealer that the cables are properly connected. Turn the volume up prop...


