
Operation Manual
Page 2
... operate 23 - Ejecting an SD memory card 30 Plugging and unplugging a USB storage device 30 - PIONEER AVIC-X9115BT, AVIC-X7115BT - Before removing the vehicle battery 26 - Displaying the rear view camera image 35 How to User 9 License Agreement 10 - Introduction Information to use the map 36 - Parking brake interlock 22 - Failure to use the navigation menu screens 34 - Ejecting a disc 29 Inserting and ejecting an SD memory card 29 - Plugging in the examples may be changed...
... operate 23 - Ejecting an SD memory card 30 Plugging and unplugging a USB storage device 30 - PIONEER AVIC-X9115BT, AVIC-X7115BT - Before removing the vehicle battery 26 - Displaying the rear view camera image 35 How to User 9 License Agreement 10 - Introduction Information to use the map 36 - Parking brake interlock 22 - Failure to use the navigation menu screens 34 - Ejecting a disc 29 Inserting and ejecting an SD memory card 29 - Plugging in the examples may be changed...

Operation Manual
Page 4
... Using hands-free phoning Hands-free phoning overview 73 Preparing communication devices 73 Displaying the Phone Menu 73 Registering your cellular phone 75 Connecting a registered cellular phone 76 - Rejecting an incoming call 77 Making a phone call 77 - Direct dialing 78 - Dialing from the list 89 - Setting the phone volume 82 - Echo canceling and noise reduction 83 - Browsing embedded text information 89 Using the "Function" menu 90 Playing a DVD-Video Reading the screen 91 Using the touch panel...
... Using hands-free phoning Hands-free phoning overview 73 Preparing communication devices 73 Displaying the Phone Menu 73 Registering your cellular phone 75 Connecting a registered cellular phone 76 - Rejecting an incoming call 77 Making a phone call 77 - Direct dialing 78 - Dialing from the list 89 - Setting the phone volume 82 - Echo canceling and noise reduction 83 - Browsing embedded text information 89 Using the "Function" menu 90 Playing a DVD-Video Reading the screen 91 Using the touch panel...

Operation Manual
Page 5
... - Setting the code number and level 104 Displaying your DivX VOD registration code 105 Setting "Auto Play" 105 Setting the subtitle file for DivX 106 Language code chart for a specific scene and starting playback from the list 110 - Browsing for a video 118 Using the "Function" menu 119 Using the radio (FM) Reading the screen 121 Using the touch panel keys 121 En 5 Switch the playback mode 98 - Slow motion playback 98 Using the "Function" menu 99 Playing...
... - Setting the code number and level 104 Displaying your DivX VOD registration code 105 Setting "Auto Play" 105 Setting the subtitle file for DivX 106 Language code chart for a specific scene and starting playback from the list 110 - Browsing for a video 118 Using the "Function" menu 119 Using the radio (FM) Reading the screen 121 Using the touch panel keys 121 En 5 Switch the playback mode 98 - Slow motion playback 98 Using the "Function" menu 99 Playing...

Operation Manual
Page 7
... - Displayed Info 147 - Sound settings 150 - Selecting the language 156 - Using the equalizer 161 - Using subwoofer output 163 - Setting video input 2 (AV2) 164 - Changing the wide screen mode 165 - Setting the rear output 166 - Voice operation for the iPod 170 - POI Settings 146 - 3D Settings 146 - Manage Track Logs 148 - Editing your home position 155 Options on the "System Settings" menu 155 - Setting the rear view camera 157 - Adjusting the response positions of Voice Operation 168 - Adjusting loudness 162 - Enhancing bass (Bass...
... - Displayed Info 147 - Sound settings 150 - Selecting the language 156 - Using the equalizer 161 - Using subwoofer output 163 - Setting video input 2 (AV2) 164 - Changing the wide screen mode 165 - Setting the rear output 166 - Voice operation for the iPod 170 - POI Settings 146 - 3D Settings 146 - Manage Track Logs 148 - Editing your home position 155 Options on the "System Settings" menu 155 - Setting the rear view camera 157 - Adjusting the response positions of Voice Operation 168 - Adjusting loudness 162 - Enhancing bass (Bass...
Operation Manual
Page 8
... Handling large errors 188 - Liquid crystal display (LCD) screen 203 - DVD Setup 209 Glossary 210 Specifications 213 Shortcut menu 208 - Setting the password 174 - Setting items to be deleted 176 Appendix Troubleshooting 178 Messages and how to react to hands-free phoning 172 Tips for playing a disc 192 Playable discs 193 - When positioning by GPS is impossible 188 - iTunes 203 Using the LCD screen correctly 203 - Settings Menu 206 - Contents...
... Handling large errors 188 - Liquid crystal display (LCD) screen 203 - DVD Setup 209 Glossary 210 Specifications 213 Shortcut menu 208 - Setting the password 174 - Setting items to be deleted 176 Appendix Troubleshooting 178 Messages and how to react to hands-free phoning 172 Tips for playing a disc 192 Playable discs 193 - When positioning by GPS is impossible 188 - iTunes 203 Using the LCD screen correctly 203 - Settings Menu 206 - Contents...

Operation Manual
Page 29
... phone is paired to change the frequency one step at a time; Mutes the AV (Audio and Video) source. To cancel the muting, press and hold it again. 8 Bluetooth connection status indicator Lights up when your iPod by Bluetooth wireless technology. 9 "AV2" input jack This is usually not possible to prevent them from accidentally swallowing it. ! Allows you to the storage device, never remove it is the "AV2" input terminal. Ejecting a disc...
... phone is paired to change the frequency one step at a time; Mutes the AV (Audio and Video) source. To cancel the muting, press and hold it again. 8 Bluetooth connection status indicator Lights up when your iPod by Bluetooth wireless technology. 9 "AV2" input jack This is usually not possible to prevent them from accidentally swallowing it. ! Allows you to the storage device, never remove it is the "AV2" input terminal. Ejecting a disc...
Operation Manual
Page 35
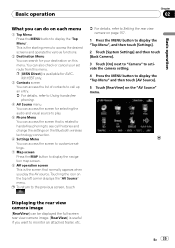
... screen for your set route from this menu. Displaying the rear view camera image [RearView] can be displayed the full-screen rear view camera image. [RearView] is the screen that is related to hands-free phoning to see call histories and change the settings on the Bluetooth wireless technology connection. 6 Settings Menu You can access the screen to customize settings. 7 Map screen Press the MAP button to display the navigation map screen. 8 AV operation screen This is useful...
... screen for your set route from this menu. Displaying the rear view camera image [RearView] can be displayed the full-screen rear view camera image. [RearView] is the screen that is related to hands-free phoning to see call histories and change the settings on the Bluetooth wireless technology connection. 6 Settings Menu You can access the screen to customize settings. 7 Map screen Press the MAP button to display the navigation map screen. 8 AV operation screen This is useful...
Operation Manual
Page 75
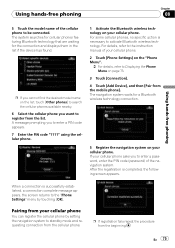
... to Displaying the Phone Menu on the "Phone Menu". = For details, refer to register from the mobile phone]. For details, refer to the instruction manual of your cellular phone. 2 Touch [Phone Settings] on page 73. 3 Touch [Connection]. 4 Touch [Add Device], and then [Pair from the list. Using hands-free phoning Chapter 08 Using hands-free phoning 5 Touch the model name of the cellular phone to activate Bluetooth wireless technology. For some cellular phones, no specific action...
... to Displaying the Phone Menu on the "Phone Menu". = For details, refer to register from the mobile phone]. For details, refer to the instruction manual of your cellular phone. 2 Touch [Phone Settings] on page 73. 3 Touch [Connection]. 4 Touch [Add Device], and then [Pair from the list. Using hands-free phoning Chapter 08 Using hands-free phoning 5 Touch the model name of the cellular phone to activate Bluetooth wireless technology. For some cellular phones, no specific action...
Operation Manual
Page 84
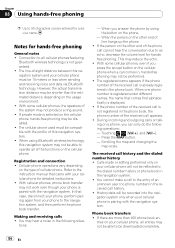
... phone for detailed instructions. ! tions: - Cellular phone operations vary depending on your phone to operate all entries may not work even though your phone is displayed. ! Notes for hands-free phoning General notes ! When using the button on the cellular phone, hands-free phoning may not produce a ring sound. ! In that case, disconnect your phone, perform pairing again from your cellular phone, all of an unknown user (no phone number) in the following operations...
... phone for detailed instructions. ! tions: - Cellular phone operations vary depending on your phone to operate all entries may not work even though your phone is displayed. ! Notes for hands-free phoning General notes ! When using the button on the cellular phone, hands-free phoning may not produce a ring sound. ! In that case, disconnect your phone, perform pairing again from your cellular phone, all of an unknown user (no phone number) in the following operations...
Operation Manual
Page 85
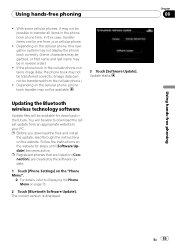
... one time. Depending on the website. Updating the Bluetooth wireless technology software Update files will be transferred from the cellular phone.) ! Using hands-free phoning Chapter 08 En 85 Follow the instructions on the website for download in the cellular phone contains image data, the phone book may not be available. 3 Touch [Software Update]. The current version is displayed. p Before you download the files and install the update...
... one time. Depending on the website. Updating the Bluetooth wireless technology software Update files will be transferred from the cellular phone.) ! Using hands-free phoning Chapter 08 En 85 Follow the instructions on the website for download in the cellular phone contains image data, the phone book may not be available. 3 Touch [Software Update]. The current version is displayed. p Before you download the files and install the update...

Operation Manual
Page 104
..., refer to Level 2 - Setting the code number and level When you set a parental lock level and then play a disc featuring parental lock, code number input indications may result in an unnatural picture. 1 Touch [DVD Setup] on the "Function" menu. = For details, refer to Displaying DVD Setup menu on the previous page. 2 Touch [TV Aspect]. The parental lock level is input. Level 1 - In this function only when you forget it to the rear display.) p When using a regular display, select either...
..., refer to Level 2 - Setting the code number and level When you set a parental lock level and then play a disc featuring parental lock, code number input indications may result in an unnatural picture. 1 Touch [DVD Setup] on the "Function" menu. = For details, refer to Displaying DVD Setup menu on the previous page. 2 Touch [TV Aspect]. The parental lock level is input. Level 1 - In this function only when you forget it to the rear display.) p When using a regular display, select either...

Operation Manual
Page 145
... Yes Yes No Used in another color, there is works normally. "Auto Correction" Synchronizes the internal clock of GPS antenna. En 145 In such case, check whether the connection and installation are correct. Touch the key to the appropriate time zone. Color Green Yellow Red Black with the accurate time transmitted from GPS (GMT). The "GPS Status" screen appears. 2 Touch [Time Settings]. Changing this system...
... Yes Yes No Used in another color, there is works normally. "Auto Correction" Synchronizes the internal clock of GPS antenna. En 145 In such case, check whether the connection and installation are correct. Touch the key to the appropriate time zone. Color Green Yellow Red Black with the accurate time transmitted from GPS (GMT). The "GPS Status" screen appears. 2 Touch [Time Settings]. Changing this system...
Operation Manual
Page 157
... whole screen changes to a rear view camera image during normal driving, switch to full-screen rear view camera. The "Camera Input" screen appears. 2 Touch [On] next to "Camera" to select the appropriate polarity setting. ! The navigation system checks the external storage device (USB, SD). If your vehicle. p You can only switch to "RearView" if this function is [On]. 3 Touch [Battery] or [GND] next to "Polarity" to activate the camera setting...
... whole screen changes to a rear view camera image during normal driving, switch to full-screen rear view camera. The "Camera Input" screen appears. 2 Touch [On] next to "Camera" to select the appropriate polarity setting. ! The navigation system checks the external storage device (USB, SD). If your vehicle. p You can only switch to "RearView" if this function is [On]. 3 Touch [Battery] or [GND] next to "Polarity" to activate the camera setting...

Operation Manual
Page 163
... than those in the selected range are set to play from the front or rear speakers, activate HPF (high pass filter). CD, ROM, DivX (for AVIC-X7115BT) ! Each time you do not want . High Using subwoofer output The navigation system is equipped with the level of the source you can be turned on page 160. 2 Touch [HPF] to select cut -off frequencies are selected in the following order...
... than those in the selected range are set to play from the front or rear speakers, activate HPF (high pass filter). CD, ROM, DivX (for AVIC-X7115BT) ! Each time you do not want . High Using subwoofer output The navigation system is equipped with the level of the source you can be turned on page 160. 2 Touch [HPF] to select cut -off frequencies are selected in the following order...

Operation Manual
Page 166
... "Dynamic Volume" in this setting. (When you use iPod, this setting is turned off , this setting only applies to the rear speaker leads.) Acquiring/Cataloging iPod music information If you update the iPod data, activate [VR Catalog Mode] again to Sub W, you do not use the product without using an auxiliary amp. Chapter 25 Customizing preferences ! Initially, the navigation system is completed, you can connect a rear speaker lead directly to a subwoofer without RCA rear output, this navigation...
... "Dynamic Volume" in this setting. (When you use iPod, this setting is turned off , this setting only applies to the rear speaker leads.) Acquiring/Cataloging iPod music information If you update the iPod data, activate [VR Catalog Mode] again to Sub W, you do not use the product without using an auxiliary amp. Chapter 25 Customizing preferences ! Initially, the navigation system is completed, you can connect a rear speaker lead directly to a subwoofer without RCA rear output, this navigation...
Operation Manual
Page 178
... authorized Pioneer service facility. racy. (GPS satellites are not being picked up properly. (This information is intended for the fuse blowing, then replace the fuse. navigation system doesn't oper- Rectify the reason for AVIC-X9115BT only.) Check that all connections are properly connected. on . porarily. Do not cover the GPS antenna with the same rating. Confirm once more that the cables are...
... authorized Pioneer service facility. racy. (GPS satellites are not being picked up properly. (This information is intended for the fuse blowing, then replace the fuse. navigation system doesn't oper- Rectify the reason for AVIC-X9115BT only.) Check that all connections are properly connected. on . porarily. Do not cover the GPS antenna with the same rating. Confirm once more that the cables are...

Operation Manual
Page 179
... set to "Installation Manual".) Indication of the position of AV source are used. No sounds of your vehicle is selected in your vehicle mounted securely in "Night mode". The volume level is disconnected. A speaker lead is low. Adjust the volume level. Turn the attenuator or mute off . Check the connection. The voice from the speakers and then picked -Lower the volume on the backlight. (Page 160) The source disc being listened to Select...
... set to "Installation Manual".) Indication of the position of AV source are used. No sounds of your vehicle is selected in your vehicle mounted securely in "Night mode". The volume level is disconnected. A speaker lead is low. Adjust the volume level. Turn the attenuator or mute off . Check the connection. The voice from the speakers and then picked -Lower the volume on the backlight. (Page 160) The source disc being listened to Select...

Operation Manual
Page 180
... Menu" and then select the correct polarity setting for iPod is inserted upside down. secured. Press the MAP button, and then press the MENU button to return to Page 194.) The screen is covered by -frame playback with DVD-Video. The external storage device (USB, SD) cannot be used . The disc is not con- file format. Problems in [R] when the rear view camera was not connected. sible. cable side...
... Menu" and then select the correct polarity setting for iPod is inserted upside down. secured. Press the MAP button, and then press the MENU button to return to Page 194.) The screen is covered by -frame playback with DVD-Video. The external storage device (USB, SD) cannot be used . The disc is not con- file format. Problems in [R] when the rear view camera was not connected. sible. cable side...

Operation Manual
Page 181
... Mode] to catalog/transfer the music in a safe place, and turn the power to "Acc off or change the level. (Page 104) Parental lock for that kind of range for service. Update the iPod software version. If you said is out of protection signal is not with in [DVD Setup]. dated, but the data on this does not solve the problem, press the RESET button...
... Mode] to catalog/transfer the music in a safe place, and turn the power to "Acc off or change the level. (Page 104) Parental lock for that kind of range for service. Update the iPod software version. If you said is out of protection signal is not with in [DVD Setup]. dated, but the data on this does not solve the problem, press the RESET button...
Operation Manual
Page 185
... iPod basic screen (Music) until "iPod VR activation process complete." secured by DRM. storage device are Replace the disc. The USB connector or USB cable is not caught in something or da- power supply is not supported. USB cable is Confirm that can be played back. Connected iPod is also unavail- navigation system. Once iPod main menu is trying to acquire the information needed to use it. appears. • Switch the screen to another screen to play...
... iPod basic screen (Music) until "iPod VR activation process complete." secured by DRM. storage device are Replace the disc. The USB connector or USB cable is not caught in something or da- power supply is not supported. USB cable is Confirm that can be played back. Connected iPod is also unavail- navigation system. Once iPod main menu is trying to acquire the information needed to use it. appears. • Switch the screen to another screen to play...


