
Installation Manual
Page 18
... can change it in "Sound and Warnings" settings. = For details, refer to Setting the volume and the guidance voice for navigation system on page 55. 8 If needed, modify the time format and unit settings, then touch [Next]. 18 En p Later you can change it in "Regional" settings. = For details, refer to Customizing...
... can change it in "Sound and Warnings" settings. = For details, refer to Setting the volume and the guidance voice for navigation system on page 55. 8 If needed, modify the time format and unit settings, then touch [Next]. 18 En p Later you can change it in "Regional" settings. = For details, refer to Customizing...

Installation Manual
Page 45
... lines to enable more hazard types if the vehicle carries dangerous material. You can be calculated. Route Planning Method: En 45 The unit for Each Route Planning: When enabled, the list of your vehicle when used in "Regional" settings. ! Fuel Consumption on Highways:..., refer to rename the profile. ! This helps you travel cost calculation. p While this key to Screen switching overview on the map. Navigation Mode: On-road navigation creates a turn by turn itinerary using the road network on page 20. 2 Touch [More...], then [Settings]. 3 Touch [Route Settings]....
... lines to enable more hazard types if the vehicle carries dangerous material. You can be calculated. Route Planning Method: En 45 The unit for Each Route Planning: When enabled, the list of your vehicle when used in "Regional" settings. ! Fuel Consumption on Highways:..., refer to rename the profile. ! This helps you travel cost calculation. p While this key to Screen switching overview on the map. Navigation Mode: On-road navigation creates a turn by turn itinerary using the road network on page 20. 2 Touch [More...], then [Settings]. 3 Touch [Route Settings]....
Installation Manual
Page 62
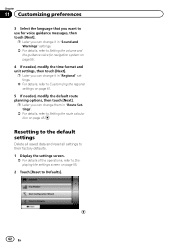
p Later you want to use for navigation system on page 55. 4 If needed , modify the default route planning options, then touch [Next]. p Later you can change it in "Sound and Warnings" settings. = ... to Displaying the settings screen on page 55. 2 Touch [Reset to Customizing the regional settings on page 61. 5 If needed , modify the time format and unit settings, then touch [Next]. Chapter 11 Customizing preferences 3 Select the language that you can change them in "Route Settings". = For details, refer to Setting the...
p Later you want to use for navigation system on page 55. 4 If needed , modify the default route planning options, then touch [Next]. p Later you can change it in "Sound and Warnings" settings. = ... to Displaying the settings screen on page 55. 2 Touch [Reset to Customizing the regional settings on page 61. 5 If needed , modify the time format and unit settings, then touch [Next]. Chapter 11 Customizing preferences 3 Select the language that you can change them in "Route Settings". = For details, refer to Setting the...

Installation Manual
Page 63
...contents of the operations, refer to show when stopped by the police. ! En 63 The "Navigation Menu" screen appears. = For details of the application. Clothing: Access travel applications: the unit converter helps you need to Screen switching overview on the map screen. Country Information: Select a ... page 20. 2 Touch [More...]. 3 Touch the desired menu item. ! You can be exported to save the trip logs for later use navigation for regular car maintenance. ! Fuel Consumption: The Fuel consumption monitor helps you keep track of the consumption of your car even if you in ...
...contents of the operations, refer to show when stopped by the police. ! En 63 The "Navigation Menu" screen appears. = For details of the application. Clothing: Access travel applications: the unit converter helps you need to Screen switching overview on the map screen. Country Information: Select a ... page 20. 2 Touch [More...]. 3 Touch the desired menu item. ! You can be exported to save the trip logs for later use navigation for regular car maintenance. ! Fuel Consumption: The Fuel consumption monitor helps you keep track of the consumption of your car even if you in ...

Installation Manual
Page 65
... than one product together with the ground from the ground of high-current products such as you must separately ground any amp unit away from the ground of the same color to the corresponding colored port, i.e., blue connector to the blue port, black ...the fuse, be installed in a vehicle without ACC (accessory) position on this unit with insulating tape. When disconnecting a connector, pull the connector itself. It is ground. Installation Chapter 13 Installation Before installing this navigation system. Use this product. ! Connecting grounds together can cause a fire and/...
... than one product together with the ground from the ground of high-current products such as you must separately ground any amp unit away from the ground of the same color to the corresponding colored port, i.e., blue connector to the blue port, black ...the fuse, be installed in a vehicle without ACC (accessory) position on this unit with insulating tape. When disconnecting a connector, pull the connector itself. It is ground. Installation Chapter 13 Installation Before installing this navigation system. Use this product. ! Connecting grounds together can cause a fire and/...
Installation Manual
Page 67
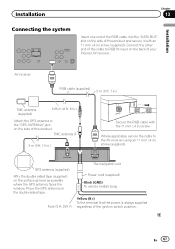
... it with an 11 mm (.4 in) screw (supplied). Connect the other end of the cable to the "GPS ANTENNA" jack on the side of your Pioneer AV receiver. AV receiver RGB cable (supplied) 2 m (6 ft. 7 in.) TMC antenna (supplied) 2.65 m (8 ft. 8 in ) screw (supplied). Place the ... product. En 67 GPS antenna (supplied) Affix the double-sided tape (supplied) on the double-sided tape. Fuse (3 A, 250 V) FUSE The navigation unit Power cord (supplied) Black (GND) To vehicle (metal) body. Installation Chapter 13 Installation Connecting the system Insert one end of the RGB cable into...
... it with an 11 mm (.4 in) screw (supplied). Connect the other end of the cable to the "GPS ANTENNA" jack on the side of your Pioneer AV receiver. AV receiver RGB cable (supplied) 2 m (6 ft. 7 in.) TMC antenna (supplied) 2.65 m (8 ft. 8 in ) screw (supplied). Place the ... product. En 67 GPS antenna (supplied) Affix the double-sided tape (supplied) on the double-sided tape. Fuse (3 A, 250 V) FUSE The navigation unit Power cord (supplied) Black (GND) To vehicle (metal) body. Installation Chapter 13 Installation Connecting the system Insert one end of the RGB cable into...
Installation Manual
Page 68
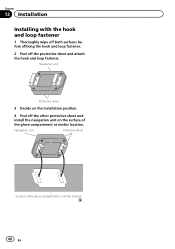
Navigation unit Protective sheet 3 Decide on the surface of the glove compartment or similar location 68 En Chapter 13 Installation Installing with the hook and loop fastener 1 Thoroughly wipe off both surfaces before affixing the hook and loop fastener. 2 Peel off the other protective sheet and install the navigation unit on the installation position. 4 Peel off the protective sheet and attach the hook and loop fastener. Navigation unit Protective sheet Surface of the glove compartment or similar location.
Navigation unit Protective sheet 3 Decide on the surface of the glove compartment or similar location 68 En Chapter 13 Installation Installing with the hook and loop fastener 1 Thoroughly wipe off both surfaces before affixing the hook and loop fastener. 2 Peel off the other protective sheet and install the navigation unit on the installation position. 4 Peel off the protective sheet and attach the hook and loop fastener. Navigation unit Protective sheet Surface of the glove compartment or similar location.


