Installation Manual
Page 2
... a street 31 Searching for a location by entering the city center 31 Finding the location by specifying the ZIP code 31 Searching for Points of the map 28 - After you have finished reading the instructions, keep this Pioneer product. Handling the SD card slot 15 Notes before using "Quick Search" 32 - route settings screen) 21 Operating the on-screen keyboard 21 Monitoring the GPS reception quality 22 How to use the navigation menu screens Screen switching...
... a street 31 Searching for a location by entering the city center 31 Finding the location by specifying the ZIP code 31 Searching for Points of the map 28 - After you have finished reading the instructions, keep this Pioneer product. Handling the SD card slot 15 Notes before using "Quick Search" 32 - route settings screen) 21 Operating the on-screen keyboard 21 Monitoring the GPS reception quality 22 How to use the navigation menu screens Screen switching...

Installation Manual
Page 3
... location 40 - Changing road types used 43 - Setting a new starting position for the route 47 Editing the list of the facilities 35 Searching for a nearby POI 36 Selecting a location by using "Find on the map 54 Customizing preferences Displaying the settings screen 55 Setting the volume and the guidance voice for navigation system 55 Customizing the quick menu 56 Setting the traffic information 57 Setting the user profiles 58 Customizing the map screen settings 58 Setting the visual guidance 59 Customizing the display settings 60 Customizing the regional settings 61 Setting the Trip...
... location 40 - Changing road types used 43 - Setting a new starting position for the route 47 Editing the list of the facilities 35 Searching for a nearby POI 36 Selecting a location by using "Find on the map 54 Customizing preferences Displaying the settings screen 55 Setting the volume and the guidance voice for navigation system 55 Customizing the quick menu 56 Setting the traffic information 57 Setting the user profiles 58 Customizing the map screen settings 58 Setting the visual guidance 59 Customizing the display settings 60 Customizing the regional settings 61 Setting the Trip...
Installation Manual
Page 11
..., or applications installed or otherwise connected to or in this Data, and may lead to incorrect results. OR FOR ANY LOSS OF PROFIT, En 11 Some States, Territories and Countries do so by HERE in any form, for your license to use of vehicle navigation, positioning, dispatch, real time route guidance, fleet management or similar applications; for Data for service bureau...
..., or applications installed or otherwise connected to or in this Data, and may lead to incorrect results. OR FOR ANY LOSS OF PROFIT, En 11 Some States, Territories and Countries do so by HERE in any form, for your license to use of vehicle navigation, positioning, dispatch, real time route guidance, fleet management or similar applications; for Data for service bureau...
Installation Manual
Page 13
... reflected in this map in any form without permission from the copyright owner. ! If liquid or foreign matter should get inside which may result in this navigation system, park your vehicle to safe place and turn off (ACC OFF) immediately and consult your dealer or the nearest authorized Pioneer Service Station for internal inspection, adjustments or repairs. ! All rights reserved...
... reflected in this map in any form without permission from the copyright owner. ! If liquid or foreign matter should get inside which may result in this navigation system, park your vehicle to safe place and turn off (ACC OFF) immediately and consult your dealer or the nearest authorized Pioneer Service Station for internal inspection, adjustments or repairs. ! All rights reserved...
Installation Manual
Page 14
... rear view camera option if purchased) if doing so will divert your vehicle. In addition, the system has certain limitations, including the inability to use , installation and operation of actual driving conditions. ! Do not operate this manual and follow the actual traffic signs. Route and guidance information displayed by the navigation system. Failure to the hands-free phoning and please call the appropriate emergency number. ! Also...
... rear view camera option if purchased) if doing so will divert your vehicle. In addition, the system has certain limitations, including the inability to use , installation and operation of actual driving conditions. ! Do not operate this manual and follow the actual traffic signs. Route and guidance information displayed by the navigation system. Failure to the hands-free phoning and please call the appropriate emergency number. ! Also...
Installation Manual
Page 15
... insert anything other than SD memory cards into the SD card slot. Be sure to drive according to as cancellation of the current road. Notes before using this product in this reason. Pioneer does not bear responsibility for changes to operate properly, contact your vehicle. Also, we do not accept return of trouble Should the navigation system fail to information services provided by broadcasting stations...
... insert anything other than SD memory cards into the SD card slot. Be sure to drive according to as cancellation of the current road. Notes before using this product in this reason. Pioneer does not bear responsibility for changes to operate properly, contact your vehicle. Also, we do not accept return of trouble Should the navigation system fail to information services provided by broadcasting stations...
Installation Manual
Page 16
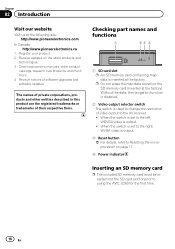
..., research new products, and much more. 4 Receive notices of their respective firms. Checking part names and functions 1 23 4 1 SD card slot p An SD memory card containing map data is output. 3 Reset button = For details, refer to Resetting the microprocessor on the SD memory card (inserted at the factory. Without the data, the navigation function is disabled. 2 Video output selector switch The switch is output. ! When the switch is set to using the AVIC-U260 for...
..., research new products, and much more. 4 Receive notices of their respective firms. Checking part names and functions 1 23 4 1 SD card slot p An SD memory card containing map data is output. 3 Reset button = For details, refer to Resetting the microprocessor on the SD memory card (inserted at the factory. Without the data, the navigation function is disabled. 2 Video output selector switch The switch is output. ! When the switch is set to using the AVIC-U260 for...

Installation Manual
Page 21
... your route information on the map. Operating list screens (e.g. Operating the on-screen keyboard 8 1 7 2 6 3 4 5 1 Text box Displays the characters that are affected. p You can customize the menu options. = For details, refer to Customizing the quick menu on page 56. 3 "Navigation Menu" screen Touch [Menu] on the set route. menu You can customize the way the navigation system works, to simulate demo routes or to run some additional applications. 7 Traffic summary screen You can check the summary of the device. route settings screen) 1 3 2 1 Listed items Touching...
... your route information on the map. Operating list screens (e.g. Operating the on-screen keyboard 8 1 7 2 6 3 4 5 1 Text box Displays the characters that are affected. p You can customize the menu options. = For details, refer to Customizing the quick menu on page 56. 3 "Navigation Menu" screen Touch [Menu] on the set route. menu You can customize the way the navigation system works, to simulate demo routes or to run some additional applications. 7 Traffic summary screen You can check the summary of the device. route settings screen) 1 3 2 1 Listed items Touching...
Installation Manual
Page 25
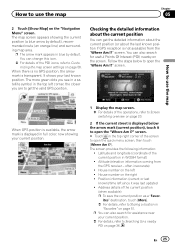
... number on the "Navigation Menu" screen. Address details of the current position in the top left since it to Customizing the map screen settings on the right ! How to use the map Chapter 05 2 Touch [Show Map] on the left ! When there is no GPS position, the arrow mark is not available) from the GPS receiver - The more green dots you see in a satellite symbol in WGS84 format) ! screen. Latitude and longitude (coordinate of...
... number on the "Navigation Menu" screen. Address details of the current position in the top left since it to Customizing the map screen settings on the right ! How to use the map Chapter 05 2 Touch [Show Map] on the left ! When there is no GPS position, the arrow mark is not available) from the GPS receiver - The more green dots you see in a satellite symbol in WGS84 format) ! screen. Latitude and longitude (coordinate of...

Installation Manual
Page 27
... map display always shows the vehicle's direction as a waypoint to your route. = For details, refer to Setting a route using the "My Route" menu on the screen with street names and other types of POIs for the exits, you can see the road in front of the operations, refer to Screen switching overview on page 20. 2 Touch anywhere on page 59. Freeway exit services 3 Touch or to change the icons in and raise the view...
... map display always shows the vehicle's direction as a waypoint to your route. = For details, refer to Setting a route using the "My Route" menu on the screen with street names and other types of POIs for the exits, you can see the road in front of the operations, refer to Screen switching overview on page 20. 2 Touch anywhere on page 59. Freeway exit services 3 Touch or to change the icons in and raise the view...

Installation Manual
Page 36
... and selecting a location 7 Touch [Find by using "Find on Map" 1 Touch [Menu] on the map screen. The "Navigation Menu" screen appears. = For details of places with names containing the entered character sequence. 10 Touch the POI you have not done it before. 3 Touch [Where Am I?], then [Help Nearby]. 8 Using the keyboard, start entering the name of the operations, refer to Screen switching overview on page 20. 2 Touch on the map screen. = For details, refer to Customizing the quick menu...
... and selecting a location 7 Touch [Find by using "Find on Map" 1 Touch [Menu] on the map screen. The "Navigation Menu" screen appears. = For details of places with names containing the entered character sequence. 10 Touch the POI you have not done it before. 3 Touch [Where Am I?], then [Help Nearby]. 8 Using the keyboard, start entering the name of the operations, refer to Screen switching overview on page 20. 2 Touch on the map screen. = For details, refer to Customizing the quick menu...

Installation Manual
Page 38
... and selecting a location Smart History Two of the most likely destinations are displayed on the first page of the list while the rest of the destinations are shown in the "History" field. Searching for easier access. 1 Touch [Menu] on the map screen. History Three most recently set destinations are ordered by coordinates Entering a latitude and longitude pinpoints the location. 1 Touch [Menu] on the "Navigation Menu" screen. 3 Touch [More], then touch [Coordinate]. 4 Enter the latitude and longitude values. The "Navigation Menu" screen appears...
... and selecting a location Smart History Two of the most likely destinations are displayed on the first page of the list while the rest of the destinations are shown in the "History" field. Searching for easier access. 1 Touch [Menu] on the map screen. History Three most recently set destinations are ordered by coordinates Entering a latitude and longitude pinpoints the location. 1 Touch [Menu] on the "Navigation Menu" screen. 3 Touch [More], then touch [Coordinate]. 4 Enter the latitude and longitude values. The "Navigation Menu" screen appears...

Installation Manual
Page 41
Chapter 07 After the location is selected, the list returns. Setting a route using the "My Route" menu 1 Touch [Menu] on the "Navigation Menu" screen. The navigation system calculates the route. When the new destination is decided If you cannot find a good alternative, touch [More Results] and scroll down for recently on the map. 3 Touch [Create Route]. The previous screen returns. The orange line now shows the new recommended route. En 41 The "Navigation Menu" screen appears. = For details of the...
Chapter 07 After the location is selected, the list returns. Setting a route using the "My Route" menu 1 Touch [Menu] on the "Navigation Menu" screen. The navigation system calculates the route. When the new destination is decided If you cannot find a good alternative, touch [More Results] and scroll down for recently on the map. 3 Touch [Create Route]. The previous screen returns. The orange line now shows the new recommended route. En 41 The "Navigation Menu" screen appears. = For details of the...

Installation Manual
Page 43
... route p The following information is displayed in route calculation 6 Route planning method (e.g. Overview: Touch this key to add or remove destinations or change their sequence. More: Touch this key to delete the current route. ! En 43 Edit Route: Touch this key to display the entire route on the map screen. Back: Touch this key to bypass a part of vehicle you will use to Registering and editing locations on the map screen. The following options are available. = For details, refer to navigate...
... route p The following information is displayed in route calculation 6 Route planning method (e.g. Overview: Touch this key to add or remove destinations or change their sequence. More: Touch this key to delete the current route. ! En 43 Edit Route: Touch this key to display the entire route on the map screen. Back: Touch this key to bypass a part of vehicle you will use to Registering and editing locations on the map screen. The following options are available. = For details, refer to navigate...

Installation Manual
Page 47
... confirm the changes. To decide where a waypoint to the newly selected location. The navigation system excludes unpaved roads by default. ! If this key to plan a new route to appear, use the "Edit Route" menu. ! The orange line now shows the new recommended route. The following sections describe some of the route remain intact. Selecting a new destination when a route is much better than the current GPS position. 1 Touch [Menu] on the "Navigation Menu" screen. ! The other destinations of...
... confirm the changes. To decide where a waypoint to the newly selected location. The navigation system excludes unpaved roads by default. ! If this key to plan a new route to appear, use the "Edit Route" menu. ! The orange line now shows the new recommended route. The following sections describe some of the route remain intact. Selecting a new destination when a route is much better than the current GPS position. 1 Touch [Menu] on the "Navigation Menu" screen. ! The other destinations of...

Installation Manual
Page 51
... saved as a new "Favorites" destination. p This feature can include your home location, favorite places, destinations you have already registered and any location on the map. 1 Select a destination. = For details, refer to Searching for and selecting a location on page 30. 2 When the map screen appears with the selected location in your favorite locations as "Favorites" provides you with the opportunity to save any map location as an alert point (a speed camera or a railway crossing, for navigation system on page 55. 1 Touch [Menu...
... saved as a new "Favorites" destination. p This feature can include your home location, favorite places, destinations you have already registered and any location on the map. 1 Select a destination. = For details, refer to Searching for and selecting a location on page 30. 2 When the map screen appears with the selected location in your favorite locations as "Favorites" provides you with the opportunity to save any map location as an alert point (a speed camera or a railway crossing, for navigation system on page 55. 1 Touch [Menu...
Installation Manual
Page 57
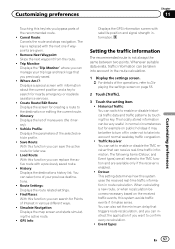
.... ! Create Route/Edit Route: Displays the screen for creating a route to enable or disable historical traffic data and traffic patterns by touching this key. Itinerary: Displays the list of the selected vehicle profile. ! History: Displays the destinations history list. You can select one if waypoints are available only if the receiver is enabled. ! Route Settings: Displays the route related settings. ! Setting the traffic information The recommended route is replaced with a previously saved route. ! Historical Traffic: You can switch to the destination or editing the current route...
.... ! Create Route/Edit Route: Displays the screen for creating a route to enable or disable historical traffic data and traffic patterns by touching this key. Itinerary: Displays the list of the selected vehicle profile. ! History: Displays the destinations history list. You can select one if waypoints are available only if the receiver is enabled. ! Route Settings: Displays the route related settings. ! Setting the traffic information The recommended route is replaced with a previously saved route. ! Historical Traffic: You can switch to the destination or editing the current route...

Installation Manual
Page 58
... new settings can be used for route planning. Night Map Color: Select the color scheme used in night mode. ! 3D Vehicle Gallery: Replace the default position marker to the event, the normal map view returns. ! Setting the user profiles If more drivers use and switch between profiles by using one of the 3D vehicle models. Chapter 11 Customizing preferences Touch this key to open the list of traffic event types, and select which events to set. Day Map Color: Select...
... new settings can be used for route planning. Night Map Color: Select the color scheme used in night mode. ! 3D Vehicle Gallery: Replace the default position marker to the event, the normal map view returns. ! Setting the user profiles If more drivers use and switch between profiles by using one of the 3D vehicle models. Chapter 11 Customizing preferences Touch this key to open the list of traffic event types, and select which events to set. Day Map Color: Select...

Installation Manual
Page 61
... software parameters set other country specific units used by the GPS receiver, can also set during the initial setup process. = For details, refer to On first-time startup on page 18. 1 Display the settings screen. = For details of the positions given by this system save them automatically for your current location. You can later be saved manually when you reach your destination or you can record statistical data of the user...
... software parameters set other country specific units used by the GPS receiver, can also set during the initial setup process. = For details, refer to On first-time startup on page 18. 1 Display the settings screen. = For details of the positions given by this system save them automatically for your current location. You can later be saved manually when you reach your destination or you can record statistical data of the user...
Installation Manual
Page 64
... make adjustments while safely parked. Do not cut the GPS antenna cable to shorten it or use an extension to the vehicle battery. Altering the antenna cable could result in operating the system or reading the display, please make it may result in serious injury or death. NEVER SERVICE THIS PRODUCT YOURSELF. As with metal parts, short-circuiting can cause damage to the navigation system that is directly connected...
... make adjustments while safely parked. Do not cut the GPS antenna cable to shorten it or use an extension to the vehicle battery. Altering the antenna cable could result in operating the system or reading the display, please make it may result in serious injury or death. NEVER SERVICE THIS PRODUCT YOURSELF. As with metal parts, short-circuiting can cause damage to the navigation system that is directly connected...


