Owner's Manual
Page 119
.... The CD format cannot be returned to turn on the Hardware Manual.) Replace disc. (Refer to appropriate slot.(➞ About CD loading slot and DVD-ROM loading slot ➞ Hardware Manual ) Insert the disc with the label upward. Parking brake interlock is inserted upside down. There was not connected. When the shift lever is in...
.... The CD format cannot be returned to turn on the Hardware Manual.) Replace disc. (Refer to appropriate slot.(➞ About CD loading slot and DVD-ROM loading slot ➞ Hardware Manual ) Insert the disc with the label upward. Parking brake interlock is inserted upside down. There was not connected. When the shift lever is in...

Owner's Manual
Page 120
...may be installed within the allowed installation angle. Message Please insert the appropriate disc. This is not available now. Please power off the system and check the installation. System will not be affected by your nearest Pioneer service facility. After you try the operation again. 118...is ready to learn without connecting the speed signal input, the precision of the installation has been changed . Clean the disc. Please insert the appropriate disc. After you may see error messages other than those shown here. Please keep in off the power, and then contact...
...may be installed within the allowed installation angle. Message Please insert the appropriate disc. This is not available now. Please power off the system and check the installation. System will not be affected by your nearest Pioneer service facility. After you try the operation again. 118...is ready to learn without connecting the speed signal input, the precision of the installation has been changed . Clean the disc. Please insert the appropriate disc. After you may see error messages other than those shown here. Please keep in off the power, and then contact...

Owner's Manual
Page 122
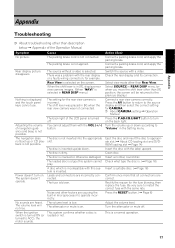
... register again. If the history data of the City could not be established by inserting a clean DVD Map Disc. Areas not stored on the DVD Map Disc, or replace the DVD Map Disc and perform the search again. In this case, try to the destination (or way point) ...can be searched. Try re-reading the data by bypassing toll roads (including toll areas). Please insert appropriate disc. Insert the DVD Map Disc containing that house number does not exist on the DVD Map Disc (unrecorded areas). NAVI/AV Appendix Message Toll road has not been avoided. The address does not...
... register again. If the history data of the City could not be established by inserting a clean DVD Map Disc. Areas not stored on the DVD Map Disc, or replace the DVD Map Disc and perform the search again. In this case, try to the destination (or way point) ...can be searched. Try re-reading the data by bypassing toll roads (including toll areas). Please insert appropriate disc. Insert the DVD Map Disc containing that house number does not exist on the DVD Map Disc (unrecorded areas). NAVI/AV Appendix Message Toll road has not been avoided. The address does not...

Hardware Manual
Page 14
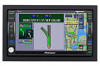
... Page 8 6 Joystick Move to open or close the LCD panel and access the CD and DVD-ROM loading slot. i DVD-ROM loading slot Insert a DVD Map Disc. a INFO button Press to display the Info/Traffic menu. When the XM tuner is turned on by selecting a source. This button flashes when ... length of time of pressing this button while it is selected*: Press and hold this channel to assign preset. Select XM audio source, and find appropriate Instant Traffic & Weather channel. How to Use Navigation System and Names of the Parts Chapter 1 4 SRC (SOURCE) button This unit is not connected...
... Page 8 6 Joystick Move to open or close the LCD panel and access the CD and DVD-ROM loading slot. i DVD-ROM loading slot Insert a DVD Map Disc. a INFO button Press to display the Info/Traffic menu. When the XM tuner is turned on by selecting a source. This button flashes when ... length of time of pressing this button while it is selected*: Press and hold this channel to assign preset. Select XM audio source, and find appropriate Instant Traffic & Weather channel. How to Use Navigation System and Names of the Parts Chapter 1 4 SRC (SOURCE) button This unit is not connected...
Hardware Manual
Page 19
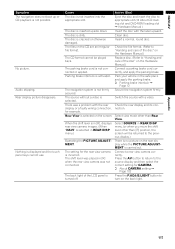
...Action (See) Connect a parking brake cord, and apply the parking brake. Check the rear display and its connection. Eject the disc and insert the disc to the source display and then select the correct setting for the fuse blowing, then replace the fuse. ROM loading slot ➞... About CAMERA setting ➞ Operation Manual Press the P.ADJ/B.LIGHT button to operate incorrectly. The parking brake is not inserted into the appropriate slot. The disc is not applied. The disc is turned ON (or turned to "Volume" in REAR DISP menu.) The setting for example. Connect a parking brake...
...Action (See) Connect a parking brake cord, and apply the parking brake. Check the rear display and its connection. Eject the disc and insert the disc to the source display and then select the correct setting for the fuse blowing, then replace the fuse. ROM loading slot ➞... About CAMERA setting ➞ Operation Manual Press the P.ADJ/B.LIGHT button to operate incorrectly. The parking brake is not inserted into the appropriate slot. The disc is not applied. The disc is turned ON (or turned to "Volume" in REAR DISP menu.) The setting for example. Connect a parking brake...

