Owner's Manual
Page 14
... 19 Features of Your DVD Navigation System 21 How to Read This Manual 22 How to use this manual 22 Operation of DVD player 22 Terminology...23 For "AVIC-9DVD" users 23 Dipswitch settings for U.S.A 2 PIONEER AVIC-90DVD (CNDV-20) - Table of the map 40 Moving the map to the location you do not know how...
... 19 Features of Your DVD Navigation System 21 How to Read This Manual 22 How to use this manual 22 Operation of DVD player 22 Terminology...23 For "AVIC-9DVD" users 23 Dipswitch settings for U.S.A 2 PIONEER AVIC-90DVD (CNDV-20) - Table of the map 40 Moving the map to the location you do not know how...
Owner's Manual
Page 15
... display and voice 57 Confirming Traffic Information Ahead on the Set Route 59 Avoiding traffic ahead on the set route 59 When confirming traffic information manually 60 Recalculating the Route to Your Destination 61 Cancelling the Route Guidance 62 Delete the current route, and cancel the route guidance 62 Changing your...
... display and voice 57 Confirming Traffic Information Ahead on the Set Route 59 Avoiding traffic ahead on the set route 59 When confirming traffic information manually 60 Recalculating the Route to Your Destination 61 Cancelling the Route Guidance 62 Delete the current route, and cancel the route guidance 62 Changing your...
Owner's Manual
Page 21
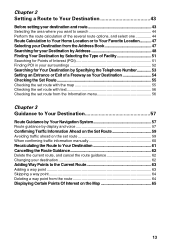
... information about the local time may not include a comprehensive list of destinations you have read and fully understand the following safety information: • Read the manual before operating this Navigation System. • This Navigation System is intended solely as the history of emergency service facilities. • Route and guidance information displayed...
... information about the local time may not include a comprehensive list of destinations you have read and fully understand the following safety information: • Read the manual before operating this Navigation System. • This Navigation System is intended solely as the history of emergency service facilities. • Route and guidance information displayed...
Owner's Manual
Page 23
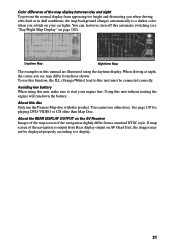
... map display between day and night To prevent the normal display from appearing too bright and distracting you when driving after dark or in this manual are illustrated using this unit, make sure to a display. 21 You can, however, turn off this automatic switching (see may not be connected correctly. To...
... map display between day and night To prevent the normal display from appearing too bright and distracting you when driving after dark or in this manual are illustrated using this unit, make sure to a display. 21 You can, however, turn off this automatic switching (see may not be connected correctly. To...
Owner's Manual
Page 25
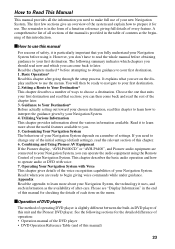
...different between the built-in the end of this unit and the Pioneer DVD player. You will then be ready to navigate to you see "Display Information" in DVD player of this manual) 23 Utilizing Various Information This chapter provides information about the useful... features available to your first destination. 1. Combining and Using Pioneer AV Equipment If the Pioneer display, "AVH-P6400CD" or "AVH-P6400", and Pioneer audio equipment are ready to ...
...different between the built-in the end of this unit and the Pioneer DVD player. You will then be ready to navigate to you see "Display Information" in DVD player of this manual) 23 Utilizing Various Information This chapter provides information about the useful... features available to your first destination. 1. Combining and Using Pioneer AV Equipment If the Pioneer display, "AVH-P6400CD" or "AVH-P6400", and Pioneer audio equipment are ready to ...
Owner's Manual
Page 26
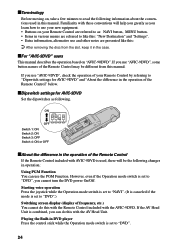
... use and other notes are referred to as following information about the conventions used in the case. ■For "AVIC-9DVD" users This manual describes the operation based on "AVIC-90DVD". If the AV Head Unit is set to "DVD". 24 ■Terminology Before moving on, take a few minutes...Switching screen display (display of the Remote Control" below. ■Dipswitch settings for AVIC-9DVD" and "About the difference in operation: Using PGM Function You can do this manual. If you can use "AVIC-9DVD", check the operation of the Remote Control may be the following changes in ...
... use and other notes are referred to as following information about the conventions used in the case. ■For "AVIC-9DVD" users This manual describes the operation based on "AVIC-90DVD". If the AV Head Unit is set to "DVD". 24 ■Terminology Before moving on, take a few minutes...Switching screen display (display of the Remote Control" below. ■Dipswitch settings for AVIC-9DVD" and "About the difference in operation: Using PGM Function You can do this manual. If you can use "AVIC-9DVD", check the operation of the Remote Control may be the following changes in ...
Owner's Manual
Page 62
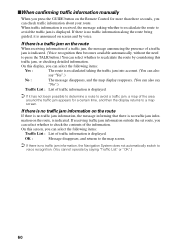
... the route If there is no traffic jam information, the message informing that there is displayed. ■When confirming traffic information manually When you press the GUIDE button on the Remote Control for a certain time, and then the display returns to a map screen. On this display, you...
... the route If there is no traffic jam information, the message informing that there is displayed. ■When confirming traffic information manually When you press the GUIDE button on the Remote Control for a certain time, and then the display returns to a map screen. On this display, you...

Owner's Manual
Page 69
.... Chapter 4 Utilizing Various Information 3 Select "Registration" and click the OK button. destinations and way points you must register it manually as Destination History. When the number of the Address Book. • Last Destination - Once the location is also automatically registered ...Book, you have searched in the Address Book and move the joystick to ensure that a particular location is overwritten automatically. a manually registered location, such as your home, your Registered Locations. Utilizing Various Information 4 Chapter Editing the Address Book The Address Book...
.... Chapter 4 Utilizing Various Information 3 Select "Registration" and click the OK button. destinations and way points you must register it manually as Destination History. When the number of the Address Book. • Last Destination - Once the location is also automatically registered ...Book, you have searched in the Address Book and move the joystick to ensure that a particular location is overwritten automatically. a manually registered location, such as your home, your Registered Locations. Utilizing Various Information 4 Chapter Editing the Address Book The Address Book...
Owner's Manual
Page 78
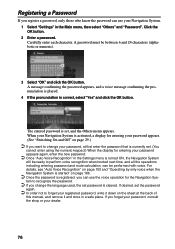
... "Auto Voice Recognition" in the Settings menu is cleared. tem to recognize the password. ➲ If you change your password, at the back of this manual, and remove it down on page 29.) ➲ If you want to change the language used, the set the password again. ➲ In order not...
... "Auto Voice Recognition" in the Settings menu is cleared. tem to recognize the password. ➲ If you change your password, at the back of this manual, and remove it down on page 29.) ➲ If you want to change the language used, the set the password again. ➲ In order not...
Owner's Manual
Page 83
For details, see "When confirming traffic information manually" on page 60. ➲ You can also call up the traffic information list by the color of the characters and display/non-display of ...
For details, see "When confirming traffic information manually" on page 60. ➲ You can also call up the traffic information list by the color of the characters and display/non-display of ...
Owner's Manual
Page 86
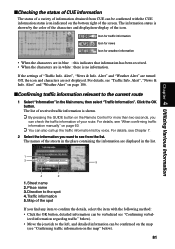
... is poor, you want to continue to search for another station, repeat this unit automatically tunes to the radio station to another station manually. Tuning to a radio station with a good reception is found, the tuning mode is stopped and the tuned frequency is stored in ...a radio station" below). ➲ If you can tune to a selected radio station, a map of 200kHz). After switching to available radio stations manually (by the step of your surroundings appears. 84 If desired, check the information. ■Selecting the radio station CUE-Receiver connected to the trace ...
... is poor, you want to continue to search for another station, repeat this unit automatically tunes to the radio station to another station manually. Tuning to a radio station with a good reception is found, the tuning mode is stopped and the tuned frequency is stored in ...a radio station" below). ➲ If you can tune to a selected radio station, a map of 200kHz). After switching to available radio stations manually (by the step of your surroundings appears. 84 If desired, check the information. ■Selecting the radio station CUE-Receiver connected to the trace ...
Owner's Manual
Page 88
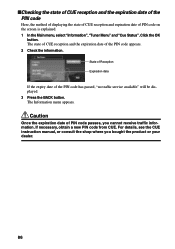
.... 1 In the Main menu, select "Information","Tuner Menu" and "Cue Status". If necessary, obtain a new PIN code from CUE. For details, see the CUE instruction manual, or consult the shop where you cannot receive traffic information. State of Reception Expiration date If the expiry date of the PIN code appears...
.... 1 In the Main menu, select "Information","Tuner Menu" and "Cue Status". If necessary, obtain a new PIN code from CUE. For details, see the CUE instruction manual, or consult the shop where you cannot receive traffic information. State of Reception Expiration date If the expiry date of the PIN code appears...
Owner's Manual
Page 89
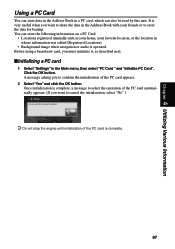
Click the OK button. You can store the following information on a PC Card: • Locations registered manually such as described next. ■Initializing a PC card 1 Select "Settings" in a PC card, which can also be read by this unit. Chapter 4 Utilizing Various Information ...
Click the OK button. You can store the following information on a PC Card: • Locations registered manually such as described next. ■Initializing a PC card 1 Select "Settings" in a PC card, which can also be read by this unit. Chapter 4 Utilizing Various Information ...
Owner's Manual
Page 98
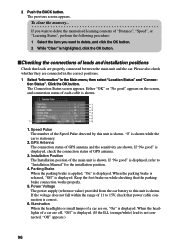
... while the car is displayed, refer to this unit is shown. Power Voltage The power supply (reference value) provided from the car battery to "Installation Manual" for the installation position. 4. Click the OK button. To clear the memory... If "No good" is stationary. 2. When the parking brake is released, "Off" is...
... while the car is displayed, refer to this unit is shown. Power Voltage The power supply (reference value) provided from the car battery to "Installation Manual" for the installation position. 4. Click the OK button. To clear the memory... If "No good" is stationary. 2. When the parking brake is released, "Off" is...
Owner's Manual
Page 99
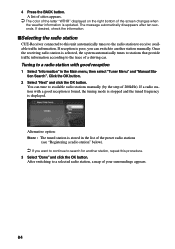
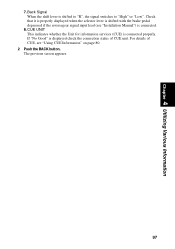
... services (CUE) is shifted to "R", the signal switches to "High" or "Low". If "No Good" is displayed check the connection status of CUE, see "Installation Manual") is shifted with the brake pedal depressed if the reversegear signal input lead (see "Using CUE Information" on page 80. 2 Push the BACK button. The...
... services (CUE) is shifted to "R", the signal switches to "High" or "Low". If "No Good" is displayed check the connection status of CUE, see "Installation Manual") is shifted with the brake pedal depressed if the reversegear signal input lead (see "Using CUE Information" on page 80. 2 Push the BACK button. The...
Owner's Manual
Page 110
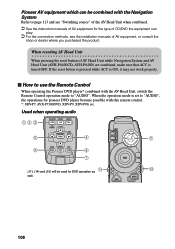
...page 113 and see "Switching source" of the AV Head Unit when combined. ➲ See the instruction manuals of AV equipment for the type of CD/DVD the equipment can be used for pioneer DVD player become possible with the AV Head Unit, switch the Remote Control operation mode to "AUDIO", ... AV Head Unit (AVH-P6400CD, AVH-P6400) are combined, make sure that ACC is set to "AUDIO". Pioneer AV equipment which can play. ➲ For the connection methods, see the installation manuals of AV equipment, or consult the shop or dealer where you purchased the product. When the operation mode is...
...page 113 and see "Switching source" of the AV Head Unit when combined. ➲ See the instruction manuals of AV equipment for the type of CD/DVD the equipment can be used for pioneer DVD player become possible with the AV Head Unit, switch the Remote Control operation mode to "AUDIO", ... AV Head Unit (AVH-P6400CD, AVH-P6400) are combined, make sure that ACC is set to "AUDIO". Pioneer AV equipment which can play. ➲ For the connection methods, see the installation manuals of AV equipment, or consult the shop or dealer where you purchased the product. When the operation mode is...

Owner's Manual
Page 113
...operate the DVD player. ➲ In case of DVD player installed in AVIC-9DVD, see the "Operation manual" of AVIC-9DVD. ➲ In case of DVD player installed in AVIC-90DVD, see "Hardware manual" of AVIC-90DVD. Chapter 6 Combining and Using Pioneer AV Equipment 9 (9) Transmitter Signals of the Remote Control are transmitted from here...push the control stick down. (12) Joystick/OK button 17 Use this for selecting items on the DVD is adjusted. The volume of Pioneer Head Unit is shown. If the dial is pressed, the volume is set to "AUDIO" or "DVD", you turn the dial downwards...
...operate the DVD player. ➲ In case of DVD player installed in AVIC-9DVD, see the "Operation manual" of AVIC-9DVD. ➲ In case of DVD player installed in AVIC-90DVD, see "Hardware manual" of AVIC-90DVD. Chapter 6 Combining and Using Pioneer AV Equipment 9 (9) Transmitter Signals of the Remote Control are transmitted from here...push the control stick down. (12) Joystick/OK button 17 Use this for selecting items on the DVD is adjusted. The volume of Pioneer Head Unit is shown. If the dial is pressed, the volume is set to "AUDIO" or "DVD", you turn the dial downwards...
Owner's Manual
Page 115
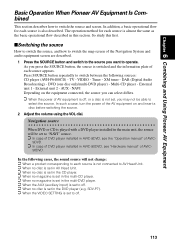
...the equipment connected, the source you press the SOURCE button, the source is also described. Chapter 6 Combining and Using Pioneer AV Equipment Basic Operation When Pioneer AV Equipment Is Combined This section describes how to off , or a disc is almost the same as the basic ... may not be set to "NAVI" source. ➲ In case of DVD player installed in AVIC-9DVD, see the "Operation manual" of AVIC- 9DVD. ➲ In case of DVD player installed in AVIC-90DVD, see "Hardware manual" of AV equipment is off . 113 TV - Tuner - External unit 1 - Navigation source...
...the equipment connected, the source you press the SOURCE button, the source is also described. Chapter 6 Combining and Using Pioneer AV Equipment Basic Operation When Pioneer AV Equipment Is Combined This section describes how to off , or a disc is almost the same as the basic ... may not be set to "NAVI" source. ➲ In case of DVD player installed in AVIC-9DVD, see the "Operation manual" of AVIC- 9DVD. ➲ In case of DVD player installed in AVIC-90DVD, see "Hardware manual" of AV equipment is off . 113 TV - Tuner - External unit 1 - Navigation source...
Owner's Manual
Page 119
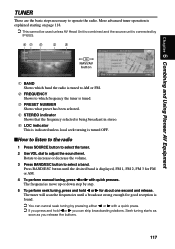
... and release. Seek tuning starts as soon as you can cancel seek tuning by pressing either 2 or 3 with quick presses. Chapter 6 Combining and Using Pioneer AV Equipment TUNER These are the basic steps necessary to select a band. Rotate to increase or decrease the volume. 3 Press BAND/ESC button to operate... Unit is combined and the source unit is connected by step. 5 To perform seek tuning, press and hold 2 or 3 for FM or AM. 4 To perform manual tuning, press 2 or 3 with a quick press. ➲ If you press and hold 2 or 3 you release the buttons. 117 The tuner will scan the ...
... and release. Seek tuning starts as soon as you can cancel seek tuning by pressing either 2 or 3 with quick presses. Chapter 6 Combining and Using Pioneer AV Equipment TUNER These are the basic steps necessary to select a band. Rotate to increase or decrease the volume. 3 Press BAND/ESC button to operate... Unit is combined and the source unit is connected by step. 5 To perform seek tuning, press and hold 2 or 3 for FM or AM. 4 To perform manual tuning, press 2 or 3 with a quick press. ➲ If you press and hold 2 or 3 you release the buttons. 117 The tuner will scan the ...
Owner's Manual
Page 122
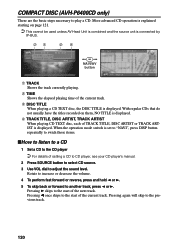
.... ■How to listen to a CD 1 Set a CD to the CD player ➲ For details of setting a CD to CD player, see your CD player's manual. 2 Press SOURCE button to select CD source. 3 Use VOL dial to the start of the current track. COMPACT DISC (AVH-P6400CD only) These are the...
.... ■How to listen to a CD 1 Set a CD to the CD player ➲ For details of setting a CD to CD player, see your CD player's manual. 2 Press SOURCE button to select CD source. 3 Use VOL dial to the start of the current track. COMPACT DISC (AVH-P6400CD only) These are the...


