Owner's Manual
Page 14
for AVIC-9DVD 23 About the difference in the operation of the Remote Control 23 Installing the Program ...25 Chapter 1 Basic Operation 29 Switching On and Off...29 Types of Menu...30 Main menu...30 Shortcut menu ...31 Basic Navigation...32 ... Changing the scale of the map 40 Moving the map to the location you want to use this manual 22 Operation of DVD player 22 Terminology...23 For "AVIC-9DVD" users 23 Dipswitch settings for U.S.A 2 PIONEER AVIC-90DVD (CNDV-20) - for Canada 5 NAVTECH ...7 GDT ...10 Table of Contents...12 Important Safety Information 18 Notes Before...
for AVIC-9DVD 23 About the difference in the operation of the Remote Control 23 Installing the Program ...25 Chapter 1 Basic Operation 29 Switching On and Off...29 Types of Menu...30 Main menu...30 Shortcut menu ...31 Basic Navigation...32 ... Changing the scale of the map 40 Moving the map to the location you want to use this manual 22 Operation of DVD player 22 Terminology...23 For "AVIC-9DVD" users 23 Dipswitch settings for U.S.A 2 PIONEER AVIC-90DVD (CNDV-20) - for Canada 5 NAVTECH ...7 GDT ...10 Table of Contents...12 Important Safety Information 18 Notes Before...
Owner's Manual
Page 98
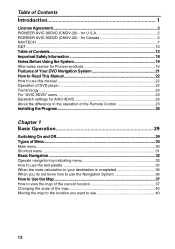
... appears. Click the OK button. Either "OK" or "No good" appears on the screen, and connection status of the main unit is shown. 1 2 3 4 5 6 7 8 1. Installation Position The Installation position of each cable is shown. Parking Brake When the parking brake is applied, "On" is shown. If "No good" is displayed, refer to...they are on while checking that the parking brake connection works properly. 5. Power Voltage The power supply (reference value) provided from the car battery to "Installation Manual" for the installation position. 4. 2 Push the BACK button.
... appears. Click the OK button. Either "OK" or "No good" appears on the screen, and connection status of the main unit is shown. 1 2 3 4 5 6 7 8 1. Installation Position The Installation position of each cable is shown. Parking Brake When the parking brake is applied, "On" is shown. If "No good" is displayed, refer to...they are on while checking that the parking brake connection works properly. 5. Power Voltage The power supply (reference value) provided from the car battery to "Installation Manual" for the installation position. 4. 2 Push the BACK button.
Owner's Manual
Page 99
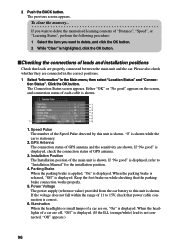
... details of CUE unit. The previous screen appears. 97 Chapter 4 Utilizing Various Information 7. If "No Good" is displayed check the connection status of CUE, see "Installation Manual") is shifted with the brake pedal depressed if the reversegear signal input lead (see "Using CUE Information" on page 80. 2 Push the BACK button. CUE...
... details of CUE unit. The previous screen appears. 97 Chapter 4 Utilizing Various Information 7. If "No Good" is displayed check the connection status of CUE, see "Installation Manual") is shifted with the brake pedal depressed if the reversegear signal input lead (see "Using CUE Information" on page 80. 2 Push the BACK button. CUE...
Owner's Manual
Page 110
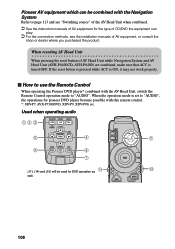
... which can be used for pioneer DVD player become possible with the AV Head Unit, switch the Remote Control operation mode to "AUDIO". Used when ... for the type of CD/DVD the equipment can play. ➲ For the connection methods, see the installation manuals of AV Head Unit while Navigation System and AV Head Unit (AVH-P6400CD, AVH-P6400) are combined, ...you purchased the product. If the reset button is pressed while ACC is set to use the Remote Control When operating the Pioneer DVD player* combined with this remote control. *: SDV-P7, AVX-P7300DVD, XDV-P9, XDV-P90, etc. When the ...
... which can be used for pioneer DVD player become possible with the AV Head Unit, switch the Remote Control operation mode to "AUDIO". Used when ... for the type of CD/DVD the equipment can play. ➲ For the connection methods, see the installation manuals of AV Head Unit while Navigation System and AV Head Unit (AVH-P6400CD, AVH-P6400) are combined, ...you purchased the product. If the reset button is pressed while ACC is set to use the Remote Control When operating the Pioneer DVD player* combined with this remote control. *: SDV-P7, AVX-P7300DVD, XDV-P9, XDV-P90, etc. When the ...

Owner's Manual
Page 113
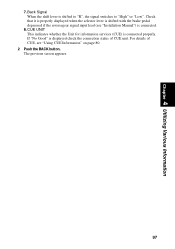
... When the DVD is stopped, the default setting screen appears. (17) TOP MENU button The main menu stored in AVIC-90DVD, see "Hardware manual" of the Remote Control are transmitted from here. 10 12 14 MENU TOP MENU 16 18 DETOUR CANCEL ROUTE GUIDE 21...player installed in AVIC-9DVD, see the "Operation manual" of AVIC-9DVD. ➲ In case of DVD player installed in DVD is displayed. (18) 7 (DETOUR) button This button is reduced to stop the playback of the volume (ATT function). Chapter 6 Combining and Using Pioneer AV Equipment 9 (9) Transmitter Signals of AVIC-90DVD....
... When the DVD is stopped, the default setting screen appears. (17) TOP MENU button The main menu stored in AVIC-90DVD, see "Hardware manual" of the Remote Control are transmitted from here. 10 12 14 MENU TOP MENU 16 18 DETOUR CANCEL ROUTE GUIDE 21...player installed in AVIC-9DVD, see the "Operation manual" of AVIC-9DVD. ➲ In case of DVD player installed in DVD is displayed. (18) 7 (DETOUR) button This button is reduced to stop the playback of the volume (ATT function). Chapter 6 Combining and Using Pioneer AV Equipment 9 (9) Transmitter Signals of AVIC-90DVD....
Owner's Manual
Page 115
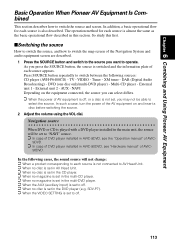
...source When DVD or CD is played with a DVD player installed in the main unit, the source will not change: ➲ When a product corresponding to off . ➲ When no disc is set in AVIC-90DVD, see the "Operation manual" of AVIC- 9DVD. ➲ In case of each source is ... AV equipment on the equipment connected, the source you want to switch the source and screen. Chapter 6 Combining and Using Pioneer AV Equipment Basic Operation When Pioneer AV Equipment Is Combined This section describes how to operate. AUX - The operation method for each source appears. TV -...
...source When DVD or CD is played with a DVD player installed in the main unit, the source will not change: ➲ When a product corresponding to off . ➲ When no disc is set in AVIC-90DVD, see the "Operation manual" of AVIC- 9DVD. ➲ In case of each source is ... AV equipment on the equipment connected, the source you want to switch the source and screen. Chapter 6 Combining and Using Pioneer AV Equipment Basic Operation When Pioneer AV Equipment Is Combined This section describes how to operate. AUX - The operation method for each source appears. TV -...
Owner's Manual
Page 142
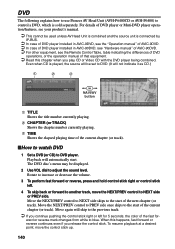
...To skip back or forward to adjust the sound level. Rotate to DVD. (It will automatically start. DVD The following explains how to use Pioneer AV Head Unit (AVH-P6400CD or AVH-P6400) to blue. The DVD disc's menu may be set to increase or decrease the volume. 3...control a DVD, which is connected by IP-BUS. ➲ In case of DVD player installed in AVIC-9DVD, see the "Operation manual" of AVIC-9DVD. ➲ In case of DVD player installed in AVIC-90DVD, see "Hardware manual" of AVIC-90DVD. ➲ For other equipment, see the Remote Control Table, table indicating the differences of ...
...To skip back or forward to adjust the sound level. Rotate to DVD. (It will automatically start. DVD The following explains how to use Pioneer AV Head Unit (AVH-P6400CD or AVH-P6400) to blue. The DVD disc's menu may be set to increase or decrease the volume. 3...control a DVD, which is connected by IP-BUS. ➲ In case of DVD player installed in AVIC-9DVD, see the "Operation manual" of AVIC-9DVD. ➲ In case of DVD player installed in AVIC-90DVD, see "Hardware manual" of AVIC-90DVD. ➲ For other equipment, see the Remote Control Table, table indicating the differences of ...
Owner's Manual
Page 163
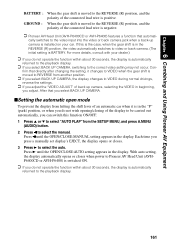
... the display changes to VIDEO during normal drivings, reverse the settings. ➲ If you adjust the "VIDEO ADJUST" of back up camera is installed on your dealer.) ➲ If you do not wish opening/closing of the display to be carried out automatically, you select BACK UP CAMERA... may not occur. Con- firm that automati- Press 3 until the OPEN/CLOSE:MANUAL setting appears in the display. Press 2 until the OPEN/CLOSE:AUTO setting appears in the display. Chapter 6 Combining and Using Pioneer AV Equipment BATTERY : GROUND : When the gear shift is moved to the REVERSE (R) ...
... the display changes to VIDEO during normal drivings, reverse the settings. ➲ If you adjust the "VIDEO ADJUST" of back up camera is installed on your dealer.) ➲ If you do not wish opening/closing of the display to be carried out automatically, you select BACK UP CAMERA... may not occur. Con- firm that automati- Press 3 until the OPEN/CLOSE:MANUAL setting appears in the display. Press 2 until the OPEN/CLOSE:AUTO setting appears in the display. Chapter 6 Combining and Using Pioneer AV Equipment BATTERY : GROUND : When the gear shift is moved to the REVERSE (R) ...
Owner's Manual
Page 179
...dealer or the nearest authorized Pioneer service facility. Such a loss of signal quality may happen for military reasons. Solutions: (1) Check the GPS signal reception using "GPS Status" (see the "Installation Manual"). (6) Confirm the installation angle. (This unit must be installed within +30 degrees to... the 3D Hybrid Sensor. (5) Check the attachment position of the main unit of your Navigation System and the setting of the Installation direction lever (see "Checking positioning information by sat- Solutions: Check the "Tracking Display" settings (see "Tracking Display" on ...
...dealer or the nearest authorized Pioneer service facility. Such a loss of signal quality may happen for military reasons. Solutions: (1) Check the GPS signal reception using "GPS Status" (see the "Installation Manual"). (6) Confirm the installation angle. (This unit must be installed within +30 degrees to... the 3D Hybrid Sensor. (5) Check the attachment position of the main unit of your Navigation System and the setting of the Installation direction lever (see "Checking positioning information by sat- Solutions: Check the "Tracking Display" settings (see "Tracking Display" on ...
Owner's Manual
Page 180
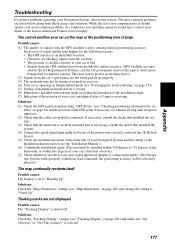
Possible causes: Installation or connection has been carried out incorrectly. Possible causes: (1) The car's light is turned ON, and "Nighttime Map" is selected on page 103) to warm ... a clear line of sight to the display unit. (4) Move the Remote Control closer to direct sunlight. (5) The Mode switch (or the dipswitch) of the "Hardware Manual"). Solutions: (1) Check the "Day/Night Map Display" setting (see "Day/Night Map Display" on page 102) and make sure "Nighttime Map" is selected. (2) Check the...
Possible causes: Installation or connection has been carried out incorrectly. Possible causes: (1) The car's light is turned ON, and "Nighttime Map" is selected on page 103) to warm ... a clear line of sight to the display unit. (4) Move the Remote Control closer to direct sunlight. (5) The Mode switch (or the dipswitch) of the "Hardware Manual"). Solutions: (1) Check the "Day/Night Map Display" setting (see "Day/Night Map Display" on page 102) and make sure "Nighttime Map" is selected. (2) Check the...
Owner's Manual
Page 183
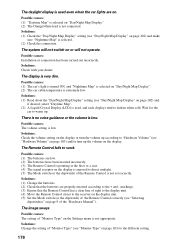
...a name of six characters or less for a registered location or a listing in the Address Book. Please turn off the system and check the installation. Please consult your first way point. What to the destination is not working properly. When: Abnormal output of Gyrosensor is set incorrectly....or Pioneer service center." What to do : Change the destination to do : Use a name with more than five way points. What to do : Note down the error code shown on the screen; When: If there are required." When: If you attempt to do : See the "Installation Manual" and...
...a name of six characters or less for a registered location or a listing in the Address Book. Please turn off the system and check the installation. Please consult your first way point. What to the destination is not working properly. When: Abnormal output of Gyrosensor is set incorrectly....or Pioneer service center." What to do : Change the destination to do : Use a name with more than five way points. What to do : Note down the error code shown on the screen; When: If there are required." When: If you attempt to do : See the "Installation Manual" and...

Other Manual
Page 2
... you to emergency services such as an aid to install this unit. 1 Not all applicable laws and regulations in your navigation system. • This manual explains how to you in your car. IMPORTANT INFORMATION ABOUT YOUR NEW DVD NAVIGATION UNIT AND THIS MANUAL • The Pioneer DVD Navigation Unit is intended solely as hospitals...
... you to emergency services such as an aid to install this unit. 1 Not all applicable laws and regulations in your navigation system. • This manual explains how to you in your car. IMPORTANT INFORMATION ABOUT YOUR NEW DVD NAVIGATION UNIT AND THIS MANUAL • The Pioneer DVD Navigation Unit is intended solely as hospitals...

Other Manual
Page 4
...not a substitute for future reference. 3. Certain state laws may in certain circumstances display erroneous information regarding the position of this manual fully and carefully before installing your car, the distance of your navigation system. 6. This DVD Navigation Unit may restrict the placement and use of your ...DVD Navigation Unit. 2. Read this system in the installation and operation of your car. Do not operate your DVD Navigation Unit if doing so will divert your attention from the safe operation...
...not a substitute for future reference. 3. Certain state laws may in certain circumstances display erroneous information regarding the position of this manual fully and carefully before installing your car, the distance of your navigation system. 6. This DVD Navigation Unit may restrict the placement and use of your ...DVD Navigation Unit. 2. Read this system in the installation and operation of your car. Do not operate your DVD Navigation Unit if doing so will divert your attention from the safe operation...
Other Manual
Page 13
... lamp (the one that the navigation system can detect whether the car is automatically muted to the supplied Installation manuals of both products and connect cords that have the same function. Clamp firmly with a Pioneer car stereo, if the car stereo has yellow/black leads, connect them to those for this product to...
... lamp (the one that the navigation system can detect whether the car is automatically muted to the supplied Installation manuals of both products and connect cords that have the same function. Clamp firmly with a Pioneer car stereo, if the car stereo has yellow/black leads, connect them to those for this product to...
Other Manual
Page 14
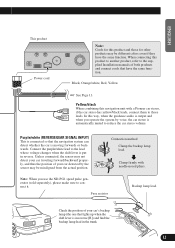
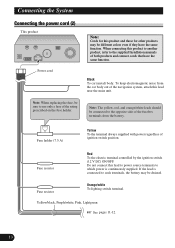
... always supplied with power regardless of the rating prescribed on the fuse holder. Do not connect this product to another product, refer to the supplied Installation manuals of the navigation system, attach this lead near the main unit. Fuse resistor Red To the electric terminal controlled by the ignition switch (12 V DC...
... always supplied with power regardless of the rating prescribed on the fuse holder. Do not connect this product to another product, refer to the supplied Installation manuals of the navigation system, attach this lead near the main unit. Fuse resistor Red To the electric terminal controlled by the ignition switch (12 V DC...
Other Manual
Page 26
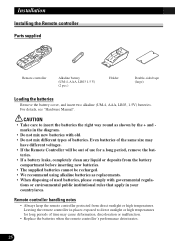
... inserting new batteries. • The supplied batteries cannot be out of use for long periods of batteries. For details, see "Hardware Manual". CAUTION • Take care to direct sunlight or high temperatures for a long period, remove the bat- teries. • If ... temperatures. tions or environmental public institutional rules that apply in the diagram. • Do not mix new batteries with governmental regula- Installation Installing the Remote controller Parts supplied Remote controller Alkaline battery (UM-4, AAA, LR03 1.5 V) (2 pcs.) Holder Double-sided tape (large)...
... inserting new batteries. • The supplied batteries cannot be out of use for long periods of batteries. For details, see "Hardware Manual". CAUTION • Take care to direct sunlight or high temperatures for a long period, remove the bat- teries. • If ... temperatures. tions or environmental public institutional rules that apply in the diagram. • Do not mix new batteries with governmental regula- Installation Installing the Remote controller Parts supplied Remote controller Alkaline battery (UM-4, AAA, LR03 1.5 V) (2 pcs.) Holder Double-sided tape (large)...
Other Manual
Page 31
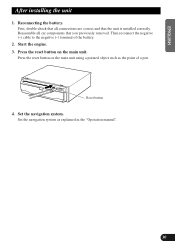
... a pointed object such as explained in the "Operation manual". 30 FRANÇAIS ITALIANO NEDERLANDS Press the reset button on the main unit. Then reconnect the negative (-) cable to the negative (-) terminal of a pen. Start the engine. 3. First, double-check that all car components that the unit is installed correctly. Reset button 4.
... a pointed object such as explained in the "Operation manual". 30 FRANÇAIS ITALIANO NEDERLANDS Press the reset button on the main unit. Then reconnect the negative (-) cable to the negative (-) terminal of a pen. Start the engine. 3. First, double-check that all car components that the unit is installed correctly. Reset button 4.

