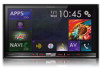
Owner's Manual
Page 2
... used in a safe place for future reference. Removing the detachable faceplate 13 - Before removing the vehicle battery 11 - Data subject to use the screens 18 - Resetting the microprocessor 11 Basic operation Checking part names and functions 12 Protecting your model properly. Plugging and unplugging a USB storage device 16 Startup and termination 16 On first-time startup 17 Regular startup 17 - Operating list screens 22 - Selecting a rear source 21 Turning off the display 17...
... used in a safe place for future reference. Removing the detachable faceplate 13 - Before removing the vehicle battery 11 - Data subject to use the screens 18 - Resetting the microprocessor 11 Basic operation Checking part names and functions 12 Protecting your model properly. Plugging and unplugging a USB storage device 16 Startup and termination 16 On first-time startup 17 Regular startup 17 - Operating list screens 22 - Selecting a rear source 21 Turning off the display 17...
Owner's Manual
Page 3
... coordinates 37 Searching for a location by address 31 Searching for POIs using "Route Planner" 41 Checking route information and preferences 41 - Restoring the default settings 48 Information on the map 45 Checking useful information about your trip Checking useful information 46 Customizing preferences of "Settings" 48 - "Start Configuration Wizard" settings 54 En 3 Searching for providers nearby that offer emergency or roadside assistance services 34 Selecting a destination from stored locations 34 Selecting a destination from the name of destinations 40 - "Traffic...
... coordinates 37 Searching for a location by address 31 Searching for POIs using "Route Planner" 41 Checking route information and preferences 41 - Restoring the default settings 48 Information on the map 45 Checking useful information about your trip Checking useful information 46 Customizing preferences of "Settings" 48 - "Start Configuration Wizard" settings 54 En 3 Searching for providers nearby that offer emergency or roadside assistance services 34 Selecting a destination from stored locations 34 Selecting a destination from the name of destinations 40 - "Traffic...
Owner's Manual
Page 4
... Displaying the Bluetooth device address 59 Clearing the Bluetooth memory 59 Updating Bluetooth software 60 Displaying the Bluetooth software version 60 Using hands-free phoning Displaying the phone menu 61 - Switching the ring tone 66 - Using the preset dial lists 64 Receiving a phone call automatically 66 - Adjusting the other party's listening volume 67 Using the voice recognition function (for iPhone) 67 Notes for hands-free phoning 67 iPod / iPhone or smartphone setup operation The basic flow of iPod / iPhone or smartphone setup 69 Setting the device connection...
... Displaying the Bluetooth device address 59 Clearing the Bluetooth memory 59 Updating Bluetooth software 60 Displaying the Bluetooth software version 60 Using hands-free phoning Displaying the phone menu 61 - Switching the ring tone 66 - Using the preset dial lists 64 Receiving a phone call automatically 66 - Adjusting the other party's listening volume 67 Using the voice recognition function (for iPhone) 67 Notes for hands-free phoning 67 iPod / iPhone or smartphone setup operation The basic flow of iPod / iPhone or smartphone setup 69 Setting the device connection...
Owner's Manual
Page 7
... screen 142 Starting procedure 142 Setting the video signal 143 Switching the operation screen 143 Using AV input Using the touch panel keys 144 Reading the screen 144 Starting procedure (for AV source) 144 Starting procedure (for iPhone 155 En 7 Contents - Setting rear view camera activation 151 - Memorizing the current contents 138 Setting the program you want to be alerted for 138 Selecting teams for Game Alert 139 Restoring the SiriusXM settings to the default...
... screen 142 Starting procedure 142 Setting the video signal 143 Switching the operation screen 143 Using AV input Using the touch panel keys 144 Reading the screen 144 Starting procedure (for AV source) 144 Starting procedure (for iPhone 155 En 7 Contents - Setting rear view camera activation 151 - Memorizing the current contents 138 Setting the program you want to be alerted for 138 Selecting teams for Game Alert 139 Restoring the SiriusXM settings to the default...
Owner's Manual
Page 8
... display 175 - Contents Setting the beep sound 155 Adjusting the response positions of the touch panel (touch panel calibration) 156 Adjusting the picture 156 Displaying the firmware version 158 Updating firmware 158 Checking sensor learning status and driving status 159 Clearing the status 159 Checking the connections of DVDs 185 Setting the video signal for the rear view camera 186 Language code chart for DVDs 187 Favorite menu Selecting a shortcut 188 Removing a shortcut 188 Common operations Setting...
... display 175 - Contents Setting the beep sound 155 Adjusting the response positions of the touch panel (touch panel calibration) 156 Adjusting the picture 156 Displaying the firmware version 158 Updating firmware 158 Checking sensor learning status and driving status 159 Clearing the status 159 Checking the connections of DVDs 185 Setting the video signal for the rear view camera 186 Language code chart for DVDs 187 Favorite menu Selecting a shortcut 188 Removing a shortcut 188 Common operations Setting...
Owner's Manual
Page 12
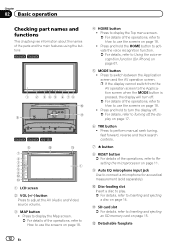
... of the operations, refer to Resetting the microprocessor on page 18. ! a Disc-loading slot Insert a disc to play. = For details, refer to Inserting and ejecting a disc on page 15. b SD card slot = For details, refer to Inserting and ejecting an SD memory card on page 14. Press to display the Map screen. = For details of the parts and the main features using the buttons. 8000NEX 7000NEX...
... of the operations, refer to Resetting the microprocessor on page 18. ! a Disc-loading slot Insert a disc to play. = For details, refer to Inserting and ejecting a disc on page 15. b SD card slot = For details, refer to Inserting and ejecting an SD memory card on page 14. Press to display the Map screen. = For details of the parts and the main features using the buttons. 8000NEX 7000NEX...

Owner's Manual
Page 24
.... The Map screen appears and you want to use online services, which require a subscription. The service coverage for voice guidance messages, then touch [Next]. 8 If needed , modify the default route planning options, then touch [Next]. The initial setup is now complete. p Later you can change it in "Regional" settings. = For details, refer to Customizing the navigation settings on page 47. 24 En The configuration wizard starts. 6 Touch [Next]. A message saying that...
.... The Map screen appears and you want to use online services, which require a subscription. The service coverage for voice guidance messages, then touch [Next]. 8 If needed , modify the default route planning options, then touch [Next]. The initial setup is now complete. p Later you can change it in "Regional" settings. = For details, refer to Customizing the navigation settings on page 47. 24 En The configuration wizard starts. 6 Touch [Next]. A message saying that...
Owner's Manual
Page 36
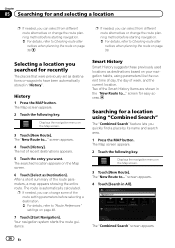
... "Route Preferences" settings on page 48. 7 Touch [Start Navigation]. The list of week, and the current location. The "Combined Search" screen appears. 36 En The searched location appears on the Map screen. 3 Touch [New Route]. Searching for a location using parameters like the current time of day, the day of recent destinations appears. 5 Touch the entry you quickly find a place by its name and search area. 1 Press the MAP button. Chapter 05 Searching for and selecting a location p If needed...
... "Route Preferences" settings on page 48. 7 Touch [Start Navigation]. The list of week, and the current location. The "Combined Search" screen appears. 36 En The searched location appears on the Map screen. 3 Touch [New Route]. Searching for a location using parameters like the current time of day, the day of recent destinations appears. 5 Touch the entry you quickly find a place by its name and search area. 1 Press the MAP button. Chapter 05 Searching for and selecting a location p If needed...
Owner's Manual
Page 41
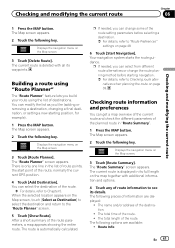
... the MAP button. The total length of the route parameters, a map appears showing the entire route. You can modify the list as you build your route using "Route Planner" The "Route Planner" feature lets you like (adding or removing a destination, changing a final destination, or setting a new starting navigation. = For details, refer to Checking route alternatives when planning the route on the Map screen, touch [Select as Destination] to select the destination and return to Chapter 5. Displays the navigation menu on the Map screen. 3 Touch [Route...
... the MAP button. The total length of the route parameters, a map appears showing the entire route. You can modify the list as you build your route using "Route Planner" The "Route Planner" feature lets you like (adding or removing a destination, changing a final destination, or setting a new starting navigation. = For details, refer to Checking route alternatives when planning the route on the Map screen, touch [Select as Destination] to select the destination and return to Chapter 5. Displays the navigation menu on the Map screen. 3 Touch [Route...
Owner's Manual
Page 46
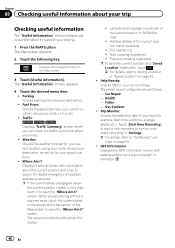
...page 43. ! Latitude and longitude (coordinate of the current position (when available) ! Touch [Start New Recording] to start time, end time, average speed, etc.). The "Useful Information" screen appears. 4 Touch the desired menu item. ! Weather: Checks the weather forecast for your current location, along your driving. 1 Press the MAP button. screen. The nearest city ! Address details of the current position in your saved locations. ! Next crossing road/street ! tings on the Map screen. 3 Touch [Useful Information]. GPS Information: Displays the GPS information screen with...
...page 43. ! Latitude and longitude (coordinate of the current position (when available) ! Touch [Start New Recording] to start time, end time, average speed, etc.). The "Useful Information" screen appears. 4 Touch the desired menu item. ! Weather: Checks the weather forecast for your current location, along your driving. 1 Press the MAP button. screen. The nearest city ! Address details of the current position in your saved locations. ! Next crossing road/street ! tings on the Map screen. 3 Touch [Useful Information]. GPS Information: Displays the GPS information screen with...
Owner's Manual
Page 47
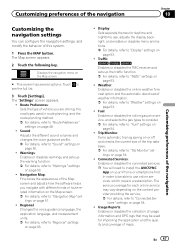
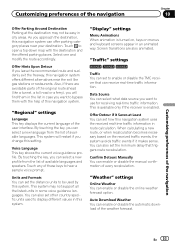
... full list. 3 Touch [Settings]. Regional: Changes the voice guidance language, the application language, and measurement units. = For details, refer to "Fuel" settings on page 51. ! En 47 The Map screen appears. 2 Touch the following key. Displays the navigation menu on page 54. ! Route Preferences: Sets the type of vehicle you navigate with different kinds of the trip database. = For details, refer to "Navigation Map" settings on page 54. ! Traffic: 8000NEX 7000NEX 6000NEX Enables or disables the TMC receiver and sets...
... full list. 3 Touch [Settings]. Regional: Changes the voice guidance language, the application language, and measurement units. = For details, refer to "Fuel" settings on page 51. ! En 47 The Map screen appears. 2 Touch the following key. Displays the navigation menu on page 54. ! Route Preferences: Sets the type of vehicle you navigate with different kinds of the trip database. = For details, refer to "Navigation Map" settings on page 54. ! Traffic: 8000NEX 7000NEX 6000NEX Enables or disables the TMC receiver and sets...
Owner's Manual
Page 52
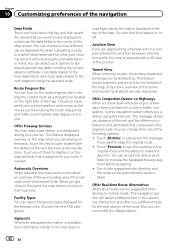
...-time Route Alternatives Alternative routes can turn this feature on freeways. But you are approaching a freeway exit or a complex intersection and the necessary information exists, the map is due to display the current route as a straight line located on the route progress bar to traffic congestion, so this navigation system offers you a detour using the next exit. Touch this key to your route if needed. Automatic Overview When selected...
...-time Route Alternatives Alternative routes can turn this feature on freeways. But you are approaching a freeway exit or a complex intersection and the necessary information exists, the map is due to display the current route as a straight line located on the route progress bar to traffic congestion, so this navigation system offers you a detour using the next exit. Touch this key to your route if needed. Automatic Overview When selected...
Owner's Manual
Page 53
... in case you can also set how this navigation system uses the received real-time traffic information in this navigation system. Data Source You can enable or disable the automatic download of the original route ahead (like gas stations or restaurants. "Weather" settings Online Weather You can set other country specific units used by this navigation system offers different alternatives near your destination. Voice Language This key shows the current voice guidance profile. En 53...
... in case you can also set how this navigation system uses the received real-time traffic information in this navigation system. Data Source You can enable or disable the automatic download of the original route ahead (like gas stations or restaurants. "Weather" settings Online Weather You can set other country specific units used by this navigation system offers different alternatives near your destination. Voice Language This key shows the current voice guidance profile. En 53...
Owner's Manual
Page 59
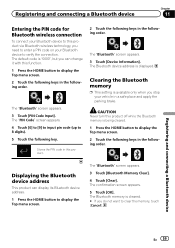
... connection. Stores the PIN code in this function. 1 Press the HOME button to display the Top menu screen. 2 Touch the following keys in the following order. The "Bluetooth" screen appears. 3 Touch [Device Information]. CAUTION Never turn this product via Bluetooth wireless technology, you can display its Bluetooth device address. 1 Press the HOME button to display the Top menu screen. The Bluetooth memory is cleared. # If you stop your vehicle in the following order. The "Bluetooth" screen appears. 3 Touch [PIN Code Input]. Clearing the Bluetooth memory p This setting is available...
... connection. Stores the PIN code in this function. 1 Press the HOME button to display the Top menu screen. 2 Touch the following keys in the following order. The "Bluetooth" screen appears. 3 Touch [Device Information]. CAUTION Never turn this product via Bluetooth wireless technology, you can display its Bluetooth device address. 1 Press the HOME button to display the Top menu screen. The Bluetooth memory is cleared. # If you stop your vehicle in the following order. The "Bluetooth" screen appears. 3 Touch [PIN Code Input]. Clearing the Bluetooth memory p This setting is available...

Owner's Manual
Page 68
... image data, the phone book may not work even though your cellular phone. ! tions: - Phone book transfers ! Chapter 12 Using hands-free phoning Registration and connection ! Making and receiving calls ! When one from your phone to the entry of the line cannot hear the conversation due to an echo, decrease the volume level for detailed instructions. ! If the phone number of the received call to this product may not display the phone book...
... image data, the phone book may not work even though your cellular phone. ! tions: - Phone book transfers ! Chapter 12 Using hands-free phoning Registration and connection ! Making and receiving calls ! When one from your phone to the entry of the line cannot hear the conversation due to an echo, decrease the volume level for detailed instructions. ! If the phone number of the received call to this product may not display the phone book...
Owner's Manual
Page 114
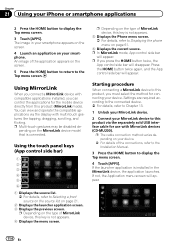
... you connect a MirrorLink device with compatible applications installed, you can view and operate the compatible applications via the separately sold USB interface cable for the mobile device directly from this product, you press the HOME button twice, the App control side bar will appear. Using the touch panel keys (App control side bar) 1 2 3 4 5 6 1 Displays the source list. = For details, refer to the Top menu screen. p In MirrorLink mode...
... you connect a MirrorLink device with compatible applications installed, you can view and operate the compatible applications via the separately sold USB interface cable for the mobile device directly from this product, you press the HOME button twice, the App control side bar will appear. Using the touch panel keys (App control side bar) 1 2 3 4 5 6 1 Displays the source list. = For details, refer to the Top menu screen. p In MirrorLink mode...
Owner's Manual
Page 151
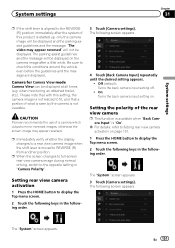
... vehicle even before the guidelines and the message are displayed. Camera for Camera View mode Camera View can be displayed. En 151 Off (default): Turns the back camera input setting off. ! The "System" screen appears. Please note that a portion of a camera which outputs mirror reversed images, otherwise the screen image may appear reversed" will be displayed on . Setting rear view camera activation 1 Press the HOME button to fit, and that with this product is started...
... vehicle even before the guidelines and the message are displayed. Camera for Camera View mode Camera View can be displayed. En 151 Off (default): Turns the back camera input setting off. ! The "System" screen appears. Please note that a portion of a camera which outputs mirror reversed images, otherwise the screen image may appear reversed" will be displayed on . Setting rear view camera activation 1 Press the HOME button to fit, and that with this product is started...
Owner's Manual
Page 190
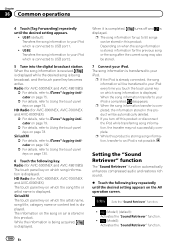
... transferring song information, the transfer may also be transferred to Using the touch panel keys on page 78. p If the iPod is not possible. Setting the "Sound Retriever" function The "Sound Retriever" function automatically enhances compressed audio and restores rich sound. % Touch the following key. When the song information is received, is displayed while the desired song is displayed. Radio (for up to an iPod is already connected...
... transferring song information, the transfer may also be transferred to Using the touch panel keys on page 78. p If the iPod is not possible. Setting the "Sound Retriever" function The "Sound Retriever" function automatically enhances compressed audio and restores rich sound. % Touch the following key. When the song information is received, is displayed while the desired song is displayed. Radio (for up to an iPod is already connected...
Owner's Manual
Page 195
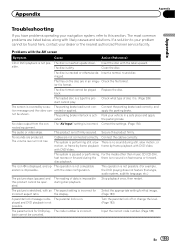
... the nearest authorized Pioneer service facility. Cables are listed below, along with DVD-Video. disc playback. This operation is impossible this pro- The code number is impossible. Input the correct code number. (Page 183) En 195 sible. Check the file format. The parking brake interlock is dirty. Correct the settings. (Page 150) nected equipment. Insert a normal, round disc. Secure this section. Connect the cables correctly. with...
... the nearest authorized Pioneer service facility. Cables are listed below, along with DVD-Video. disc playback. This operation is impossible this pro- The code number is impossible. Input the correct code number. (Page 183) En 195 sible. Check the file format. The parking brake interlock is dirty. Correct the settings. (Page 150) nected equipment. Insert a normal, round disc. Secure this section. Connect the cables correctly. with...
Owner's Manual
Page 198
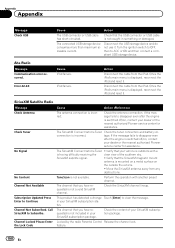
...) Check Antenna Check Tuner No Signal No Content Channel Not Available Subscription Updated Press Enter to clear the message. Perform the operation with a is having difficulty receiving the clear view of your SiriusXM subscription status. Check the content of the southern sky. feature. 198 En Once the iPod's main menu is displayed, reconnect the iPod and reset it . Channel Locked Please Enter the Lock Code The antenna connection is displayed, reconnect...
...) Check Antenna Check Tuner No Signal No Content Channel Not Available Subscription Updated Press Enter to clear the message. Perform the operation with a is having difficulty receiving the clear view of your SiriusXM subscription status. Check the content of the southern sky. feature. 198 En Once the iPod's main menu is displayed, reconnect the iPod and reset it . Channel Locked Please Enter the Lock Code The antenna connection is displayed, reconnect...


