Owner's Manual
Page 1
Operation Manual MULTIMEDIA NAVIGATION RECEIVER AVIC-8100NEX AVIC-7100NEX AVIC-6100NEX AVIC-5100NEX Notice to all users: This software requires that you must understand before using this product. English Be sure to your vehicle's parking brake and depending on your Authorized Pioneer Electronics retailer or call us at (800) 421-1404. For more information, please contact your vehicle...
Operation Manual MULTIMEDIA NAVIGATION RECEIVER AVIC-8100NEX AVIC-7100NEX AVIC-6100NEX AVIC-5100NEX Notice to all users: This software requires that you must understand before using this product. English Be sure to your vehicle's parking brake and depending on your Authorized Pioneer Electronics retailer or call us at (800) 421-1404. For more information, please contact your vehicle...
Owner's Manual
Page 2
... is not available 20 How to operate your product against theft 16 - Operating list screens 27 - Important The screens shown in this Pioneer product. Introduction Manual overview 11 - Removing the detachable faceplate 16 - Inserting and ejecting an SD memory card 18 - Selecting a rear source 25 Turning... you will know how to use the map How to read through these instructions so you have finished reading the instructions, keep this manual 11 - Conventions used in the examples may differ from actual screens, which may be changed without notice for future reference. Using the...
... is not available 20 How to operate your product against theft 16 - Operating list screens 27 - Important The screens shown in this Pioneer product. Introduction Manual overview 11 - Removing the detachable faceplate 16 - Inserting and ejecting an SD memory card 18 - Selecting a rear source 25 Turning... you will know how to use the map How to read through these instructions so you have finished reading the instructions, keep this manual 11 - Conventions used in the examples may differ from actual screens, which may be changed without notice for future reference. Using the...
Owner's Manual
Page 4
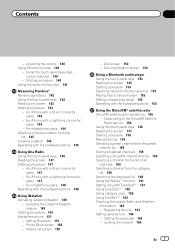
... hands-free phoning Displaying the phone menu 80 - Setting the initial odometer value 60 - "Traffic" settings 69 - Deleting a registered device 76 Connecting a registered Bluetooth device manually 77 Switching visibility 77 Entering the PIN code for hands-free phoning 86 Calling a number in the phone book 85 - "Navigation Map" settings 66 - Using...
... hands-free phoning Displaying the phone menu 80 - Setting the initial odometer value 60 - "Traffic" settings 69 - Deleting a registered device 76 Connecting a registered Bluetooth device manually 77 Switching visibility 77 Entering the PIN code for hands-free phoning 86 Calling a number in the phone book 85 - "Navigation Map" settings 66 - Using...
Owner's Manual
Page 5
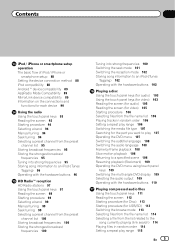
...for each device 90 Using the radio Using the touch panel keys 93 Reading the screen 93 Starting procedure 94 Selecting a band 94 Manual tuning 94 Seek tuning 94 Selecting a preset channel from the preset channel list 95 Storing broadcast frequencies 95 Storing the strongest broadcast ...Radio™ reception HD Radio stations 97 Using the touch panel keys 97 Reading the screen 98 Starting procedure 99 Selecting a band 99 Manual tuning 99 Seek tuning 99 Selecting a preset channel from the preset channel list 100 Storing broadcast frequencies 100 Storing the strongest broadcast frequencies...
...for each device 90 Using the radio Using the touch panel keys 93 Reading the screen 93 Starting procedure 94 Selecting a band 94 Manual tuning 94 Seek tuning 94 Selecting a preset channel from the preset channel list 95 Storing broadcast frequencies 95 Storing the strongest broadcast ...Radio™ reception HD Radio stations 97 Using the touch panel keys 97 Reading the screen 98 Starting procedure 99 Selecting a band 99 Manual tuning 99 Seek tuning 99 Selecting a preset channel from the preset channel list 100 Storing broadcast frequencies 100 Storing the strongest broadcast frequencies...
Owner's Manual
Page 7
... the channel 164 En 7 Subscribing to the SiriusXM Satellite Radio service 156 Using the touch panel keys 156 Reading the screen 157 Starting procedure 158 Manual tuning 159 Selecting a preset channel from the preset channel list 159 Storing broadcast channels 159 Selecting a SiriusXM channel directly 159 Selecting a channel from a list of...
... the channel 164 En 7 Subscribing to the SiriusXM Satellite Radio service 156 Using the touch panel keys 156 Reading the screen 157 Starting procedure 158 Manual tuning 159 Selecting a preset channel from the preset channel list 159 Storing broadcast channels 159 Selecting a SiriusXM channel directly 159 Selecting a channel from a list of...

Owner's Manual
Page 11
... will be referred to as generalpurpose AV equipment. Functions of an item displayed on , take a few minutes to read Important Information for AVIC-8100NEX. If the following icons are shown, the description is intended for what you want to do When you have decided what you want...your new equipment. ! En 11 Buttons on page 22. ! e.g.) 8100NEX 7100NEX Terms used in the following information about the conventions used in this manual Before moving images of DVD-Videos, Video-CDs, ROMVideos, DivX®, iPod, and any equipment that are available on the screen are described in...
... will be referred to as generalpurpose AV equipment. Functions of an item displayed on , take a few minutes to read Important Information for AVIC-8100NEX. If the following icons are shown, the description is intended for what you want to do When you have decided what you want...your new equipment. ! En 11 Buttons on page 22. ! e.g.) 8100NEX 7100NEX Terms used in the following information about the conventions used in this manual Before moving images of DVD-Videos, Video-CDs, ROMVideos, DivX®, iPod, and any equipment that are available on the screen are described in...

Owner's Manual
Page 12
... to as the "external storage device (USB, SD)". Settings and recorded contents are reset to as "iPod". p Do not perform this manual, iPod and iPhone will not be reset. 6100NEX 5100NEX Data subject to erasure 1 The information is referred to the factory settings. 8100NEX 7100NEX Notes on the map with a significant positioning...
... to as the "external storage device (USB, SD)". Settings and recorded contents are reset to as "iPod". p Do not perform this manual, iPod and iPhone will not be reset. 6100NEX 5100NEX Data subject to erasure 1 The information is referred to the factory settings. 8100NEX 7100NEX Notes on the map with a significant positioning...
Owner's Manual
Page 13
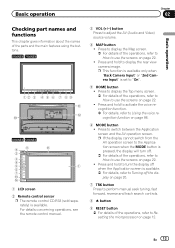
Press and hold to turn off the display on page 20. 7 TRK button Press to perform manual seek tuning, fast forward, reverse and track search controls. 8 h button 9 RESET button = For details of the operations, refer to Resetting the ... operations, refer to How to display the Map screen. = For details of the parts and the main features using the buttons. 8100NEX 7100NEX 12 3 4 5 6 7 8 9 b c a 6100NEX 5100NEX 9 8 b 2 3 4 5 1 6 7 d e 1 LCD screen 2 Remote control sensor p The remote control CD-R33 (sold separately) is available. = For details, refer to Turning off . = For...
Press and hold to turn off the display on page 20. 7 TRK button Press to perform manual seek tuning, fast forward, reverse and track search controls. 8 h button 9 RESET button = For details of the operations, refer to Resetting the ... operations, refer to How to display the Map screen. = For details of the parts and the main features using the buttons. 8100NEX 7100NEX 12 3 4 5 6 7 8 9 b c a 6100NEX 5100NEX 9 8 b 2 3 4 5 1 6 7 d e 1 LCD screen 2 Remote control sensor p The remote control CD-R33 (sold separately) is available. = For details, refer to Turning off . = For...
Owner's Manual
Page 17
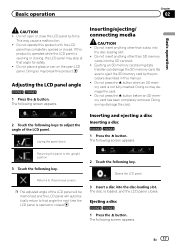
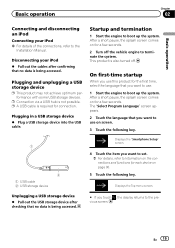
... to the previous screen. Returns to the upright position. 3 Touch the following screen appears. Basic operation Chapter 02 Basic operation CAUTION ! Do not operate this manual. ! Laying the panel down. p The adjusted angle of the LCD panel. The following key. En 17
... to the previous screen. Returns to the upright position. 3 Touch the following screen appears. Basic operation Chapter 02 Basic operation CAUTION ! Do not operate this manual. ! Laying the panel down. p The adjusted angle of the LCD panel. The following key. En 17
Owner's Manual
Page 19
... iPod % Pull out the cables after checking that no data is being accessed. Disconnecting your iPod = For details of the connections, refer to the Installation Manual. After a short pause, the splash screen comes on page 90. 5 Touch the following key. This product is not possible.
... iPod % Pull out the cables after checking that no data is being accessed. Disconnecting your iPod = For details of the connections, refer to the Installation Manual. After a short pause, the splash screen comes on page 90. 5 Touch the following key. This product is not possible.
Owner's Manual
Page 57
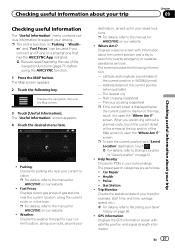
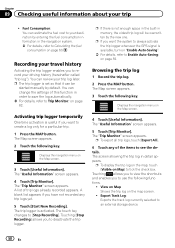
...Police: ! p To save the current position as follows. ! p The online function in "Saved Location" on the map, touch it to the manual for AVICSYNC on our website. ! p For details, refer to open the "Where Am I ?: Displays a special screen with satellite position and signal ...GPS Information: Displays the GPS information screen with information about your trip Checking useful information The "Useful Information" menu contains various information to the manual for AVICSYNC on our website. ! En 57 The "Useful Information" screen appears. 4 Touch the desired menu item. ! p For details...
...Police: ! p To save the current position as follows. ! p The online function in "Saved Location" on the map, touch it to the manual for AVICSYNC on our website. ! p For details, refer to open the "Where Am I ?: Displays a special screen with satellite position and signal ...GPS Information: Displays the GPS information screen with information about your trip Checking useful information The "Useful Information" menu contains various information to the manual for AVICSYNC on our website. ! En 57 The "Useful Information" screen appears. 4 Touch the desired menu item. ! p For details...
Owner's Manual
Page 58
.... 5 Touch [Trip Monitor]. Displays the navigation menu on page 60. The screen showing the trip log in memory, the oldest trip log will be started manually by the new one. Chapter 09 Checking useful information about your driving history (hereinafter called "trip log"). p If there is activated.
.... 5 Touch [Trip Monitor]. Displays the navigation menu on page 60. The screen showing the trip log in memory, the oldest trip log will be started manually by the new one. Chapter 09 Checking useful information about your driving history (hereinafter called "trip log"). p If there is activated.
Owner's Manual
Page 68
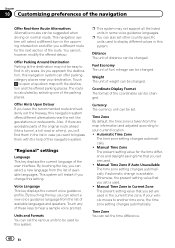
... offered parking places. p You can also set the time difference. 68 En Automatic Time Zone The time zone setting changes automatically. ! Manual Time Zone The present setting value for the next section of this system. If your current location. ! Touch any of the user interface...restaurants. p This system may not be easy to hear a sample voice prompt. Weight The unit of fuel mileage can be changed. Manual Time Zone if Auto Unavailable The time zone setting changes automatically if automatic change this system. Offer Parking Around Destination Parking at the destination...
... offered parking places. p You can also set the time difference. 68 En Automatic Time Zone The time zone setting changes automatically. ! Manual Time Zone The present setting value for the next section of this system. If your current location. ! Touch any of the user interface...restaurants. p This system may not be easy to hear a sample voice prompt. Weight The unit of fuel mileage can be changed. Manual Time Zone if Auto Unavailable The time zone setting changes automatically if automatic change this system. Offer Parking Around Destination Parking at the destination...
Owner's Manual
Page 69
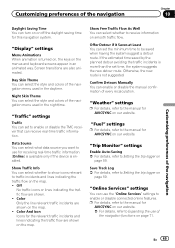
...time for receiving real-time traffic information. [Online] is available only if the device is not suggested. p For details, refer to the manual for AVICSYNC on page 59. Customizing preferences of the navigation Chapter 10 Customizing preferences of the navigation Daylight Saving Time You can select whether to... flow. Day Skin Theme You can set time, the system suggests the new detour route. "Weather" settings p For details, refer to the manual for AVICSYNC on our website. = For details, refer to Setting the trip logger on page 59. En 69 Color And Icon Icons for AVICSYNC...
...time for receiving real-time traffic information. [Online] is available only if the device is not suggested. p For details, refer to the manual for AVICSYNC on page 59. Customizing preferences of the navigation Chapter 10 Customizing preferences of the navigation Daylight Saving Time You can select whether to... flow. Day Skin Theme You can set time, the system suggests the new detour route. "Weather" settings p For details, refer to the manual for AVICSYNC on our website. = For details, refer to Setting the trip logger on page 59. En 69 Color And Icon Icons for AVICSYNC...

Owner's Manual
Page 73
... connection. = For details of the Bluetooth connection, refer to Chapter 11. = For details of the USB connections, refer to the Installation Manual. 4 Press the MAP button. The menus for the connected service are activated. En 73 Once the association is established, your iPhone or ...app to your iPhone or smartphone (Android). The Map screen appears. 5 Touch the following URL and refer to "HOW TO UPDATE?" http://pioneer.naviextras.com Customizing preferences of the navigation 7 Touch [Associate New Phone]. 8 Touch the iPhone or smartphone (Android) that you want to activate...
... connection. = For details of the Bluetooth connection, refer to Chapter 11. = For details of the USB connections, refer to the Installation Manual. 4 Press the MAP button. The menus for the connected service are activated. En 73 Once the association is established, your iPhone or ...app to your iPhone or smartphone (Android). The Map screen appears. 5 Touch the following URL and refer to "HOW TO UPDATE?" http://pioneer.naviextras.com Customizing preferences of the navigation 7 Touch [Associate New Phone]. 8 Touch the iPhone or smartphone (Android) that you want to activate...

Owner's Manual
Page 74
.... Preparing communication devices This product has a built-in function that feature the following profiles with the devices featuring Bluetooth wireless technology, refer to the instruction manual of three devices can be connected to set up a Bluetooth connection. p When the device is necessary to device operation). file) ! You can register and use...
.... Preparing communication devices This product has a built-in function that feature the following profiles with the devices featuring Bluetooth wireless technology, refer to the instruction manual of three devices can be connected to set up a Bluetooth connection. p When the device is necessary to device operation). file) ! You can register and use...

Owner's Manual
Page 76
... device is ready for a Bluetooth wireless connection, a connection to this product will automatically be established automatically when the ignition switch is set to the instruction manual of the registered devices. p If registration fails, repeat the procedure from the device. If your Bluetooth device and this product will take place automatically as...
... device is ready for a Bluetooth wireless connection, a connection to this product will automatically be established automatically when the ignition switch is set to the instruction manual of the registered devices. p If registration fails, repeat the procedure from the device. If your Bluetooth device and this product will take place automatically as...
Owner's Manual
Page 77
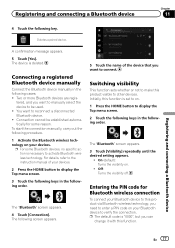
... The following procedure. 1 Activate the Bluetooth wireless technology on your Bluetooth device to this product via Bluetooth wireless technology, you want to manually select the device to other devices. Connection cannot be used. ! The "Bluetooth" screen appears. 3 Touch [Visibility] repeatedly until the... no specific action is set to on . ! Two or more Bluetooth devices are regis- For details, refer to the instruction manual of the device that you can change it with this function is necessary to reconnect a disconnected Bluetooth device. ! Initially, this function...
... The following procedure. 1 Activate the Bluetooth wireless technology on your Bluetooth device to this product via Bluetooth wireless technology, you want to manually select the device to other devices. Connection cannot be used. ! The "Bluetooth" screen appears. 3 Touch [Visibility] repeatedly until the... no specific action is set to on . ! Two or more Bluetooth devices are regis- For details, refer to the instruction manual of the device that you can change it with this function is necessary to reconnect a disconnected Bluetooth device. ! Initially, this function...
Owner's Manual
Page 84
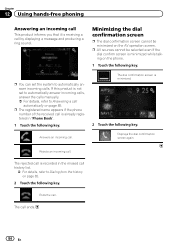
... answer incoming calls. The rejected call history list. = For details, refer to Answering a call . p You can set to automatically answer incoming calls, answer the calls manually. = For details, refer to Dialing from the history on the phone. 1 Touch the following key. p AV sources cannot be minimized on page 85. Answers an...
... answer incoming calls. The rejected call history list. = For details, refer to Answering a call . p You can set to automatically answer incoming calls, answer the calls manually. = For details, refer to Dialing from the history on the phone. 1 Touch the following key. p AV sources cannot be minimized on page 85. Answers an...
Owner's Manual
Page 87
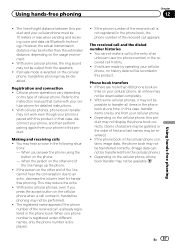
... number of the received call appears. When you press the accept button on the cellular phone, hands-free phoning may be possible to the instruction manual that case, disconnect your cellular phone for handsfree phoning. If there are made by one phone number is registered under different names, only the phone...
... number of the received call appears. When you press the accept button on the cellular phone, hands-free phoning may be possible to the instruction manual that case, disconnect your cellular phone for handsfree phoning. If there are made by one phone number is registered under different names, only the phone...


